
R60 2013 Countryman S (Codename: Stormtrooper)
#26
 03-31-2013, 08:27 PM

#27
05-23-2013, 07:21 AM

Join Date: Feb 2013
Location: South Louisiana
Posts: 61
Likes: 0
Received 0 Likes
on
0 Posts
Today is the day. Pulling apart dash and finally got to pull my center console. Pulling apart the a/c, radio, and speedo as soon as i grab a drink.
As a side note, does anyone know someone who works for BMW on the mini designs? If so, could you please smack the crap out of them the next time you see them? Tell them it's from me and directly related to engineering designs that are made by folks who don't work on cars.
Thanks.
As a side note, does anyone know someone who works for BMW on the mini designs? If so, could you please smack the crap out of them the next time you see them? Tell them it's from me and directly related to engineering designs that are made by folks who don't work on cars.
Thanks.
#28
05-24-2013, 03:12 PM
Join Date: Feb 2013
Location: South Louisiana
Posts: 61
Likes: 0
Received 0 Likes
on
0 Posts
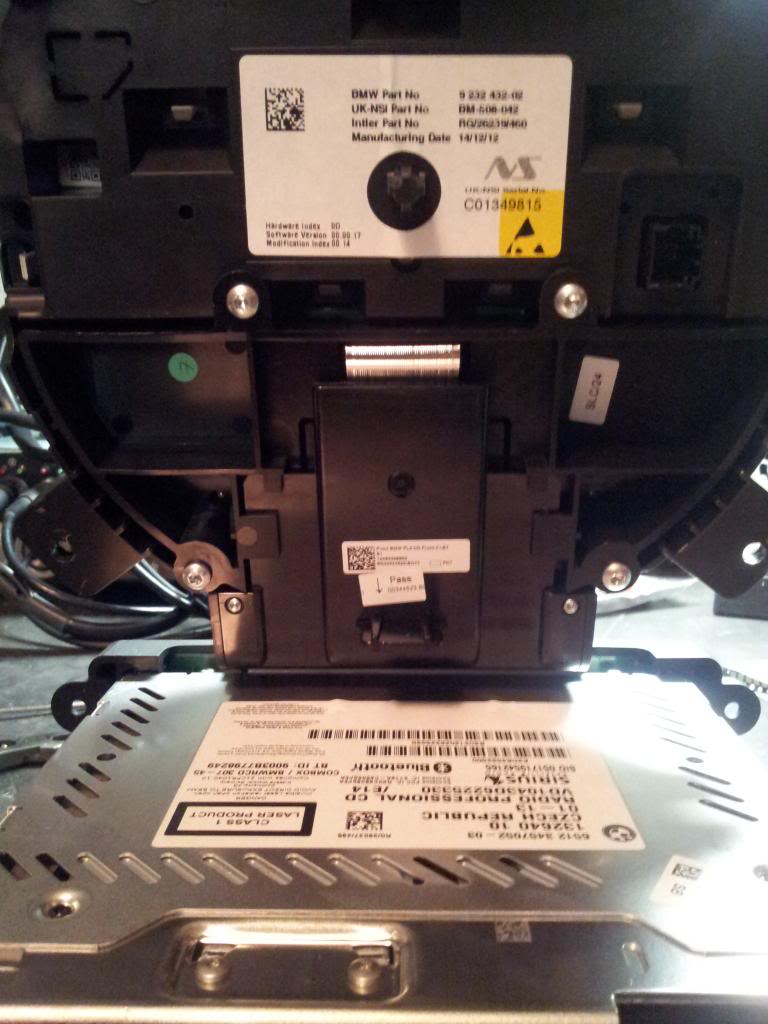
Onto the interior of the speedo for those who are brave.
The speedo is attached to the stock radio so first you have to pull them apart.
A few screws will get it done. then you have to press back on a little platic tab to allow them to slide apart.
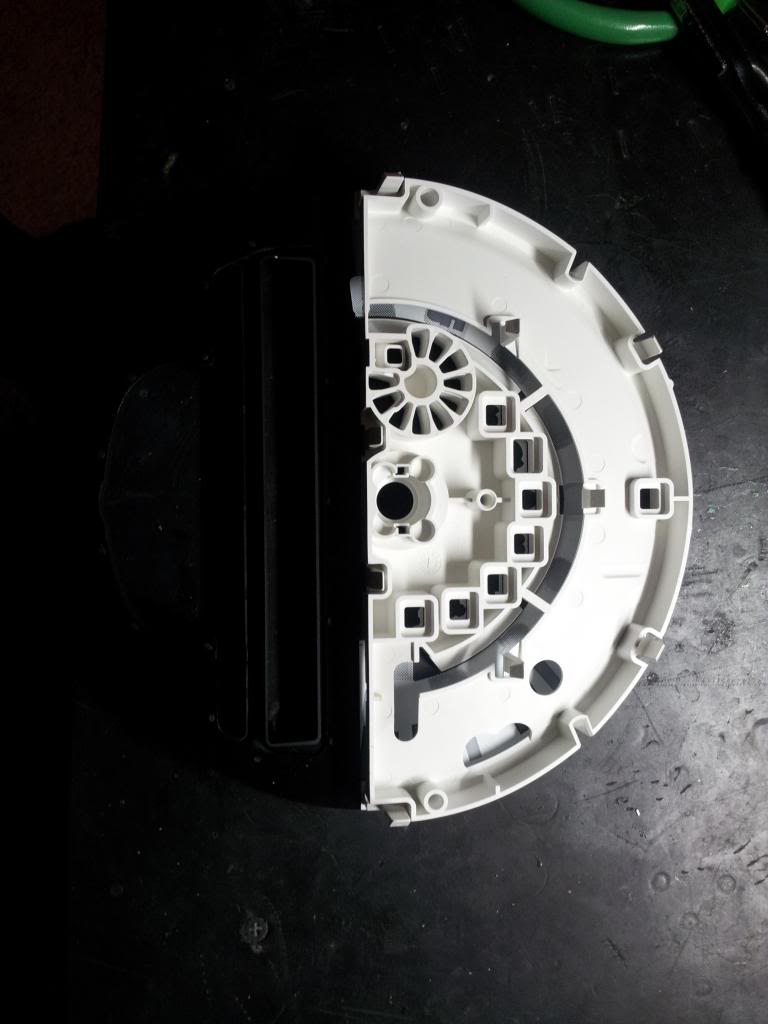
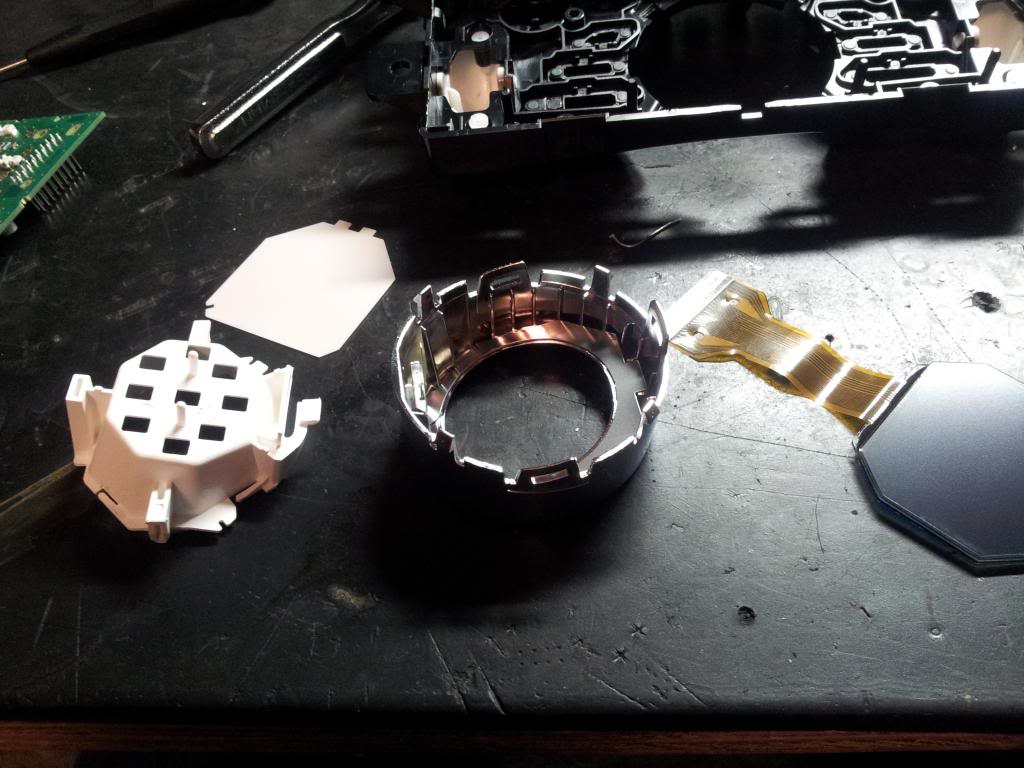
Once you have the speedo removed and all alone it's all plastic tabs holding the assembly together. Dis-assembly did not get picture but it's much the same as the tach. Pull apart layer by layer by applying pressure to the locking tabs and sliding things apart.
Remove the needle by hooking a 90 degree pick under the center of the needle and pull straight up. Again, much the same as on the tach. Once the needle is removed some rubbing alcohol and a q-tip will get the orange backing color off. Then you apply acrylic paint of you choice to get it colored with your theme.
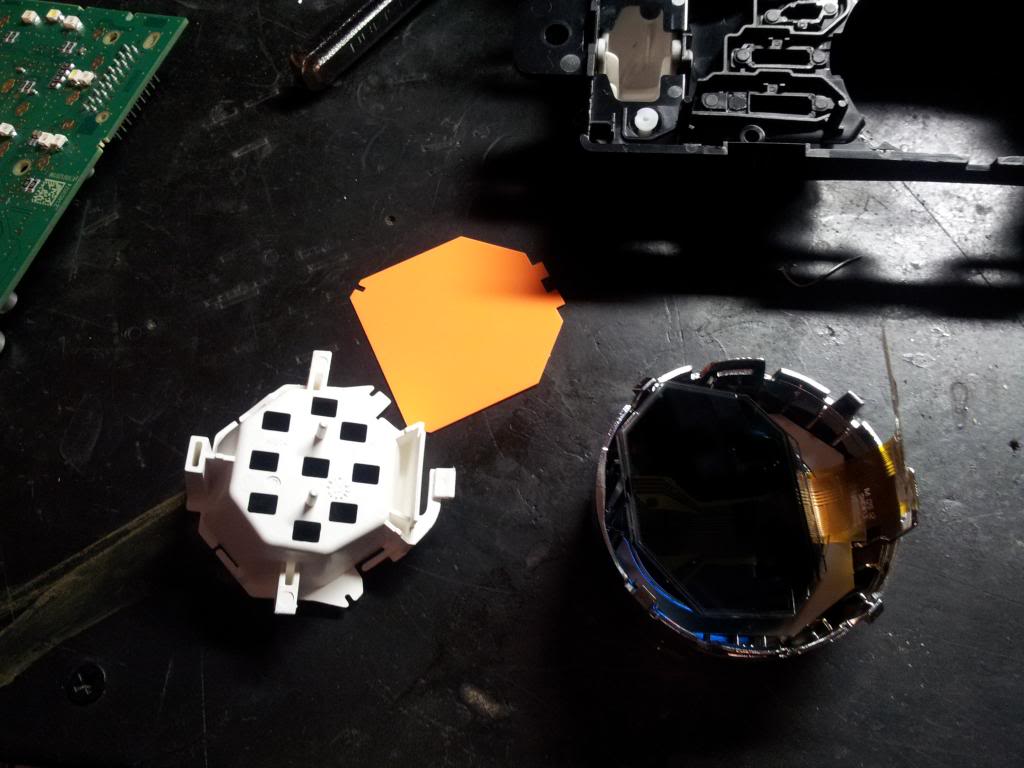
Now the gauge face will pull away from the PCB and you end up with this.
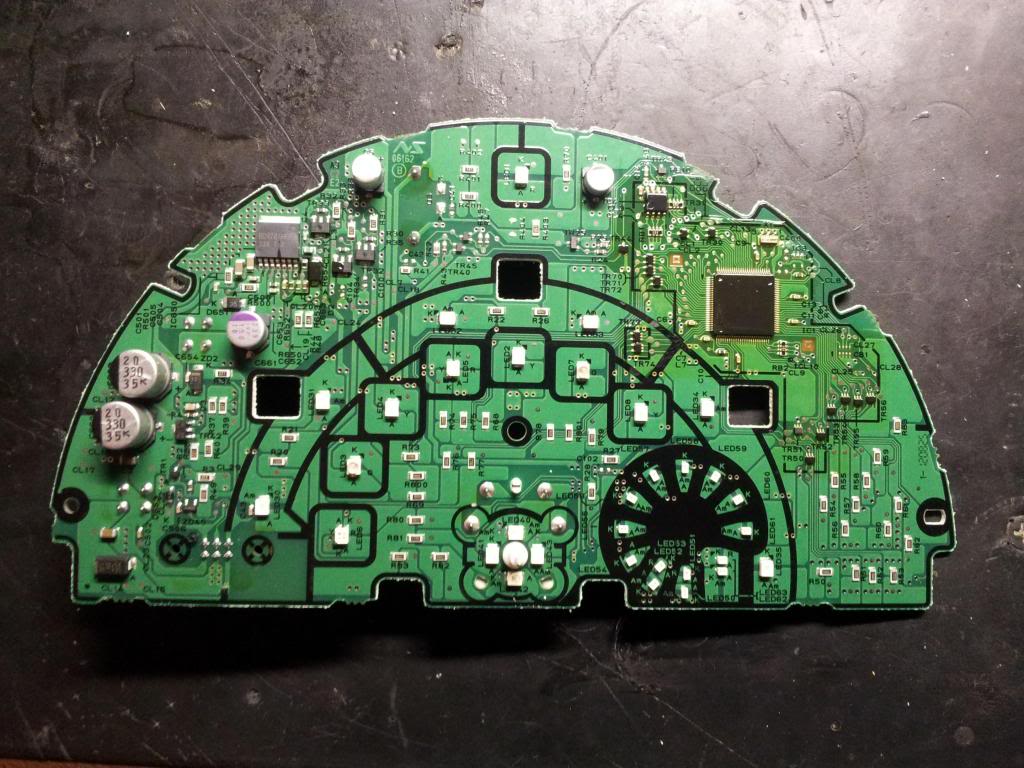
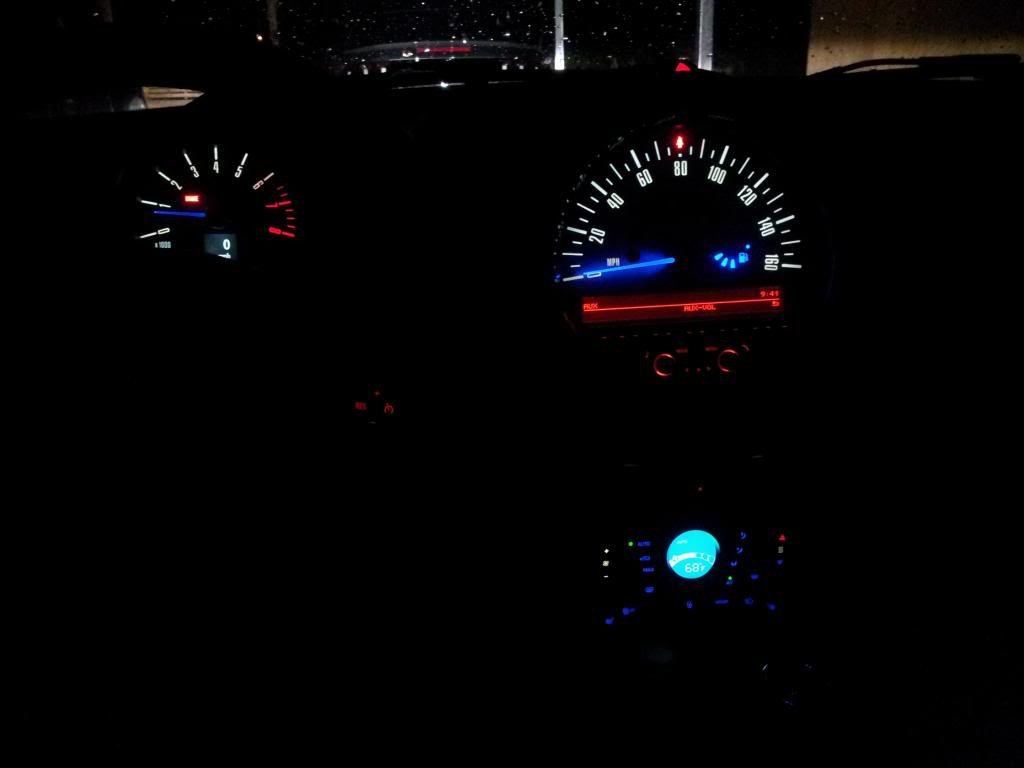
The individual black squares on the "inner arc" are the indicators such as fog lights, and cruise control. The longer boxes on the "outer arc" are the backlights for the speedo numbers. The needle LED's are the 4 around the needle shaft.
The black circle over to the right side is the fuel gauge. You will notice the last two corn kernels having two leds in it as well as the location where the fuel pump icon is visible on the gauge face. One of these is the amber one and the other is the red one for when the car is dinging at you that it's getting thirsty.
The speedo is attached to the stock radio so first you have to pull them apart.
A few screws will get it done. then you have to press back on a little platic tab to allow them to slide apart.

Once you have the speedo removed and all alone it's all plastic tabs holding the assembly together. Dis-assembly did not get picture but it's much the same as the tach. Pull apart layer by layer by applying pressure to the locking tabs and sliding things apart.
Remove the needle by hooking a 90 degree pick under the center of the needle and pull straight up. Again, much the same as on the tach. Once the needle is removed some rubbing alcohol and a q-tip will get the orange backing color off. Then you apply acrylic paint of you choice to get it colored with your theme.
Now the gauge face will pull away from the PCB and you end up with this.


The individual black squares on the "inner arc" are the indicators such as fog lights, and cruise control. The longer boxes on the "outer arc" are the backlights for the speedo numbers. The needle LED's are the 4 around the needle shaft.
The black circle over to the right side is the fuel gauge. You will notice the last two corn kernels having two leds in it as well as the location where the fuel pump icon is visible on the gauge face. One of these is the amber one and the other is the red one for when the car is dinging at you that it's getting thirsty.
#29
05-24-2013, 03:45 PM
Join Date: Feb 2013
Location: South Louisiana
Posts: 61
Likes: 0
Received 0 Likes
on
0 Posts
and for the A/C and switch panel.
One of my pictures got messed up for some reason but once you get the plastic tabs to release and get the shell pulled apart you will see two boards. They are connected by a small set of wires. The plug is tight but can be removed if done carefully.
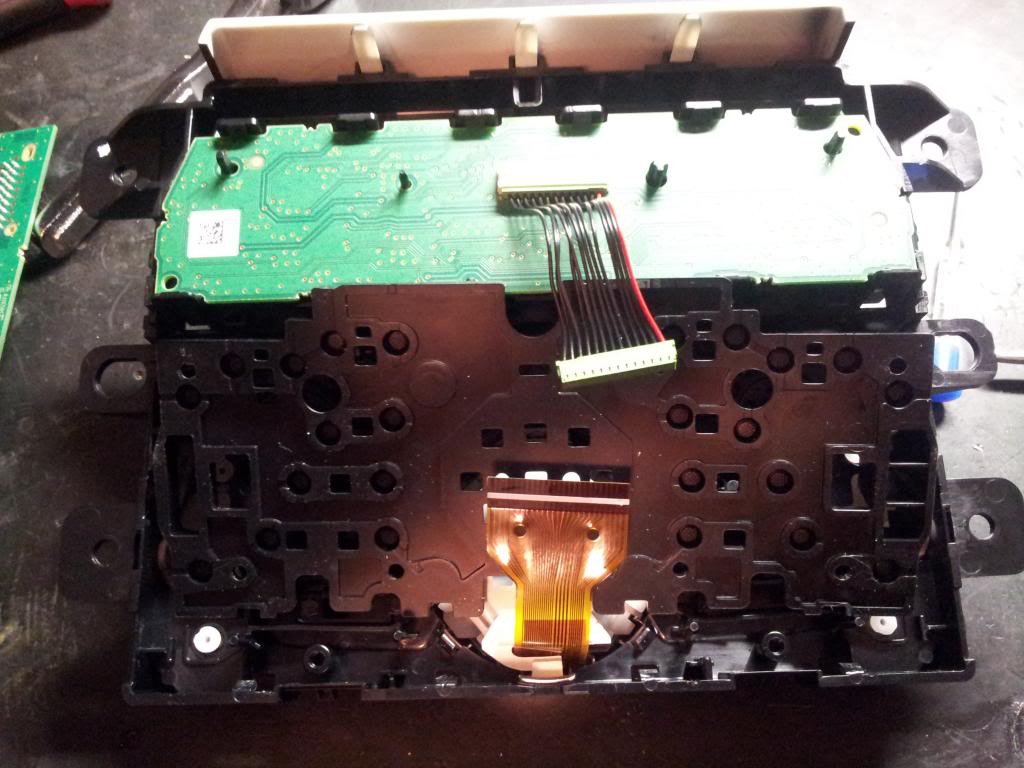
Once the boards are pulled off you have access to the back of the A/C display. There is an orange backing that needs to be pulled off and scrubbed to get the orange off.
Start with this
Put a little bit of kitchen scrubber on it and get that orange nasty off. I used a little bit of wd40 just because it can usually get nasty stuff off but i don't know if i needed it or not.
re-assemble the way it came apart and put it back into it's hole.
then on to the soldering!
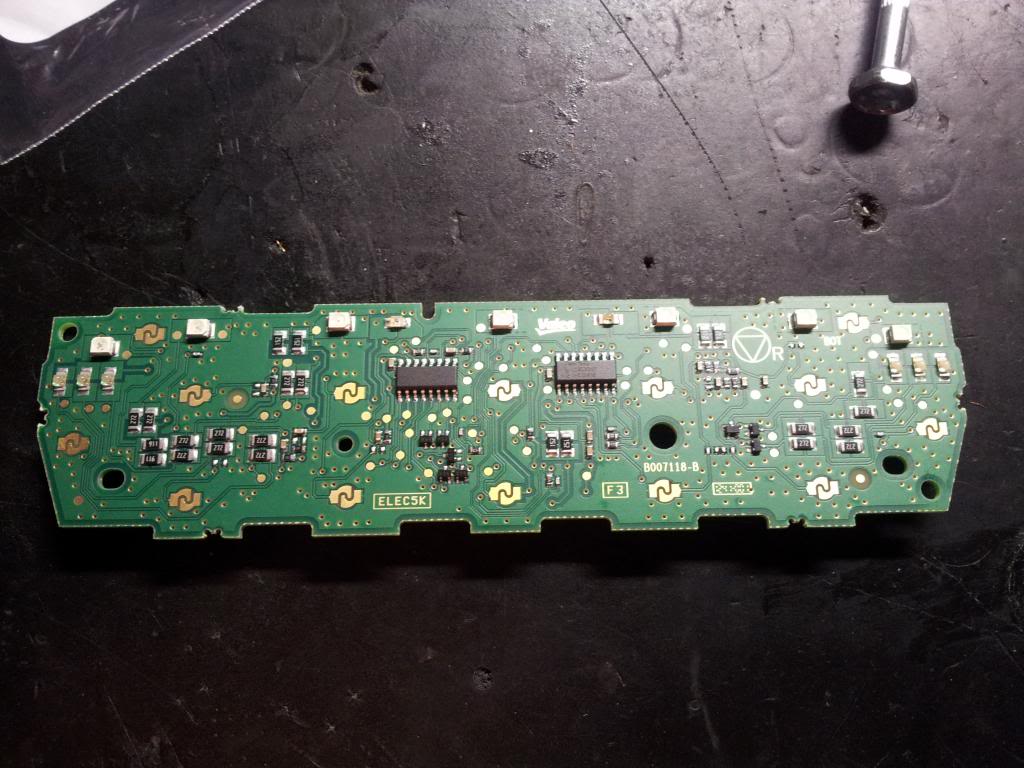
This is the switch PCB. Across the top are the indicators. The far right and far left are seat warmer buttons. You can see the 3 led's under each one that are the green level indicators. you can also see the indicator leds for the sport mode and all4 buttons.
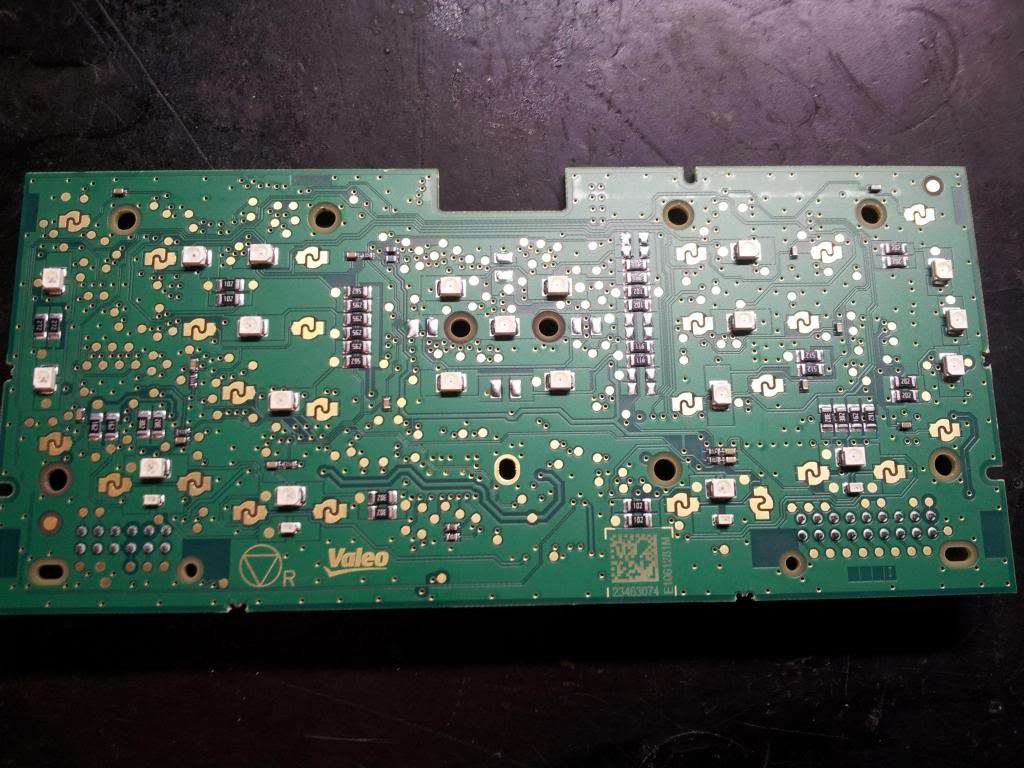
This is the A/C PCB. Far left is fan control, far right is temp control. On the temp control leave the top and bottom so the buttons don't look weird with a different color behind the red and blue icons. The center cluster of 5 is the back light for the display. I put white in mine and it came out that Cyan color. So it seems the glass has some natural coloring. That that into account when choosing you colors. and be sure to test it before you do the whole reassembly. Across the bottom you see sets of two LED's. The smaller one is the amber backlight for the button. The upper one is the color of the "on" indicator.
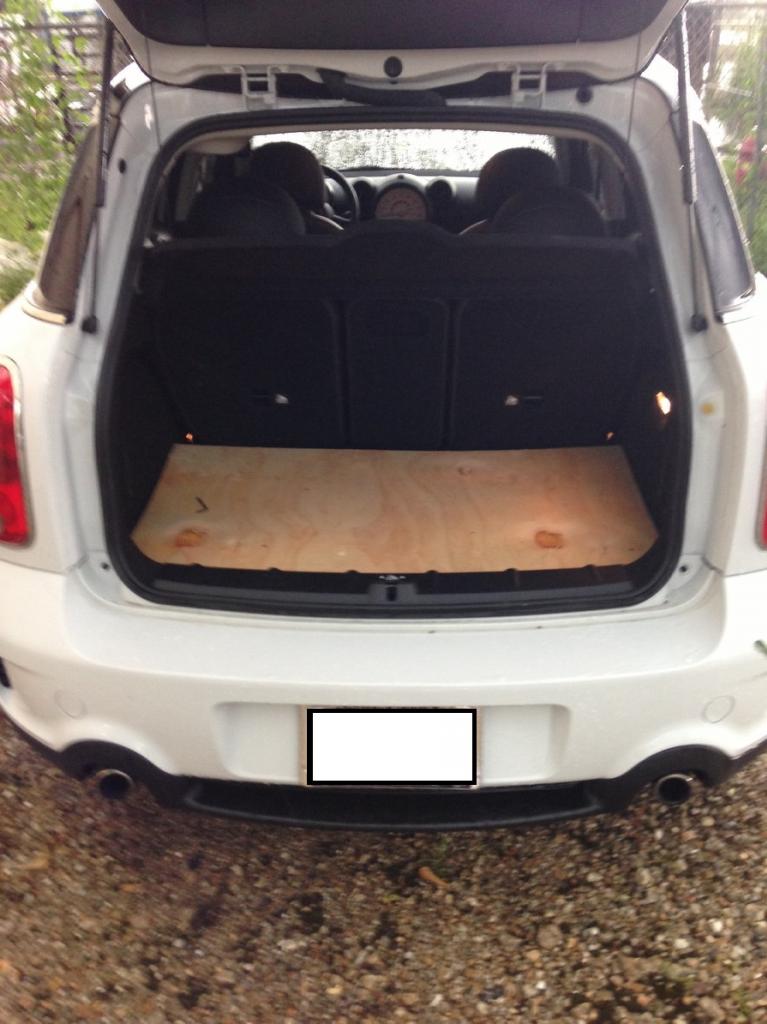
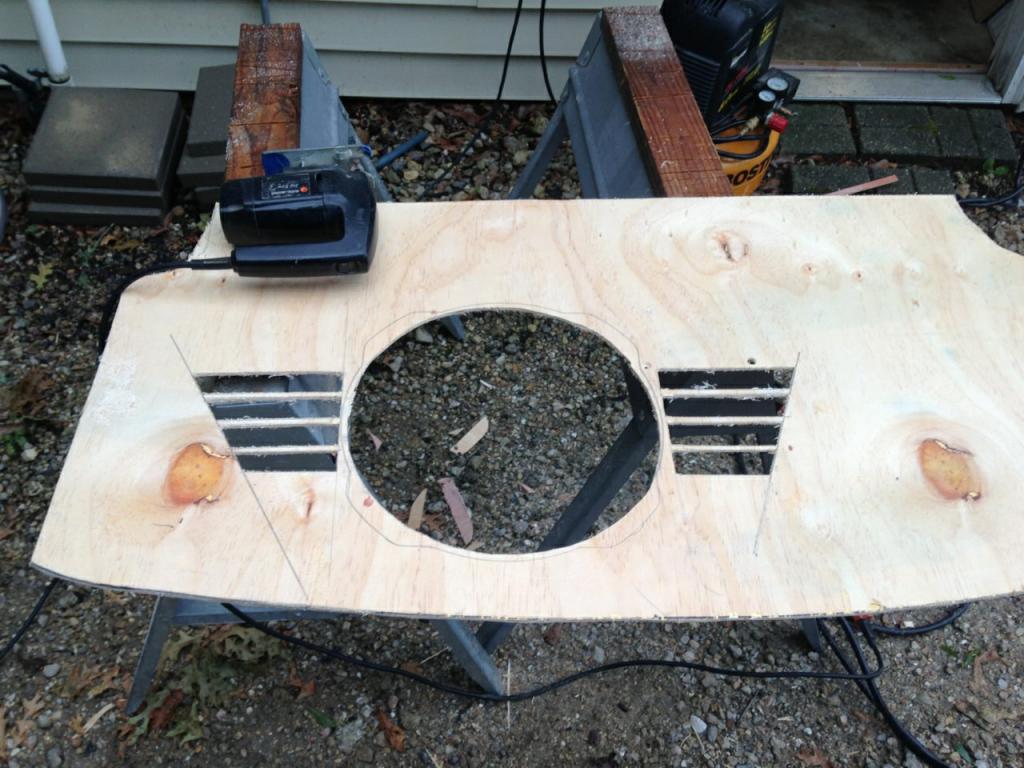
So. the final product looks a lot like this..... (Ignore the radio. It'll be removed shortly)

One of my pictures got messed up for some reason but once you get the plastic tabs to release and get the shell pulled apart you will see two boards. They are connected by a small set of wires. The plug is tight but can be removed if done carefully.

Once the boards are pulled off you have access to the back of the A/C display. There is an orange backing that needs to be pulled off and scrubbed to get the orange off.
Start with this

Put a little bit of kitchen scrubber on it and get that orange nasty off. I used a little bit of wd40 just because it can usually get nasty stuff off but i don't know if i needed it or not.

re-assemble the way it came apart and put it back into it's hole.
then on to the soldering!
This is the switch PCB. Across the top are the indicators. The far right and far left are seat warmer buttons. You can see the 3 led's under each one that are the green level indicators. you can also see the indicator leds for the sport mode and all4 buttons.

This is the A/C PCB. Far left is fan control, far right is temp control. On the temp control leave the top and bottom so the buttons don't look weird with a different color behind the red and blue icons. The center cluster of 5 is the back light for the display. I put white in mine and it came out that Cyan color. So it seems the glass has some natural coloring. That that into account when choosing you colors. and be sure to test it before you do the whole reassembly. Across the bottom you see sets of two LED's. The smaller one is the amber backlight for the button. The upper one is the color of the "on" indicator.

So. the final product looks a lot like this..... (Ignore the radio. It'll be removed shortly)


#30
06-07-2013, 03:10 PM
Join Date: Feb 2013
Location: South Louisiana
Posts: 61
Likes: 0
Received 0 Likes
on
0 Posts
Had a friend of mine trade some speaker box work for some blue needles in his Tundra.
I think the black wings and white box sounded good but doesn't look as good in person. Likely going to do a color swap. make the wings white and do the cover black.


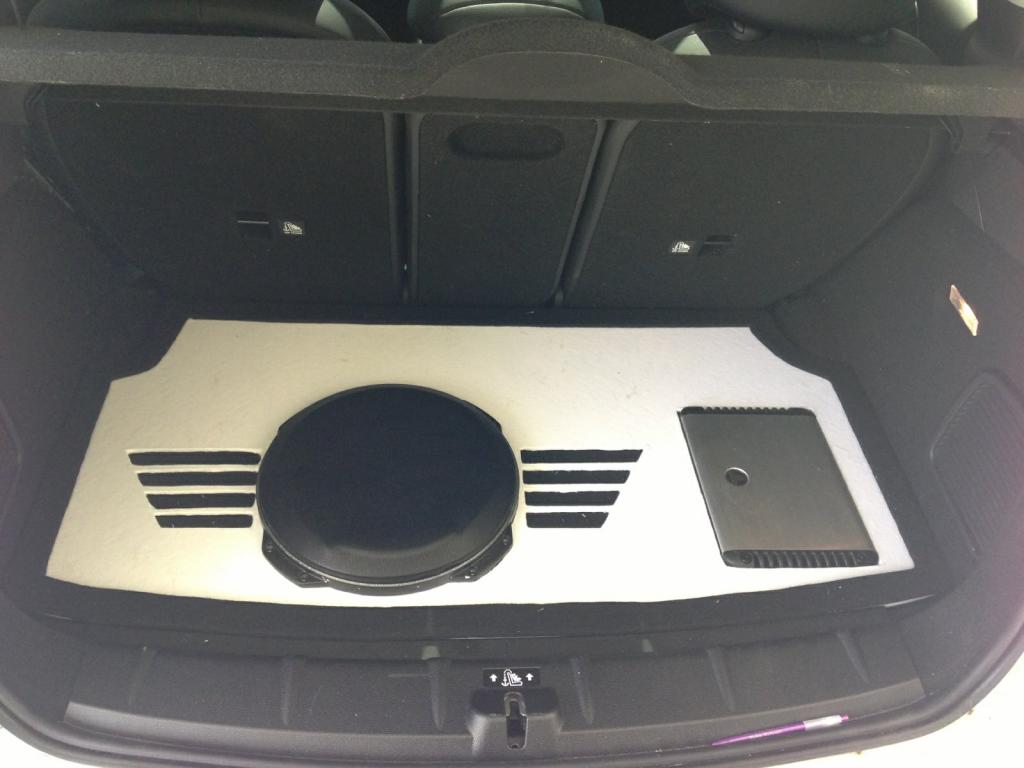
I think the black wings and white box sounded good but doesn't look as good in person. Likely going to do a color swap. make the wings white and do the cover black.


Last edited by goofballtech; 06-07-2013 at 03:19 PM.
#31
06-07-2013, 07:52 PM

Gosh, I am impressed! You actually know what you're talking about. I like the blue LED accents. Also the tinting. The Mini dealer here in Orange County, CA charges $399 for tinting and think it is only for the rear windows. Illegal to tint forward of the rear door post.
I haven't decided who will tint mine when it arrives. I will get the front's tinted. It is a minor infraction and I won't get them dark. the rear will be limo tint though.
#32
07-15-2013, 07:35 PM
Join Date: Feb 2013
Location: South Louisiana
Posts: 61
Likes: 0
Received 0 Likes
on
0 Posts
Does anyone like the smell of wine? I dont care for it.... but now my CM smells like it.
I am in the process of moving and i had a large decorative bottle of wine that i never intended to drink. I set it in the back of the car (cork is still in the bottle with the original seal) laying down because it wouldn't fit any other way. It started to rain so i left all the stuff that was in the car there over night. Took of the next morning for work thinking nothing in there was hurting anything.
Up to this point all was well.
Got in the car that afternoon (after Louisiana heat) and smelled something odd. I assumed it was the Smoothie King cup that was now empty in the cup holder Fruit smells like that after cooking in the car all day..... threw the cup away assuming the smell would dissipate. Incorrect.
About 3 hours later when i could still smell it i went digging to find about 5 liters of red wine had covered the speaker box and amp. nothing went toward the speaker side. It seem the bottle layed horizontally build up some internal heat. This heat pushed the cork out and my car got drunk.
Good and Bad, Bad is obvious, had to pull it all out to clean. Good was now i had a great excuse to stop procrastinating the change out of that white fabric with the vinyl "pleather" so the box matched the car. Swung by hancock fabrics and snagged some up. Pictures to come in a day or so once it stops raining EVERY DAMN HOUR!
Last edited by goofballtech; 07-15-2013 at 07:42 PM.
#33
07-15-2013, 08:32 PM
5th Gear
Just print this and hand it to the trooper as walks up to your car and asks "Have you Ben drinking". better yet " Have younfor your Car been drinking".
I would try one of the enzyme cleaners they make for dog accidents on it. It will smell more for a day or so when it starts working. But then should get better.
I would try one of the enzyme cleaners they make for dog accidents on it. It will smell more for a day or so when it starts working. But then should get better.
#34
04-22-2014, 12:27 PM
Join Date: Feb 2013
Location: South Louisiana
Posts: 61
Likes: 0
Received 0 Likes
on
0 Posts
Anyone ever see a dash kit for the 13+ countryman's yet? I have a whole set of LJ Audio goodness i pulled from my tundra sitting in my garage laughing at me every time i pass by them. Would sound so great in the mini but i wanted to wait till a kit came out.
A year is a logn time for me to wait since i am impatient as hell.... i am fairly certain the wait is almost over and something is going to happen.... SOON.
Anyone seen a thread or kit that might be close enough to be a good starting point?
A year is a logn time for me to wait since i am impatient as hell.... i am fairly certain the wait is almost over and something is going to happen.... SOON.
Anyone seen a thread or kit that might be close enough to be a good starting point?
#35
04-22-2014, 09:37 PM

2nd Gear
Join Date: Jan 2014
Location: Los Gatos, CA
Posts: 60
Likes: 0
Received 0 Likes
on
0 Posts

Thread
Thread Starter
Forum
Replies
Last Post
LifeAfterBeetle
R60/R61 Stock Problems/Issues
15
03-02-2016 07:10 PM
molala
MINIs & Minis for Sale
1
10-02-2015 01:53 PM
dandw2
MINIs & Minis for Sale
0
09-07-2015 11:14 AM