
My Restoration Project - A Pictorial
#1
 06-05-2007, 09:57 PM


Join Date: Sep 2002
Location: Aurora, IL
Posts: 256
Likes: 0
Received 0 Likes
on
0 Posts
My Restoration Project - A Pictorial
Here is a short pictorial of the ongoing restoration that I am currently working on Lucille - my 1974 Austin Mini. I've had her for about a year.
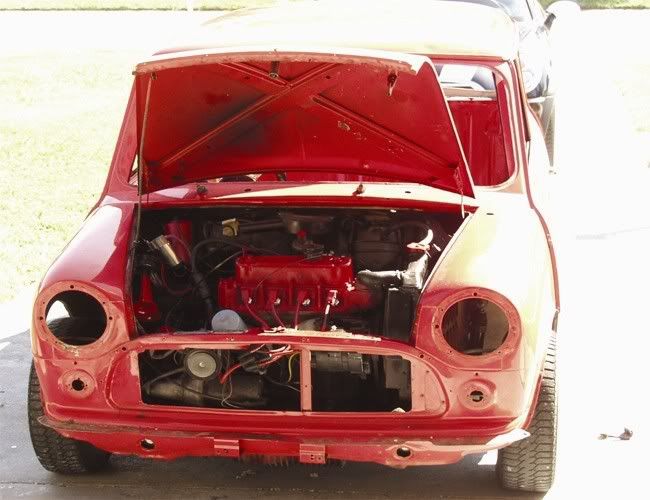
She started out life as Mini 1000 but at some point a 1275cc engine from a MG Metro was fitted. She now runs on 12" wheels with 8.4" discs up front and drums in rear. Overall the shell is pretty solid with no major rust, dents or filler. She will need a new paint job soon, which will likely be done as a complete tear down this coming winter following the fall motoring season. But first things first, it's time to fix up some minor things for the time being.
Here we go:
First I removed the seats to get at the carpet which had to go. A previous owner put in cheapo carpet and pad - the kind that belongs in a utility room and not a car. I also planned on grinding down the floor to take care of some surface rust and paint it help seal it against future rust.

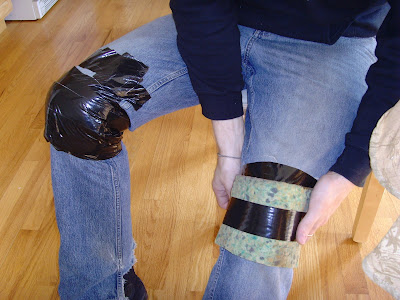
Since I would be crawling around and kneeling a lot during the restoration I fashioned some kneepads out of some pieces of the carpet pad that was in the car. A little bit of duct tape and I was ready to go. Yes, that is actual carpet pad, not really sure what the previous owner was thinking when they put it in there.
Not really sure what car these seats are from, but I think they are from an MG Metro. I'm going to have the head rests removed and have them reupholstered in the near future. The foam is still in pretty good shape, but the rest could use a refresh.

The next item of business was to replace the front turn signal sockets and rubber seals. The rubber seals were pretty degraded and hard and the sockets were pretty corroded. It's a wonder how the chrome ring and glass stayed on there. A word of warning when replacing either the sockets or the rubber seals, PUT THE BULB IN. After about 10 minutes of work getting the ring 1/2 way on I realized I forgot to put in the bulb. Whoops! Those rings aren't that easy to put on either.

After getting the ring and glass attached it was a simple matter of reconnecting the wires. If you have sockets with twin filament bulbs I would recommend testing the lights first to make sure that the brighter of the 2 filaments is connected to the turn signal and not the parking lamps. An easy test before applying heat shrink tubing.

Next I installed my new air horns which coincidently are pretty damn loud. During the wiring I incorrectly wired the relay and when my girlfriend reconnected the battery we were blasted by the horns which inside a confined space like a garage are reallllly loud. After a quick rewire I am now ready to blast small children and animals off their feet as I drive by. I also fashioned a Red Bull can into a cover for the ignition coil. Really easy to do, just cut off the top and bottom and make a slit down the middle and presto!

In what would become one of several small problems that would turn into a larger problem I present my tail lights. I had originally intended to replace the lower left-hand lens because it was cracked but soon realized that the rubber seals were also bad. The plastic housings also needed replacing since they had some cracks and at least one screw that had rusted through with the head broken off. So I decided to just replace the whole damn lot and ordered completely new assemblies, lens and seals. Oddly enough it is easier to find complete assemblies with all the seals and lenses and everything than it is to find individual parts especially the seals and plastic housing.
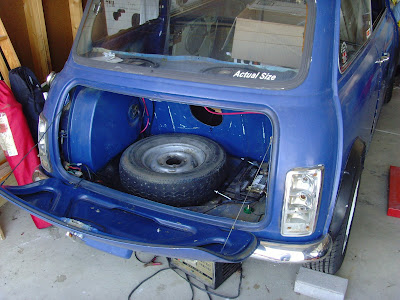
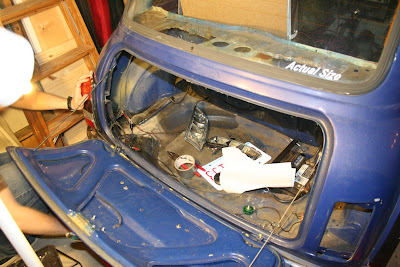
Removing the left-hand housing posed some interesting problems when I tried to remove it. The gas tank is in the way of the nuts holding on the housing. I decided to remove it figuring I could kill 2 birds with one stone. First bird: get at the tail lights. Second bird: figure out why the trunk always smelled of gas. Well it turns out that there was a small hole in the bottom of the tank that had been plugged with a boiler plug. Well, the rubber had broken down just enough as to cause a slow leak of gas inside the trunk. So I drained the tank and found out that my car had been running on apple juice all this time. Not exactly but there was considerable rust on the inside of the tank which had discolored the gas in such a way that it looked like apple juice, especially when I put it in an apple juice bottle. The rusty gas tank brought on its own set of problems, more on that later.

Gas tank out and in the process of installing new tail lights.
Success! New tail lights in and they look a helluva lot better than the old ones did. The new lenses make a big difference in the brightness of the lights and of course the overall appearance. I also put on a new badge - Lucille is now a 1275GT. This more closely matches her true self; she used to have a Mini Cooper S badge which is of course not true.

Stay tuned for the next installment in a day or two; I've got a bunch more to write up about the process of prepping the floor for paint.
Brian
Photo credit: My lovely girlfriend Steph
Keep reading in this thread for parts 2 + 3!
She started out life as Mini 1000 but at some point a 1275cc engine from a MG Metro was fitted. She now runs on 12" wheels with 8.4" discs up front and drums in rear. Overall the shell is pretty solid with no major rust, dents or filler. She will need a new paint job soon, which will likely be done as a complete tear down this coming winter following the fall motoring season. But first things first, it's time to fix up some minor things for the time being.
Here we go:
First I removed the seats to get at the carpet which had to go. A previous owner put in cheapo carpet and pad - the kind that belongs in a utility room and not a car. I also planned on grinding down the floor to take care of some surface rust and paint it help seal it against future rust.
Since I would be crawling around and kneeling a lot during the restoration I fashioned some kneepads out of some pieces of the carpet pad that was in the car. A little bit of duct tape and I was ready to go. Yes, that is actual carpet pad, not really sure what the previous owner was thinking when they put it in there.
Not really sure what car these seats are from, but I think they are from an MG Metro. I'm going to have the head rests removed and have them reupholstered in the near future. The foam is still in pretty good shape, but the rest could use a refresh.
The next item of business was to replace the front turn signal sockets and rubber seals. The rubber seals were pretty degraded and hard and the sockets were pretty corroded. It's a wonder how the chrome ring and glass stayed on there. A word of warning when replacing either the sockets or the rubber seals, PUT THE BULB IN. After about 10 minutes of work getting the ring 1/2 way on I realized I forgot to put in the bulb. Whoops! Those rings aren't that easy to put on either.
After getting the ring and glass attached it was a simple matter of reconnecting the wires. If you have sockets with twin filament bulbs I would recommend testing the lights first to make sure that the brighter of the 2 filaments is connected to the turn signal and not the parking lamps. An easy test before applying heat shrink tubing.
Next I installed my new air horns which coincidently are pretty damn loud. During the wiring I incorrectly wired the relay and when my girlfriend reconnected the battery we were blasted by the horns which inside a confined space like a garage are reallllly loud. After a quick rewire I am now ready to blast small children and animals off their feet as I drive by. I also fashioned a Red Bull can into a cover for the ignition coil. Really easy to do, just cut off the top and bottom and make a slit down the middle and presto!
In what would become one of several small problems that would turn into a larger problem I present my tail lights. I had originally intended to replace the lower left-hand lens because it was cracked but soon realized that the rubber seals were also bad. The plastic housings also needed replacing since they had some cracks and at least one screw that had rusted through with the head broken off. So I decided to just replace the whole damn lot and ordered completely new assemblies, lens and seals. Oddly enough it is easier to find complete assemblies with all the seals and lenses and everything than it is to find individual parts especially the seals and plastic housing.
Removing the left-hand housing posed some interesting problems when I tried to remove it. The gas tank is in the way of the nuts holding on the housing. I decided to remove it figuring I could kill 2 birds with one stone. First bird: get at the tail lights. Second bird: figure out why the trunk always smelled of gas. Well it turns out that there was a small hole in the bottom of the tank that had been plugged with a boiler plug. Well, the rubber had broken down just enough as to cause a slow leak of gas inside the trunk. So I drained the tank and found out that my car had been running on apple juice all this time. Not exactly but there was considerable rust on the inside of the tank which had discolored the gas in such a way that it looked like apple juice, especially when I put it in an apple juice bottle. The rusty gas tank brought on its own set of problems, more on that later.
Gas tank out and in the process of installing new tail lights.
Success! New tail lights in and they look a helluva lot better than the old ones did. The new lenses make a big difference in the brightness of the lights and of course the overall appearance. I also put on a new badge - Lucille is now a 1275GT. This more closely matches her true self; she used to have a Mini Cooper S badge which is of course not true.
Stay tuned for the next installment in a day or two; I've got a bunch more to write up about the process of prepping the floor for paint.
Brian
Photo credit: My lovely girlfriend Steph
Keep reading in this thread for parts 2 + 3!
Last edited by qskapunk; 07-25-2007 at 08:28 AM. Reason: Part 2!
#2
06-05-2007, 10:03 PM

1st Gear
Join Date: Nov 2003
Location: Garland, Texas
Posts: 32
Likes: 0
Received 0 Likes
on
0 Posts


#4
06-06-2007, 05:02 AM

#6
06-06-2007, 06:20 AM
Join Date: Sep 2002
Location: Aurora, IL
Posts: 256
Likes: 0
Received 0 Likes
on
0 Posts
I got the horns from Mini Mania - www.minimania.com - they are made by an Italian company, FIAMM. I've also seen them in auto part stores, but those are probably made in China and probably of lesser quality. You can probably find the same horns from other purveyors of Mini parts.
Last edited by qskapunk; 06-06-2007 at 06:42 AM. Reason: fix link
#7
06-06-2007, 06:38 AM
Trending Topics
#9
06-06-2007, 06:48 AM
I'm getting one for my 2006. If I ever find a classic I like, I'll get it for that car as well. Did the relay some with the female connector as well, or did you just hard-wire it? And did you have to find a separate momentary switch?
Thanks, and good luck with the restoration! I'm quite jealous...
Thanks, and good luck with the restoration! I'm quite jealous...

#11
06-06-2007, 07:28 AM
Join Date: Sep 2002
Location: Aurora, IL
Posts: 256
Likes: 0
Received 0 Likes
on
0 Posts
I'm getting one for my 2006. If I ever find a classic I like, I'll get it for that car as well. Did the relay some with the female connector as well, or did you just hard-wire it? And did you have to find a separate momentary switch?
Thanks, and good luck with the restoration! I'm quite jealous...
Thanks, and good luck with the restoration! I'm quite jealous...
I used the existing horn switch and just disconnected the old horn and connected the +12v wire to the relay. You can probably do the same on your '06, assuming there's easy access to the horn. Based on the numerous mods you've done on your MINI you should be more than capable of such a task. Let me know if you have any questions though.
Good luck on the search for a Classic. Try getting in contact with the Mini club in your area, M.A.D.M.E.N. - Mid-America Diehard Mini Enthusiasts' Network. I bet someone in the club either has a Classic for sale or knows of someone who does.
#12
06-06-2007, 07:36 AM
The harness shuold be common as dirt as a local auto shop, but just in case you have to order one:
http://www.oznium.com/relay-harness
Oz is a great online retailler - tell him I sent you over.
I'll check on my horn wiring - i was going to use a seperate momentary switch, but that's not a basd idea. Of course, knowing ther new MINIs, I'll get a "Check Engine" light if I disconnect the computerized horn or something.
As for my Classic, I have a line on one in Florida, but I think the owner wants to sell locally, which is his right (and is probably simplier to deal with). Still, I hope I can work things out with him. I found one or two other likely prospects over on MiniMania's classifieds. That's a GREAT site with lots of cars listed. I think someone in the Dayton club is selling a VERY SWEET car soon, but given the ammount of work I know he's done on it I bet it will end up being outside of my price range. Oh, well, the hunt is half the fun, right?
(( Just keep telling yourself that... deep breath... deep breath ))).
#14
06-06-2007, 08:47 AM
Join Date: Sep 2002
Location: Aurora, IL
Posts: 256
Likes: 0
Received 0 Likes
on
0 Posts
I'll check on my horn wiring - i was going to use a seperate momentary switch, but that's not a basd idea. Of course, knowing ther new MINIs, I'll get a "Check Engine" light if I disconnect the computerized horn or something.
As for my Classic, I have a line on one in Florida, but I think the owner wants to sell locally, which is his right (and is probably simplier to deal with). Still, I hope I can work things out with him. I found one or two other likely prospects over on MiniMania's classifieds. That's a GREAT site with lots of cars listed. I think someone in the Dayton club is selling a VERY SWEET car soon, but given the ammount of work I know he's done on it I bet it will end up being outside of my price range. Oh, well, the hunt is half the fun, right?
(( Just keep telling yourself that... deep breath... deep breath ))).
I'd say just look for a good Mini with a good shell. All the other stuff is a relatively easy fix if you're up to it, if there's some significant rust on the shell then you could be in for some trouble. A car can always be repainted but when you start adding in body work into the mix it becomes a much bigger project both in time and $.
It's all about the hunt, there are plenty of quality Minis out there so just relax and you'll find the right Mini for you eventually...I did.
#16
06-06-2007, 01:06 PM
Join Date: Sep 2002
Location: Aurora, IL
Posts: 256
Likes: 0
Received 0 Likes
on
0 Posts
Here is a short list of some of the things I have fixed/replaced on Lucille thus far:
front turn signal sockets, seals and bulbs - cleaned up the glass lenses
front and rear badges (better pictures soon)
sanded and painted the floor (details soon)
carpet (details soon)
door cards (details soon)
interior handles + window cranks (coming from UK soon)
gas pedal (old one was bodgey - will post pics soon)
pedal covers - red and blue for brake/clutch, black for gas
shift and parking brake boots (custom made by same guy who did my door panels)
removed rear speakers that were hacked into rear shelf - emphasis on hacked
red bull can ignition coil cover
air horns
fixed mirrors so they don't sag
gas tank - in the process of acquiring a new/used one
negative battery cable + quick disconnect
tail lights - completely new housings, lenses and seals
third tail light - added for safety/visibility (details soon)
changed the bulbs in license plate lamps - the lenses were pretty gross too, but cleaned up nicely
outside window scraper - old one had no rubber left at all
List of things I want to do:
wheels - ordering them real soon - 12" Minilites
grille - mine is pretty tired and got some dents/dings
accent rings to attach shift and parking brake boots
steering wheel - maybe a nice wood one
dash - thinking about converting to center speedo pod
reupholster the seats to match door panels - also remove head rests
heater valve - leaks ever so slightly
paint - needs a new paint job - big project
shocks - probably get adjustables
speedo cable - got some needle bounce
headlamp rings - could use some nice new chrome
bumpers - got some corrosion and dents - might get black ones
windscreen seals - front and rear - bout time for some new ones
door seals - also time for new ones
union jack or other flag painted onto roof - maybe scotland
new fender flares
Basically there's a lot of things I want to change and given some time I will get them done. Will keep updating this post as time progresses.
If anyone has any parts they no longer need, let me know, there's a good chance I might be interested in them.
#17
06-07-2007, 12:26 PM
[quote=ImagoX;1560660]This is the kit you used, right?

That is exactly the type of horn I have been looking for! The site mentioned it has been installed in new MINI's as well as classic's-I'll have to find a spot under the bonnet for the horns tonight. Let me know how the install goes Imagox- if I don't beat you to it!
That is exactly the type of horn I have been looking for! The site mentioned it has been installed in new MINI's as well as classic's-I'll have to find a spot under the bonnet for the horns tonight. Let me know how the install goes Imagox- if I don't beat you to it!

#21
06-07-2007, 01:22 PM
Join Date: Sep 2002
Location: Aurora, IL
Posts: 256
Likes: 0
Received 0 Likes
on
0 Posts


#25
06-07-2007, 02:56 PM
6th Gear
Join Date: Jul 2006
Location: St. Petersburg, Florida
Posts: 1,284
Likes: 0
Received 0 Likes
on
0 Posts