
Drivetrain My Own Engine Dampener Brackets
#26
 01-19-2007, 12:17 PM


Former Vendor
no, you are right. in this application "if it dosnt bend it wont break". I guess my concern is that it WILL bend IF it does in fact carry a load.
If you clamped those brackets down in a vice can you bend them by hand? I think you could.
For a easy little experiment fab a cardboard link in there, fix them ridgidly together and go around the block and accelerate pretty hard a few times then check to see if the cardboard bent any. I think there may not be any movement to dampen in which case the conversation is a mute point and underhood style is the only factor.
(that was hard to word, let me know if you get where I'm going with it)
#27
01-19-2007, 12:43 PM

Nice job Arly & Steve.
Here's a pic of the "official" LOTF mounting solution.


#28
01-19-2007, 12:47 PM

6th Gear
Partsman, to answer your question, yes the aluminum is taped with nuts on the back side. The fastners are polished SS ( 2 @ 5/16, 3 @ 3 3/16 button heads ). The plate supplied w/kit is under the frame horn, large end toward the rear to take into account the direction of force. The MM piece is 1 1/4 angle cut & angled so the damper is flat in line with the frame horn. The angle is a little less steep than the LOTF kit ( not by much ).
At the time of this instalation I wanted better access than the intended design. I had no idea you guys were planning a revision. The problem with this instsall, as a consumer piece, it's not just a bolt on. I did send a pic to LOTF. He replied with a pic of the revision hardware, way more better. I have at least 1 more to make for an 06, another NAMer, same style.
Glad you like it!
This pic was posted on the OCC thread to show the alternate connection method ( best ).
#29
01-19-2007, 12:50 PM
6th Gear
#30
01-19-2007, 12:52 PM

Join Date: Feb 2003
Location: Grand Rapids, Michigan
Posts: 502
Likes: 0
Received 0 Likes
on
0 Posts
#31
01-19-2007, 02:16 PM
6th Gear
Bottom line, without people, like yourself, we would know nothing.... So you just keep doing what you are doing......

#33
01-19-2007, 10:11 PM
Join Date: Jul 2005
Location: Albuquerque New Mexico
Posts: 2,435
Likes: 0
Received 2 Likes
on
2 Posts
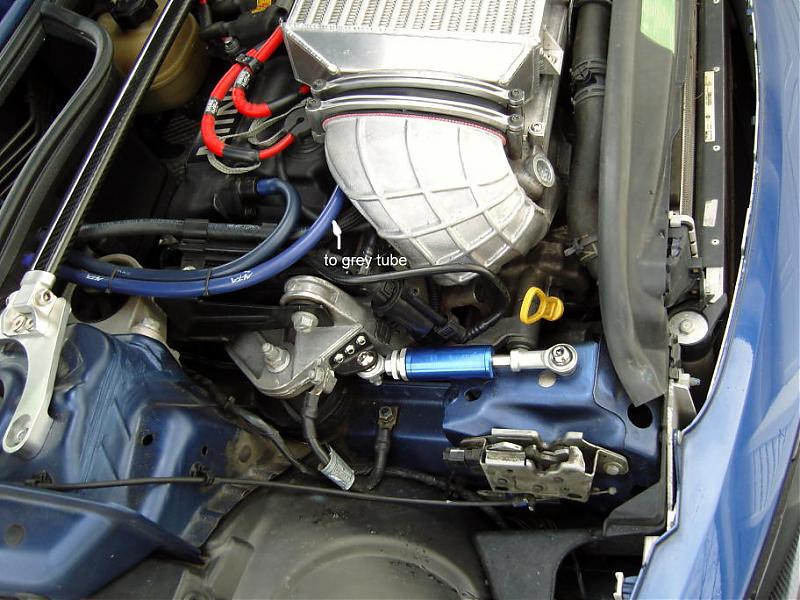
Here's my solution--before painting the brackets:

If you have HID Xenons ('05 and on) you have very little room to mount the damper before hitting the ballast for the lights.
Steve--as always you have come up with a very elegant solution!! I *love* the bracket with the 3 threaded bolts. woohoo.
There are lots of us "home grown" engineers out here.
If you have HID Xenons ('05 and on) you have very little room to mount the damper before hitting the ballast for the lights.
Steve--as always you have come up with a very elegant solution!! I *love* the bracket with the 3 threaded bolts. woohoo.
There are lots of us "home grown" engineers out here.


#35
01-28-2007, 07:02 PM
Join Date: Feb 2003
Location: Grand Rapids, Michigan
Posts: 502
Likes: 0
Received 0 Likes
on
0 Posts


#37
07-15-2007, 01:09 PM

I find it interesting that all the braketing for the dampers in this thread are in such a fashion that the dampers are to dampen a pulling force on the unit and not a pushing force.
I was of the impression that the force of the engine pushed towards the back of the car. Other then stressing the rubber bushings inside the damper how do these actually do any dampening. Basically all you are doing is lashing the engine down... to do this you certainly would not need any of the shaft of the damper.
I was of the impression that the force of the engine pushed towards the back of the car. Other then stressing the rubber bushings inside the damper how do these actually do any dampening. Basically all you are doing is lashing the engine down... to do this you certainly would not need any of the shaft of the damper.
#39
07-15-2007, 02:00 PM

#40
07-15-2007, 09:37 PM
I find it interesting that all the braketing for the dampers in this thread are in such a fashion that the dampers are to dampen a pulling force on the unit and not a pushing force.
I was of the impression that the force of the engine pushed towards the back of the car. Other then stressing the rubber bushings inside the damper how do these actually do any dampening. Basically all you are doing is lashing the engine down... to do this you certainly would not need any of the shaft of the damper.
I was of the impression that the force of the engine pushed towards the back of the car. Other then stressing the rubber bushings inside the damper how do these actually do any dampening. Basically all you are doing is lashing the engine down... to do this you certainly would not need any of the shaft of the damper.
The shaft is simply there for the overall length. No need to adjust the length on both sides of the damper.
#41
07-15-2007, 11:20 PM

Arly, I totally love that you got out there and did this on your own. Most folks wouldn't bother...
I do have one question. The lower bracket raises the damper up which will add additional stress to the frame area that it is mounted to (standard fulcrum stuff. I haven't done any test with the damper, but is that additional stress going to be too much for that piece of steel to handle? Do you think that it might cause bending or warping of that frame piece?
Just curious.
#42
07-16-2007, 12:34 AM

OVERDRIVE
#44
07-16-2007, 03:41 AM
Join Date: Feb 2003
Location: Grand Rapids, Michigan
Posts: 502
Likes: 0
Received 0 Likes
on
0 Posts
The way I have it set up on my 2002, I am just reinforcing the stock oem dampener. The forces should be minimum. I might be more concerned if this was the only dampener in the system I would go the route of using the holes for the oem dampener if I had a 2004 MCS when the oem dampener was removed.
#45
07-16-2007, 08:01 AM
Some things to think about...
first is while there are concerns for bending with the brackets, no one has really run into the issue, so if it comes up, just make it from stronger stuff. No FEA required!
Second, and probably more importantly, is as the damper is at a larger and larger angle relative to the motion direction, the allowable range of motion of the damper gets reduced. I think the Mini engine likes to swing a lot more than the dampers range of motion even with perfect alignment, and this will just get worse with angle. Non-ideal allignments act to effectivly stiffen the damper even more.
Matt


#47
07-16-2007, 09:12 AM
6th Gear
#48
07-16-2007, 10:04 AM
Join Date: Feb 2003
Location: Grand Rapids, Michigan
Posts: 502
Likes: 0
Received 0 Likes
on
0 Posts
I will check how much movement this damper has using a tie wrap around the shaft at the juncture between the damper body and shaft. If it moves, then it is doing something. If it does not, then it is just bracing the oem damper frame. If you look at the oem dampener system there is a main isolator at the strut mount area frame and then the rubber bushing that is attached to the bolt I am using to mount my bracket. Since the LOTF dampener is stiffer it should be doing some work in dampening. I made my bracket system this way because I have 2 OCC setup and I was using a bracket to suspend the front Oil Catch Can.
#49
09-07-2007, 06:15 PM
Join Date: Feb 2003
Location: Grand Rapids, Michigan
Posts: 502
Likes: 0
Received 0 Likes
on
0 Posts

#50
10-15-2007, 07:26 AM

New Brackets?
Lord,
Are these a new style brack for your damper? I have one of your dampers with a different mounting style and it bent in a week from what seemed to be the angle.
Are these a new style brack for your damper? I have one of your dampers with a different mounting style and it bent in a week from what seemed to be the angle.