Drivetrain My Own Engine Dampener Brackets
#1
 01-19-2007, 04:05 AM


Join Date: Feb 2003
Location: Grand Rapids, Michigan
Posts: 502
Likes: 0
Received 0 Likes
on
0 Posts
My Own Engine Dampener Brackets
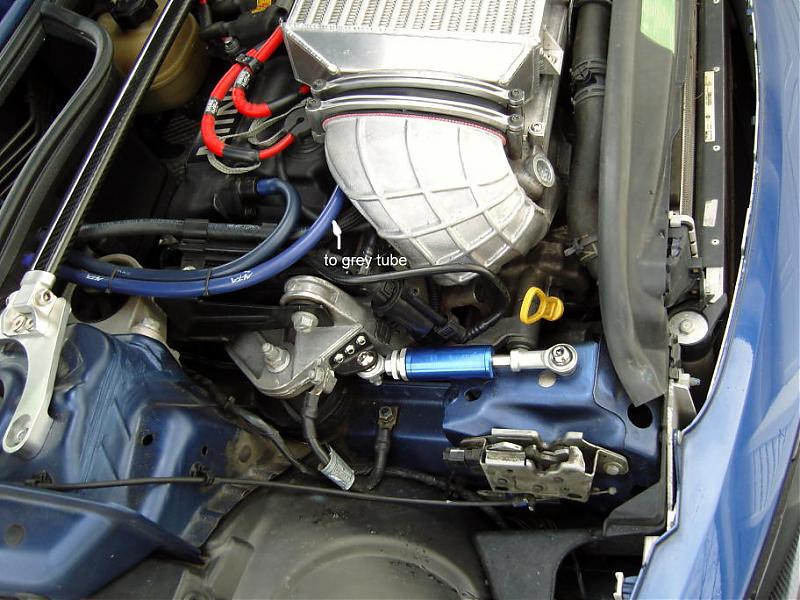
I participated in the LOTF group buy on these engine dampers and since I have an 02 MCS, I could not install the damper in the original area. Plus I could not install it in the second area using the LOTF brackets because I had an OCC in that area. I then decided to try my own way. Here are pictures of the carboard prototypes. I found a way to place the damper using the same front mounting position hole and using the 02 damper bolt as pictured. As for the final material, I found that door brackets from the local hardware store will do the trick.


#2
01-19-2007, 06:34 AM

3rd Gear
Join Date: Jul 2004
Location: Pope AFB
Posts: 265
Likes: 0
Received 0 Likes
on
0 Posts

#5
01-19-2007, 07:09 AM
Join Date: Feb 2003
Location: Grand Rapids, Michigan
Posts: 502
Likes: 0
Received 0 Likes
on
0 Posts
I am not an engineer. Those hold beams to lock a barn door, so I assume they will be strong enough. From what I observe, the brackets are zinc coated steel. About an 1/8 IN thick and they do not bent easily. If these do not work, I might go to our machine shop and get some scrap T6 AL or angle iron.
#6
01-19-2007, 07:10 AM

5th Gear
Join Date: Nov 2005
Location: Elyria, Ohio
Posts: 633
Likes: 0
Received 0 Likes
on
0 Posts
#7
01-19-2007, 07:18 AM
What are we supposed to do sit on our hands and wait on a vendor?
Good grief:impatient .... It�s a brace! To limit engine movement, if it fails just double up the bracket on the frame rail.
This isn't a critical part that life depends on.
Trending Topics
#8
01-19-2007, 07:39 AM
Join Date: Feb 2003
Location: Grand Rapids, Michigan
Posts: 502
Likes: 0
Received 0 Likes
on
0 Posts
I just did a test fitting and the only concern is how close the bolt is to the OCC hoses. I might have to change bolt head shape, maybe a bolt style that used a hex key. I might be able to lengthen one of the hose so that it clears without rubbing. Again the steel versions will be slightly more accurate since the card board flexed when I bolted the OEM damper bolt. i'll see if this work. The brackets were a couple of bucks each so I am not out too much.
#9
01-19-2007, 07:48 AM

Former Vendor

#10
01-19-2007, 08:05 AM
I am not an engineer. Those hold beams to lock a barn door, so I assume they will be strong enough. From what I observe, the brackets are zinc coated steel. About an 1/8 IN thick and they do not bent easily. If these do not work, I might go to our machine shop and get some scrap T6 AL or angle iron.
 You might want to make a plate for underneath to sandwich the frame rail.
#11
01-19-2007, 08:40 AM

Join Date: Jan 2003
Posts: 590
Likes: 0
Received 0 Likes
on
0 Posts
well, i'm an engineer and i think this kind of home depot engineering / monster garage tinkering is great! 
the only comments i have:
what is the function of the 2 little tabs that are bent over on the rear side of the upper/aft bracket? to keep the bracket from rotating?
the lower bracket will also have a force trying to rotate it about the axis of the bolt. if you make the bracket a "u" shape with the sides of the u straddling the bolt, you'll reduce or eliminate that rotating force.
#12
01-19-2007, 08:42 AM
Former Vendor
I'm gonna guess they are there to keep it from rotating up and down
#13
01-19-2007, 08:54 AM

6th Gear
I just did a test fitting and the only concern is how close the bolt is to the OCC hoses. I might have to change bolt head shape, maybe a bolt style that used a hex key. I might be able to lengthen one of the hose so that it clears without rubbing. Again the steel versions will be slightly more accurate since the card board flexed when I bolted the OEM damper bolt. i'll see if this work. The brackets were a couple of bucks each so I am not out too much.
The bad is, that the top mount is bolted through a rubber mount and the bracket that returns to the rear rubber mount, not directly where the movement is, the actual mount that is bolted to the engine ( where the ground strap is connected ).
You could build the same type of arangement, as the front horn, and bolt it through the engine mount.
#14
01-19-2007, 09:01 AM

I think you did a great job. But.....
The bad is, that the top mount is bolted through a rubber mount and the bracket that returns to the rear rubber mount, not directly where the movement is, the actual mount that is bolted to the engine ( where the ground strap is connected ).
You could build the same type of arangement, as the front horn, and bolt it through the engine mount.
I discussed this with Shoe when we were figuring out brackets for his damper, he wanted to bolt it there.
I shot it down because you are trying to dampen a rubber bushed mount. Definitely relocate the engine side mount.
Other than that, nice job Arly.
#15
01-19-2007, 09:06 AM
6th Gear
Join Date: Sep 2003
Location: Wichita, Kansas
Posts: 1,443
Likes: 0
Received 0 Likes
on
0 Posts
And what do you suggest? A $55,000 dollar engineering study to determine load torque and material requirements.
Good grief:impatient .... It�s a brace! To limit engine movement, if it fails just double up the bracket on the frame rail.
This isn't a critical part that life depends on.
Good grief:impatient .... It�s a brace! To limit engine movement, if it fails just double up the bracket on the frame rail.
This isn't a critical part that life depends on.
#16
01-19-2007, 09:34 AM
5th Gear
Join Date: Nov 2005
Location: Elyria, Ohio
Posts: 633
Likes: 0
Received 0 Likes
on
0 Posts
Jason
Jason
#17
01-19-2007, 09:50 AM
On the topic of stiffness, I wonder about the brackets stiffness. If they aren't stiff enough, or have any rotation (play) to them, this would allow the damper to move laterally which may cause additional wear on the piston and seal.
Justa thought... I agree that tinkering like this is fun! Looks nice
Justa thought... I agree that tinkering like this is fun! Looks nice
#18
01-19-2007, 10:17 AM
6th Gear
On the topic of stiffness, I wonder about the brackets stiffness. If they aren't stiff enough, or have any rotation (play) to them, this would allow the damper to move laterally which may cause additional wear on the piston and seal.
Justa thought... I agree that tinkering like this is fun! Looks nice
Justa thought... I agree that tinkering like this is fun! Looks nice
There is a Thread here somewhere, Lordof the flies, that has a picture of the damper installed... worth a look
#19
01-19-2007, 10:24 AM
#20
01-19-2007, 10:24 AM
Join Date: Feb 2003
Location: Grand Rapids, Michigan
Posts: 502
Likes: 0
Received 0 Likes
on
0 Posts
the bolt that is left in the picture is actually attached to the same part as the LOTF bracket. You will notice that I am reinforcing the OEM damper using that bolt. That bracket will be made out of the bought brackets and I will leave the back section where the "L" starts and grind down the area that the OEM bracket is at. This will prevent my bracket from rotating up and down. As for the frame bracket, the U shape will be better. I will explore if I can still use the brackets I bought and cut off the ears. I hope that the remaining bracket will be tall enough. I have to still clear the OCC and be not too tall and then I will hit the hood.
I appreciate most of the comments here. I am a tinkerer at heart and mechanically inclined. I just like making things work when others will give up.
I appreciate most of the comments here. I am a tinkerer at heart and mechanically inclined. I just like making things work when others will give up.
#21
01-19-2007, 10:25 AM
Join Date: Feb 2003
Location: Grand Rapids, Michigan
Posts: 502
Likes: 0
Received 0 Likes
on
0 Posts
#22
01-19-2007, 10:55 AM
6th Gear
Join Date: Sep 2003
Location: Wichita, Kansas
Posts: 1,443
Likes: 0
Received 0 Likes
on
0 Posts
I disagree with you on that 100%. For this bracket to work (to allow the damper to do it's job) the brackets need to be stiff and have minimal deflection. When it comes to stiffness, "steel is steel", the actual stiffness (modulus of elasticity) stays pretty much identical for different grades of steel, although the strength of the steel does vary. I am not going to judge Arly's design here (good or bad), but for a bracket like this using any grade of steel, one needs to design for stiffness. If it is stiff enough, than it's going to be strong enough. If it's flexible enough to break, then it wasn't stiff enough to be doing it's job anyways, no matter what grade of steel.
Jason
Jason
Jason
Jason
If you clamped those brackets down in a vice can you bend them by hand? I think you could.
For a easy little experiment fab a cardboard link in there, fix them ridgidly together and go around the block and accelerate pretty hard a few times then check to see if the cardboard bent any. I think there may not be any movement to dampen in which case the conversation is a mute point and underhood style is the only factor.
#23
01-19-2007, 11:15 AM
You are correct that Shoe's bracket is bolted to that same part, but he is not using the same bolt that you are. His connection is more direct, as the bolt you are using is surrounded by a rubber bushing. The engine torque will move that bolt inside the bushing, unless you pre-load your setup by pulling the engine forward a little, adjusting the damper, bolting everything together tight, and then let the engine go.
#24
01-19-2007, 11:41 AM
6th Gear