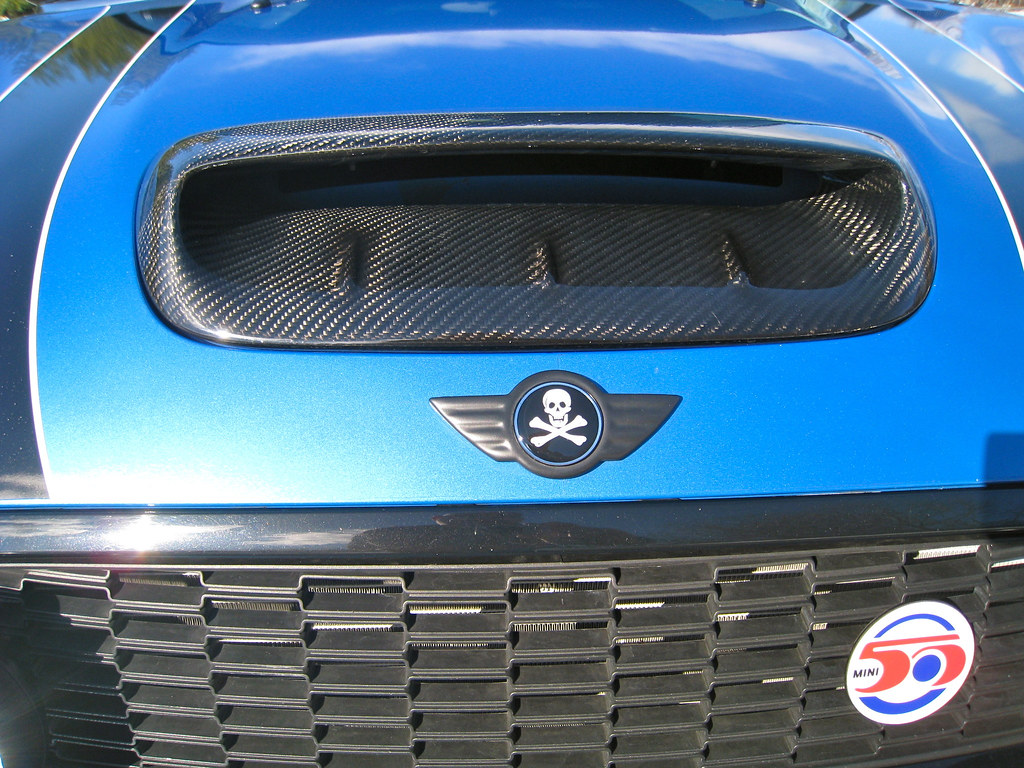
Removed Hood Scoop Honeycomb Insert
#1
Removed Hood Scoop Honeycomb Insert
On my new 2011 JCW... I was going to do the dremal mod and cut more holes into my Hood Scoop Insert.
Than my dremal gave out.
It lasted many years of punishment... so I can't complain too much.
But than I thought.. hey just take out the insert and lets see how it looks.
Well i like it. I had to use my daughters black finger nail polish and color the grey/white grommet that connects the scoop to the hood and hangs down..
But soo far I like it.
My question is ... has anyone done this? I'm sure you have.... so how did it work out? Any rain issues? Any other issues?
Will probably try this out for a while and test things..
Thx!
Than my dremal gave out.

It lasted many years of punishment... so I can't complain too much.
But than I thought.. hey just take out the insert and lets see how it looks.

Well i like it. I had to use my daughters black finger nail polish and color the grey/white grommet that connects the scoop to the hood and hangs down..
But soo far I like it.
My question is ... has anyone done this? I'm sure you have.... so how did it work out? Any rain issues? Any other issues?
Will probably try this out for a while and test things..

Thx!
Last edited by Jack$0n; 07-22-2011 at 04:03 PM.
#2
When I had my '04 mini, the hood scoop was open. The look was great, but I did have a lot of problems with leaves getting stuck on the inter-cooler...especially in the fall.
I actually had the option to do it on my '10 cooper a few days ago (replaced the scoop with a CF one) and after much thought I left it in because of those problems I had with the '04. Granted, ours are now turbo-ed so the inter-cooler isn't in that spot, but I have an open filter intake (NM) and thought I'd probably end up with leaves getting stuck on that, or at least building up below it which could be a fire hazard.
I'd love to see pictures of what it looks like off; I didn't latch mine down for fear of breaking it taking it off if i didn't like it. Also let us know how it works out if you do keep it off. If there are no problems, or they're minimal, I may have to reconsider my decision.
#5
#6
#7
Trending Topics
#8
#9
What dremel bit did you use. I tried that but couldn't find a bit that produced good results and a clean smooth edge.
#10
Think I'm going to paint it red ...shhhh don't tell anyone
#11
I think it was about 1/8" or 3/16" and it had an aggressive bite, cylindrical shaped. It did leave a rough edge but a small file/rasp cleaned it right up.
#12
#14
Had a similar grill-like setup on a previous car.
Instead of a Dremel, used an Exacto knife and heated the blade using a candle.
The hot blade easily cut through the plastic.
The key to ease, following the desired cut, and to safety, was to keep the blade hot.
I paused after nearly every cut to reheat the blade.
I like the Mini-Fini stainless one, but wish it was black.
Oh well, there is always Power Coating!
#15
#16
#17

#19
I really like this product. Now I just need to find the original screws that hold it on.

#20


