
How To Maintenance :: Cooper S Oil Change (with pics!)
#476
 09-18-2010, 10:06 AM


#477
09-18-2010, 02:48 PM


A little extreme, don't you think?
What I can find is that the difference of note between LL-01 and LL-04 is the LL-04 starts with a lower TBN (total base number) than LL-01, and that the inconsistent sulfur levels in US gasoline mean that TBN depletion rates may be higher in the US than in the UK. So, in the UK, one may be able to run for 15,000 miles on LL-04 oil before TBN depletion (the service life of the oil) becomes an issue, but in the US you'll likely not be able to go for that long between changes.
And, since this thread seems to be mainly people who want to change their oil well before 15,000 miles is up, I don't see it as being an issue.
Just to be safe, though, I'll try to remember to send in a sample at 5k and 10k miles (maybe also 7.5k?) to check� but I'm still going to use this oil because it appears to be rather highly regarded among the oil geeks over at bobistheoilguy.com � and also because the price is excellent!

#478
09-19-2010, 07:45 PM

#480
09-20-2010, 07:06 AM
How on earth does that make it sound like the engine will fall apart?
Seriously?
I put it out there for everyone to decide because everyone's situation will be different. While your oil depletion rate might be fine, someone using gas from another refinery might not. Similarly, just because some claim to run 89 octane in their S just fine, doesn't mean I am will to do so to save a few dollars.
This is the "Oil Change"' thread, not the "change your oil before the recommended interval" thread. You shouldn't assume that everyone is going to use a short interval. Once the free maintenance period is over, some may choose to go by what the computer tells it and save on the stealership/garage fee.
That said, do go have your oil tested and report back.
#482
11-06-2010, 04:43 PM

#483
11-21-2010, 07:10 AM
6th Gear
Updated How-To
Thanks z3bum and others for all the great how-to info. I have enjoyed reading this thread. I thought I'd do my part to help out. So here it is. I have gathered information and photos from the OP's post as well as other tips discussed in the thread and elsewhere online. I have combined/edited this in this one post.
PLEASE BE SURE TO THANK z3bum FOR THE WRITE UP/PHOTOS AND ROBIN CASADAY FOR THE ILLUSTRATED DRAIN PAN PHOTO.
/////////////////////////////////07+ Oil Change How-To/////////////////////////////////
Required Items:
8mm Allen (hex) wrench/bit – drain pan plug
27mm Socket – Oil filter housing (1-2 long extensions are helpful to reach)
10mm Wrench – to remove the coolant tank
Oil catch pan
Ramps
Rags/Paper towels
Approved Oil
1. Get it up on ramps/jack stands

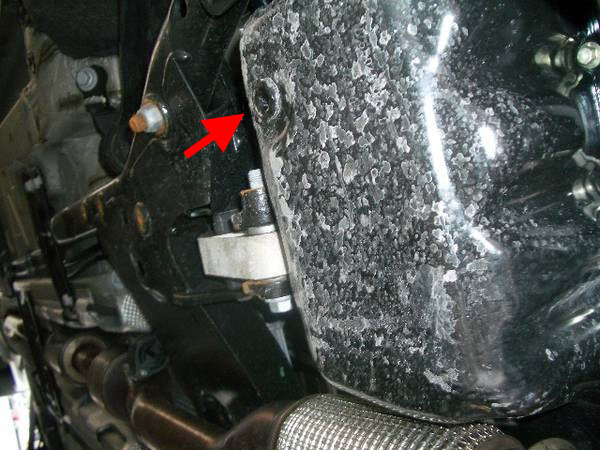
2. Loosten the coolant tank to gain exposure to the oil filter housing

Oil filter housing shown here after coolant tank was moved aside.
Removing the coolant tank: use 8mm wrench to loosen fasteners then lift out and push aside.
3. Loosen oil filter housing

Use 27mm socket to loosen oil filter housing. Shown here is the 27mm socket and extension.
**NOTE – Loosen the filter cap and let it stand for a few minutes before removing. This can greatly decrease oil leakage from the filter housing.
4. Loosen drain pan plug.
Use 8mm Allen (hex) wrench/bit to loosen drain pan plug. CAUTION oil may be hot. If needed, let plug fall in to oil catch pan.
5. Replace filter and drain plug.

Shown here are the replacement filter, fresh O-ring, and copper crush washer.
Clean the filter housing making sure debris are removed.
Lube replacement O-ring with clean oil and install onto filter housing.
Place filter in housing and reinstall on engine. Hand thread filter housing to ensure threads aren’t crossed.
6. Replace approx 4.4 quarts of approved synthetic oil.
7. Reinstall coolant tank.
8. Reset Service Indicator (Optional)
Resetting the service indicator via the service menu:
To enter the service Menu:
Insert Key
Press Start button but DO NOT press clutch/brake
Wait until symbol disappears on the rev counter display then IMMEDIATELY press and hold Both buttons on the rev counter
Continue holding - system will run dash light check
Display will show VIN/Menu – continue holding until the time appears on the display
Now release ONLY the Right-hand Button (trip reset) for about a second, and then press and hold again
After approximately 2 seconds, display will show front brake symbol-you are now in the service menu
Scroll through service menu list by pressing the BC button on the indicator stalk. Press and hold the BC Button at the desired symbol until RESET appears – release button then press and hold again until process is complete.
Turn ignition Off/On
Your done!
PLEASE BE SURE TO THANK z3bum FOR THE WRITE UP/PHOTOS AND ROBIN CASADAY FOR THE ILLUSTRATED DRAIN PAN PHOTO.
/////////////////////////////////07+ Oil Change How-To/////////////////////////////////
Required Items:
8mm Allen (hex) wrench/bit – drain pan plug
27mm Socket – Oil filter housing (1-2 long extensions are helpful to reach)
10mm Wrench – to remove the coolant tank
Oil catch pan
Ramps
Rags/Paper towels
Approved Oil
Long-life rating LL-01 Approved Synthetic Oils for the US Market:
- Castrol Syntec European Formula SAE 0W-30
- Mobil 1 SAE 0W-40
- Pennzoil Platinum European Formula Ultra SAE 5W-30
- Valvoline SynPower SAE 5W-30
- Castrol Syntec European Formula SAE 0W-30
- Mobil 1 SAE 0W-40
- Pennzoil Platinum European Formula Ultra SAE 5W-30
- Valvoline SynPower SAE 5W-30
1. Get it up on ramps/jack stands
2. Loosten the coolant tank to gain exposure to the oil filter housing
Oil filter housing shown here after coolant tank was moved aside.
Removing the coolant tank: use 8mm wrench to loosen fasteners then lift out and push aside.
3. Loosen oil filter housing
Use 27mm socket to loosen oil filter housing. Shown here is the 27mm socket and extension.
**NOTE – Loosen the filter cap and let it stand for a few minutes before removing. This can greatly decrease oil leakage from the filter housing.
4. Loosen drain pan plug.
Use 8mm Allen (hex) wrench/bit to loosen drain pan plug. CAUTION oil may be hot. If needed, let plug fall in to oil catch pan.
5. Replace filter and drain plug.
Shown here are the replacement filter, fresh O-ring, and copper crush washer.
Clean the filter housing making sure debris are removed.
Lube replacement O-ring with clean oil and install onto filter housing.
Place filter in housing and reinstall on engine. Hand thread filter housing to ensure threads aren’t crossed.
Proper torque spec for filter housing = (25 Nm or 18 lb-ft)
Next, reinstall drain pan plug. Place new crush washer and torque to spec. Proper torque spec for drain pan plug = (30Nm or 22 lb-ft)
6. Replace approx 4.4 quarts of approved synthetic oil.
Long-life rating LL-01 Approved Synthetic Oils for the US Market
- Castrol Syntec European Formula SAE 0W-30
- Mobil 1 SAE 0W-40
- Pennzoil Platinum European Formula Ultra SAE 5W-30
- Valvoline SynPower SAE 5W-30
- Castrol Syntec European Formula SAE 0W-30
- Mobil 1 SAE 0W-40
- Pennzoil Platinum European Formula Ultra SAE 5W-30
- Valvoline SynPower SAE 5W-30
7. Reinstall coolant tank.
8. Reset Service Indicator (Optional)
Resetting the service indicator via the service menu:
To enter the service Menu:
Insert Key
Press Start button but DO NOT press clutch/brake
Wait until symbol disappears on the rev counter display then IMMEDIATELY press and hold Both buttons on the rev counter
Continue holding - system will run dash light check
Display will show VIN/Menu – continue holding until the time appears on the display
Now release ONLY the Right-hand Button (trip reset) for about a second, and then press and hold again
After approximately 2 seconds, display will show front brake symbol-you are now in the service menu
Scroll through service menu list by pressing the BC button on the indicator stalk. Press and hold the BC Button at the desired symbol until RESET appears – release button then press and hold again until process is complete.
Turn ignition Off/On
Your done!
Last edited by biggripper; 01-05-2011 at 11:13 AM.
#484
11-21-2010, 09:35 AM

3rd Gear
Join Date: Apr 2009
Location: YORK, PA
Posts: 191
Likes: 0
Received 0 Likes
on
0 Posts
Nice job, putting all this in one post, it will help any new folk that are looking for info on doing their own changes.
Only thing I would add is folks may want to consider purchasing a Vacuum System that takes the oil out through the dipstick tube. It has made the job so much easier, no need for ramps or crawling under the car. If you have ramps and are still young enough to do the crawl then it might seem like over kill, but at least check out this link. I purchased the 2 gallon size from Liquivac and am quite happy with the process, you loosen the oil filter cap and proceed as instructed.
Only thing I would add is folks may want to consider purchasing a Vacuum System that takes the oil out through the dipstick tube. It has made the job so much easier, no need for ramps or crawling under the car. If you have ramps and are still young enough to do the crawl
then it might seem like over kill, but at least check out this link. I purchased the 2 gallon size from Liquivac and am quite happy with the process, you loosen the oil filter cap and proceed as instructed.
Last edited by john171; 11-21-2010 at 06:50 PM.

#488
12-18-2010, 02:30 PM
The coolant tank bolt on a 2010 is 10mm (not 8mm as stated), and 5qrts would overfill the 4.4qrt system. I put in 4 qrts Mobil 1 0W/40.
Nice to have the right tools ahead of time thanks to this thread. I also just bought a set of these wheel changing studs. Right tools for wheel changes.....
http://stores.ebay.com/GOOD-OL-BEARs...h&_sid=5931062

Last edited by MCS Fever; 12-18-2010 at 02:55 PM.
#489
02-26-2011, 01:06 PM

So ... I'm having a really hard time getting to the oil filter on a 2011 S. The hoses from the coolant tank only give like an inch of movement on the tank itself and it is really hard to get to the filter hex. I can reach it (and definitely remove it) with a 10" extension but it's such a tricky angle that i'm worried about threading the new one on. Starting it by hand is out of the question because with the small amount of movement on the tank there is no way to get my hand down there. I'm considering replacing the coolant lines with longer ones so i'll have more play. Any thoughts? Thanks! -Alex
#490
02-27-2011, 04:21 AM
2nd Gear
Join Date: Mar 2008
Location: Windham, NH
Posts: 63
Likes: 0
Received 0 Likes
on
0 Posts
as far as my 08, just push tank out of the way. lines are strong enough
#491
02-27-2011, 05:23 AM
are the lines strong enough to allow enough movement to hand start the filter or did you start it with a wrench? i just can't see getting it aligned from so far away without cross-threading.
#492
02-27-2011, 09:06 AM
#493
02-27-2011, 10:22 AM

Post #483 above appears to have a 2011 JCW, and has managed to move the coolant tank out of the way, the hoses are tough and will bend.
Do your very best to get your meathooks down there to make sure the filter housing is started properly.
Kudos for having the wisdom to change your oil early. Good luck.
Do your very best to get your meathooks down there to make sure the filter housing is started properly.
Kudos for having the wisdom to change your oil early. Good luck.
#494
02-27-2011, 01:25 PM

How to remove most oil from filter before change
A technique I use with all cars I change oil on to flush most of the oil out of the filter is as follows.
1. Drain oil from oil pan.
2. While oil pan drain still open and container to catch oil still in place and old filter still in place, start car and let run for about 10 seconds.
This will pump remaining oil out of the filter, but not all. It helps with the mess when the oil filter seal is opened while taking it off.
The engine is coated in oil so it won't hurt it.
Dave
#495
02-28-2011, 05:26 AM
A technique I use with all cars I change oil on to flush most of the oil out of the filter is as follows.
1. Drain oil from oil pan.
2. While oil pan drain still open and container to catch oil still in place and old filter still in place, start car and let run for about 10 seconds.
This will pump remaining oil out of the filter, but not all. It helps with the mess when the oil filter seal is opened while taking it off.
The engine is coated in oil so it won't hurt it.
Dave
1. Drain oil from oil pan.
2. While oil pan drain still open and container to catch oil still in place and old filter still in place, start car and let run for about 10 seconds.
This will pump remaining oil out of the filter, but not all. It helps with the mess when the oil filter seal is opened while taking it off.
The engine is coated in oil so it won't hurt it.
Dave
For those of us who prefer NOT to run our MINI with no oil in it.
Simply loosen the filter to a point where it is close to leaking, then remove the oil drain bolt. As the engine is draining crack the oil filter loose, it will drain with the help of the suction from the oil draining.

#497
03-07-2011, 04:00 PM
Highly recommend the 5qt jug, btw. The car takes about 4qts, so you have a little left over for any top-offs you may need between changes. And it's also really easy to pour all the oil back into that single jug when you drain it out again however many thousand miles later.
#498
03-15-2011, 08:03 PM

Just completed my break-in period oil and filter change at 1400 mi on my new 2011 MCS. The entire process was a snap thanks to the guidance in this thread.
However, I was a bit unnerved by some coolant loss around the fitting that attaches to the bottom of the expansion tank. I honestly didn't put very much stress on the hose or the fitting, but with the tank under pressure any amount of lateral stress on the hose fitting as the tank was lifted up allowed the coolant to squirt past. I imagine I lost probably six tablespoons of coolant. I finally ended up sucking the tank dry with a syringe so I could move it out of the way without leaking and then replaced the fluid when I put everything back together. There were no leaks--oil or water--apparent during the post-change leak inspection with the engine at idle. I guess I should let it come up to full operating temperature tomorrow and check the expansion tank again just to be sure.
Has anyone else experienced something similar?
#499
03-16-2011, 05:58 AM
Just completed my break-in period oil and filter change at 1400 mi on my new 2011 MCS. The entire process was a snap thanks to the guidance in this thread.
However, I was a bit unnerved by some coolant loss around the fitting that attaches to the bottom of the expansion tank. I honestly didn't put very much stress on the hose or the fitting, but with the tank under pressure any amount of lateral stress on the hose fitting as the tank was lifted up allowed the coolant to squirt past. I imagine I lost probably six tablespoons of coolant. I finally ended up sucking the tank dry with a syringe so I could move it out of the way without leaking and then replaced the fluid when I put everything back together. There were no leaks--oil or water--apparent during the post-change leak inspection with the engine at idle. I guess I should let it come up to full operating temperature tomorrow and check the expansion tank again just to be sure.
Has anyone else experienced something similar?
However, I was a bit unnerved by some coolant loss around the fitting that attaches to the bottom of the expansion tank. I honestly didn't put very much stress on the hose or the fitting, but with the tank under pressure any amount of lateral stress on the hose fitting as the tank was lifted up allowed the coolant to squirt past. I imagine I lost probably six tablespoons of coolant. I finally ended up sucking the tank dry with a syringe so I could move it out of the way without leaking and then replaced the fluid when I put everything back together. There were no leaks--oil or water--apparent during the post-change leak inspection with the engine at idle. I guess I should let it come up to full operating temperature tomorrow and check the expansion tank again just to be sure.
Has anyone else experienced something similar?
#500
03-25-2011, 04:14 PM
6th Gear