When you click on links to various merchants on this site and make a purchase, this can result in this site earning a commission. Affiliate programs and affiliations include, but are not limited to, the eBay Partner Network.
I have 2014 Clubman S with leatherette sport seats.
Went to Sewell yesterday to get the kit for Driver's side. Was told the 52102752611 was superseded by the 52107299941 but both are interchangeable. Must be some difference else why would part number change? Could be different supplier but same part specs?
Of interest is I was told there is yet another part number coming. It's not orderable yet. I didn't jot the number down but now wish I had. Nevertheless, I bought the 941 and will be installing as soon as I get a free second (not today). Parts Mgr said he didn't know of anyone that had tried the 611 or 941 in a '14 but could confirm the seat frame and foam part numbers hadn't changed from previous model years so couldn't point to a reason it won't work.
First pic is the zipper end I fished out. Second is after I unzipped the cover. Note, once you unzip both sides, the bottom of the rear cover is attached to the bottom of the front cover via two plastic parts attached to the bottom of the front and back edges. The plastic part attached to the front edge fits into a channel in the plastic part attached to the rear bottom edge of the leatherette. Best way to separate is inserting a putty knife, push in (against the plastic part attached to the back (upper part) and pull the plastic part attached to the front. Third pic is with the hard plastic piece removed. This comes off pretty easy just pulling at the bottom and pressing in the tabs where it attaches in two places at the top.
7. This is the hook at the bottom left of the old spring mat. These were the hardest to get out. I actually had to bend the hook a bit straighter than what it is in this pic to get it out of the hole.
8. New assembly prior to installation. Seems to work better if you insert the right side first
9. New assembly in place but none of the hooks attached. Seemed best to get the entire thing in before trying to feed the hooks through the eyelets.
10. Once you get the adjuster inserted into it's mounting hole, you'll need to secure it with the two torx head screws supplied in the kit. I'm not going to lie, I dropped one of the screws and had to fish around in the seat for 10 minutes to find it. Getting the screw started requires really pushing (or pulling) the foam and leatherette way away from the frame so you can get your hands in there to get the screw started. Get it started with your fingers (as much as you possibly can) then get your ratchet with the torx bit and tight it up.
11. Wider shot of tightening the screws. The lower screw is the hardest to start and tighten. Careful about overtightening. It's going into plastic so you can easily strip out the hole. Once you get them tightened, make sure the assembly is centered from side to side and the assembly is as far down as it can go. Mine was difficult to get as low as it needed to be and the lumbar mechanism wanted to move off-center to the left. Everything in place, feel around the outside of the leatherette for the center of the adjuster and make a plunge cut with a razor, then a cross cut so you have a small X, then just keep making it bigger until you can squeeze the adjuster **** through it. Snap the adjust **** onto the mechanism, put the hard plastic cover back on, zip the cover, tuck the ends, rejoin the plastic parts attached the bottom ends of the front/back into the channel and you're done.
12. Success!! Adjuster **** easily clears the center armrest and the large diameter conceals the cuts made in the leatherette.
The difference is well worth the cost of the part and the hassle of installing. The seats are not terrible but the lack of lumbar support was noticeable and painful to me after the first 5 mile drive.
This was the cure. Good luck. Sorry most of the pics open horizontal. Hopefully you can figure out the top edge of the pic is at the left in most of these.
The difference is well worth the cost of the part and the hassle of installing. The seats are not terrible but the lack of lumbar support was noticeable and painful to me after the first 5 mile drive.
+1
Once you put the lumbar support in, you realize that it is almost as if the seats were missing something from the factory. Just having the supports installed and at the flattest setting makes an immediate and very noticeable improvement.
The lumbar support along with raising the front of the seat tracks with washers, radically improve seating comfort. Required mods in my book.
10. Once you get the adjuster inserted into it's mounting hole, you'll need to secure it with the two torx head screws supplied in the kit. I'm not going to lie, I dropped one of the screws and had to fish around in the seat for 10 minutes to find it. Getting the screw started requires really pushing (or pulling) the foam and leatherette way away from the frame so you can get your hands in there to get the screw started. Get it started with your fingers (as much as you possibly can) then get your ratchet with the torx bit and tight it up.
11. Wider shot of tightening the screws. The lower screw is the hardest to start and tighten. Careful about overtightening. It's going into plastic so you can easily strip out the hole. Once you get them tightened, make sure the assembly is centered from side to side and the assembly is as far down as it can go. Mine was difficult to get as low as it needed to be and the lumbar mechanism wanted to move off-center to the left. Everything in place, feel around the outside of the leatherette for the center of the adjuster and make a plunge cut with a razor, then a cross cut so you have a small X, then just keep making it bigger until you can squeeze the adjuster **** through it. Snap the adjust **** onto the mechanism, put the hard plastic cover back on, zip the cover, tuck the ends, rejoin the plastic parts attached the bottom ends of the front/back into the channel and you're done.
12. Success!! Adjuster **** easily clears the center armrest and the large diameter conceals the cuts made in the leatherette.
The difference is well worth the cost of the part and the hassle of installing. The seats are not terrible but the lack of lumbar support was noticeable and painful to me after the first 5 mile drive.
This was the cure. Good luck. Sorry most of the pics open horizontal. Hopefully you can figure out the top edge of the pic is at the left in most of these.
Thanks for the new photos, the new zippers shoudl make the install way simplier than it was in my 09 MCS. Time to get started! Thanks
WoW ! I just did this mod on my 2012 MCS this weekend and I am just thrilled. This is how our leatherette seats should have been from the factory. I'd be mad at mini for skimping on this part which was fairly inexpensive but has changed the ride dramatically but I am too elated about the improvement the Lumbar made. Took me about 1/2 an hour to complete. Thanks so much to Angib for the original instructions and also to Swjtx for the extra leatherette seat pics and info. The drivers side complete kit part # was 52107347727 which supersedes 52102752611.Thanks to Chris at Kinnesaw Mini in GA. I'm going to get the passenger side from Outmotoring because Chris could not find a part number for the kit for it. Thanks again. I'm in love with my mini again. One more thing. I drove a loaner 2014 Mini Cooper S on Saturday with the standard seats and still no damn lumbar adjustment! Come On Mini ! Hopefully there is a kit for it. The car felt like a big comfortable car with Mini characteristics . I'd seriously consider it if there was a lumbar fix for it.
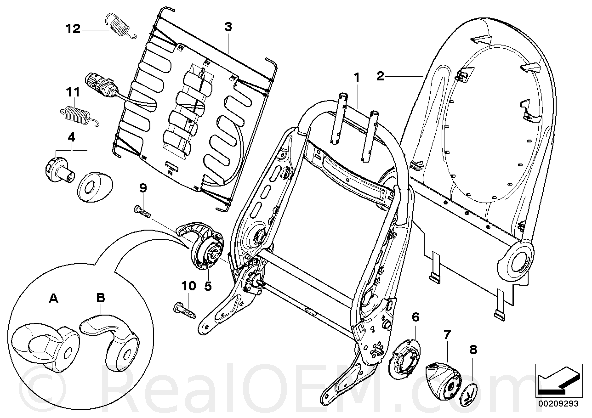
The part numbers for the R52 are different so it's likely the R55/6/7/8/9 kit won't fit. You are probably best going to a dealer and ordering the parts from them. The parts diagram for your seats is:
Did this Friday night on my newly-acquired 2013 JCW. Super easy install, seriously. It took me exactly 50 minutes, from start to finish, including getting out my tools, etc.
The hardest part was, as everyone else has mentioned, getting those white hooks out of the bottom holes. If not for that, this would have been 30 minutes, tops. I didn't have pliers that I could grab onto the white hooks with to manipulate or bend them, so I was stuck manipulating them out with my hands. The driver's side, which I did first, didn't take me too long, but the passenger side was a bear. I probably struggled with the first hook on that side for 10 min+. Once you get the first one out, you have more than enough free range of motion to wiggle the other one free.
Also - at the recommendation of others, I grabbed a new pair of mechanix gloves to do this, as my old ones are pretty oil-soaked, to protect my hands. They honestly got in the way more than they helped, since I lost that all-important finger-feel. I decided to ditch the gloves after a few minutes, and didn't have any issues scratching my hands up, or anything like that. There really isn't much inside of the seats that's sharp, aside from the ends of the hooks themselves.
Otherwise - don't hesitate to perform this mod. It really is easy to do (coming from someone who knows what they're doing, but has absolutely terrible luck performing mods), and the payoff is better than you can imagine.
FYI - I'm in Plano, TX, I ordered them from Sewell (over the internet) on Tuesday, had the parts in my hands on Thursday for both seats.
edit - I wish I had known about this mod last September. If I had, I might not have gotten rid of our 2011 S. All for the best, though, since we have what we really wanted now.
I too wanted to take a moment and thank everyone that has supported this thread thru the years. My back has been bad for quite sometime and getting worse. Daily commute for the last 6 plus years has been 128 miles per day. My Mini seats had been better than most but over the past year really weren't cutting it anymore. I didn't even realize there was a retrofit kit until I called my dealer looking for a seat with adjustable lumbar. When I heard that I started searching and found this thread. I'll have to cancel my appointment, because my wife and I installed the kit this morning. Thanks to this thread it was very straight forward. Took about 30 to 45 minutes because I decided to detail everything while I had the drivers seat out.
As an update the retrofit kit is 52 10 7 347 727. It contains everything you need to do the job and replacements for anything you might loose or break in the process.
Cheers!
~MattS
I installed it in the past and it made a tremendous difference!
Feel better
Thanks for all the great info. Just did this on my LCi car. Wow was it easy, under 20 minutes to do 1 seat. What a great mod wish I had done it on my original R56 as well.
Thanks for all the great info. Just did this on my LCi car. Wow was it easy, under 20 minutes to do 1 seat. What a great mod wish I had done it on my original R56 as well.
i realize this is an old thread but is there a chance if any u guys know if this would work for the R56 models? i.e. i gota 2009 MCS and 5 spine surgeries and need 1 more prolly 2...i really could use the lumbar support if i can put it in my factory seats some way --- they are the fake leather/vinyl seats.....of coarse...
The R56 - R59 retrofit is here. The one above on this page is for Gen 1 2002-2008 MINIs.
They comes with the lumbar and the turn handles and cups. Retrofit pics a couple pages back in this thread. I have them and really help the lower lumbar.
R56- R59 MINI Cooper ( Gen 2 ) 52107347727 & 52107347728
i realize this is an old thread but is there a chance if any u guys know if this would work for the R56 models? i.e. i gota 2009 MCS and 5 spine surgeries and need 1 more prolly 2...i really could use the lumbar support if i can put it in my factory seats some way --- they are the fake leather/vinyl seats.....of coarse...
i realize this is an old thread but is there a chance if any u guys know if this would work for the R56 models? i.e. i gota 2009 MCS and 5 spine surgeries and need 1 more prolly 2...i really could use the lumbar support if i can put it in my factory seats some way --- they are the fake leather/vinyl seats.....of coarse...
Doc, the retrofit applies (mainly) to sports seats without lumbar adjustment as I think Mini cheapskated them by using the same backrest foam as for seats with lumbar adjustmtent, so the 'without' seats have a void in the foam where the adjuster bulge should go.
Having vinyl seats, you could have sports or non-sports seats. The sports seats have higher wings either side of the seat base but that is just foam styling rather than metal supports.
You can put the last seven digits of your VIN number into this site to see the original ordering specification for your car. Sports seats would be option 481 under 'Standard Equipment'. http://www.bimmer.work/
I suspect (but don't know for sure) that the adjustable lumbar could be added to a non-sports seat but it might give a choice between too much lumbar support and even more support than that, as there (presumably) won't be a void in the backrest foam of non-sports seats since none of those have lumbar adjusmtent.

 10-16-2013, 04:10 AM