When you click on links to various merchants on this site and make a purchase, this can result in this site earning a commission. Affiliate programs and affiliations include, but are not limited to, the eBay Partner Network.
Bentley manual says insert until "flush" but doesnt say flush with what. I assume the crankcase.
The thing I like about the FELPRO seal (ELRING also has one...maybe its the original supplier since manual shows the white plastic guide) is the come with a disposable plastic guide.
There is a small pin on the block, on the left side, which will prevent seal to go any deeper. Can't find any pic now, but once you remove the seal, you will see it.
So use this guide for a new seal you will buy. How many times did you already replace this seal? May be it's time for 40$... honestly, I didn't pay 40 for it, but I believe your issue is the depth, and I didn't have it due to new hub.
The last one I used (still installed) is Victor Renz.
There is a small pin on the block, on the left side, which will prevent seal to go any deeper. Can't find any pic now, but once you remove the seal, you will see it.
When I did mine the first time I did not pay enough attention. I installed it wet/oiled and did not clean the hub, it had also received the lightest scratch from when I use a tool to remove the old one. I had also taken it off the centre piece to have a look at it which was probably a big mistake because when I removed it when it failed I could clearly see the fine edge had flipped causing two creases. It failed within a week.
Second one, I took the finest emery cloth I could get (don't know the spec) and lightly cleaned the hub for a good 20 minutes and cleaned all surfaces with petrol rags. I also used the seal with the center piece shown above in white. I installed it dry as per the instructions, as it came out of the box, taking great care to keep it as square on as possible. I made a plastic rim, similar to the plastic pipework others have recommended. Tapped it home to where about 4mm was showing between the face and front of the seal. That was a few months ago, been perfect ever since.
Whatever you do Lex do not remove the centre large nut without all the tools mentioned or your timing will be out, on an interference engine that is fatal.
I wont be touching the large crankcase bolt...dont worry.
I wont have the space to polish the crankcase hub surface like you did when you had it out...therefore I dont know how successful I will.
I didn't have the hub out. There is enough space to get something thin, wooden or plastic with the emery wrapped round it :-) Don't be tempted to use metal like a screw driver. Just takes a bit of patience and time going round and round. Don't pull back a forth, you want any machining marks, no mater how light, to be around and not from back to front if that makes sense.
You will have to inspect the hub for damages like mentioned - I also had a huge scratch on it. Turns to be quite soft metal btw.
To prevent such scratches, all you need to do is put screwdriver on TOP of the seal, and push it down (you may need some small hammer). As as said, there's a small pin at 9o'clock which stops at certain depth, so it will make the bottom of seal pop out once top of it goes in.
But well, you are doing it not first time, I am sure you already know the technique
I got around to polishing the crankshaft hub using NEVR DULL and put in a new Fel Pro seal. This is the 3rd seal in 7000 miles. I swear these Mini's just force you to do the most humiliating junk. Polishing a freaking crankshaft hub so it wont leak. ONLY Mini.
I tried a dremel tool with felt polisher but the felt flew everywhere and got onto the timing chain so I gave up on that.
Even 180 grit emery cloth was WAY WAY too aggressive. DONT USE EMERY CLOTH, YOU WILL SCRATCH THE HELL OUT OF THE HUB AND THE SEAL WILL LEAK
Nevr Dull ended up being the best option.
There is just barely enough space to get your finger on to the end of that damn hub to polish it. It definitely looked a lot smoother after an hour of polishing.
BEFORE:
AFTER:
Scudder44, there is a lip behind the seal which would prevent you from pushing the seal any farther back. Its on the bottom, but Im not sure its there as a limiter/stop. Anyway I circled it in yellow:
I didnt get the seal in perfectly straight. Its slighly deeper up top. I tried pounding it straight but was afraid I would damage it. Im sure its gonna leak again. Fingers crossed.
guy, you have used a metal polish? what are you thinking? we are not talking about polishing the family silver. All you have done is cleaned it, you have not removed the scratches, I can see them plainly. I said use some fine grade emery paper and go around, your new seal will fail. Also to whoever posted that their seal is squint, that will also fail. Come on. This is not rocket science. I might sound rude here but what is the point of asking for assistance it you ignore the advice?
guy, you have used a metal polish? what are you thinking? we are not talking about polishing the family silver. All you have done is cleaned it, you have not removed the scratches, I can see them plainly. I said use some fine grade emery paper and go around, your new seal will fail. Also to whoever posted that their seal is squint, that will also fail. Come on. This is not rocket science. I might sound rude here but what is the point of asking for assistance it you ignore the advice?
Dude you need a drink.
Yes EXACTLY I cleaned it. The scratches cannot be removed with the hub on the crank. 180 grit emery is too aggressive. It makes the scratches worse.
Well, no, but that isn't saying much because the car had only been driven maybe 100 miles since I changed the seal. I fully expect it to start leaking again since I didn't get it in perfectly straight.
After a few hundred miles I'll take another look and get back to you.
The crank shaft end was definitely rusty and rough so I'm sure that polishing it should help.
Thanks for the input. To replace the seal, I would like to use the pelicanparts seal installation tool to ensure the seal goes in straight. Did you buy the tool so that maybe I can rent from you? Or if I buy it would you be interested in renting it should you ever need to do it again?
Thanks for the input. To replace the seal, I would like to use the pelicanparts seal installation tool to ensure the seal goes in straight. Did you buy the tool so that maybe I can rent from you? Or if I buy it would you be interested in renting it should you ever need to do it again?
Sorry for hijacking this thread, but I finally bought the MINI crank seal installation tool (shown in the pictures) and would like to offer it for rental to fellow MINI owners here, helping others while recouping a fraction of the initial investment. It is quite a expensive tool for how simple it actually is, but it really takes the guess work out of the equation: It has a lip which when bottoms out will set the correct depth of the seal, and you also don't need to worry about the seal going in crooked. Shoot me an message if you are interested, it will be much much cheaper than buying it up-front.
Thanks!
Originally Posted by Lex2008
Bentley manual says insert until "flush" but doesnt say flush with what. I assume the crankcase.
The thing I like about the FELPRO seal (ELRING also has one...maybe its the original supplier since manual shows the white plastic guide) is the come with a disposable plastic guide.
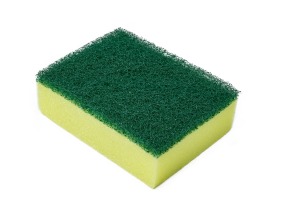
Another way of very lightly cleaning the crankshaft hub and other bits on engines without causing scratches is a kitchen (plastic) scouring pad. Now in this thread scenario, where the crankshaft hub is not removed it may be difficult to get the scouring pad around and in between the hub and surround. In this case you can cut off the sponge part of the pad or buy a kitchen scouring pad without the sponge as these are much thinner. As always there is a caveat, the kitchen scouring pad could (they are designed not to, so that you do not eat plastic bits on your kitchen wear) leave plastic pad debris (hairs) in the crankshaft area or on the hub so be careful. I removed the hub (which is too much for a simple crankshaft seal replacement job) because I did a timing chain change. So it was easier for me to clean the crankshaft hub with the kitchen scourer when the hub was not installed. Pictures below,
Last edited by valle; 11-26-2019 at 05:34 AM.
Reason: Typo
About to tackle this on my SO's 2011 base cooper. Reading pelican parts DIY for the front main seal they list nothing regards to locking the tensioner and getting the belt off which is odd. Anyways one question I do have as I haven't pulled it apart to look just yet.. is the seal set inside the block? IE its not flush with with edge?
About to tackle this on my SO's 2011 base cooper. Reading pelican parts DIY for the front main seal they list nothing regards to locking the tensioner and getting the belt off which is odd. Anyways one question I do have as I haven't pulled it apart to look just yet.. is the seal set inside the block? IE its not flush with with edge?


 07-24-2017, 11:42 AM