
How To Install a JCW Exhaust on a Countryman S ALL4
#1
 01-31-2020 | 02:27 PM
Thread Starter
|
Neutral
Joined: Jan 2020
Posts: 9
Likes: 11
From: Miami, FL
Install a JCW Exhaust on a Countryman S ALL4
This How-To is to present the install of the JCW Exhaust on the Mini Countryman S ALL4. Most of the aftermarket exhausts would have a similar process.
Went with the JCW Exhaust mostly because of the tone. It's a bit more aggressive than the stock but not annoying and over the top on an otherwise stock car. The fit and finish on the JCW is excellent as well which I'd expect from a factory part. Install was fair simple and I was able to complete it alone.
A note before I get started. TO complete this install you need to get the car raised in the air to access the underside of the car. I will not go into detail on how to do that with a floor jack and jackstands. I use a lift to complete the work. Having said that, please search and read up on the proper procedure to lift your car and how to support it safely. This is very important and no joke. Please support the car well with good sturdy stands that are rated to support much more weight than what the Mini weighs. This is one of those cases where it is not wise to be cheap. Now that I have that disclaimer out of the way....
Tools needed:
- Range of sockets from 10mm to 21mm
- A ratchet wrench and a breaker bar (some bolts are "set" in their place) is minimum. An impact gun for some of the larger bolts would be awesome. Use the impact with care, don't over do it.
- A few extensions for your sockets. I would say a 12" to 14" one is a must.
- Small prybar or old flathead screwdriver
- A pair or two of pliers
- WD40 to loosen some of the bolts that might have some corrosion
- Hacksaw or reciprocating saw or cut-off wheel
- Way to raise and support the car. A floor jack or two and 4 jackstands as a minimum. I use my lift in the how-to. If you have access to or can rent time with a lift, it makes life far easier.
- Optional but nice to have: Pipe expander.
Lets get started.
First, get the car in the air and supported safely.
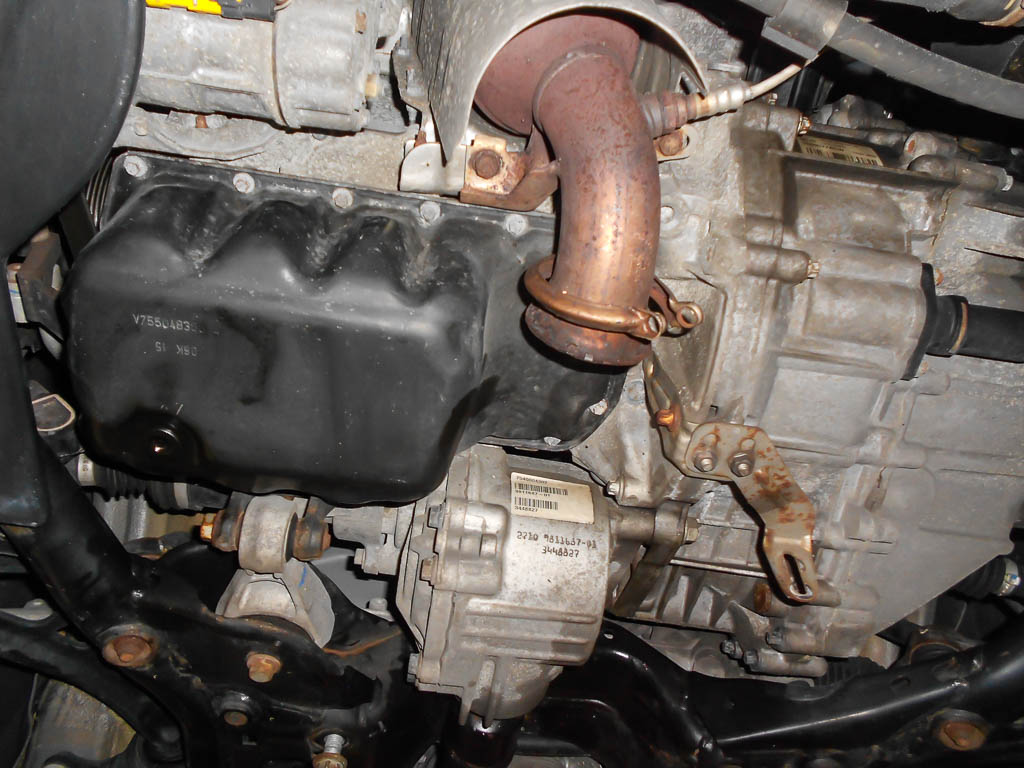
The Mini Countryman S exhaust (I assume all Countryman's are the same) is a single welded unit that attaches at a the bottom of the downpipe at the front of the car with a V-Band clamp. We need to remove it from the car as one unit and I found it easiest to remove it from front to back. I bought my car used and it was a northern car. The rust and oxidation on some of the bolts is pretty bad. However, even for clean cars WD40 can be your friend.
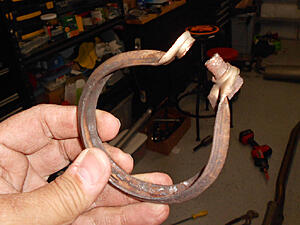
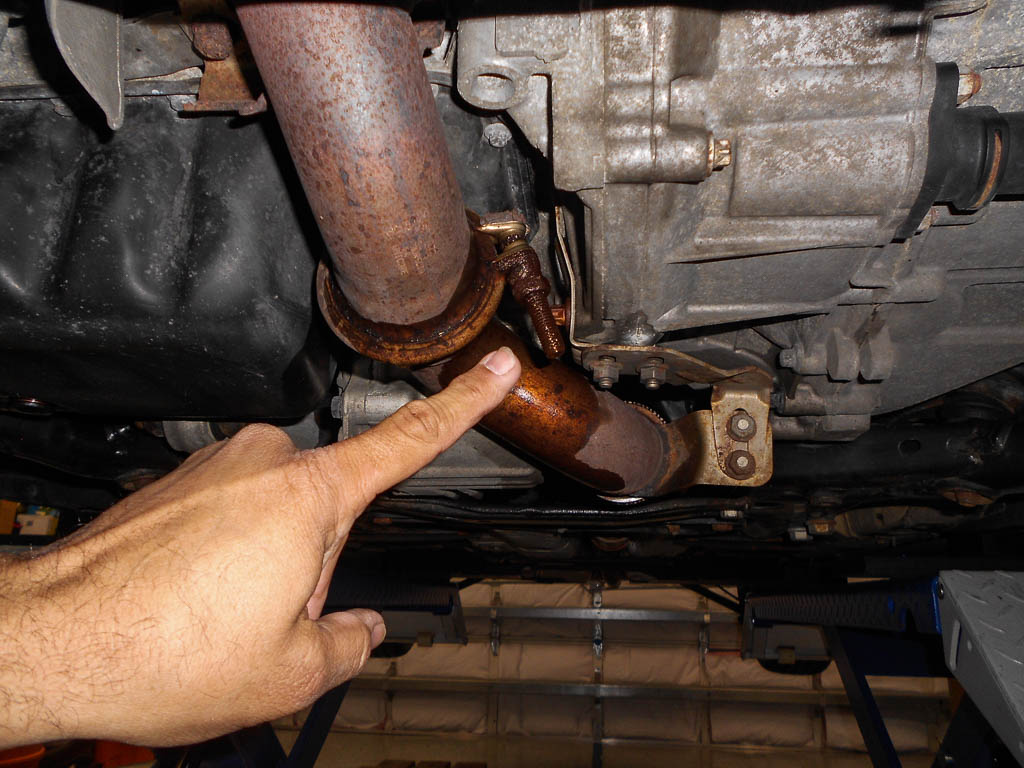
At the front of the car right off the downpipe coming down in front of the engine, you'll find the V-Clamp that connects the downpipe to the rest of the exhaust. You need to remove the bolt and clamp. Easy way to get it off is to pry one side at a time up and over the pipe flanges. Once there, your pliers can get your clamp off and up onto the downpipe. In the shot, you will see the bolt with a generous amount of WD40 on it to help me get it off. In the end, unfortunately, my bolt snapped.

Clamp with the snapped bolt. Not the highest quality bolt, to be honest.
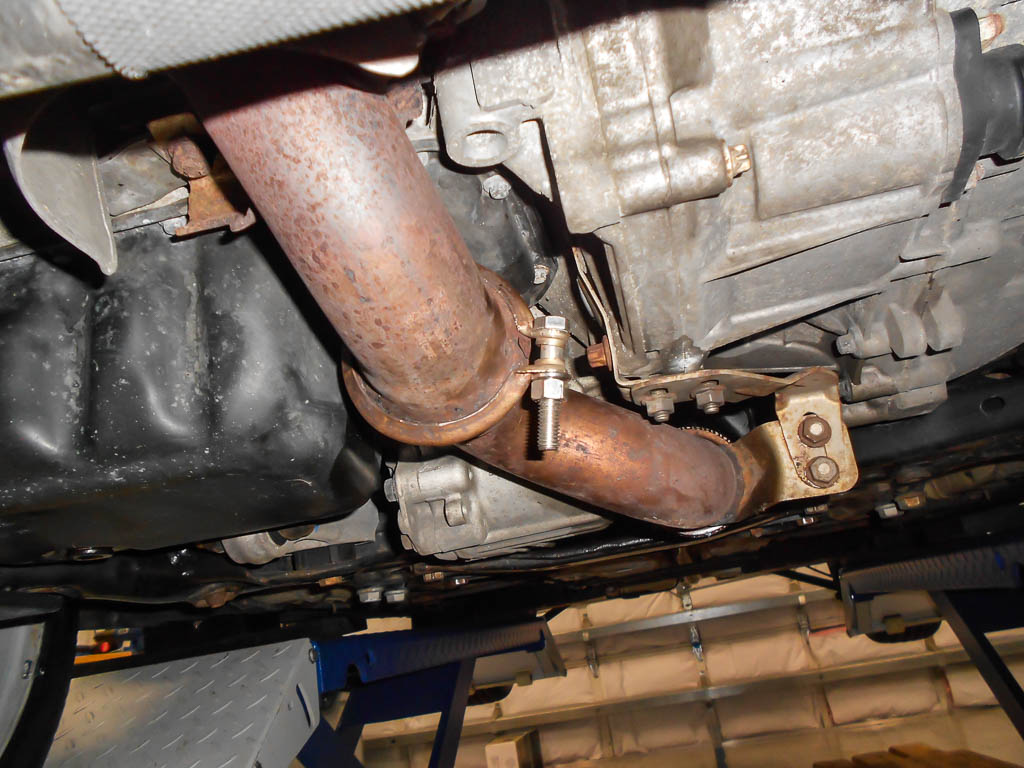
Once you have that V-clamp off, move to the next pair of bolts shown below. Once those two bolts are loose, you can pull the exhaust off the downpipe with the play the flex pipe gives you.
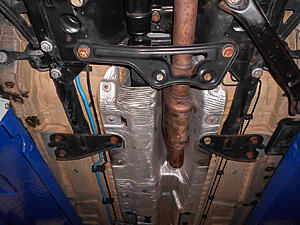
Next you have a series of cross members that are on the car. Four of them in total, two up by the engine and two in the middle area under the back seats. I remove the rear of the two cross members shown in the photo below. This is the crossmember that is physically attached to the exhaust pipe. An impact wrench here is your friend. Again, with care and moderation (yes impact guns are variable with that trigger) because you don't want to break a bolt in place. The reason I leave the front crossmember of these two in place is because it'll hold the exhaust from dropping out up front. Remember, you're disconnected now at the downpipe.
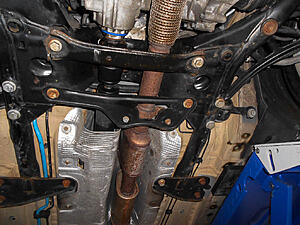
Next move back and remove both of the middle/rear cross members. You can spot them about 2/3 of the way back in the photo below. (Yes this is a shot of the new exhaust installed. I just did not get a clear shot of the two back cross members before) :-). These are held in place with a few 10mm bolts and there is one larger bolt on the rear plate. I remove the bolts on the driver's side and leave one bolt on the passenger side of each loose just to swing the plates out of the way.

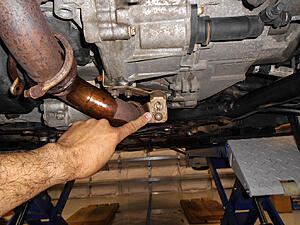
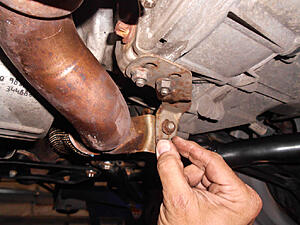
At this point the last thing holding the exhaust up are the brackets at the back holding up the rear muffler can and the fron corss member we left in place. There are two brackets, one near the extreme left and rear corners of the car. You'll need the extension and a 13mm socket if memory serves. The photo shows the hanger bracket with the two nuts holding it up. I removed the outside nut on both sides first and loosened the second one to the point you can remove it with your fingers. Since I am alone doing this, I then hold the weight of the rear muffler up with one had while I remove the last nut on each side with the other. A second pair of hands is not a bad thing. Another floor jack works too. If you have a buddy helping great, if not, it's not insanely heavy and it can be done carefully. The bracket is in the shot below.

At this point with the muffler hanger brackets off you can lay the exhaust down in back and then pull it back gently to pull it out from above the front bracket we left in place earlier. Once there, your exhaust is out. There are no O2 sensors or anything like that to worry about.
Below are the hanger brackets that should still be on the rear muffler if you did this as I described above.

If you look on the inside of the bracket, you'll see that you have one marked "L" and the other "R". Drive and passenger side basically. You will be swapping these over to the new exhaust and these will help you make sure you got them on the correct sides.

Now comes the cutting. What many fear!
Not a huge deal. All you need to do is line up the new exhaust pipe next to the old system. You can use the mandrel bends in the pipe to line it up right. Below is the shot of the new pipe aligned to the old system. Note that the cross member I left bolted to the old pipe is still there. You will be reusing that in a bit.
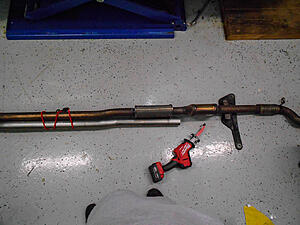
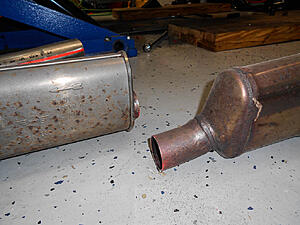
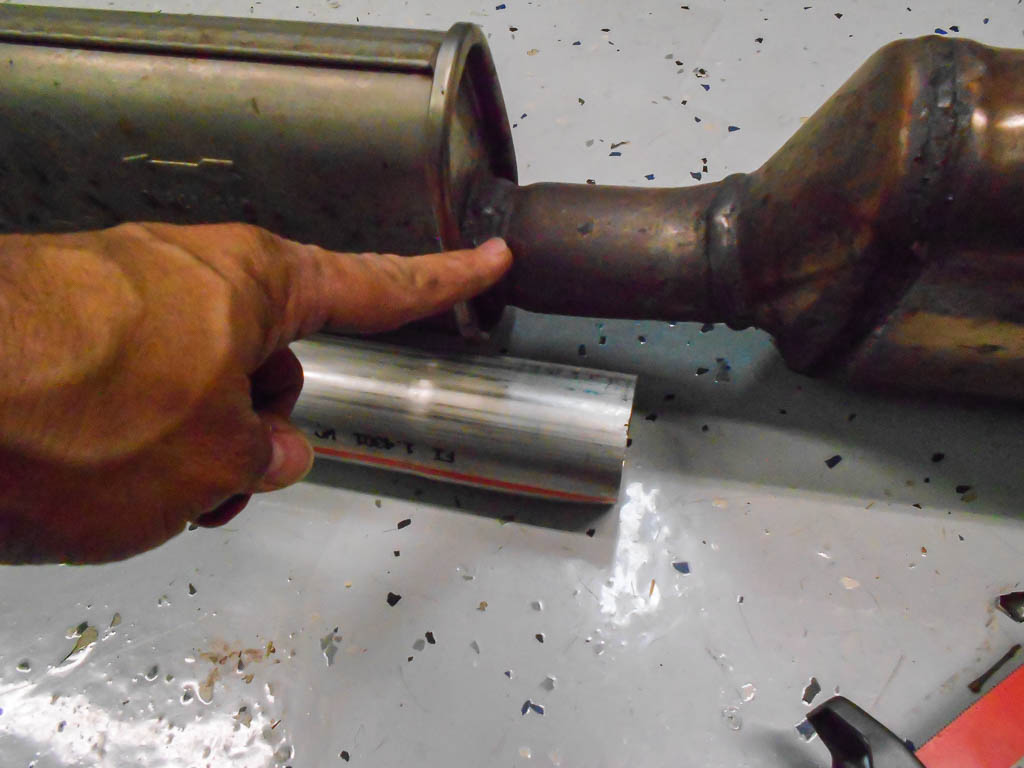
Here is the close up of where I cut the old exhaust. You will be cutting right where I am pointing. Basically, right in front of the resonator. If you look closely you will see a flared section on the new pipe. That will slip over the old pipe where you cut it. This is why the cut is 2 or 3 inches behind the end of the new pipe. The new pipe will slip over the old and get clamped in place.

Below is where I made the cut.
Once I made the cut, I went through the trouble of cleaning off the cut well. Made sure the outside of the pipe was nice and clean so the slip fit would be easy. Also de-burred the inside of the pipe. Just making it nice to "help the flow". :-)
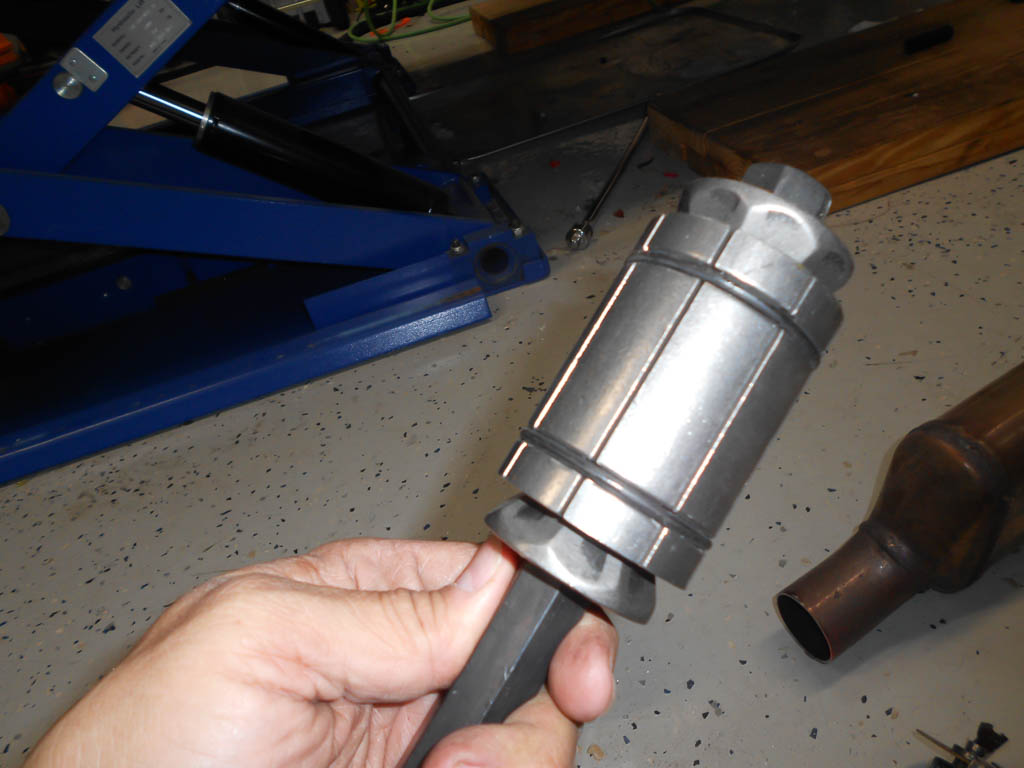
Once the old pipe cut area is good, I took a look at the new pipe. I used the pipe expansion tool to correct the new pipe. My pipe had a bend on the flared tip and the pipe expander simply let me make it round again and a slight expansion makes it easier to assemble. You may not even need one, but just in case, having one is easier than doing it an 1/8" at a time with a pair of pliers. The pipe expander looks like this:

The tool in the pipe as I expand it and then I come in with a metal hammer to tidy up the bend and make it perfectly round again.

Next you transfer the hanger brackets onto the new JCW Exhaust Muffler that will go up in the back. Remember to check the "L" and "R" designation on the brackets to position them correctly.
Once that is done you can reinstall from front to back again. You take the old exhaust pipe section from the front of the exhaust that you just cut. It is the part with the Cat and flex pipe. It will have the cross member still attached. Go up the front of the car and put the V-Clamp back in place on the down pipe.

Slide the old pipe section over the cross member you left in place and let it hang there and place the two bolts back on the bracket that is attached to the old exhaust section. This will hold it in place. I left the two bolts just started on a few threads. This way the pipe can move around as you slip the new pipe over the cut end.
At this point, you can bring the V-Clamp back into position with the down pipe and old exhaust section seated back together. Take your time here. You have to wrestle that clamp back in place but with some pliers and some "persuasion" you'll get the pipes fitted and the clamp over both ends of the pipe. This is what keeps the seal there. Make sure it's seated right and tighten it back down. Don't worry about the old section moving on the back side to slip the new pipe one. The flex section has plenty of play to make that work easily. Note I have a new stainless bolt in place. The rusted one is gone.

Grab one of the supplied exhaust clamps and place it over the old section of the exhaust. Now slip the new exhaust pipe (the one without the resonator) and move one of the cross members back under it to hold it up. Slide the flared end over the old section pipe and leave the clamp loose for now. The mid pipe should be able to stay in place without falling now.

Now grab the new rear muffler and lift it into place. You should already have transferred over the hanging brackets. Again, two people would be easier, but one can do it. Lift the muffler into place and thread on a nut on the inside bolt on the bracket on each side. Throw the second supplied clamp over the mid pipe and slide it back about a foot or two. The muffler and new mid pipe should have plenty of sway/play in them to let you slip the muffler's flared pipe over the new pipe. Position the clamp in place and you should look like this.

At this point slide the pipe into the flare enough so you do not see any gap in the slits on the side. Position the clamp and tighten it down. Don't go nuts but enough to hold it in place.
Move back to the front and, again, make certain there is no gap in the slits on the flared end of the pipe. Position the clamp and tighten it to hold for now.
Go to the hanger brackets again and put in the two other nuts and tighten the bolts back there.
Now that the muffler has both brackets tightened the general position should be good. Check the rear to make sure both exhaust pipes are in the center of the opening. The hanger brackets have next to no adjustment. If the muffler exits or "off" you will need to loosen the clamps and move the pipe back or forward to get the tips right. You may have to twist the mid pipe a touch as well. Point is, a little time and patience gets the alignment right.
Once you are happy it's all good. Tighten the clamps down well.
Next you will need to button everything up. Replace the nuts on the flex pipe section bracket.
Bring all the cross members back into place and tighten down the bolts. Don't go nuts on the tightness of the bolts on the center cross members. They are only 10mm bolts. You don't need to torque them down huge. Tight with a hand ratchet is good enough.
Go over everything and make sure it's all tight. Check the clamps again.
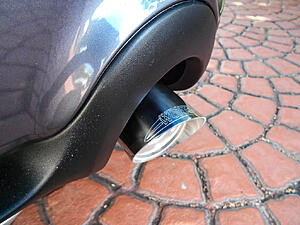
Last step is to place the gorgeous JCW tips on the end of the final exhaust pipes. They tighten with an Allen screw. Again, slide them in and out, make sure the logo is straight up and tighten the set screws.
Once you are done, and if you can do it safely with the car up on the jack stands or lift, run the engine. Listen to make sure you hear no "rattles". If everything is tight you are good. Bring the car down and enjoy it.
You want to run the car a few times driving around a bit. After about a week or a few decent trips, lift the car and recheck the clamps. Just make sure they are still tight. With a few heat cycles the clamps can expand and loosen. Most likely you'll be good, but it does not hurt to check.
All done.... enjoy the ride!
Went with the JCW Exhaust mostly because of the tone. It's a bit more aggressive than the stock but not annoying and over the top on an otherwise stock car. The fit and finish on the JCW is excellent as well which I'd expect from a factory part. Install was fair simple and I was able to complete it alone.
A note before I get started. TO complete this install you need to get the car raised in the air to access the underside of the car. I will not go into detail on how to do that with a floor jack and jackstands. I use a lift to complete the work. Having said that, please search and read up on the proper procedure to lift your car and how to support it safely. This is very important and no joke. Please support the car well with good sturdy stands that are rated to support much more weight than what the Mini weighs. This is one of those cases where it is not wise to be cheap. Now that I have that disclaimer out of the way....
Tools needed:
- Range of sockets from 10mm to 21mm
- A ratchet wrench and a breaker bar (some bolts are "set" in their place) is minimum. An impact gun for some of the larger bolts would be awesome. Use the impact with care, don't over do it.
- A few extensions for your sockets. I would say a 12" to 14" one is a must.
- Small prybar or old flathead screwdriver
- A pair or two of pliers
- WD40 to loosen some of the bolts that might have some corrosion
- Hacksaw or reciprocating saw or cut-off wheel
- Way to raise and support the car. A floor jack or two and 4 jackstands as a minimum. I use my lift in the how-to. If you have access to or can rent time with a lift, it makes life far easier.
- Optional but nice to have: Pipe expander.
Lets get started.
First, get the car in the air and supported safely.
The Mini Countryman S exhaust (I assume all Countryman's are the same) is a single welded unit that attaches at a the bottom of the downpipe at the front of the car with a V-Band clamp. We need to remove it from the car as one unit and I found it easiest to remove it from front to back. I bought my car used and it was a northern car. The rust and oxidation on some of the bolts is pretty bad. However, even for clean cars WD40 can be your friend.
At the front of the car right off the downpipe coming down in front of the engine, you'll find the V-Clamp that connects the downpipe to the rest of the exhaust. You need to remove the bolt and clamp. Easy way to get it off is to pry one side at a time up and over the pipe flanges. Once there, your pliers can get your clamp off and up onto the downpipe. In the shot, you will see the bolt with a generous amount of WD40 on it to help me get it off. In the end, unfortunately, my bolt snapped.
Clamp with the snapped bolt. Not the highest quality bolt, to be honest.

Once you have that V-clamp off, move to the next pair of bolts shown below. Once those two bolts are loose, you can pull the exhaust off the downpipe with the play the flex pipe gives you.

Next you have a series of cross members that are on the car. Four of them in total, two up by the engine and two in the middle area under the back seats. I remove the rear of the two cross members shown in the photo below. This is the crossmember that is physically attached to the exhaust pipe. An impact wrench here is your friend. Again, with care and moderation (yes impact guns are variable with that trigger) because you don't want to break a bolt in place. The reason I leave the front crossmember of these two in place is because it'll hold the exhaust from dropping out up front. Remember, you're disconnected now at the downpipe.

Next move back and remove both of the middle/rear cross members. You can spot them about 2/3 of the way back in the photo below. (Yes this is a shot of the new exhaust installed. I just did not get a clear shot of the two back cross members before) :-). These are held in place with a few 10mm bolts and there is one larger bolt on the rear plate. I remove the bolts on the driver's side and leave one bolt on the passenger side of each loose just to swing the plates out of the way.

At this point the last thing holding the exhaust up are the brackets at the back holding up the rear muffler can and the fron corss member we left in place. There are two brackets, one near the extreme left and rear corners of the car. You'll need the extension and a 13mm socket if memory serves. The photo shows the hanger bracket with the two nuts holding it up. I removed the outside nut on both sides first and loosened the second one to the point you can remove it with your fingers. Since I am alone doing this, I then hold the weight of the rear muffler up with one had while I remove the last nut on each side with the other. A second pair of hands is not a bad thing. Another floor jack works too. If you have a buddy helping great, if not, it's not insanely heavy and it can be done carefully. The bracket is in the shot below.

At this point with the muffler hanger brackets off you can lay the exhaust down in back and then pull it back gently to pull it out from above the front bracket we left in place earlier. Once there, your exhaust is out. There are no O2 sensors or anything like that to worry about.

Below are the hanger brackets that should still be on the rear muffler if you did this as I described above.

If you look on the inside of the bracket, you'll see that you have one marked "L" and the other "R". Drive and passenger side basically. You will be swapping these over to the new exhaust and these will help you make sure you got them on the correct sides.

Now comes the cutting. What many fear!
Not a huge deal. All you need to do is line up the new exhaust pipe next to the old system. You can use the mandrel bends in the pipe to line it up right. Below is the shot of the new pipe aligned to the old system. Note that the cross member I left bolted to the old pipe is still there. You will be reusing that in a bit.

Here is the close up of where I cut the old exhaust. You will be cutting right where I am pointing. Basically, right in front of the resonator. If you look closely you will see a flared section on the new pipe. That will slip over the old pipe where you cut it. This is why the cut is 2 or 3 inches behind the end of the new pipe. The new pipe will slip over the old and get clamped in place.
Below is where I made the cut.

Once I made the cut, I went through the trouble of cleaning off the cut well. Made sure the outside of the pipe was nice and clean so the slip fit would be easy. Also de-burred the inside of the pipe. Just making it nice to "help the flow". :-)
Once the old pipe cut area is good, I took a look at the new pipe. I used the pipe expansion tool to correct the new pipe. My pipe had a bend on the flared tip and the pipe expander simply let me make it round again and a slight expansion makes it easier to assemble. You may not even need one, but just in case, having one is easier than doing it an 1/8" at a time with a pair of pliers. The pipe expander looks like this:
The tool in the pipe as I expand it and then I come in with a metal hammer to tidy up the bend and make it perfectly round again.

Next you transfer the hanger brackets onto the new JCW Exhaust Muffler that will go up in the back. Remember to check the "L" and "R" designation on the brackets to position them correctly.
Once that is done you can reinstall from front to back again. You take the old exhaust pipe section from the front of the exhaust that you just cut. It is the part with the Cat and flex pipe. It will have the cross member still attached. Go up the front of the car and put the V-Clamp back in place on the down pipe.
Slide the old pipe section over the cross member you left in place and let it hang there and place the two bolts back on the bracket that is attached to the old exhaust section. This will hold it in place. I left the two bolts just started on a few threads. This way the pipe can move around as you slip the new pipe over the cut end.

At this point, you can bring the V-Clamp back into position with the down pipe and old exhaust section seated back together. Take your time here. You have to wrestle that clamp back in place but with some pliers and some "persuasion" you'll get the pipes fitted and the clamp over both ends of the pipe. This is what keeps the seal there. Make sure it's seated right and tighten it back down. Don't worry about the old section moving on the back side to slip the new pipe one. The flex section has plenty of play to make that work easily. Note I have a new stainless bolt in place. The rusted one is gone.
Grab one of the supplied exhaust clamps and place it over the old section of the exhaust. Now slip the new exhaust pipe (the one without the resonator) and move one of the cross members back under it to hold it up. Slide the flared end over the old section pipe and leave the clamp loose for now. The mid pipe should be able to stay in place without falling now.
Now grab the new rear muffler and lift it into place. You should already have transferred over the hanging brackets. Again, two people would be easier, but one can do it. Lift the muffler into place and thread on a nut on the inside bolt on the bracket on each side. Throw the second supplied clamp over the mid pipe and slide it back about a foot or two. The muffler and new mid pipe should have plenty of sway/play in them to let you slip the muffler's flared pipe over the new pipe. Position the clamp in place and you should look like this.

At this point slide the pipe into the flare enough so you do not see any gap in the slits on the side. Position the clamp and tighten it down. Don't go nuts but enough to hold it in place.
Move back to the front and, again, make certain there is no gap in the slits on the flared end of the pipe. Position the clamp and tighten it to hold for now.
Go to the hanger brackets again and put in the two other nuts and tighten the bolts back there.
Now that the muffler has both brackets tightened the general position should be good. Check the rear to make sure both exhaust pipes are in the center of the opening. The hanger brackets have next to no adjustment. If the muffler exits or "off" you will need to loosen the clamps and move the pipe back or forward to get the tips right. You may have to twist the mid pipe a touch as well. Point is, a little time and patience gets the alignment right.
Once you are happy it's all good. Tighten the clamps down well.
Next you will need to button everything up. Replace the nuts on the flex pipe section bracket.

Bring all the cross members back into place and tighten down the bolts. Don't go nuts on the tightness of the bolts on the center cross members. They are only 10mm bolts. You don't need to torque them down huge. Tight with a hand ratchet is good enough.
Go over everything and make sure it's all tight. Check the clamps again.
Last step is to place the gorgeous JCW tips on the end of the final exhaust pipes. They tighten with an Allen screw. Again, slide them in and out, make sure the logo is straight up and tighten the set screws.

Once you are done, and if you can do it safely with the car up on the jack stands or lift, run the engine. Listen to make sure you hear no "rattles". If everything is tight you are good. Bring the car down and enjoy it.
You want to run the car a few times driving around a bit. After about a week or a few decent trips, lift the car and recheck the clamps. Just make sure they are still tight. With a few heat cycles the clamps can expand and loosen. Most likely you'll be good, but it does not hurt to check.
All done.... enjoy the ride!
The following 2 users liked this post by luis_v:
Mini-Titan (12-23-2020),
oqy1977 (03-26-2021)


Thread
Thread Starter
Forum
Replies
Last Post
Boneman
1st Gen Countryman (R60) Talk (2010-2015)
2
07-03-2015 06:26 PM
ECSTuning
Drivetrain Products
0
05-19-2015 02:42 PM
ECSTuning
Vendor Classifieds
0
05-19-2015 02:40 PM
Profile36
MINI Parts for Sale
4
11-19-2014 06:17 AM