
How To Maintenance :: Changing FRONT Brake Pads for Beginners!
#126
 08-01-2008, 12:49 PM


3rd Gear
Join Date: Oct 2005
Location: Las Vegas
Posts: 237
Likes: 0
Received 0 Likes
on
0 Posts
#127
08-01-2008, 02:27 PM

a good soak
I read ..... I did not believe
I tried.....I recommend
#128
08-03-2008, 07:13 AM

1st Gear
Join Date: Mar 2005
Location: Chicago (Grayslake), IL
Posts: 40
Likes: 0
Received 0 Likes
on
0 Posts
Just wanted to say thanx for the great How-To. I just replaced my front pads and rotors last night without too much of hiccup. If anyone's wondering, the rotors are very easy to change. You have to remove the caliper mounting bracket and then the T50 torx bolt and the rotor comes off.
Did the proper bedding in procedure from Zeckhausen racing, got the smoke and all and brakes feel awesome.
Isn't it satisfying to work on something yourself
Neighbor lady walks by and asks "what you're doing?". I say "Changing the brakes on my car," and she says, "Wow, you can do that yourself?! You must be quite handy."
Installing a new exhaust today
#129
08-03-2008, 08:12 AM

What a great article! I did my rotors and brakes last weekend, and this was a great help. A big note to all: the front and rear caliper mounting bolts have a different torque setting. The rear is 48 ft/lbs, and the front is 81ft/lbs. Don't put 81 on the back, or you risk having the bolts shear, and then have to frantically call a buddy to help you go get new hardened bolts, and a metric tap/die set to clean out the threads 
Gary
#130
08-17-2008, 12:20 PM

2nd Gear
Join Date: Jun 2006
Location: Southern Cal
Posts: 71
Likes: 0
Received 0 Likes
on
0 Posts
You may want to get one of these:

Disk Brake Caliper Tool Set from Harbor Freight for $40.00. It has the proper attachments to do both the front and the rears calipers, and will save a lot of wear and tear on you and your calipers.
Disk Brake Caliper Tool Set from Harbor Freight for $40.00. It has the proper attachments to do both the front and the rears calipers, and will save a lot of wear and tear on you and your calipers.
Thanks for the headsup! Good deal!
#131
08-26-2008, 07:32 PM

#132
08-31-2008, 02:08 PM
Not too many do
Old School / New School. Not too many people will tell you to turn the rotors anymore. The guys on Car Talk have stopped turning rotors at their shop, and most of the Mechanics I've talked to and work with say they will only turn rotors for people who demand it. You're right, there are grooves which show up in the rotors after use. Most of them have an RHR of less than 64 thousands of an inch. You can see them, but your fingernail won't catch. Plus, you should never let your brakes get close, but the Brake sensor WILL light up when it's time (some say passed time) to replace your pads.
I have done MANY brake jobs on MANY vehicles and I have NEVER replaced the pads or shoes without having the rotors or drums turned (machined). When you take off the old pads you will notice grooves and ridges on the rotor. You should resurface the rotors to a flat surface for the new pads to seat otherwise you do not get full contact between the pads and rotors. You will have to rely on your brand new pads having to be grooved by applying the brakes to cut the ridges into the new pads to seat against the old rotors. Which in my opinion does not make sense. This is especially the case if you have gone too long and have gone completely thru the abrasive material and into the steel backing of the pad. Once you have metal to metal contact then you will have ALOT of rotor grooving and must likely end up having to replace the rotor. If gone too long it will be to deep to have machined out and the rotor will be passed minimum specs.
If the rotors are too thin to get turned then they need to be replaced anyway. If your going to replace the brake pads you might as well do it right.
If the rotors are too thin to get turned then they need to be replaced anyway. If your going to replace the brake pads you might as well do it right.
#133
09-01-2008, 08:26 AM

3rd Gear
Join Date: Aug 2006
Location: Edmonton, Alberta
Posts: 264
Likes: 0
Received 0 Likes
on
0 Posts
Many thanks for the DIY write up, it was very helpful to me, as this weekend I replaced the rear pads on my '04 MC. (at approx. 73,000 km.)
It was not a very difficult job, but for a first timer as myself, there is some degree of trepidation before starting. I was a little concerned about having to turn in while compressing the piston on the rear brakes, but it was pretty easy using a c-clamp and needle nose pliers in the dimples to turn the piston. Alternated between tightening the clamp and turning the pliers, and it worked fine, was not too hard on the hands.
Now when it comes time to do the fronts it will be a snap.
I did wear out the sensor on the rear, but chose not to replace it. Just bared the two wire strands, twisted them together to close the circuit, a little electrical tape, zip tied, and after about 30 seconds with the key in position #2 the dash light was cleared. Noted that the wear sensor did it's job, as the inner pads were at 3mm, which is minimum thickness according to the Bentley guide.
I retained the rotors, they looked fine, were thicker than minimum spec., and I decided to just put the new Hawk HPS pads in place. BTW, even though the Tire Rack site says the rear HPS pads do not accept the wear sensor, mine had the notch for them, so those who want to retain the wear sensor need not worry about this.
Anyone on the fence about replacing pads and/or rotors on their MINI, just do it!
#134
09-01-2008, 08:37 AM

5th Gear
Join Date: Oct 2006
Location: San Antonio, Texas
Posts: 958
Likes: 0
Received 0 Likes
on
0 Posts
#135
09-26-2008, 03:24 PM

This was a very valuable thread for me during my recent brake pad install and I want to thank all those contributing. Here's a few further tips:
1. Typically the fronts outlast the rears, but not in my case (2004 MCS). At 25K, the warning light came on and I thought it was going to be the front, but the right rear sensor was the one that tripped. The rears were at 15%, the fronts about 30%. I went ahead and replaced them all with stock parts.
2. Because of the emergency brake system on the rear brakes, it is absolutely vital that when compressing the rear caliper pistons, you turn them clockwise - compressing them without turning them just causes the piston to bind up. The HF tool is probably the easiest way to go, but you can typically get by just using a pair of needle-nose pliers as you really don't need to do much if any compression while turning - turning is enough. I was royally confused by the directions in here about why you have to periodically re-adjust the HF tool to take up the slack after each a quarter turn, but I believe it is because the threads in the caliper piston are coarser than the threads in the HF tool so as you turn the piston and it retracts, it retracts faster than the threads on the HF tool push the tool in. All very confusing, but if you simply readjust the tool as you go, you'll have no problem.
3. On the fronts, you don't want the piston to turn during retraction, so you use one of the HF adapters that simply provides a smooth surface to bear on the piston. Or you could use a big C-clamp of some sort. One thing to note on the HF tool is that there is a pin that locks the head to the screw assembly and makes them turn together. If you want to be able to apply pressure without torquing the head, just remove this pin and the head can freely rotate. I did this on the front and compression of the piston was very easy.
4. Judgment call, but I vote NOT to open up the caliper bleed screw during piston retraction - just unscrew the cap on the master cylinder. My MC level came pretty close to the top doing all four wheels, but didn't overflow. There is enough crap going on down at the wheel to not be having to deal with cracking bleed screws, keeping air out of the system, and keeping brake fluid from making a mess. Replace your pads, then if you need to bleed the system, do that separately.
5. To spread the disc brake goop that quiets the pads, use a q-tips or a small paintbrush. Just gloping it on with your fingers or squeezing it from the packet directly onto the brakes will make a huge mess. The critical spots are the areas in the pad carriers that engage the end hooks on the pads, although a little on the places where the caliper bears on the back of the pads is a good idea too. I also first cleaned the places where I put the goop with a small toothbrush and some brake cleaner.
6. Be careful in the rear to make sure your caliper piston properly "catches" the spring clips on the back of the inside pad. You can first put the pad on the piston and then work it over the pad carrier, but I liked putting both pads in the carrier, and then placing the caliper onto the carrier over the pads, making sure you have the piston lined up with the insides of the spring clips. You do this mostly by feel.
Brake maintenance is incredibly dirty cave man mechanics, but it does have a nice payoff in savings.
- Mark
Last edited by markjenn; 09-26-2008 at 03:40 PM.
#136
09-26-2008, 04:18 PM
Join Date: Oct 2005
Location: Car Nut Since 1987, Owner Since Fall 2005, Vendor Since Fall 2007
Posts: 3,499
Likes: 0
Received 0 Likes
on
0 Posts
Don't twist that line, PICS
HEy Gang,
I had a local customer do his brakes and after a few days called to say the brakes "just didnt feel right" Had him come to my partner shop today, put it on the lift, pulled the wheel off and BAM! Twisting brake line.
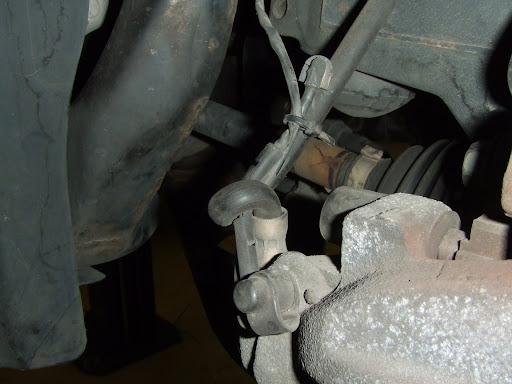
This is how NOT to do it, seems there is just enought line to twist it.
Remove caliper and below you see it done right.

We could see where had the line not been fixed it would have wore thru and started to leak. After the pedal felt better too. Please check them lines.
I had a local customer do his brakes and after a few days called to say the brakes "just didnt feel right"
Had him come to my partner shop today, put it on the lift, pulled the wheel off and BAM! Twisting brake line.This is how NOT to do it, seems there is just enought line to twist it.
Remove caliper and below you see it done right.
We could see where had the line not been fixed it would have wore thru and started to leak. After the pedal felt better too. Please check them lines.
#137
11-07-2008, 06:50 AM

1st Gear
Join Date: Oct 2005
Location: Round Rock (North Austin), TX
Posts: 23
Likes: 0
Received 0 Likes
on
0 Posts
Rotor Torx Bolt drilled out.
I had to drill my torx bolt out on the left front rotor after completing the right front. The first T-50 torx head I used from harbor freight twisted, but I guess it did enough damage to the shallow bolt, that the next torx head I got from AutoZone would not grip. So a third trip up to Autozone for a $20 bolt extractor set was needed. I used the largest one in the set (OEM tools P/N 25467) #5, 19/64 drill bit with the #5 9/16-3/4 extractor. I used an 8" adjustable wrench to turn the extractor and the bolt came right off. I'm not putting one back in.
Last edited by flashaggie; 11-07-2008 at 06:52 AM. Reason: missing title
#138
12-01-2008, 08:42 PM

Hey everyone, 1st time poster here and I just finished reading every page of this guide so I don't sound like a total newbie. Anyway big thanks to OCTANEGUY for this valuable post!!!
Question 1: I have a 2004 Cooper S with ABS and was wondering if there are any complications with pushing the calipers in with the HF tool that may mess with the ABS system? I haven't seen anyone else comment about this and I heard there are some issues in some other cars.
Question 2: No one has really followed up with performance of the various brake pads (besides the initial bedding) and I was wondering how much better certain ones are compared to OEM. In addition where's the best place (read: cheapest)to buy said brakes? I'm thinking about the mintex for my first attempt. Looks like the best place I've found is:
PELICAN PARTS.COM (fronts $25 (out of stock) rear $30 free shipping over $75)
Promini.com (fronts $39.95 rears $37.69 free shipping over $125)
Also I know its been a while since this review was done with the replacement of the Mintex rear brakes...but have any newer models come out that actually have the groove for the brake sensor now?
THANKS EVERYONE!
#139
12-02-2008, 11:29 AM
Question 1: I have a 2004 Cooper S with ABS and was wondering if there are any complications with pushing the calipers in with the HF tool that may mess with the ABS system? I haven't seen anyone else comment about this and I heard there are some issues in some other cars.
- Mark
#140
12-06-2008, 01:28 PM

What a great thread!
I have a new 09 Cooper S, (R56 obviously) and wanted to switch out the dusty OEM pads with Carbotechs. Is the procedure posted here the same? It appears that most of the cars in this thread were doing swaps for wear, and were on R53's. My understanding is that these are different brakes. The R53 JCW brakes are the same as the standard R56 brakes, if I understand that correctly, but the standard R53 brakes are different.
So is the process the same? Any differences? If so, is there a similar how-to for the R56? I searched but didn't see one.
Thanks in advance!
#141
12-07-2008, 02:31 PM
I posted a reply to this about a year ago....it's here somewhere
bottom line is yes there are differences but nothing major. All in all I think the GEN2 is a little easier than the GEN1.
The two primary differences that I recall from doing the fronts on my 07 S after having done GEN1 several times.
1. You don't need the allen socket anymore, everything is a simple metric socket.
2. The front pads did not have the big spring clip that sits inside the piston on the GEN1.
so follow the DIY and just be ready for these two changes. All in all it make the GEN2 easier IMHO.
Short version of the DIY
1. Jack up the corner / remove wheel
2. Remove 2 'slider pins' releasing the caliber..pull caliber and pads free from rotor..don't let it hang by the hose
3. Remove the old pads....clean up dust mess as required (remove brake wear sensor wire if present)
{insert change rotors here if doing that....}
{insert replace MINI wear sensor if 'consumed'}
4. Press piston back to make room for full pad depth (when replacing pads on a 'new' car this is a small amount; a c-clamp works fine for the fronts; you still need to turn the rears clockwise during compression I believe making a tool handy; I can often press pistons back with my thumbs....slow even pressure is what works best)
5. Lightly apply brake lube to pad contact points and place pads into the caliber; position wear sensor if applic' (MINI)
6. Position caliber back into place on the rotor and replace the slider pins (bolts) be sure you do not twist / kink the line
Doing a new car you shouldn't need to worry about the resiv' fluid level but it sure doesn't hurt to monitor it as you press pistons back. If you don't open anything you shouldn't need to bleed the system...but the HAYNES procedure says open the bleeders to relieve pres' when pressing pistons back so then u would possibly want to bleed and top off. I don't...ur choice)
all in all this is a DIY for any disk brake!
#142
12-07-2008, 02:52 PM
Hey everyone, 1st time poster here and I just finished reading every page of this guide so I don't sound like a total newbie. Anyway big thanks to OCTANEGUY for this valuable post!!!
Question 1: I have a 2004 Cooper S with ABS and was wondering if there are any complications with pushing the calipers in with the HF tool that may mess with the ABS system? I haven't seen anyone else comment about this and I heard there are some issues in some other cars.
Not intented as a slam...but doesn't every MINI have ABS as standard equipment? ASC or DSC aside, there's no difference in the brake change procedure as you won't be touching the sensors for those systems (unless you finger-ge-poken someplace you shouldn't)
Question 2: No one has really followed up with performance of the various brake pads (besides the initial bedding) and I was wondering how much better certain ones are compared to OEM. In addition where's the best place (read: cheapest)to buy said brakes? I'm thinking about the mintex for my first attempt. Looks like the best place I've found is:
PELICAN PARTS.COM (fronts $25 (out of stock) rear $30 free shipping over $75)
Promini.com (fronts $39.95 rears $37.69 free shipping over $125)
Also I know its been a while since this review was done with the replacement of the Mintex rear brakes...but have any newer models come out that actually have the groove for the brake sensor now?
OPINION here but I don't think you'll find anyone who's really done a head to head comparison 'tween 'em all nor can I point you to a quantified test by a tester like say Road and Track...performance wize which if not instrument tested in controlled conditions is a subjective issue. What you will find here is opinions like "I use and feel these are the best" and "I sell which are clearly the best". However...less dust is an easier issue to compare and is reported here. Almost ANY decent aftermarket pad is less dust than the OEM. Relize that this is not a MINI/BMW flaw...it is a design decision. Soft pads have great bite....at a cost of dust. Look at 'Benz and BMW....not uncommon to see tons of dust on them too if not continuiously cleaned. OTOH....seldom see dust on any Honda or Toyota product....hard pads common there. My Honda at 75,000 has never dusted the wheels and the pads are 50% worn!
So all you can do is read 'em all and be as confused as all the rest! I would caution that 'racing pads' and the procedures for bedding racing quality pads are not always the best for non racing pads and rotors....you'll read that between the lines here too if you connect the dots. Check the documentation that comes with your pads (and rotors). Let's face it, did your new car come with a brake bedding procedure? Do you think they did that at the factory? Don't damage your new parts..... Hard bedding MIGHT be right for what you buy...and it might not. Some companies say the way to bed the brakes is to drive cautiously for the first several hundred miles....isn't that what's in the owner's manual?
Last edited by Capt_bj; 12-07-2008 at 03:16 PM.
#143
12-16-2008, 04:42 PM
Update to my last post:
I just ordered Mintex Pads (Front and Back) fron Ebay for $68.71 inclusive and both FRONT and REAR pads have the grooves for the wear sensor!
I bought it from seller: "joetlc"
You can probably get it direct from him as well:
MDB2162D & MDB2639D ep (for Mini Coop S '04 )
(336) 591-1108
I just ordered Mintex Pads (Front and Back) fron Ebay for $68.71 inclusive and both FRONT and REAR pads have the grooves for the wear sensor!
I bought it from seller: "joetlc"
You can probably get it direct from him as well:
MDB2162D & MDB2639D ep (for Mini Coop S '04 )
(336) 591-1108
#144
12-20-2008, 04:46 PM
just finished changing my brakes with great success (besided my mistaken assumption that I had a 7mm allen wrench...which I didn't so I had to drive to the parts shop). Anyway, looking at my pads I think I still had a while to go but considering I went 45,000 miles on the same pads was quite impressive.
Anyway, cheapest place for mintex brakes is from this guy:
EBAY
Anyway, cheapest place for mintex brakes is from this guy:
EBAY
#145
01-03-2009, 07:58 PM

4th Gear
Another "thank you" to OctaneGuy for the writeups - I just did all 4 wheels with new pads and rotors. No issues except I had to make a run to my dad's house for a bigger C-clamp to do the back piston retraction.
I did EBC Green Stuff pads and EBC Blackdash rotors - I bought the kit from Atlantic British, they seemed to have the right price *AND* they gave a choice of shipping by UPS or FedEx Ground (which was actually cheaper).
Like several others have said, I didn't have to remove the pad carrier on the rear to swap the rotors.
Also, PB Blaster is the key to this whole job. At least on a MINI that lives where there is lots of salt on the roads in the winter.
I was able to get the Torx bolt out with just a breaker bar on the fronts, but for the rear I used an impact wrench.
#146
02-22-2009, 08:47 PM

Great write up!
When you consider doing this job, instead of doing this:

You may want to get one of these:
Disk Brake Caliper Tool Set from Harbor Freight for $40.00. It has the proper attachments to do both the front and the rears calipers, and will save a lot of wear and tear on you and your calipers.
When you consider doing this job, instead of doing this:
You may want to get one of these:
Disk Brake Caliper Tool Set from Harbor Freight for $40.00. It has the proper attachments to do both the front and the rears calipers, and will save a lot of wear and tear on you and your calipers.
I got one and started doing my pads today.
Thanks Richard!
Last edited by ronniejay; 02-22-2009 at 09:21 PM.
#147
02-23-2009, 07:02 PM
4th Gear
Well, I'm about 1500 miles into the new rotors and pads, and I think I've got a problem. When I apply the brakes, I get a fairly significant shimmy/vibration up through the steering wheel. I think I might have warped one of the new rotors. Can anybody share a good method to determine which of the rotors is warped?
After about 1000 miles of driving on the new rotors & pads, I had to come to a pretty quick stop in traffic. I vaguely recall feeling something a bit different during that stop, but ever since I've had the vibration.
Any ideas are welcomed.
Thanks!
After about 1000 miles of driving on the new rotors & pads, I had to come to a pretty quick stop in traffic. I vaguely recall feeling something a bit different during that stop, but ever since I've had the vibration.
Any ideas are welcomed.
Thanks!
Another "thank you" to OctaneGuy for the writeups - I just did all 4 wheels with new pads and rotors. No issues except I had to make a run to my dad's house for a bigger C-clamp to do the back piston retraction.
I did EBC Green Stuff pads and EBC Blackdash rotors - I bought the kit from Atlantic British, they seemed to have the right price *AND* they gave a choice of shipping by UPS or FedEx Ground (which was actually cheaper).
Like several others have said, I didn't have to remove the pad carrier on the rear to swap the rotors.
Also, PB Blaster is the key to this whole job. At least on a MINI that lives where there is lots of salt on the roads in the winter.
I was able to get the Torx bolt out with just a breaker bar on the fronts, but for the rear I used an impact wrench.
I did EBC Green Stuff pads and EBC Blackdash rotors - I bought the kit from Atlantic British, they seemed to have the right price *AND* they gave a choice of shipping by UPS or FedEx Ground (which was actually cheaper).
Like several others have said, I didn't have to remove the pad carrier on the rear to swap the rotors.
Also, PB Blaster is the key to this whole job. At least on a MINI that lives where there is lots of salt on the roads in the winter.
I was able to get the Torx bolt out with just a breaker bar on the fronts, but for the rear I used an impact wrench.
#148
02-23-2009, 07:22 PM

2nd Gear
Join Date: Dec 2002
Location: Cheshire, CT USA
Posts: 100
Likes: 0
Received 0 Likes
on
0 Posts
No such thing as warped rotors...
Well, I'm about 1500 miles into the new rotors and pads, and I think I've got a problem. When I apply the brakes, I get a fairly significant shimmy/vibration up through the steering wheel. I think I might have warped one of the new rotors. Can anybody share a good method to determine which of the rotors is warped?
After about 1000 miles of driving on the new rotors & pads, I had to come to a pretty quick stop in traffic. I vaguely recall feeling something a bit different during that stop, but ever since I've had the vibration.
Any ideas are welcomed.
Thanks!
After about 1000 miles of driving on the new rotors & pads, I had to come to a pretty quick stop in traffic. I vaguely recall feeling something a bit different during that stop, but ever since I've had the vibration.
Any ideas are welcomed.
Thanks!
Good luck with it! Knock on wood I haven't had to make any panic stops followed by a complete stop... this would surely do it!
#149
02-24-2009, 07:15 PM
4th Gear
Interesting idea - thanks for the reply. It makes sense to me - I'll try to pull off the front wheels this weekend and take a peek.
I read the other day that Carroll Shelby once said he had never heard of warped rotors. I have had the problem once before on a VW with a very high quality set of brembo rotors. I know what you are speaking of and it is very annoying. Apparently, however, it isn't warping of rotors. It is, instead, the transfer of brake material to the rotors after a hot stop. So if you drive really fast up an off ramp and then have to sit on the brakes at a traffic light. That heat soak melts the brake pad material onto the rotors and you have vibration during braking from that point forward. Apparently the solution is to take abrasive material and scrub the rotors, both sides. You might be able to do this without removing the rotors from the hubs, but getting to the back side with be a real challenge!
Good luck with it! Knock on wood I haven't had to make any panic stops followed by a complete stop... this would surely do it!
Good luck with it! Knock on wood I haven't had to make any panic stops followed by a complete stop... this would surely do it!
#150
02-25-2009, 02:53 AM
2nd Gear
Join Date: Dec 2002
Location: Cheshire, CT USA
Posts: 100
Likes: 0
Received 0 Likes
on
0 Posts
I remembered what "abrasive material" what used in the quote, though I can't remember where I found it... the person was using garnet paper.