
How To Maintenance :: Changing FRONT Brake Pads for Beginners!
#226
 11-17-2012, 07:06 PM


3rd Gear
Ok my job is done
My experience was hindered by a frozen torx screw in the passengers side rotor. Breaker bar was no use. It stripped quickly. Yes I used penetrating oil and a lot of it. tried to drill it out and broke a few bits and a new extractor.
My solution was simple. Local pepboys are my pals had my new screws so I put everything back together and they put it on the lift. torched it until red hot and BAM IMACT HAMMAR!
put the new one in. drove home and finished the job. went with WMW rotors and greenstuff pads (thanks way). work great no light and we are back on the road.
Don't fear doing the rotors be careful and if you do not have an impact hammer or torch you a plan B (only added 50 bucks to the job FYI)
If you are changing rotors I would highly recommend you break these first! If things go bad you can get the thing out at a shop. best 50 bucks I spent today.
driver side note my caliper balancing box


new rotor on pads going in


and there you go
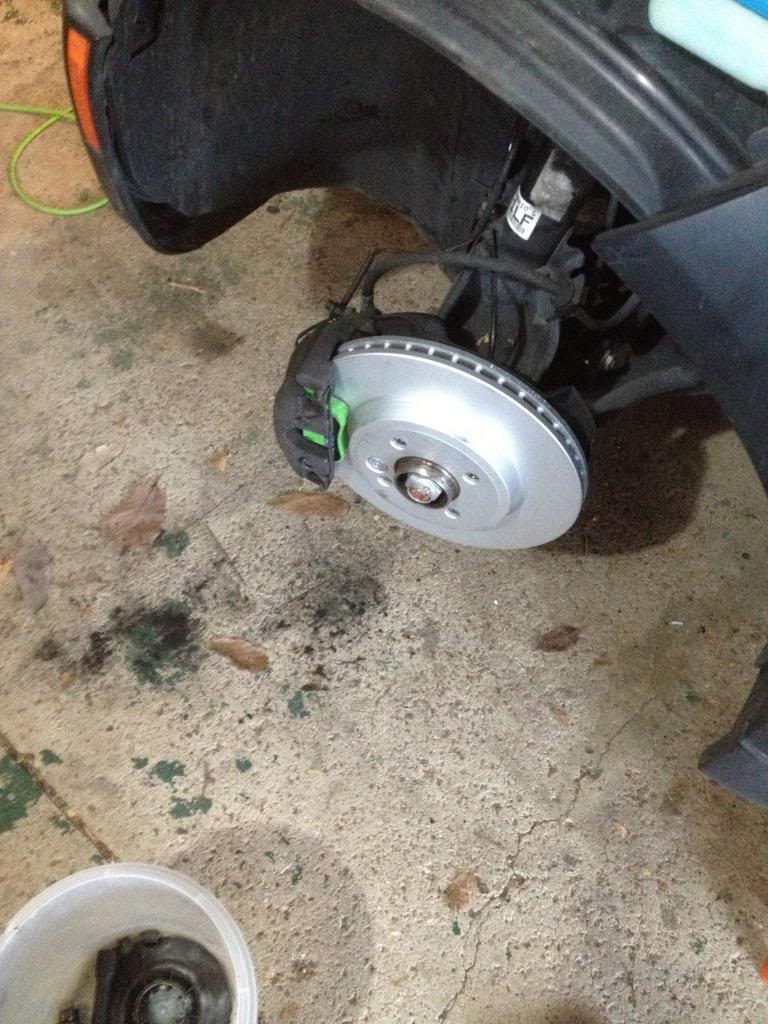
I know a little fuzzy but you can see how bad the old pads were ( so much dust)

My experience was hindered by a frozen torx screw in the passengers side rotor. Breaker bar was no use. It stripped quickly. Yes I used penetrating oil and a lot of it. tried to drill it out and broke a few bits and a new extractor.
My solution was simple. Local pepboys are my pals had my new screws so I put everything back together and they put it on the lift. torched it until red hot and BAM IMACT HAMMAR!
put the new one in. drove home and finished the job. went with WMW rotors and greenstuff pads (thanks way). work great no light and we are back on the road.
Don't fear doing the rotors be careful and if you do not have an impact hammer or torch you a plan B (only added 50 bucks to the job FYI)
If you are changing rotors I would highly recommend you break these first! If things go bad you can get the thing out at a shop. best 50 bucks I spent today.
driver side note my caliper balancing box
new rotor on pads going in
and there you go
I know a little fuzzy but you can see how bad the old pads were ( so much dust)
#227
12-18-2012, 10:23 AM

Word of caution there are so many various types of configurations as far as the brakes hardware it is mind blowing I just did the rear brakes on my 2009 Mini S and it wasn't like anything I have seen on any youtube video or how to's. The 2009 has two metal clips that snap on the rotor that hold the pads in, that cost me time. Indicator lights specifically the Red Brake light, I have seen explained away 4 or 5 different ways in my case it ment it has been X amout of miles or years time to replace rear brakes. I think it also can be a sensor light but look up the code first. I even seen it explained away has low brake fluid or the emergency brake being the problem and a lose gas gap. I can say for certain in my case it was a preset indicator light just telling me that the rear brakes where due to be changed. All the information you find about changing your brakes is very helpful and thanks to the people who put it out their, just make sure you take your tire off and look at your cars configuration before you order parts. The internet will give you the basics and they are all helpful but as I said the configuration of my Mini Cooper was unlike any I seen on the web.
#228
01-12-2013, 03:19 PM

#229
02-28-2013, 04:57 PM

2nd Gear
Join Date: Mar 2005
Location: Lawrenceville,GA
Posts: 145
Likes: 0
Received 0 Likes
on
0 Posts
Just wanted to thank you, OctaneGuy, for your write up as it helped me out with my first brake job on a MINI. I guess I should have read the entire thread, but I was kinda in a hurry and just read your 1st post and watched a video from another thread about doing the rotors.....4th post down...
https://www.northamericanmotoring.co...or-change.html
In that video, the nut that holds the rotor on was a hex and I didn't know if it was a MINI or some other BMW he was working on; hence, I got the car jacked up and wheel off and immediately saw the "star" torx bolt.
 Luckily I had a truck to take to the parts store to get the bit.
 Oh, I did have quite a time getting that bugger to come loose, too. It was the most difficult part of the entire job. Obviously, it went back on with anti-seize on the threads.
Thanks again for your time consuming effort writing this up and including the pictures!
#230
03-01-2013, 07:15 AM

Platinum Sponsor
Yes,
The brake rotor screws can be seized to the rotor if you live in a climate that has salt on the roads. I replace these every time I do a brake job. You can spray PB blaster behind the screw on the hub and on the connection of the flange to the screw seat. Let in soak for a while. Then try with the torx.
Also apply a little anti - seize to the threads when you put the new ones in.
http://www.ecstuning.com/Search/07136772426/ES16458/
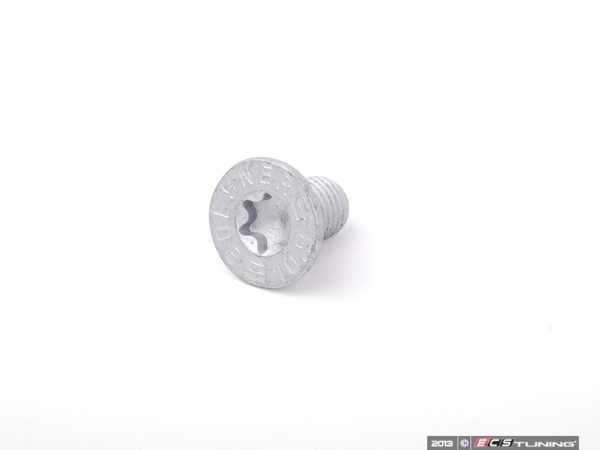
One is used one per rotor.
Here is another thread about it: Hopefully you will not have to heat them up.
https://www.northamericanmotoring.co...rew-issue.html
Thanks
The brake rotor screws can be seized to the rotor if you live in a climate that has salt on the roads. I replace these every time I do a brake job. You can spray PB blaster behind the screw on the hub and on the connection of the flange to the screw seat. Let in soak for a while. Then try with the torx.
Also apply a little anti - seize to the threads when you put the new ones in.
http://www.ecstuning.com/Search/07136772426/ES16458/
One is used one per rotor.
Here is another thread about it: Hopefully you will not have to heat them up.
https://www.northamericanmotoring.co...rew-issue.html
Thanks
__________________

MINI Guru/ MINI Owner Since 2004 | NEW Lifetime Part Replacement | Local Pickup
Milltek | Genuine MINI | Forge Motorsport | NM Engineering | ECS Performance | M7 Speed
Customer Service Hours: 8am-8pm EST|Sales Team Hours: 8am-11pm | SAT 10am-7pm 800.924.5172
MINI Guru/ MINI Owner Since 2004 | NEW Lifetime Part Replacement | Local Pickup
Milltek | Genuine MINI | Forge Motorsport | NM Engineering | ECS Performance | M7 Speed
Customer Service Hours: 8am-8pm EST|Sales Team Hours: 8am-11pm | SAT 10am-7pm 800.924.5172
#231
03-01-2013, 08:50 AM

4th Gear
 I like how you time it too.
#232
12-04-2013, 07:29 AM
Join Date: Jun 2004
Location: SLC, Utah
Posts: 663
Likes: 0
Received 0 Likes
on
0 Posts
#233
12-04-2013, 07:45 AM
3rd Gear
Well an impact wrench would work. I got one out easily with a breaker bar the other was so tough it was starting to strip. I did not have a torch so I buttoned up the car, drove to pepboys and they torched it out for me for 20 bucks. Note I had new screws with me from the deal and I just installed those for the drive home.
#234
02-18-2014, 09:47 PM

I'll be doing my brakes tomorrow, and this thread really defined how to do it. But, the pictures are missing. Looking at other threads I came across a link that does show these pictures; http://soopercooperinfo.com/lindaminidiy11-09.html
These repairs are listed alphabetically.
Juanpablo2002
These repairs are listed alphabetically.
Juanpablo2002
#235
03-24-2014, 05:54 AM

3rd Gear
When I had my 09 justa, I did both front and rear pads and rotors.. I researched on you tube, and I had a Bentley manual. I worked slowly and carefully. It all went very well. Be well prepared, and unhurried.
Now, whenever I switch between summer and winter tires, I always loosen and retighten the torx bolt, just to avoid any difficulties later on.
Now, whenever I switch between summer and winter tires, I always loosen and retighten the torx bolt, just to avoid any difficulties later on.
#236
06-22-2015, 10:47 PM

Neutral
Join Date: Jun 2003
Location: San Antonio TX
Posts: 10
Likes: 0
Received 0 Likes
on
0 Posts
Thanks
I've gone through this post several times with my 2003 Cooper S, including changing rotors at least twice. This time I thought I had accidentally pulled the connector for the front sensor loose or broken the part that comes from the rest of the car (plastic has deteriorated to the point it's crumbly when you try and release the connector). Fortunately, the wiring and socket part only runs about $15 from the dealership. A little cutting, wrapping wires together, solder, and a little heat-shrink tubing and it's good as new.
I ran into an issue after replacing all pads and both sensors this time, where the sensor light was still on. I thought I had messed up the wiring job but after reading well into this post, the solution was just to put the key to position 2 and wait a minute. The car eventually figured out that it needed to reset the light. Color me relieved, as the alternative was to start taking the wiring harness apart from the left front to find where the sensor wire might have broken.
I ran into an issue after replacing all pads and both sensors this time, where the sensor light was still on. I thought I had messed up the wiring job but after reading well into this post, the solution was just to put the key to position 2 and wait a minute. The car eventually figured out that it needed to reset the light. Color me relieved, as the alternative was to start taking the wiring harness apart from the left front to find where the sensor wire might have broken.
#237
10-16-2015, 05:56 PM

This thread, already great/helpful/deserving of muchos kudos, would be the penultimate aid to those lucky/foolhardy/daring/traditional enuf 1st gen DIYers able to resist the "progress" drumbeat via principle or lack of funds or both, if the pictorial parts, seemingly victims of that same run ahead of the techtrain mantra, were still viewable, which they weren't, for me, using Android tablet. Getting one's nice new Nikon blackened by soot in order to share is true altruism, but sadly the virtual machine runs on 93 octane profit.
Last edited by zzinglish; 10-16-2015 at 06:00 PM. Reason: clarity

Thread
Thread Starter
Forum
Replies
Last Post
igzekyativ
MINIs & Minis for Sale
34
07-16-2020 12:54 PM