
Interior/Exterior DIY: Checkered Driving Lamp Covers
#1
 06-09-2007, 01:20 PM


Join Date: Sep 2006
Location: Boston, MA
Posts: 836
Likes: 0
Received 0 Likes
on
0 Posts
DIY: Checkered Driving Lamp Covers
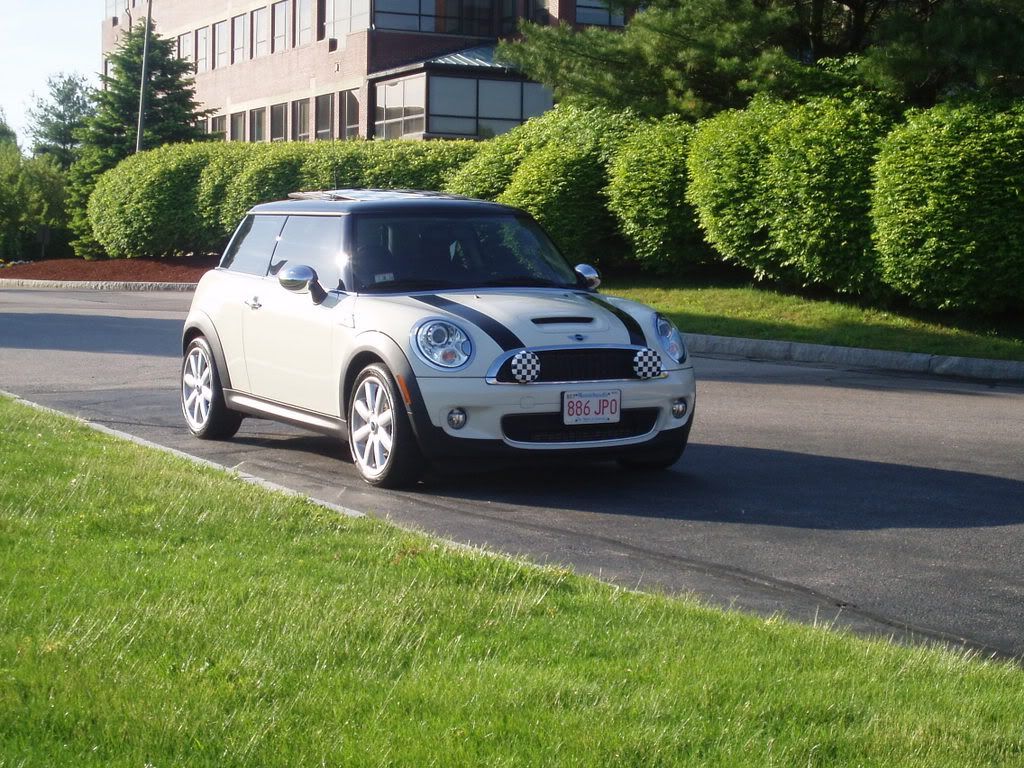
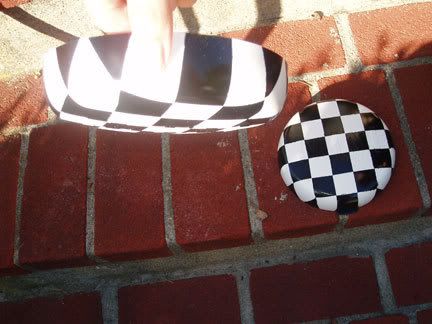
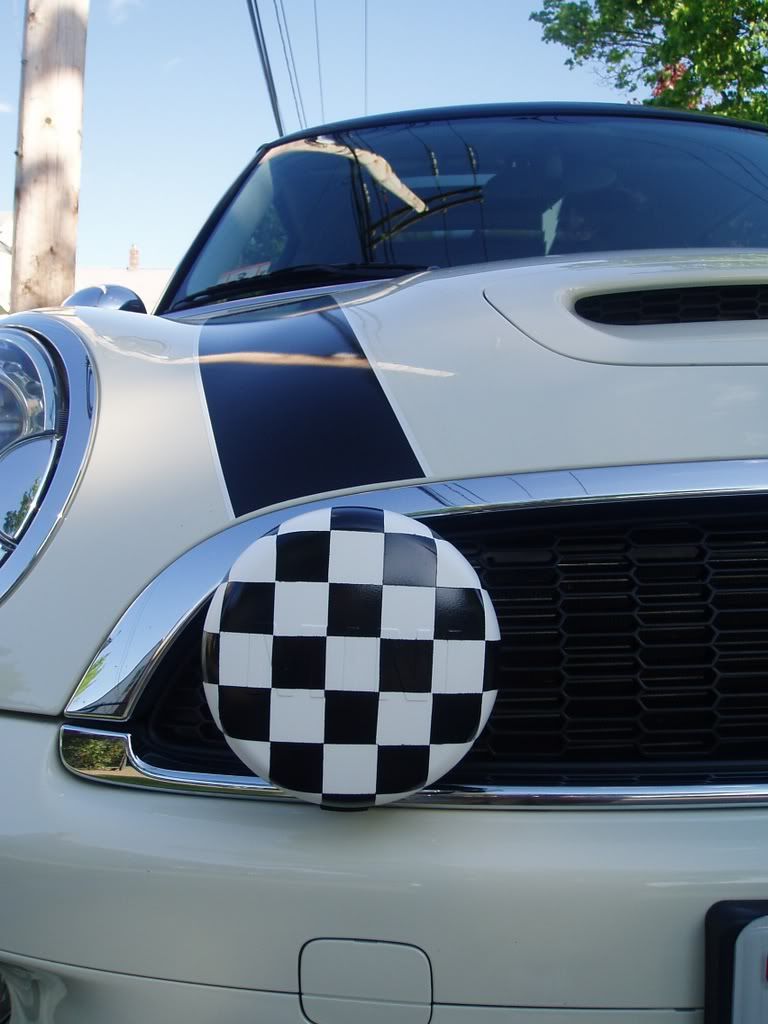
Some of you have been asking about how I created my checkered driving lamp covers, so I've decided to document my process and post this Do-It-Yourself Guide. The whole process took about 2 hours, including drying time. I had decided to do this because the driving lamp covers that come with the R56 driving lamps are plain white (not black like the older ones). The white doesn't match anything on my MINI, so making them checkered matches my checkered sunroof.
Here is a picture of the result:
Items you will need:
-white MINI driving lamp covers
-masking tape (at least 1" wide)
-pencil
-ruler
-box cutter, scissors
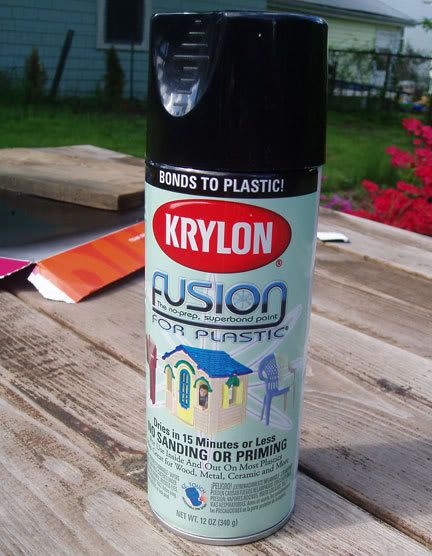
-Krylon Fusion paint for plastics in a shade of black (I used Black Semi-Gloss)
-plastic wrap and black permanent marker (optional)

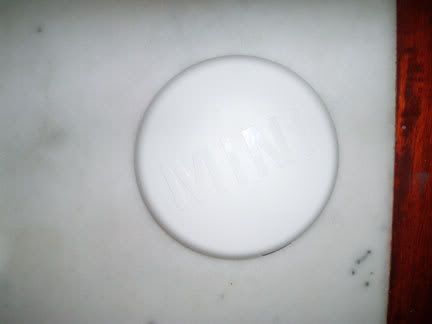
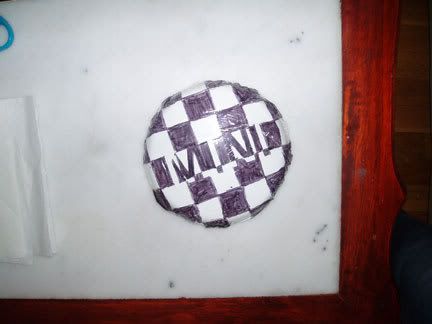
STEP 1
Begin with a clean driving lamp cover.
This part is optional:
Wrap the front with plastic wrap.
Smooth out the front and tape to the back with masking tape.
With a black permanent marker, draw a 1"x1" grid and fill in alternating squares. Just to see what it would look like, I traced around the word MINI.
In doing this, you can unwrap the plastic wrap and get an approximate idea of what shapes you need to recreate with masking tape later.
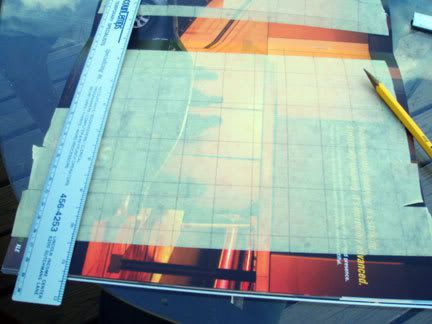
STEP 2
Line up pieces of masking tape edge-to-edge on something like a glossy magazine cover that you will be able to easily peel off later. I used a car brochure (thick and glossy). Measure out 1" squares and cut up. Make sure you have a sharp blade!
STEP 3
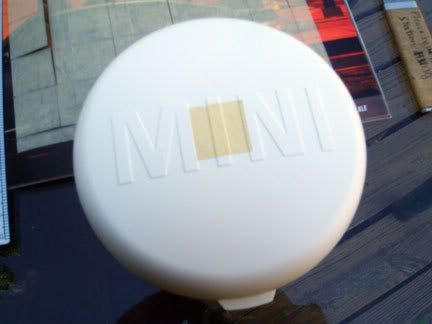
Peel off a masking tape square carefully and place in between the M and the N in MINI and center it on the I. Press the tape into the grooves and the edges of the letters. IMPORTANT: Make sure all edges adhere securely to the cover. This will ensure even and clean squares later on.
STEP 4
Place another 1" tape square directly next to the first square. This is a placeholder square and will not need to be secure. Now place another square next to that. The second square can now be removed.
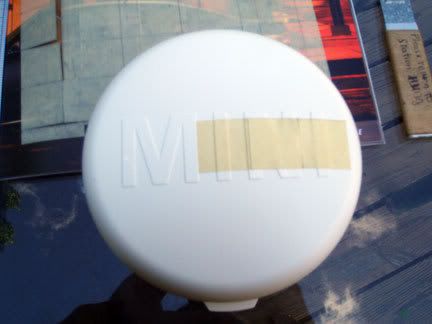
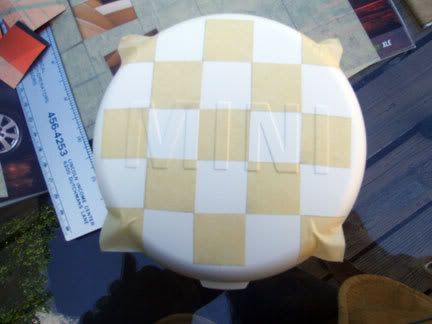
Repeat STEP 4 on all four sides of the first square until your cover looks like this:
STEP 5
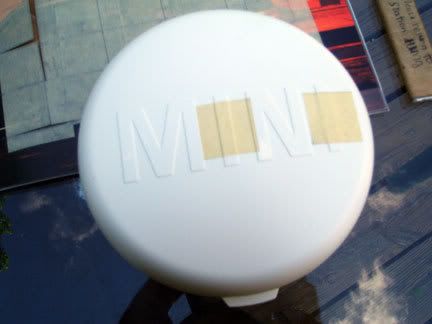
The square in the corners are next. The tops and bottoms of these squares will have to aligned optically with the squares they are next to. This means that they will not necessarily look straight from the side, but they will look aligned when you look at the grid straight on. Secure only 2 edges for these side squares, and leave the rest hanging off.
STEP 6
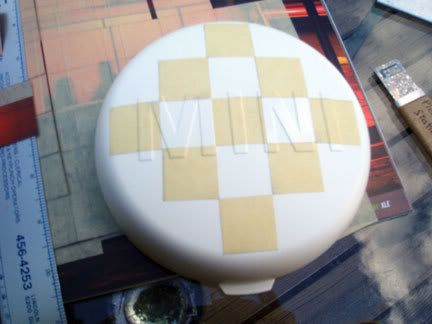
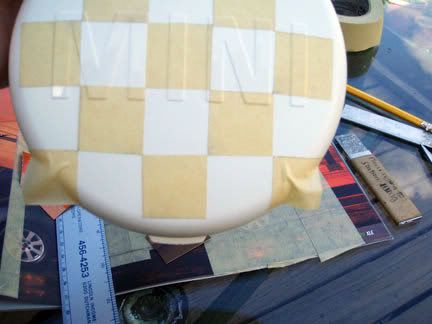
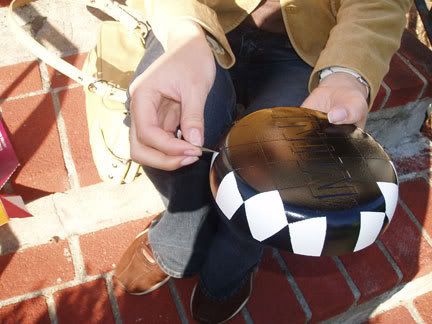
If you refer to the plastic wrap from the beginning, you will notice that this next step will require you to make "trapezoids" for the remaining side squares. The plastic wrap will give you a general shape of the pieces. Again, these have to be optically aligned so that when looking at the cover straight on, the squares will appear to follow the grid. This part may take alot of trial and error, and is one that I personally found the most difficult. You will use the remaining tape squares to form these "trapezoids." Remember, the tape can be overlapping and even multi-layered and bulky, as long as the edges are clearly defined.
View from the side:

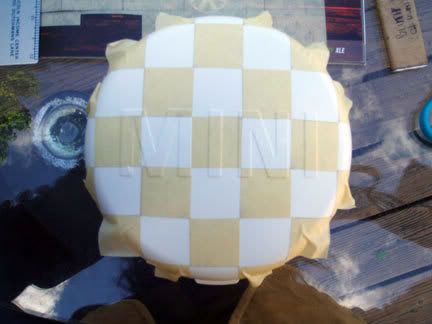
Press down on all edges, and you get this:
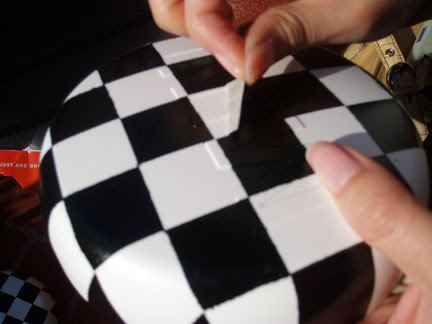
STEP 7
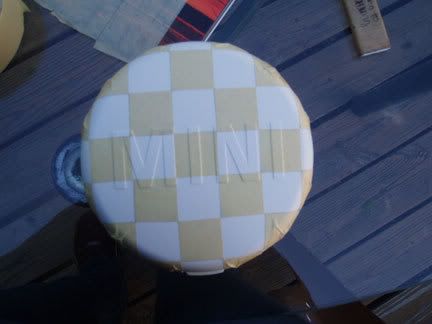
After making sure ALL the edges are secure for each square, lay the driving lamp cover down on a flat, covered surface, and spray on the Krylon Fusion. Use broad overlapping strokes, making 3-4 passes for even coverage, and make sure to get the sides too.

STEP 8
Wait a half an hour. During this time, you can prep the other driving lamp cover. When the cover is dry to the touch, you can start slowly peeling the masking tape squares.
Last square!
Ta-da!
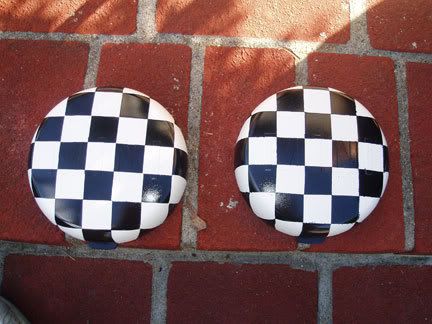
And from the side:
If some of the edges are not clean enough, you can use a blade to "trim" off the excess by scraping at the paint.
Have fun!

Here is a picture of the result:
Items you will need:
-white MINI driving lamp covers
-masking tape (at least 1" wide)
-pencil
-ruler
-box cutter, scissors
-Krylon Fusion paint for plastics in a shade of black (I used Black Semi-Gloss)
-plastic wrap and black permanent marker (optional)
STEP 1
Begin with a clean driving lamp cover.
This part is optional:
Wrap the front with plastic wrap.
Smooth out the front and tape to the back with masking tape.
With a black permanent marker, draw a 1"x1" grid and fill in alternating squares. Just to see what it would look like, I traced around the word MINI.
In doing this, you can unwrap the plastic wrap and get an approximate idea of what shapes you need to recreate with masking tape later.
STEP 2
Line up pieces of masking tape edge-to-edge on something like a glossy magazine cover that you will be able to easily peel off later. I used a car brochure (thick and glossy). Measure out 1" squares and cut up. Make sure you have a sharp blade!
STEP 3
Peel off a masking tape square carefully and place in between the M and the N in MINI and center it on the I. Press the tape into the grooves and the edges of the letters. IMPORTANT: Make sure all edges adhere securely to the cover. This will ensure even and clean squares later on.
STEP 4
Place another 1" tape square directly next to the first square. This is a placeholder square and will not need to be secure. Now place another square next to that. The second square can now be removed.
Repeat STEP 4 on all four sides of the first square until your cover looks like this:
STEP 5
The square in the corners are next. The tops and bottoms of these squares will have to aligned optically with the squares they are next to. This means that they will not necessarily look straight from the side, but they will look aligned when you look at the grid straight on. Secure only 2 edges for these side squares, and leave the rest hanging off.
STEP 6
If you refer to the plastic wrap from the beginning, you will notice that this next step will require you to make "trapezoids" for the remaining side squares. The plastic wrap will give you a general shape of the pieces. Again, these have to be optically aligned so that when looking at the cover straight on, the squares will appear to follow the grid. This part may take alot of trial and error, and is one that I personally found the most difficult. You will use the remaining tape squares to form these "trapezoids." Remember, the tape can be overlapping and even multi-layered and bulky, as long as the edges are clearly defined.
View from the side:
Press down on all edges, and you get this:
STEP 7
After making sure ALL the edges are secure for each square, lay the driving lamp cover down on a flat, covered surface, and spray on the Krylon Fusion. Use broad overlapping strokes, making 3-4 passes for even coverage, and make sure to get the sides too.
STEP 8
Wait a half an hour. During this time, you can prep the other driving lamp cover. When the cover is dry to the touch, you can start slowly peeling the masking tape squares.
Last square!
Ta-da!
And from the side:
If some of the edges are not clean enough, you can use a blade to "trim" off the excess by scraping at the paint.
Have fun!
Last edited by aznqtboy984; 06-28-2007 at 09:16 PM.
#2
06-09-2007, 01:37 PM

Join Date: Oct 2006
Location: Vancouver, British Columbia, Canada
Posts: 975
Likes: 0
Received 0 Likes
on
0 Posts
#3
06-09-2007, 01:39 PM

Peace Keeper
#4
06-09-2007, 02:19 PM
4th Gear
Join Date: Jul 2006
Location: Madison, WI
Posts: 458
Likes: 0
Received 0 Likes
on
0 Posts
Those look really great. They really help to bring the car all together. I also love the chrome mirror covers! Maybe the new checkered handles would be a nice touch too. Of course, I am a bit over the top with the checkered thing.  A nice clean and professional looking job on the covers with an excellent explaination of how to!
I wanted checkered covers for my Hella driving lights. I have a roll of checkered vinyl (contact paper). The white plastic covers say Hella in the center and have an oval near the outer edge. I made a tracing of the oval. Then I centered the tracing on the vinyl and carefully cut them out. It was a bit tricky getting them to lay flat as the covers are slightly convex. With a little work I got them on smoothly. I can faintly read Hella through the checkers. At first I hated that. Now I realize that one can still see that they are Hella lights and that's not all bad. At some point I'm sure I'll have to upgrade to a better quality vinyl from one of the great vendors here on NAM. I've also used my vinyl to make covers for the caution stickers on the sun visors. I have some MINI wings stickers that are just the right size so I added them too. I made a steering wheel center cover by making a tracing of the center and the MINI wings. I cut out the circle and the wings. It was a challenge, but, I got that on smoothly too with the original wings showing through in the center. Today I ordered a new Whalen Shift Machine **** with the Aesthetic Creations checked wing center. It's going to look so great! :impatient
A nice clean and professional looking job on the covers with an excellent explaination of how to! I wanted checkered covers for my Hella driving lights. I have a roll of checkered vinyl (contact paper). The white plastic covers say Hella in the center and have an oval near the outer edge. I made a tracing of the oval. Then I centered the tracing on the vinyl and carefully cut them out. It was a bit tricky getting them to lay flat as the covers are slightly convex. With a little work I got them on smoothly. I can faintly read Hella through the checkers. At first I hated that. Now I realize that one can still see that they are Hella lights and that's not all bad. At some point I'm sure I'll have to upgrade to a better quality vinyl from one of the great vendors here on NAM. I've also used my vinyl to make covers for the caution stickers on the sun visors. I have some MINI wings stickers that are just the right size so I added them too. I made a steering wheel center cover by making a tracing of the center and the MINI wings. I cut out the circle and the wings. It was a challenge, but, I got that on smoothly too with the original wings showing through in the center. Today I ordered a new Whalen Shift Machine **** with the Aesthetic Creations checked wing center. It's going to look so great! :impatient

 (maybe not out yet for R56)
#6
06-09-2007, 08:15 PM
Join Date: Sep 2006
Location: Boston, MA
Posts: 836
Likes: 0
Received 0 Likes
on
0 Posts
#7
06-10-2007, 06:32 AM

4th Gear
Join Date: Apr 2007
Location: Chicago, IL
Posts: 395
Likes: 0
Received 0 Likes
on
0 Posts
Trending Topics
#8
06-10-2007, 08:13 AM

Join Date: Dec 2006
Posts: 1,137
Likes: 0
Received 0 Likes
on
0 Posts
#9
06-19-2007, 03:23 AM

2nd Gear
Join Date: Jun 2007
Location: Cloverdale, B.C., Canada
Posts: 53
Likes: 0
Received 0 Likes
on
0 Posts
On an unrelated note, when you installed your checkered sunroof decal did you notice a big difference in how much light your sunroof allowed in. I'm trying to decide whether to install the same decal or just tint the glass so your input would be helpful. Thanks.
#10
06-20-2007, 11:06 AM
Join Date: Sep 2006
Location: Boston, MA
Posts: 836
Likes: 0
Received 0 Likes
on
0 Posts
I originally wanted to tint my sunroof. After reading some threads here on NAM, I decided not to. For the checkered sunroof, only the white part is vinyl. This blocks some sunlight into the car.
#11
06-22-2007, 05:11 AM
2nd Gear
Join Date: Jun 2007
Location: Cloverdale, B.C., Canada
Posts: 53
Likes: 0
Received 0 Likes
on
0 Posts
Are you refering to the "exploding" sunroofs ? If so in those cases was it the "darkness" of the tint that caused the problem ie: the darker the tint the higher the risk or is it any tint ? I'm considering going with a 20% tint because my tinter said although he's also heard of it happening he's never had it happen to any he's done personally and figures if it were to it would be more likely the "limo"= 5% because the really dark tint attracts more heat. What have you heard ?

#13
06-24-2007, 09:47 AM
6th Gear
Join Date: Jun 2007
Location: Ay Bee Cue, NM
Posts: 1,310
Likes: 0
Received 0 Likes
on
0 Posts
Are you refering to the "exploding" sunroofs ? If so in those cases was it the "darkness" of the tint that caused the problem ie: the darker the tint the higher the risk or is it any tint ? I'm considering going with a 20% tint because my tinter said although he's also heard of it happening he's never had it happen to any he's done personally and figures if it were to it would be more likely the "limo"= 5% because the really dark tint attracts more heat. What have you heard ?
#14
06-24-2007, 09:52 AM

#15
03-31-2008, 04:40 PM

4th Gear
Join Date: Apr 2007
Location: Mesa, AZ
Posts: 313
Likes: 0
Received 0 Likes
on
0 Posts
Finally got it done
Thanks, aznqtboy984. I've been saving this thread since June because I knew sooner or later I was going to install OEM lights. Finally got them done this weekend and following your DIY they came out great. I did them basically the same way you did, except I masked off the MINI and painted the letters silver. I think it came out pretty sharp. Thanks for the awesome tutorial.


#16
03-31-2008, 06:33 PM

Those look great! I hope they hold up. I painted my white ones all black, 4-5 light coats of Krylon's plastic paint. But in less than 1000 miles they were full of chips down to the white. The car didn't have any rock chips in that time however.
I opted to just buy the black OEM ones. The checkers look great though!
aznqtboy984, how has the paint held up?
I opted to just buy the black OEM ones. The checkers look great though!
aznqtboy984, how has the paint held up?

#18
03-31-2008, 09:03 PM
I didn't clear mine. I don't see why a clear coat would stop chips. Clear is just another layer of paint. But maybe it reduces them getting all the way through.

#20
10-08-2008, 08:25 PM

Thanks, aznqtboy984. I've been saving this thread since June because I knew sooner or later I was going to install OEM lights. Finally got them done this weekend and following your DIY they came out great. I did them basically the same way you did, except I masked off the MINI and painted the letters silver. I think it came out pretty sharp. Thanks for the awesome tutorial.
#21
10-08-2008, 08:39 PM
4th Gear
Join Date: Apr 2007
Location: Mesa, AZ
Posts: 313
Likes: 0
Received 0 Likes
on
0 Posts
After the paint dryed on the checkers, I used masking tape and an Exacto knife to mask off the letters. I used some "chrome" model spray paint on the letters.
#22
10-08-2008, 08:46 PM
#23
02-23-2009, 08:54 PM
4th Gear
Join Date: Apr 2007
Location: Mesa, AZ
Posts: 313
Likes: 0
Received 0 Likes
on
0 Posts
I got to thinking about the silver MINI letters on my covers and thought how nice they'd look if they were actually chrome.
I had a friend make a chrome sticker for the back of my wife's cabrio and asked him if he could spare a 1-1/2" strip about 12" long.
So, with a little patience this is how they turned out.


I had a friend make a chrome sticker for the back of my wife's cabrio and asked him if he could spare a 1-1/2" strip about 12" long.
So, with a little patience this is how they turned out.

#25
10-24-2010, 09:50 AM
