
Interior/Exterior Xenon Headlight: Eletrical Plug/Reflective Importance
#1
 12-09-2007 | 04:59 PM

Xenon Headlight: Eletrical Plug / Joey Mod
I recently bought a xenon set with broken pins.
I figured I have to open up the headlights to replace the "plug unit"
so might as well do a joey mod.
Three questions:
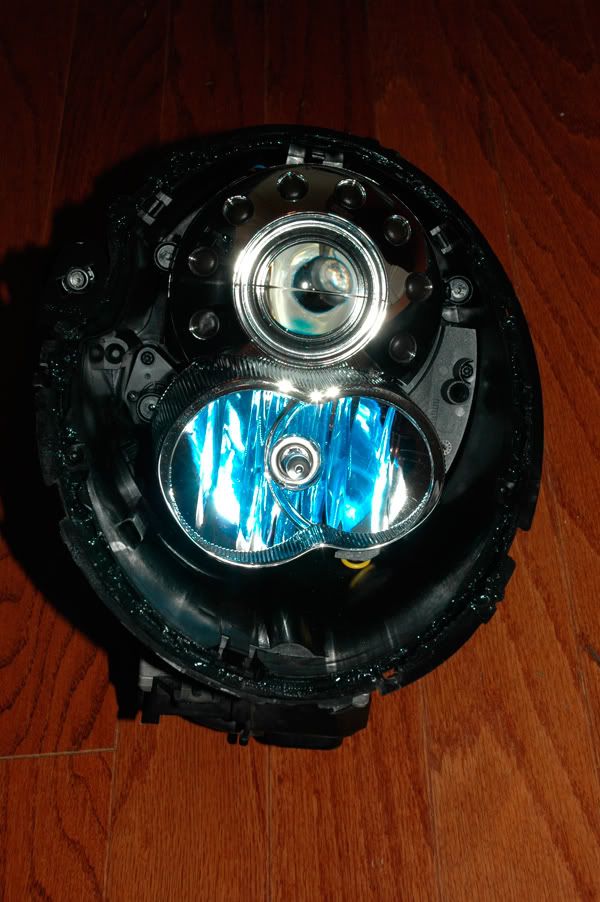
1. How do I remove the plug unit (green dot)
2. I see that many people haven't painted these (red dot). What purpose do they serve? (The ouside, not the inside)
3. How do I remove every bit of innards in the headlight assembly... which probably answers number 1 as well. hah


I figured I have to open up the headlights to replace the "plug unit"
so might as well do a joey mod.
Three questions:
1. How do I remove the plug unit (green dot)
2. I see that many people haven't painted these (red dot). What purpose do they serve? (The ouside, not the inside)
3. How do I remove every bit of innards in the headlight assembly... which probably answers number 1 as well. hah
Last edited by donjulio; 12-09-2007 at 07:29 PM.
#2
12-09-2007 | 09:31 PM

#3
12-09-2007 | 10:29 PM
well I figured it out
the inside is connected to the outside by three ***** that's used for adjusting the lights
I just popped it out but you should really unscrew them instaed
After that you can use either hexangonal screw driver or a star screw to undo the wires
During the whole disassembling
i broke about five clips..lol that i will glue back with plastic superglueg
#4
12-10-2007 | 08:23 PM
You can paint the exterior of the high beam. It serves no function, and actually reflects off the low beam and is quite annoying.
The reason it is ribbed is to diffuse all reflection, so just paint it. Ohh, and be careful NOT to use any cleaning product on the chrome. Windex eats the chrome, leaving the white plastic underneath :(
The reason it is ribbed is to diffuse all reflection, so just paint it. Ohh, and be careful NOT to use any cleaning product on the chrome. Windex eats the chrome, leaving the white plastic underneath :(
Last edited by burley; 12-10-2007 at 08:28 PM.
#6
12-10-2007 | 08:56 PM
You can paint the exterior of the high beam. It serves no function, and actually reflects off the low beam and is quite annoying.
The reason it is ribbed is to diffuse all reflection, so just paint it. Ohh, and be careful NOT to use any cleaning product on the chrome. Windex eats the chrome, leaving the white plastic underneath :(
The reason it is ribbed is to diffuse all reflection, so just paint it. Ohh, and be careful NOT to use any cleaning product on the chrome. Windex eats the chrome, leaving the white plastic underneath :(
 and these things stand up to the heat generated by the lightbulbs! Blows my mind...
-Chase
#7
12-10-2007 | 11:09 PM
Trending Topics

#9
12-11-2007 | 07:55 AM

5th Gear
Joined: Mar 2007
Posts: 678
Likes: 4
I am finishing up my headlights tonight.
I would recommend sanding and priming.
It may take a little bit longer having to sand.
It simply creates a better surface to bond to.
I used a self etching primer, kind of liked the flat green color of the primer, I must admit .
.
So I sanded everything smooth and applied a light primer.
After 20 min. put a bit heavier coat of primer.
Then, after a half hour, I applied the first coat of paint, once dry I lightly sanded and applied the final coat of paint.
The inside parts were easy to sand and prime although the rings seemed to be a chrome treated plastic that I was only able to scuff up.
Last night I sprayed the final coat on my rings and washer caps and added the final clear coat. So tonight I plan to drop the rings back on the headlights and put them back on the car.
Then the fun part will be re-aligning the headlights
I thought of painting the outside of the high beam for a bit.
Ended up leaving so I eager to see how yours turn out.
Good luck with the mod..
I would recommend sanding and priming.
It may take a little bit longer having to sand.
It simply creates a better surface to bond to.
I used a self etching primer, kind of liked the flat green color of the primer, I must admit
.So I sanded everything smooth and applied a light primer.
After 20 min. put a bit heavier coat of primer.
Then, after a half hour, I applied the first coat of paint, once dry I lightly sanded and applied the final coat of paint.
The inside parts were easy to sand and prime although the rings seemed to be a chrome treated plastic that I was only able to scuff up.
Last night I sprayed the final coat on my rings and washer caps and added the final clear coat. So tonight I plan to drop the rings back on the headlights and put them back on the car.
Then the fun part will be re-aligning the headlights
I thought of painting the outside of the high beam for a bit.
Ended up leaving so I eager to see how yours turn out.
Good luck with the mod..
#10
12-11-2007 | 08:07 AM
Pics you two... PICS!!!
Maybe Im not patient enough, but every time I took something apart, I broke a new tab. I'll list them...
- Grey plastic things under the bezels, yup. A couple tabs.
- Multiple tabs on the clear lens.
- A tab from each of the clips that attach to the plastic ***** that aim the headlights... (I broke about 4 total, I from each of the hor/vert)
- The shrouding at the top...
- A tab that holds the bezel to the projector..
- Just about every tab on the chrome rings.
Im sure theres more, I cant remember. Its all been repaired w/ JB Qwik, so its rock solid.
Just be careful, there's no feeling like breaking a part that is damn near irreplaceable. I learned that you dont drink and mod
#11
12-11-2007 | 08:17 AM
5th Gear
Joined: Mar 2007
Posts: 678
Likes: 4
Very true, I made sure that at any point of the project I had TIME to get to the next step. Do not rush this job since there are a lot of tabs to be broke.
Thank god I only snapped one, the small one of the two holding the plastic ring around the Xenon Lens. Gotta love super glue

Finished pics hopefully tonight..
Thank god I only snapped one, the small one of the two holding the plastic ring around the Xenon Lens. Gotta love super glue
Finished pics hopefully tonight..
#14
12-11-2007 | 09:21 AM
5th Gear
Joined: Mar 2007
Posts: 678
Likes: 4
I used a heavy crazy glue to attached the arrowed spot where the clip broke.
You think it will hold, if not I am still able to open the headlight up and make the change. To JB Qwik...
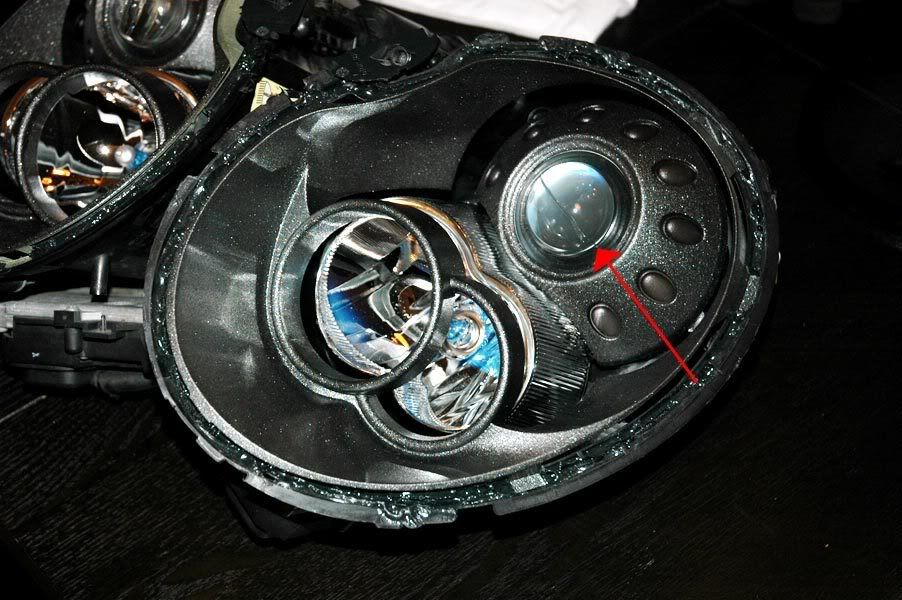
You think it will hold, if not I am still able to open the headlight up and make the change. To JB Qwik...
#15
12-11-2007 | 09:59 AM
#16
12-11-2007 | 10:08 AM
5th Gear
Joined: Mar 2007
Posts: 678
Likes: 4
Hey Burley,
Thanks for the heads up,
I might just open it up and fix so I don't have to do it again, I already re-sealed it but opening it now and fixing will be faster than doing the whole removal process over.
JB Qwik, is that the same as JB weld?
TIA..
Thanks for the heads up,
I might just open it up and fix so I don't have to do it again, I already re-sealed it but opening it now and fixing will be faster than doing the whole removal process over.
JB Qwik, is that the same as JB weld?
TIA..
#17
12-11-2007 | 01:18 PM
JB Weld takes 24 hours to cure, is much stronger, and has a temp rating of 800 degrees. JB Qwik cures in 4 minutes, and has a temp rating of 400 degrees.
I use JB Weld on most mounting, but for a bezel, qwik is great. Its still pretty damn rock solid, just not as sturdy as the regular.
#19
12-11-2007 | 09:40 PM
#21
12-12-2007 | 06:52 AM
5th Gear
Joined: Mar 2007
Posts: 678
Likes: 4
True... Honestly your going to really like having those lights, big difference.
And once you have them all you need to do is buy paint/primer/sand paper.
So this mod is really on the low end of the spectrum
The car sure eats up a good chunk of change though!
I had to re-open one of mine last night again.
Take Burleys que, anything breaks hit it with some JB QUIK
Lookin' forward to checkin out your pics.
Last edited by MidniteCoop; 12-12-2007 at 06:56 AM.
#22
12-12-2007 | 06:53 AM
5th Gear
Joined: Mar 2007
Posts: 678
Likes: 4
#23
12-12-2007 | 07:27 AM

5th Gear
Joined: May 2006
Posts: 646
Likes: 1
From: Illadelphia
Will do, hoping to have it finished by Sunday. Need to stop by my friend's shop on Saturday to use their paint booth since it's too cold out to paint in my garage. I'm going with a satin black finish, but will leave the rings chrome for now. Might go body color once I change out my stripes next year, but who knows, I change my mind every day when it comes to that. What day are you hitting Helix for the RMW tune? I'll be stopping by Saturday morning to check out the action & meet Jan.
#24
12-12-2007 | 07:38 AM
5th Gear
Joined: Mar 2007
Posts: 678
Likes: 4
Nice.
That's pretty tight you can paint em up in a booth.
I painted in my garage
Only really had trouble with the Rings!
The lights look great.
I will post pictures once they are back on the whip!
I'm at Helix on Thursday, Man I can't wait.
And when I leave there.....I will look like the whole way home...
Haven't been to Illadelphia in a while, Will have to grab a REAL CheeseSteak before the ride home!
That's pretty tight you can paint em up in a booth.
I painted in my garage
Only really had trouble with the Rings!
The lights look great.
I will post pictures once they are back on the whip!
I'm at Helix on Thursday, Man I can't wait.
And when I leave there.....I will look like
the whole way home...Haven't been to Illadelphia in a while, Will have to grab a REAL CheeseSteak before the ride home!
Will do, hoping to have it finished by Sunday. Need to stop by my friend's shop on Saturday to use their paint booth since it's too cold out to paint in my garage. I'm going with a satin black finish, but will leave the rings chrome for now. Might go body color once I change out my stripes next year, but who knows, I change my mind every day when it comes to that. What day are you hitting Helix for the RMW tune? I'll be stopping by Saturday morning to check out the action & meet Jan.
#25
12-12-2007 | 07:49 AM
I bough some 05 xenons (for parts), and when I put those in the oven, I started at 2 minutes @ 150 degrees. I pulled those lenses off w/ my bare hands... Cake. When I put them back together, I didn't even use the oven.
They used a different glue in the 03 than in the 05. You can tell by finding some on the tabs of on the underside edge, before removing the lens, and press the glue w/ your fingernail. If its hard, then good luck. The easier glue will sink in like play-dough.