
Interior/Exterior Joey mod R56!
#126
 04-07-2008, 12:55 AM


Auto on Sport Button guy
#127
04-07-2008, 01:28 AM

#128
04-07-2008, 05:22 AM


#129
04-09-2008, 08:17 PM

Join Date: May 2007
Location: Sacramento, Ca
Posts: 1,442
Likes: 0
Received 0 Likes
on
0 Posts
heres a little update on mine...
I was checking out my lights the other day and i noticed that some of the paint on the piece that attaches to the actual lens is blistering... im pretty sure its a sign that the paint is too hot.
I think the heat is coming from the metal "box" under the light, the ballast.
The same parts on both lights are experiencing the same deal but those are the only parts that are showing those signs.
I will open up the lights again when i get a chance and inspect the other parts. I will then strip the paint on the messed up parts and repaint them with Krylon High temperature paint. this should solve any blistering problems

#131
04-09-2008, 10:09 PM
Join Date: May 2007
Location: Sacramento, Ca
Posts: 1,442
Likes: 0
Received 0 Likes
on
0 Posts

#132
04-16-2008, 11:15 PM
Join Date: May 2007
Location: Sacramento, Ca
Posts: 1,442
Likes: 0
Received 0 Likes
on
0 Posts
ok, i finally decided on what i wanted to do to fix the problem...
these are the materials i needed... sorry none of these pix are of the actual process but you can get the idea.
You will need 2 of these:

Some of this:

this is optional:

and you will end up with something like this:


I made a template of what i wanted the heat shield to look like out of masking tape... after i got a shape i liked, i peeled the tape off the plastic shroud and stuck it on a soda can.
I used a dremel to cut out the piece of aluminum from the soda. I then cleaned the aluminum piece and stuck on some of my CF Vinyl, i tested it with a heat gun and it holds up to heat very well, plus its actually a foil based material and should reflect heat as well.
Then i used the double sided foam tape to stick the aluminum shield to the plastic shroud. I put tape on the border, except the side facing the projector, of the aluminum piece as well as 1 piece in the middle for support. I figure the foam tape will allow some space between the aluminum and plastic to further insulate it. There is no issue of binding or rubbing from the projector movement.
hope this helps with anyone else experiencing any warping or bubbling.
feel free to pm me if you have any questions or post in this thread... although a pm will get a response a lot faster!
these are the materials i needed... sorry none of these pix are of the actual process but you can get the idea.
You will need 2 of these:
Some of this:
this is optional:
and you will end up with something like this:
I made a template of what i wanted the heat shield to look like out of masking tape... after i got a shape i liked, i peeled the tape off the plastic shroud and stuck it on a soda can.
I used a dremel to cut out the piece of aluminum from the soda. I then cleaned the aluminum piece and stuck on some of my CF Vinyl, i tested it with a heat gun and it holds up to heat very well, plus its actually a foil based material and should reflect heat as well.
Then i used the double sided foam tape to stick the aluminum shield to the plastic shroud. I put tape on the border, except the side facing the projector, of the aluminum piece as well as 1 piece in the middle for support. I figure the foam tape will allow some space between the aluminum and plastic to further insulate it. There is no issue of binding or rubbing from the projector movement.
hope this helps with anyone else experiencing any warping or bubbling.
feel free to pm me if you have any questions or post in this thread... although a pm will get a response a lot faster!
#133
04-17-2008, 12:10 AM
Auto on Sport Button guy

#134
04-17-2008, 12:15 AM
#135
04-17-2008, 02:11 AM
4th Gear
Join Date: Feb 2008
Location: Renton, WA
Posts: 492
Likes: 0
Received 0 Likes
on
0 Posts
ghosthound, where can one buy the realistic looking CF vinyl like the one you have?
#136
04-17-2008, 06:56 AM

4th Gear
Join Date: Oct 2007
Location: Kansas City
Posts: 510
Likes: 0
Received 0 Likes
on
0 Posts


#137
04-17-2008, 10:25 AM

#138
04-17-2008, 08:36 PM
Join Date: May 2007
Location: Sacramento, Ca
Posts: 1,442
Likes: 0
Received 0 Likes
on
0 Posts
Ebay... there are a few different "realistic" versions but some look better than others.... make sure you look at a few... also be careful because different vendors on ebay sell the same products with different names... as in one sellers CF II is another companies CF III or what have you.
#139
04-20-2008, 08:09 AM

I'm doing mine with real Carbon Fiber in a few weeks. Bought it from a vendor for about $20 after shipping for a 50"x12" roll. Testing it on something a little less expensive so I get used to working with the CF and the Epoxy. So far everything has worked pretty good so I'm pretty excited to get started.
Still nervous about the baking part ... but if this many people have done it without any major consequences it shouldn't be too bad. My family and co-workers think I'm crazy for attempting this after just purchasing such an expensive vehicle ... lol
Still nervous about the baking part ... but if this many people have done it without any major consequences it shouldn't be too bad. My family and co-workers think I'm crazy for attempting this after just purchasing such an expensive vehicle ... lol
#140
04-20-2008, 09:25 AM
I'm doing mine with real Carbon Fiber in a few weeks. Bought it from a vendor for about $20 after shipping for a 50"x12" roll. Testing it on something a little less expensive so I get used to working with the CF and the Epoxy. So far everything has worked pretty good so I'm pretty excited to get started.
Still nervous about the baking part ... but if this many people have done it without any major consequences it shouldn't be too bad. My family and co-workers think I'm crazy for attempting this after just purchasing such an expensive vehicle ... lol
Still nervous about the baking part ... but if this many people have done it without any major consequences it shouldn't be too bad. My family and co-workers think I'm crazy for attempting this after just purchasing such an expensive vehicle ... lol
#141
04-20-2008, 06:20 PM
4th Gear
Join Date: Feb 2008
Location: Renton, WA
Posts: 492
Likes: 0
Received 0 Likes
on
0 Posts
#142
04-20-2008, 08:16 PM
Do tell more, checkercoop. Mine is an R56 with the Xenon's. I'm assuming you still have to take the lamps off the vehicle, but just don't have to stick them in the oven? Everything I've read has pointed me to the oven, but if a heatgun works that would be awesome. Of course, I'd have to buy the heatgun ... lol
rippymcs: the vendor I got the CF was on eBay. Here's an active listing, the same product I purchased: http://cgi.ebay.com/ebaymotors/ws/eB...2BSI%26otn%3D2
It's real CF and even comes in Twill weave (matches JCW CF if you're worried about that) It comes rolled and with the sides taped/sewn to prevent fraying while you're working with it. Really couldn't be happier and for the price it's a no brainer.
I would definitely recommend doing some test overlays with a small portion before you do anything major. Working with the CF and the Epoxy is a bit of a learning experience and I'm glad I experienced it a bit so I know what to expect.
Here's a site that had some good instructions about working with CF overlays. http://www.webbikeworld.com/t2/carbo...orcycle-parts/ They recommend the vacuum bagging method which I didn't use for my test but have definitely realized it's the way to go ... just to be sure the CF is as tightly formed as possible. I'm just having trouble finding the "polythene"-type plastic that's required to do this without bonding your bag to your part.
#143
04-20-2008, 08:33 PM
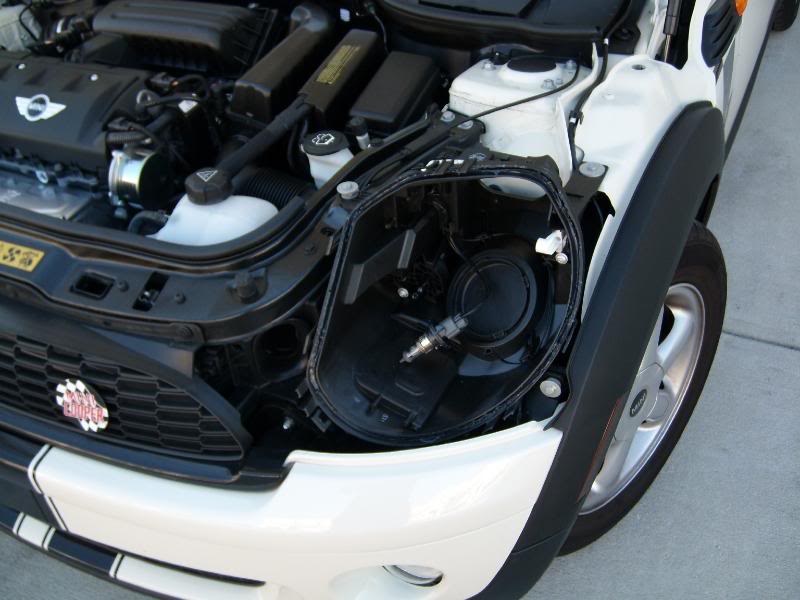
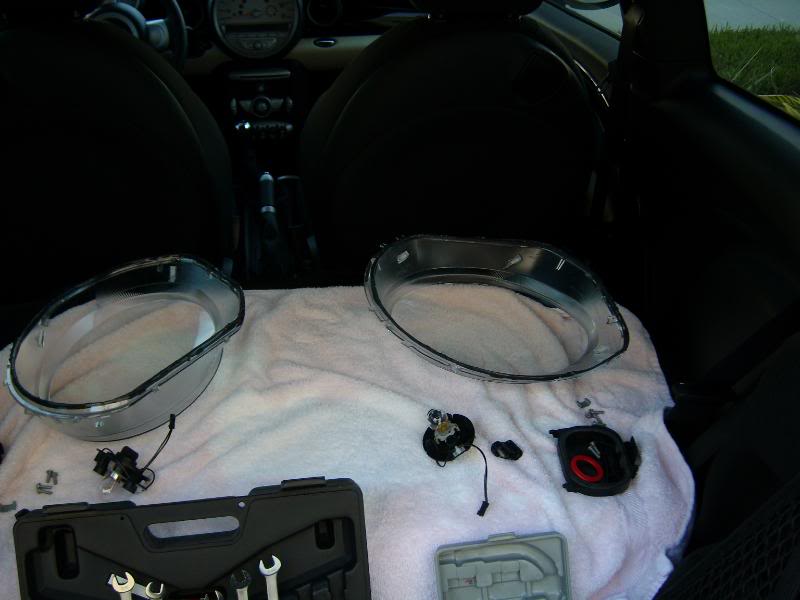
Do tell more, checkercoop. Mine is an R56 with the Xenon's. I'm assuming you still have to take the lamps off the vehicle, but just don't have to stick them in the oven? Everything I've read has pointed me to the oven, but if a heatgun works that would be awesome. Of course, I'd have to buy the heatgun ... lol
here are some pics of my disassemble (I'm not sure how much it differs from xenons, but i think it should be the same just about)

#144
04-20-2008, 08:42 PM
4th Gear
Join Date: Feb 2008
Location: Renton, WA
Posts: 492
Likes: 0
Received 0 Likes
on
0 Posts
#146
04-21-2008, 12:43 AM
It does take some time, patience, and enduring. I decided for my "test" I would buy a cheap Xbox 360 faceplate and coat it with CF. My advice: go with something a bit simpler for the first try ... lol
I just finished the first wet sand, and need to do one more to get a few more bumps out. Right now the epoxy is really milky after sanding but I'm assuming with the polishing it will get all clear again ... I hope?
Home Depot also sells a UV coating (good for parts to be put on the car) in either a clear glossy or matte finish in spray paint cans ... just for a last coat to make sure things last.
I'm hoping my "test" project turns out like I'm envisioning. If so, it really opens the doors for doing a lot of the carbon fiber stuff on my own. Just think how easy it would be to wrap the gas cap instead of paying several hundred dollars for one already made. Plus, you get to say that you did it.
Last edited by Ignigena; 04-21-2008 at 12:48 AM.
#147
04-21-2008, 12:44 AM
#148
04-21-2008, 01:56 AM
Join Date: May 2007
Location: Sacramento, Ca
Posts: 1,442
Likes: 0
Received 0 Likes
on
0 Posts
#149
04-21-2008, 04:57 AM
 if you do use the heat gun try to watch how much heat goes on the lens because you will notice some melting/moving if you do it too much
And yes VERY fun and definitely rewarding
#150
04-24-2008, 09:35 PM
Join Date: May 2007
Location: Sacramento, Ca
Posts: 1,442
Likes: 0
Received 0 Likes
on
0 Posts
ive been doing some reading on making carbon fiber pieces and i have come to the conclusion that it is not necessary to vacuum mold it if its not structural.
If you still want the polythene bags, search ebay for "hdpe" its just another name for it. Or go to the grocery store and get some of their produce bags, i think they are the same thing since most of the hdpe bags on ebay are the produce bags.
http://cgi.ebay.com/Clear-Plastic-Pr...QQcmdZViewItem
If you still want the polythene bags, search ebay for "hdpe" its just another name for it. Or go to the grocery store and get some of their produce bags, i think they are the same thing since most of the hdpe bags on ebay are the produce bags.
http://cgi.ebay.com/Clear-Plastic-Pr...QQcmdZViewItem
Last edited by ghosthound; 04-24-2008 at 09:38 PM.