
Interior/Exterior Coast to Coast Autopower Roll Bar Install
#1
 05-05-2008, 10:58 AM


The following users liked this post:
bradkara124 (07-17-2019)


#5
05-05-2008, 12:11 PM
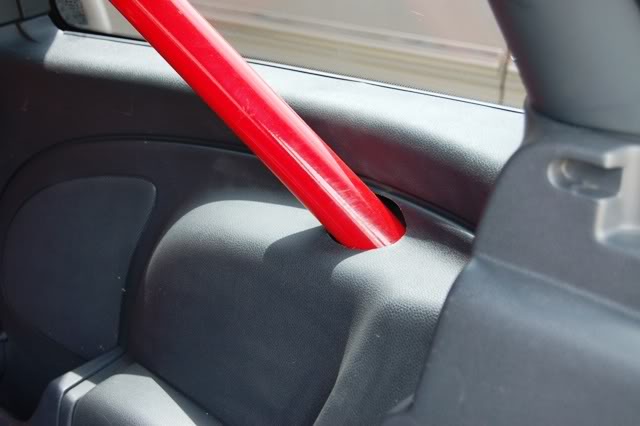
I've thought about adding trim. Hole would need to be enlarged a bit but we'll see. I don't have pictures of the mounting points. I will take some the next time I have access to that area. Ditched the bolt / nut method. Used high strength nutserts and bolted from the outside in with no need to hold a nut in place.
#7
05-05-2008, 11:46 PM

6th Gear
Join Date: May 2005
Location: Golden, Colo.
Posts: 3,049
Likes: 0
Received 0 Likes
on
0 Posts
Trending Topics

#9
05-06-2008, 05:45 AM
The end result is worth the added aggravation in my opinion as I really did not want to go about it with the slit method.
Last edited by cliff@coasttocoastusa; 05-06-2008 at 09:33 AM.
The following users liked this post:
robj (04-16-2020)
#10
05-06-2008, 07:03 AM

Peace Keeper
#12
05-07-2008, 06:44 PM

Join Date: Apr 2004
Location: charleston, SC
Posts: 1,874
Likes: 0
Received 0 Likes
on
0 Posts
#14
05-08-2008, 08:41 AM

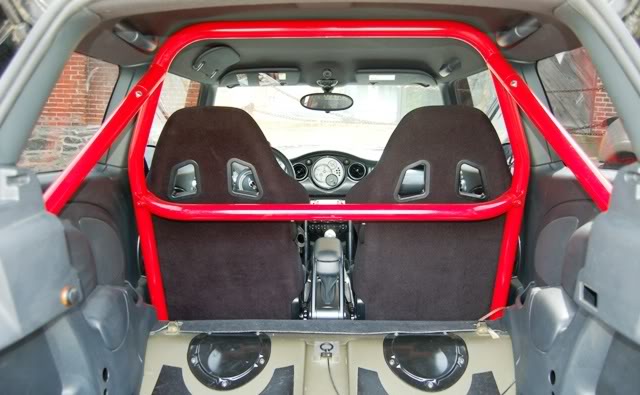
The horizontal bar just below the belt openings in the back of the seat is a harness bar. Unless the front side of the harness bar has tabs for a harness they would be wrapped around the bar. For proper mounting a set of belt guides should be welded on the bar or there is a possibility the harness could slide.
Harness Belt Guides

Harness Belt Guides
#15
05-08-2008, 10:15 AM
#16
05-08-2008, 11:19 AM
Guides were fabricated. Nothing fancy needed, it's just a guide, no real stresses are placed on those parts.
Placement is easy. Just use a straight edge and come back from the belt pass through in the seat. The main issue is that the outboard belt ends up on the curve of the harness bar and in an incident could slide around that bend letting tension off.
We had to add the guides on my setup. Had to grind off the finish. weld and refinish. It was welded and rattle canned in place. Removing the cage for the guides would have been silly.

#19
05-09-2008, 07:07 AM
Guides were fabricated. Nothing fancy needed, it's just a guide, no real stresses are placed on those parts.
Placement is easy. Just use a straight edge and come back from the belt pass through in the seat. The main issue is that the outboard belt ends up on the curve of the harness bar and in an incident could slide around that bend letting tension off.
We had to add the guides on my setup. Had to grind off the finish. weld and refinish. It was welded and rattle canned in place. Removing the cage for the guides would have been silly.
Placement is easy. Just use a straight edge and come back from the belt pass through in the seat. The main issue is that the outboard belt ends up on the curve of the harness bar and in an incident could slide around that bend letting tension off.
We had to add the guides on my setup. Had to grind off the finish. weld and refinish. It was welded and rattle canned in place. Removing the cage for the guides would have been silly.

#20
05-09-2008, 08:52 AM
Peace Keeper
Hey guys...I just had a question that my dad wanted me to post...
I told him I did not think it was safe, but I will get your guys' info to add to mine...
Is it SAFE it re-route the rear support bars from the top of the fender well to the place where the rear seats have their latch?

He wanted to place the supports on here so that we did not put any holes in my interior, but I would feel more comfortable with them in the intended location...
If it is safe that would be a great solution...but please let me know the facts...
Thanks.
I told him I did not think it was safe, but I will get your guys' info to add to mine...
Is it SAFE it re-route the rear support bars from the top of the fender well to the place where the rear seats have their latch?
He wanted to place the supports on here so that we did not put any holes in my interior, but I would feel more comfortable with them in the intended location...
If it is safe that would be a great solution...but please let me know the facts...
Thanks.
#21
05-09-2008, 08:59 AM
Peace Keeper
Also, Nate...if you have anywhere that is a good source for Mini specific 6pt. harness install instructions I would greatly appreciate it
I have been checking Schroth and others...they have generic info, but I was wondering if you had some specifics since you installed the TeamTech's...
Anyone with harness info can email me at chris.vogelsong@gmail.com
Thanks to everyone.
I have been checking Schroth and others...they have generic info, but I was wondering if you had some specifics since you installed the TeamTech's...
Anyone with harness info can email me at chris.vogelsong@gmail.com
Thanks to everyone.
#22
05-09-2008, 10:17 AM
Mine were installed by a race shop. The generic instructions show the angles that need to be used to be safe. You can't go wrong with lots of measuring and fitting before drilling. They had me sit in the car and they crawled around me, no mean feat, to measure. The hard part is the anti-submarine belts. All the rest is easy. The shoulder belts wrap on the harness bar. The lap belts can be connected to the same mounting points as the current one. All the belt makers have adapter plates for this.
Driver side lap belt mounting.
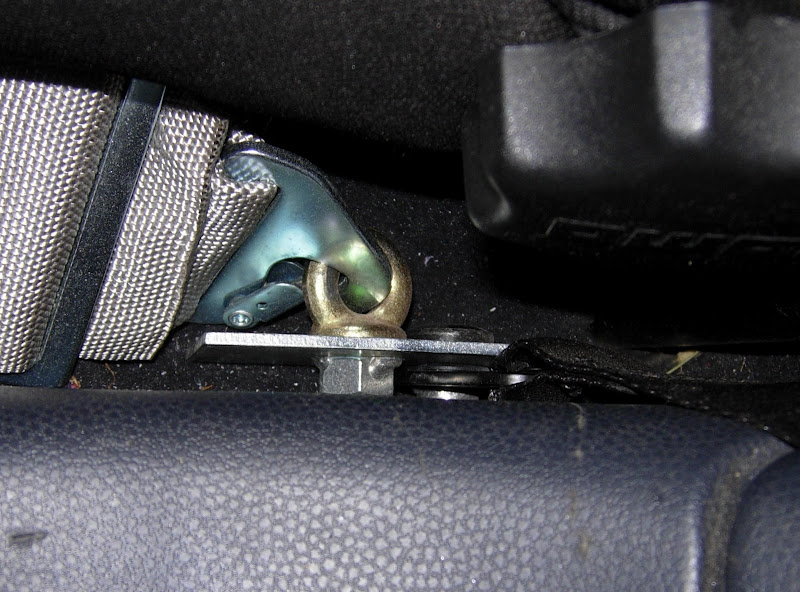
Driver side lap belt mounting.
#23
05-09-2008, 02:34 PM
Peace Keeper

#24
05-09-2008, 03:32 PM
Hey guys...I just had a question that my dad wanted me to post...
I told him I did not think it was safe, but I will get your guys' info to add to mine...
Is it SAFE it re-route the rear support bars from the top of the fender well to the place where the rear seats have their latch?
He wanted to place the supports on here so that we did not put any holes in my interior, but I would feel more comfortable with them in the intended location...
If it is safe that would be a great solution...but please let me know the facts...
Thanks.
The area where the seat latches is not as strong as you think. You can wiggle the end some, and it's only held in with a few spot welds. It's one of the reasons I've never thought the rear bar some folks sell has much use.
You'll need to cut and replace the legs of the bar. Might as well make your own custom at that point.
Far from me to question Auto Power's engineering and I don't know the structure of MINI at the pooint they use to be an expert but I think they chose a poor location to mount the rear legs to the body. Lower down where the unibody has "frame rail" type structure I think would be stronger and is one of the reasons I choose a Safety Devices bar.
#25
05-10-2008, 07:12 AM
Peace Keeper
Thanks for your insight Nate It is always appreciated. I will let my father know(he trusts AutoPwer, but just wanted the interior to take less of a beating--to me when I am done with the car the interior will be the last of my concerns )
)
BTW, The gauge pod is coming along well know that I have the time to work on it
It is always appreciated. I will let my father know(he trusts AutoPwer, but just wanted the interior to take less of a beating--to me when I am done with the car the interior will be the last of my concerns)BTW, The gauge pod is coming along well know that I have the time to work on it

Thread
Thread Starter
Forum
Replies
Last Post
igzekyativ
MINIs & Minis for Sale
34
07-16-2020 12:54 PM
squawSkiBum
MINI Parts for Sale
15
10-02-2015 09:21 AM