
Interior/Exterior DIY stripe install. PIcs.
#1
 06-12-2008, 07:16 AM


Join Date: Jul 2006
Posts: 106
Likes: 0
Received 0 Likes
on
0 Posts


#2
06-12-2008, 04:15 PM


 from bumper to bumper
#4
06-13-2008, 06:37 AM
Join Date: Jul 2006
Posts: 106
Likes: 0
Received 0 Likes
on
0 Posts
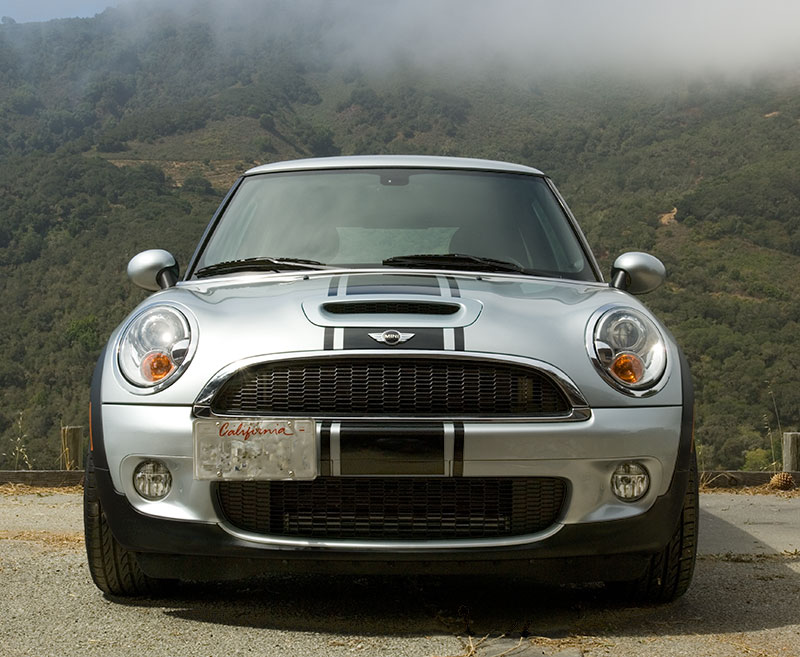
the Vinyl came pre cut for the center tripe (thats why its so fat) i didnt trim it down. all i did was trim it at the windshield and the grill. i got it from http://www.beacongraphics.com/. it was posted in another thread about wrapping the headlight rings.
the side stripes are .5" extra 3m i had left over (I bought the wrong size) for the beltline.
#5
07-16-2008, 02:38 PM

1st Gear
Join Date: Jun 2008
Location: Ponte Vedra Beach
Posts: 15
Likes: 0
Received 0 Likes
on
0 Posts
[QUOTE=davo_florida;2294744]I got a fat black stripper. I tried to extend to the lower parts, but without a heat gun, the bumper would have been a PITA. It may be too thick, i might redo it in a thinner stripe. It wasnt very hard at all. some soapy water and a squeegee. what say you?
Looks good Dave! You have more patience then me.
Looks good Dave! You have more patience then me.
#6
07-16-2008, 02:42 PM

4th Gear
Wow! Good job on the DIY. I'd be too afraid I'd botch it, or notice small imperfections and just take the whole thing off. That's why I just got the pre-installed bonnet stripes when I ordered...
otherwise I love the shelby stripes including a roof stripe too...if I wasn't such a scardey-cat
otherwise I love the shelby stripes including a roof stripe too...if I wasn't such a scardey-cat
#7
07-16-2008, 04:11 PM

Trending Topics
#8
07-17-2008, 07:41 AM
Join Date: Jul 2006
Posts: 106
Likes: 0
Received 0 Likes
on
0 Posts
 i finished the stripe all the way down my new JCW bumper.. no pics yet.
#9
07-21-2008, 06:08 PM

2nd Gear
Join Date: Apr 2008
Location: Michigan
Posts: 52
Likes: 0
Received 0 Likes
on
0 Posts
Davo I have joined the fat stripe club. I picked up a partial roll from a local sign shop for a couple bucks a foot.
The red pinstriping I had on hand is not wide enough for my liking so I plan on picking up some wider stuff. I am pretty pleased with it and think it will look better when I can get the bumper done.

The red pinstriping I had on hand is not wide enough for my liking so I plan on picking up some wider stuff. I am pretty pleased with it and think it will look better when I can get the bumper done.
#10
07-22-2008, 06:48 AM
Join Date: Jul 2006
Posts: 106
Likes: 0
Received 0 Likes
on
0 Posts
#12
07-22-2008, 11:10 AM
6th Gear
Due to an accident, the front bumper was replaced, and to bonnet resprayed. So, the stripe had to be replaced. The body shop did the job. They do a lot of stipes, but had to do the bumper twice.
The worst you can do is screw up the vinyl. I had originally thought I'd put the stripe from bumper to bumper. So I had plenty of extra stripe to play with.
#13
07-23-2008, 08:07 AM
Join Date: Jul 2006
Posts: 106
Likes: 0
Received 0 Likes
on
0 Posts
#14
07-23-2008, 08:48 AM
2nd Gear
Join Date: Apr 2008
Location: Michigan
Posts: 52
Likes: 0
Received 0 Likes
on
0 Posts
#15
07-26-2008, 08:13 AM
2nd Gear
Join Date: Apr 2008
Location: Michigan
Posts: 52
Likes: 0
Received 0 Likes
on
0 Posts

#16
08-01-2008, 07:53 PM

So I take it the emblem is just glued onto the bonnet? How do you replace the emblem?


#18
08-17-2008, 06:51 PM
Join Date: Jul 2006
Posts: 106
Likes: 0
Received 0 Likes
on
0 Posts

#19
08-17-2008, 08:01 PM
ClubRed
Join Date: Mar 2006
Location: Boynton Beach, FL
Posts: 276
Likes: 0
Received 0 Likes
on
0 Posts
#20
08-17-2008, 08:15 PM

OVERDRIVE
Robin,
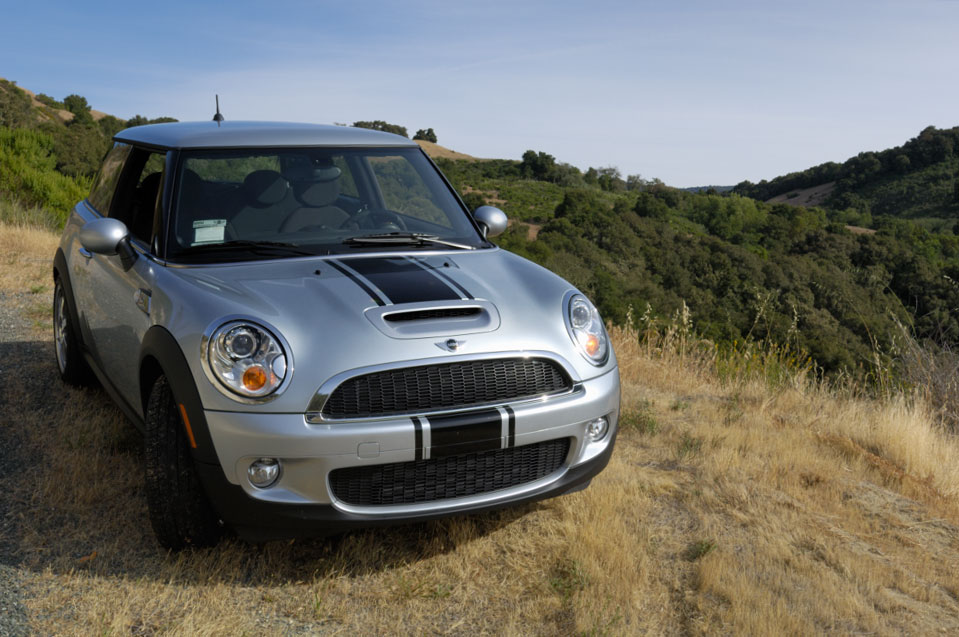
In the first picture, I noticed that the reflections on either side of the bonnet stripe make it look like that entire section is raised up relative to the rest of the bonnet.
I know that it's really flat and not raised, but wouldn't that be a cool look? It would probably be pretty hard to do without some serious fiberglas work, since the factory scoop is flush with the bonnet, but I'd love to try something like that with one of the aftermarket scoops that actually sit higher than the bonnet.
EDIT - After looking at some other R56 pictures, it appears that the bonnet actually *is* raised up in the middle, and it wasn't just an optical illusion from the reflections. If that's the case, I like that look a LOT.

Thread
Thread Starter
Forum
Replies
Last Post
NorthWestEuro
MINI Parts for Sale
1
10-21-2015 08:11 PM
EVMini
R56 :: Hatch Talk (2007+)
4
09-28-2015 10:20 AM