
Interior/Exterior Going checked
#1
 02-23-2009 | 03:34 AM

Going checked
Hi all,
I decided that my car needs some blocks, I love the checkmate MINI's Checkerd side panels and also saw DixonL2 did his car so the blocks look like they are blowing away. I want more or less the same look but would like to know what size are those checkerd blocks. I also want to do the mirrors the same.
Will post pics when I start doing it.

#4
02-23-2009 | 07:29 AM
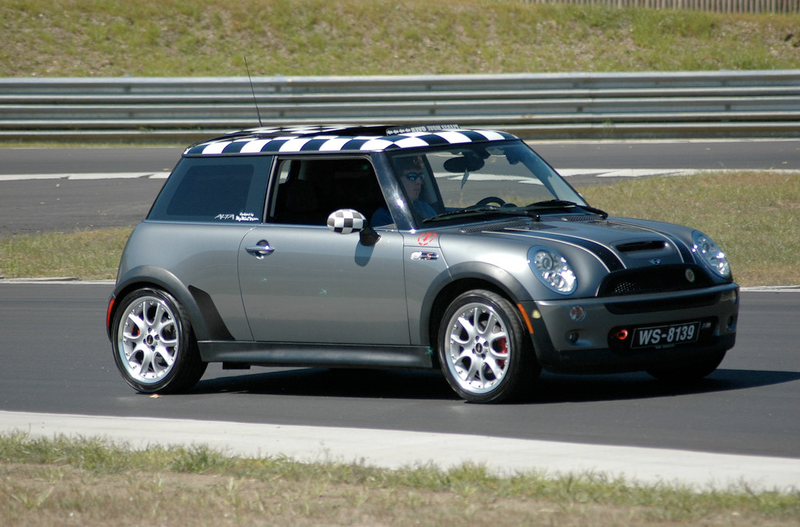
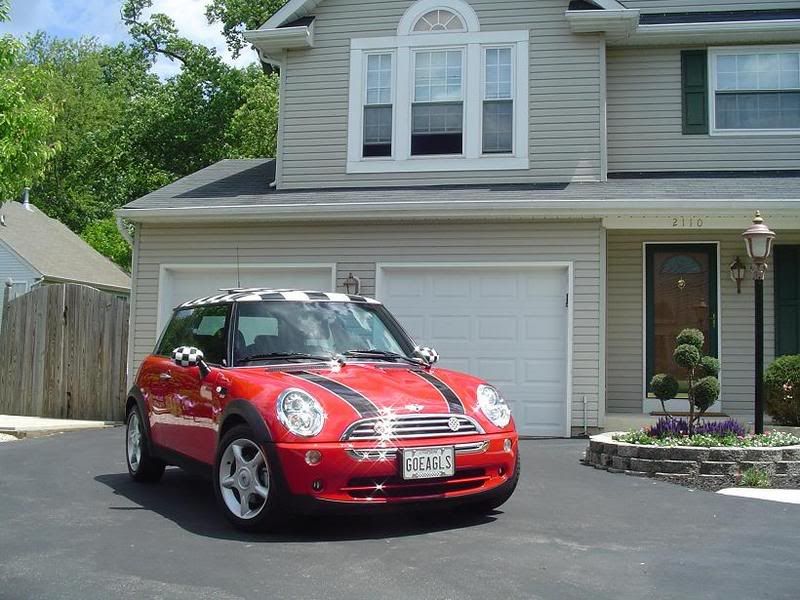
Thanks guys, those look great. I might not do the roof at first, but will start with the wing- and interior mirrors. Just heard from DixonL2 that the side blocks for the checkmate is about 1 7/8" for me i will just round it off to 50mm.
This is a photo of his car and what i want to do first. My car is PW so i will do it in semi-gloss black blocks.
This is a photo of his car and what i want to do first. My car is PW so i will do it in semi-gloss black blocks.
#6
02-23-2009 | 08:08 AM
That is what i am scared of, i don't want it too look like a heap of blocks. But that i have to see. i have a sunroof so maybe if i do the roof i will keep to the sides and not the glass.
The other thing is my stripes, they are a bit faded so i want to get new ones, maybe checkered or some other design also like the checkmate. but that will have to wait till after the sides.
But i have to say all your cars look great!
The other thing is my stripes, they are a bit faded so i want to get new ones, maybe checkered or some other design also like the checkmate. but that will have to wait till after the sides.
But i have to say all your cars look great!
#7
02-23-2009 | 09:03 AM
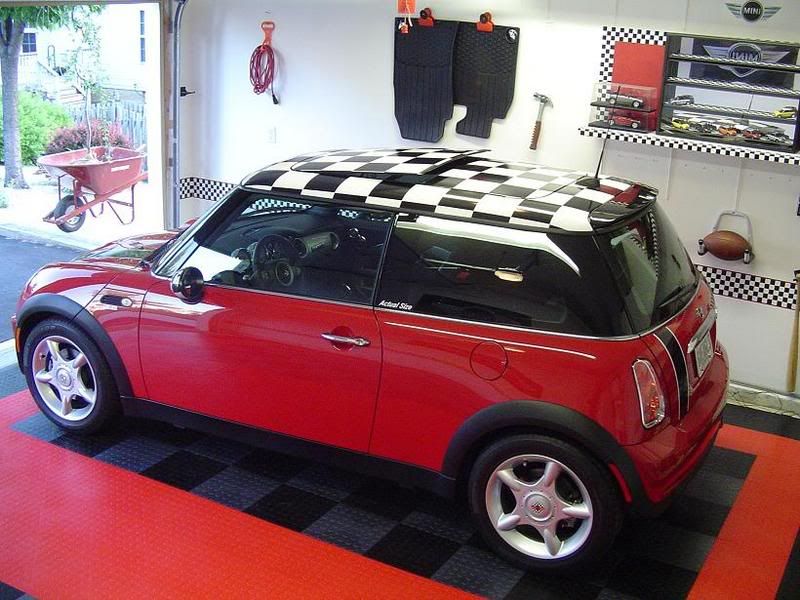
CR&PW&JB, I love your garage. My mouth literally was open.
Anyway, I say you should check the glass and not the sides of the roof. This way, when looking from the sides, its not over kill and when looking from the front, you still have your checks(mirror caps, rearview and cocked roof). Best of both worlds.
I think i am going join the Checkerd train soon. And by soon I mean after I get and aero kit and a few other mods. But I want to do roof and mirrors. But that also means my A-panel UJ's would have to go....
Trending Topics

#10
02-23-2009 | 05:41 PM
5th Gear
Joined: Jan 2008
Posts: 680
Likes: 1
From: Brisbane, Australia
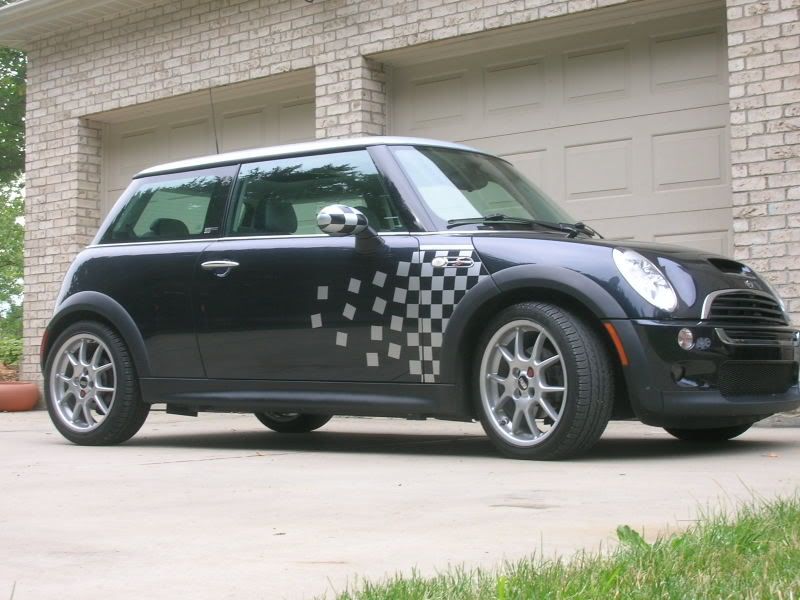
DixonL2 and I both have the checkers on the wing mirrors. He was the creator of this idea and I some what followed his instructions and all went well. He used a auto-leveler laser beam to make sure the checkers were all level, I did it without. Took quite some time to get right but in the end it was well worth it. I have had them on for around a year and so far most of the checks have lasted, although i replaced a couple last week as i half scrapped them off while cleaning. If I can find his original how-to post ill chuck it up.
#11
02-23-2009 | 05:44 PM
5th Gear
Joined: Jan 2008
Posts: 680
Likes: 1
From: Brisbane, Australia
#13
02-23-2009 | 09:22 PM
Thanks guys for all the posts so far, and CR&PW&JB i also love your garage, so far i just had my fianc� make me a checkered bed cover. 
Anyway, yesterday afternoon i ordered 100 X 50mmx50mm semi-gloss black blocks for the sides and mirrors, hope it will be sufficient. if it’s not I’ll just spray the inside mirror.
Some of you might have seen the covers MINI sells for the interior mirror, i think it is ridiculous. I fitted one to a friend’s R55 last week and think for the price it should have been a better product.
#14
02-24-2009 | 10:30 PM
So last night i stoped over at a shop close to my place, they have the widest range of R/C models i have ever seen, and i was looking at getting myself one that looks like my S. Then i see this guy do vynil stuff, asked him about it and he does.
So i got the blocks for my checkered project, had it cut and everything for about $25 in your terms. didn't think it was to bad. And best off all is, i got a extra piece of vynil about 500mm X 1500mm.
So now i have the block, just have to wash my car and get sticking!
I'll take photos as i go along.
#15
03-02-2009 | 11:33 AM
Okay, it's been a busy few days so nothing happend yet, til today, got home from work an decided to start my project. I started just by painting the rear view mirror, as i didn't feel like cutting and fitting yet.
First took of the mirror, as i did a few before this is easy. Twist the mirror and it comes off. unplug the plug and the whole assembly is in your hands. Sorry i didn't take photos of this yet but it was to easy.
Now i stripped all the parts i could that i did not want to paint or feel like masking off. Disassemble the plug, making sure you know which wire goes were.
The ball and socket just pops out. With a little force anything is possable.
Then comes the masking off bit. I found a washer just the right size to fill the big hole an let the wires come thru. then just masked off the wires and the front so i don't spray all over the glass.

Then i was as easy as whiping the mirror down with some thinners. let dry and sprayed the first coat of plastic primer.

This was funny cause the primer was almost totaly clear. just very faint grey tone.

Waited for it to dry and then came the first of three coats of cream sprayon. It matches the cars paint almost exactly and costs like $4 per can.

By now i was no longer in the mood for working so i just assembled all the parts and fitted it back to the car. Wish it was the end but i was not as lucky and this goes out to all what not to do. some paint got on to the pins for the connector and i did not clean them off. And seeing that those wires are for the remote sensor my car couldn't lock and thus i was not finished. Had to take everything off again clean the pins and this time tested to see if the remote works. I did so i could get back to my coffee and computer.
To give you an idea of how easy and quick this realy is. it took me longer tiping this post than to paint my rear view mirror.
I will take some better photos when i do all the blocks.
First took of the mirror, as i did a few before this is easy. Twist the mirror and it comes off. unplug the plug and the whole assembly is in your hands. Sorry i didn't take photos of this yet but it was to easy.
Now i stripped all the parts i could that i did not want to paint or feel like masking off. Disassemble the plug, making sure you know which wire goes were.
The ball and socket just pops out. With a little force anything is possable.
Then comes the masking off bit. I found a washer just the right size to fill the big hole an let the wires come thru. then just masked off the wires and the front so i don't spray all over the glass.
Then i was as easy as whiping the mirror down with some thinners. let dry and sprayed the first coat of plastic primer.
This was funny cause the primer was almost totaly clear. just very faint grey tone.
Waited for it to dry and then came the first of three coats of cream sprayon. It matches the cars paint almost exactly and costs like $4 per can.
By now i was no longer in the mood for working so i just assembled all the parts and fitted it back to the car. Wish it was the end but i was not as lucky and this goes out to all what not to do. some paint got on to the pins for the connector and i did not clean them off. And seeing that those wires are for the remote sensor my car couldn't lock and thus i was not finished. Had to take everything off again clean the pins and this time tested to see if the remote works. I did so i could get back to my coffee and computer.
To give you an idea of how easy and quick this realy is. it took me longer tiping this post than to paint my rear view mirror.
I will take some better photos when i do all the blocks.
#16
03-02-2009 | 11:34 AM
And this was the finished product before fitting the second time.

And while the paint was drying i took photos of all the girls wanting attention.

She is very old and but still going strong, have to take out the garden rubble.

Waiting for paint to dry is like waiting for live to go past, hate it but at least i had time to enjoy the view.
And while the paint was drying i took photos of all the girls wanting attention.
She is very old and but still going strong, have to take out the garden rubble.
Waiting for paint to dry is like waiting for live to go past, hate it but at least i had time to enjoy the view.

#19
03-03-2009 | 09:08 PM
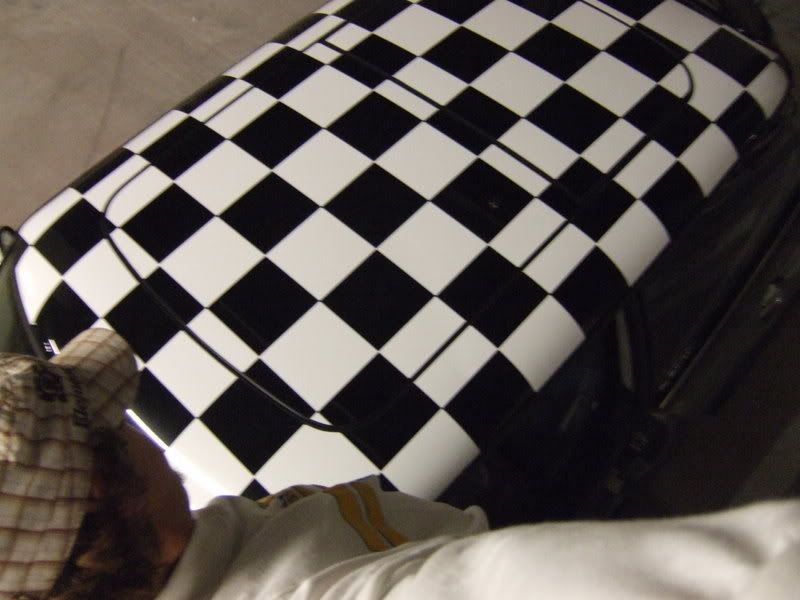
Okay People, this is what i was waiting for. Last night i desided to go and put some blocks on my car.
As i got then already cut at a sign shot this was at least out of the way.
I would recomend if you do this, first wash and polish the car, i didn't because i was a bit lazy.
But again like the previous stuf this was fairly straight forward. First make a mix with water and some car wash shampoo so you have a soapy water. then spray it on the car and on the back of the sticker. Place the sticker in more or less the right place. The soap water makes it possible to move the sticker around and remove it if needed as to perfect the layout.

When i was happy with the layout, i used a small piece of wiper blade to remove the water from under the sticker and it is stuck. It just take a bit of practise.
And i ended up with the car looking like this.

There are still a few blocks i will stick on as i think one or two more will make it look more complete.
As i got then already cut at a sign shot this was at least out of the way.
I would recomend if you do this, first wash and polish the car, i didn't because i was a bit lazy.
But again like the previous stuf this was fairly straight forward. First make a mix with water and some car wash shampoo so you have a soapy water. then spray it on the car and on the back of the sticker. Place the sticker in more or less the right place. The soap water makes it possible to move the sticker around and remove it if needed as to perfect the layout.
When i was happy with the layout, i used a small piece of wiper blade to remove the water from under the sticker and it is stuck. It just take a bit of practise.
And i ended up with the car looking like this.
There are still a few blocks i will stick on as i think one or two more will make it look more complete.
#20
03-03-2009 | 09:11 PM
Oh and as for cutting the blocks to size, you can either do it before removing it from the paper backing or it you have everything all wet you can remove the sticker after you marked it and then cut it. it is also something you have to try out first.
That is why i got much more blocks than needed so i can test a few.
That is why i got much more blocks than needed so i can test a few.
#22
03-04-2009 | 03:28 AM
Thanks, i couldn't have done it without you guys. the spacing was a bit tricky and the two sides of the car is not exactly the same. But what made it easy was the fact that everything was wet so i could move the block around until i was happy and then pressed out the water. I still want to add one row at the top were the scattered blocks start and put two more blocks at the end.
The worst i think is stil to come with the side mirrors.
But many thanks for your support so far!
The worst i think is stil to come with the side mirrors.
But many thanks for your support so far!

Thread
Thread Starter
Forum
Replies
Last Post
mimaal
R56 :: Hatch Talk (2007+)
7
09-04-2015 09:09 AM
M7Speed
R58 :: Coup� Talk (2012+)
0
09-03-2015 07:29 AM
M7Speed
R56 :: Hatch Talk (2007+)
0
09-03-2015 07:27 AM