
Interior/Exterior Matching factory gauges
#501
 11-16-2009, 08:45 PM


Neutral
Join Date: Jul 2009
Location: Miami Beach
Posts: 9
Likes: 0
Received 0 Likes
on
0 Posts
Got mine installed last Friday and couldn�t be happier with my first mod.
The diming issue is not a problem for me since I don�t usually mess with the dimmer settings and full bright doesn�t bother me. My installer, at his suggestion, connected the white lights for day driving and the amber for night driving (if I try and dim the amber it just switches to white).
I have noticed the vibrating needle issue and thanks to those that posted a fix, I will do so if/when it starts to get bothersome.
Many thanks to Steve for his effort; I only wish I could have gone to his shop for the install as a way to repay him.
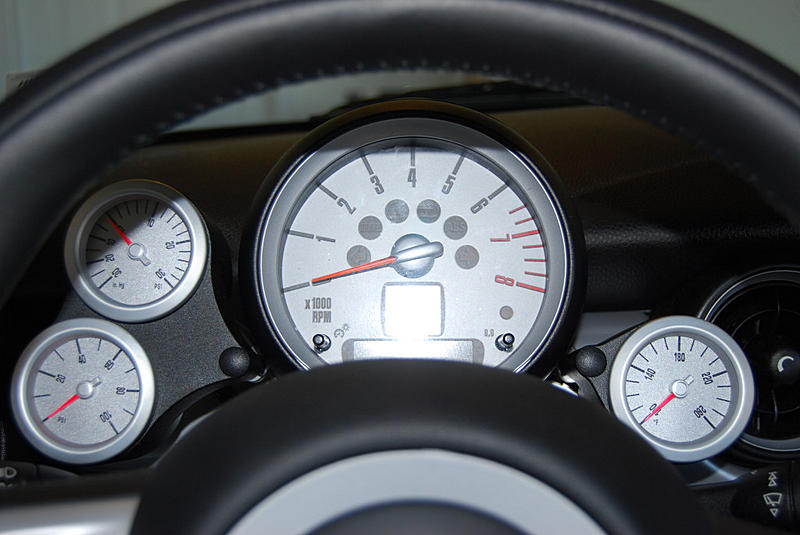
FYI, the gauges are oriented in such a way that the needle will point to about the 12 O'Clock direction when operating at its expected normal range.
The diming issue is not a problem for me since I don�t usually mess with the dimmer settings and full bright doesn�t bother me. My installer, at his suggestion, connected the white lights for day driving and the amber for night driving (if I try and dim the amber it just switches to white).
I have noticed the vibrating needle issue and thanks to those that posted a fix, I will do so if/when it starts to get bothersome.
Many thanks to Steve for his effort; I only wish I could have gone to his shop for the install as a way to repay him.
FYI, the gauges are oriented in such a way that the needle will point to about the 12 O'Clock direction when operating at its expected normal range.

#503
11-17-2009, 07:46 PM
Join Date: Dec 2007
Location: Lemoore, CA
Posts: 1,872
Likes: 0
Received 0 Likes
on
0 Posts
#504
11-18-2009, 07:08 AM

Former Vendor
Join Date: May 2005
Location: Oakhurst/Fresno, CA
Posts: 3,480
Likes: 0
Received 0 Likes
on
0 Posts
so i own the oil pressure and boost guage so far and plan on getting oil temp and water temp soon as well. this might be a stupid question, but would the oil pressure sending unit work as a oil temperature sending unit as well? i only ask since there are 2 contacts on the back, only 1 of which is used for pressure read-out. if not, how would one install a pressure and temperature sending unit?
Steve
#505
11-18-2009, 07:11 AM
Former Vendor
Join Date: May 2005
Location: Oakhurst/Fresno, CA
Posts: 3,480
Likes: 0
Received 0 Likes
on
0 Posts
#506
11-27-2009, 04:40 PM

Instead of putting up Christmas decorations today [  ] I decided to try and finish off the installation of my new stepper gauges (oil pres and water temp). Here's a clip of the result. The engine was already warm when I took this. I cycled through start up, turning on the lights, revved the engine to see the oil pressure response, turning off the lights, and shut down:
I wired the lights from the left front side marker light and used a relay to isolate the circuit (thanks a million to Marty for the wiring guidance with the relay). I used the Marshall dimmer and located it on the right rear of my Euro Parcel Shelf...here's a pic:

Steve, thanks for all of the hard work putting this together. I'm very happy with the result.
] I decided to try and finish off the installation of my new stepper gauges (oil pres and water temp). Here's a clip of the result. The engine was already warm when I took this. I cycled through start up, turning on the lights, revved the engine to see the oil pressure response, turning off the lights, and shut down:I wired the lights from the left front side marker light and used a relay to isolate the circuit (thanks a million to Marty for the wiring guidance with the relay). I used the Marshall dimmer and located it on the right rear of my Euro Parcel Shelf...here's a pic:
Steve, thanks for all of the hard work putting this together. I'm very happy with the result.
Last edited by Gil-galad; 11-29-2009 at 01:03 PM.
#507
11-28-2009, 03:04 PM

2nd Gear
Join Date: Dec 2005
Location: Dallas Texas
Posts: 89
Likes: 0
Received 0 Likes
on
0 Posts
#508
11-29-2009, 12:33 PM

2nd Gear
Join Date: Jul 2008
Location: Knoxville, TN
Posts: 145
Likes: 0
Received 0 Likes
on
0 Posts
Wiring Boost
I finally got around to wiring my Marshall boost gauge using the Alta Performance instructions. No joy.
I suspect I need to tweak my "T" connects, but feel I miss read the install.
I connected the "orange" wire and the "white" wire to the lighter. I also originally didn't connect the "Red" wire, but when first try failed I saw that "Red" needed to go to the OBDII hot line.
It had no effect.
I am not great with wiring, but I give it a go and do have gauge working.
Thanks for the "Cotton" solution. I thought I had a bad gauge chattering away.
I will contact Steve for a dimmer switch, but can any one point me to better wiring instructions?
Update......when door is opened and interior light go on, the gauge did have lights.
Thanks
Last edited by bearcat245; 11-30-2009 at 08:48 AM.
#509
11-30-2009, 10:26 AM
Former Vendor
Join Date: May 2005
Location: Oakhurst/Fresno, CA
Posts: 3,480
Likes: 0
Received 0 Likes
on
0 Posts
I finally got around to wiring my Marshall boost gauge using the Alta Performance instructions. No joy.
I suspect I need to tweak my "T" connects, but feel I miss read the install.
I connected the "orange" wire and the "white" wire to the lighter. I also originally didn't connect the "Red" wire, but when first try failed I saw that "Red" needed to go to the OBDII hot line.
It had no effect.
I am not great with wiring, but I give it a go and do have gauge working.
Thanks for the "Cotton" solution. I thought I had a bad gauge chattering away.
I will contact Steve for a dimmer switch, but can any one point me to better wiring instructions?
Update......when door is opened and interior light go on, the gauge did have lights.
Thanks
I suspect I need to tweak my "T" connects, but feel I miss read the install.
I connected the "orange" wire and the "white" wire to the lighter. I also originally didn't connect the "Red" wire, but when first try failed I saw that "Red" needed to go to the OBDII hot line.
It had no effect.
I am not great with wiring, but I give it a go and do have gauge working.
Thanks for the "Cotton" solution. I thought I had a bad gauge chattering away.
I will contact Steve for a dimmer switch, but can any one point me to better wiring instructions?
Update......when door is opened and interior light go on, the gauge did have lights.
Thanks
Steve
#510
11-30-2009, 11:42 AM

5th Gear
Hi all--
I just want to double-check to ensure that I didn't mis-read the info in this thread.
I am planning to get these for my '03 R53:
Thanks!
C ya,
Dutch
I just want to double-check to ensure that I didn't mis-read the info in this thread.
I am planning to get these for my '03 R53:
- Vac/Boost, 30" Hg - 30 PSI (mechanical)
- Oil pressure, 0-100 PSI (electric)
Thanks!
C ya,
Dutch
#511
11-30-2009, 12:44 PM
Former Vendor
Join Date: May 2005
Location: Oakhurst/Fresno, CA
Posts: 3,480
Likes: 0
Received 0 Likes
on
0 Posts
Hi all--
I just want to double-check to ensure that I didn't mis-read the info in this thread.
I am planning to get these for my '03 R53:
Thanks!
C ya,
Dutch
I just want to double-check to ensure that I didn't mis-read the info in this thread.
I am planning to get these for my '03 R53:
- Vac/Boost, 30" Hg - 30 PSI (mechanical)
- Oil pressure, 0-100 PSI (electric)
Thanks!
C ya,
Dutch
Steve
#512
11-30-2009, 09:00 PM
Join Date: Dec 2007
Location: Lemoore, CA
Posts: 1,872
Likes: 0
Received 0 Likes
on
0 Posts
I finally got around to wiring my Marshall boost gauge using the Alta Performance instructions. No joy.
I suspect I need to tweak my "T" connects, but feel I miss read the install.
I connected the "orange" wire and the "white" wire to the lighter. I also originally didn't connect the "Red" wire, but when first try failed I saw that "Red" needed to go to the OBDII hot line.
It had no effect.
I am not great with wiring, but I give it a go and do have gauge working.
Thanks for the "Cotton" solution. I thought I had a bad gauge chattering away.
I will contact Steve for a dimmer switch, but can any one point me to better wiring instructions?
Update......when door is opened and interior light go on, the gauge did have lights.
Thanks
I suspect I need to tweak my "T" connects, but feel I miss read the install.
I connected the "orange" wire and the "white" wire to the lighter. I also originally didn't connect the "Red" wire, but when first try failed I saw that "Red" needed to go to the OBDII hot line.
It had no effect.
I am not great with wiring, but I give it a go and do have gauge working.
Thanks for the "Cotton" solution. I thought I had a bad gauge chattering away.
I will contact Steve for a dimmer switch, but can any one point me to better wiring instructions?
Update......when door is opened and interior light go on, the gauge did have lights.
Thanks
Tron Chief
#513
12-01-2009, 04:48 AM
2nd Gear
Join Date: Jul 2008
Location: Knoxville, TN
Posts: 145
Likes: 0
Received 0 Likes
on
0 Posts
Bearcat if I'm understanding correctly you have power from the lighter to the red wire. Your ground can also use the lighter if you have not found a better source and for the lighting white gets you the white light which I did not use however connecting the orange wire to the DSC lighting circuit thus when I turned on the lights my gauges backlight worked also. The dimmer will also control the lights (NON STEPPER) by doing this method also.
Tron Chief
Tron Chief
Thanks post to 2nd gen with more detail since this thread is too long.
Update= moving
Last edited by bearcat245; 12-02-2009 at 06:22 AM. Reason: moving post to 2nd generation
#514
12-08-2009, 09:47 AM
Former Vendor
Join Date: May 2005
Location: Oakhurst/Fresno, CA
Posts: 3,480
Likes: 0
Received 0 Likes
on
0 Posts
New Stepper Boost Gauge
The Group Buy is still on through the end of December. New items in RED.
Group Buy Prices:
Vac/Boost, 30" Hg - 30 PSI (mechanical) $47.50
Vac/Boost, 30" Hg - 30 PSI (stepper) $102.50 (now with peak recall and warning)
Oil pressure, 0-100 PSI (electric) $59.50
Oil pressure, 0-100 PSI (stepper) $83.50
Water temperature, 100-260�F (electric) $53.50
Water temperature, 100-260�F (stepper) $77.50
Dimmer for stepper gauges $25.00
Oil temperature, 140-310�F (electric) $60.50 (only a few in stock)
Oil temperature, 140-310�F (stepper) $84.50
Voltmeter, 0-18V (electric) $48.50 (only a few in stock)
Voltmeter, 0-18V (stepper) $63.50
Oil pressure, oil temperature and water temperature gauges include the sending unit with 1/8" NPT connection.
Stepper motor gauges have peak recall and warning functions.
Shipping is $10 in the lower 48 states. Hawaii, Alaska and non-USA destinations will be determined individually.
The CravenSpeed mounting and adapters are going to be 10% off list price for this group buy. If you have any other CravenSpeed requests, I will offer 10% off those items during this group buy. Anyone with existing CravenSpeed mounts should be aware that the new mounts are powder coated instead of anodized so they won't match perfectly. I still have a few anodized pieces in stock so let me know.
Gauge Cup (52mm) gen1 and gen2 $49.00
Gauge Cup (dual 52mm) gen1 and gen2 $71.00
Bracket X (gen1) tach mount for cups $30.00
Bracket ZL (gen1) cup mount for chrono/nav $40.00
Bracket ZR (gen1) cup mount for chrono/nav $40.00
Bracket A (gen2) cup mount $45.00
Bracket R (gen2) single cup mount $40.00
Cup Caps (52mm) caps for back of cups $26.00
Tapless Adapter (gen1) oil pressure adapter $44.00
Tapless Adapter (gen2) oil pressure adapter $67.00
Hot Link (gen2) water temp adapter $54.00
PSIClone (gen2) vac/boost adapter $35.00
Please e-mail your billing and shipping addresses to gaugegb@blackoaks.com. Be sure to include your phone number and the gauges and mountings you want to buy. I will e-mail you an invoice for you to OK and then you can call me or vice-versa for the CC info. Some have e-mailed me the CC info which is OK if you are comfortable with that. I do not bill until I ship. You can call me if you have questions at 559.320.0004 Thanks.
Steve
New items in RED.Group Buy Prices:
Vac/Boost, 30" Hg - 30 PSI (mechanical) $47.50
Vac/Boost, 30" Hg - 30 PSI (stepper) $102.50 (now with peak recall and warning)
Oil pressure, 0-100 PSI (electric) $59.50
Oil pressure, 0-100 PSI (stepper) $83.50
Water temperature, 100-260�F (electric) $53.50
Water temperature, 100-260�F (stepper) $77.50
Dimmer for stepper gauges $25.00
Oil temperature, 140-310�F (electric) $60.50 (only a few in stock)
Oil temperature, 140-310�F (stepper) $84.50
Voltmeter, 0-18V (electric) $48.50 (only a few in stock)
Voltmeter, 0-18V (stepper) $63.50
Oil pressure, oil temperature and water temperature gauges include the sending unit with 1/8" NPT connection.
Stepper motor gauges have peak recall and warning functions.
Shipping is $10 in the lower 48 states. Hawaii, Alaska and non-USA destinations will be determined individually.
The CravenSpeed mounting and adapters are going to be 10% off list price for this group buy. If you have any other CravenSpeed requests, I will offer 10% off those items during this group buy. Anyone with existing CravenSpeed mounts should be aware that the new mounts are powder coated instead of anodized so they won't match perfectly. I still have a few anodized pieces in stock so let me know.
Gauge Cup (52mm) gen1 and gen2 $49.00
Gauge Cup (dual 52mm) gen1 and gen2 $71.00
Bracket X (gen1) tach mount for cups $30.00
Bracket ZL (gen1) cup mount for chrono/nav $40.00
Bracket ZR (gen1) cup mount for chrono/nav $40.00
Bracket A (gen2) cup mount $45.00
Bracket R (gen2) single cup mount $40.00
Cup Caps (52mm) caps for back of cups $26.00
Tapless Adapter (gen1) oil pressure adapter $44.00
Tapless Adapter (gen2) oil pressure adapter $67.00
Hot Link (gen2) water temp adapter $54.00
PSIClone (gen2) vac/boost adapter $35.00
Please e-mail your billing and shipping addresses to gaugegb@blackoaks.com. Be sure to include your phone number and the gauges and mountings you want to buy. I will e-mail you an invoice for you to OK and then you can call me or vice-versa for the CC info. Some have e-mailed me the CC info which is OK if you are comfortable with that. I do not bill until I ship. You can call me if you have questions at 559.320.0004 Thanks.
Steve
#515
12-08-2009, 08:48 PM
Join Date: Dec 2007
Location: Lemoore, CA
Posts: 1,872
Likes: 0
Received 0 Likes
on
0 Posts
#516
12-09-2009, 07:56 AM

Steve,
Does the new stepper version of the Vac/Boost still require the vacuum hose to go all the way to the gauge, or is there a new sender that converts the pressure/boost to an electrical signal at the manifold?
Thanks!
Tom
PS - Finally got all four gauges working! Only problem now is that the back lighting comes on whenever I apply the brakes . I guess I tapped the brake light wire instead of the the tail light wire!
  Easy fix.
Does the new stepper version of the Vac/Boost still require the vacuum hose to go all the way to the gauge, or is there a new sender that converts the pressure/boost to an electrical signal at the manifold?
Thanks!
Tom
PS - Finally got all four gauges working! Only problem now is that the back lighting comes on whenever I apply the brakes
. I guess I tapped the brake light wire instead of the the tail light wire! Easy fix.
#517
12-09-2009, 08:15 AM
Former Vendor
Join Date: May 2005
Location: Oakhurst/Fresno, CA
Posts: 3,480
Likes: 0
Received 0 Likes
on
0 Posts
Steve,
Does the new stepper version of the Vac/Boost still require the vacuum hose to go all the way to the gauge, or is there a new sender that converts the pressure/boost to an electrical signal at the manifold?
Thanks!
Tom
PS - Finally got all four gauges working! Only problem now is that the back lighting comes on whenever I apply the brakes. I guess I tapped the brake light wire instead of the the tail light wire! Easy fix.
Does the new stepper version of the Vac/Boost still require the vacuum hose to go all the way to the gauge, or is there a new sender that converts the pressure/boost to an electrical signal at the manifold?
Thanks!
Tom
PS - Finally got all four gauges working! Only problem now is that the back lighting comes on whenever I apply the brakes
. I guess I tapped the brake light wire instead of the the tail light wire! Easy fix. Finding the correct wires is always the most fun.Steve
#518
12-13-2009, 09:21 PM
Join Date: Dec 2007
Location: Lemoore, CA
Posts: 1,872
Likes: 0
Received 0 Likes
on
0 Posts
#519
12-14-2009, 09:46 AM
Former Vendor
Join Date: May 2005
Location: Oakhurst/Fresno, CA
Posts: 3,480
Likes: 0
Received 0 Likes
on
0 Posts
Steve
#520
12-18-2009, 04:36 AM
#521
12-18-2009, 05:28 AM
Join Date: Dec 2007
Location: Lemoore, CA
Posts: 1,872
Likes: 0
Received 0 Likes
on
0 Posts

#522
12-18-2009, 07:22 AM

3rd Gear
Join Date: May 2007
Location: Eastern Panhandle, WV
Posts: 183
Likes: 0
Received 0 Likes
on
0 Posts
Attached Thumbnails

__________________

#524
12-19-2009, 10:50 AM
I've got all four gauges setup in two Craven Dual Pods in my R56. I'm out of town right now, but will snap a few pics and post them when I get back next week.
Tom