
Interior/Exterior My Blackout Mod Saga...how to black out just about everthing
#1
 07-10-2009 | 09:34 PM

My Blackout Mod Saga...how to black out just about everthing
This story starts when I got my MINI...that's about it. I decided I wanted it to be dark and that's what I did.
So here it goes.

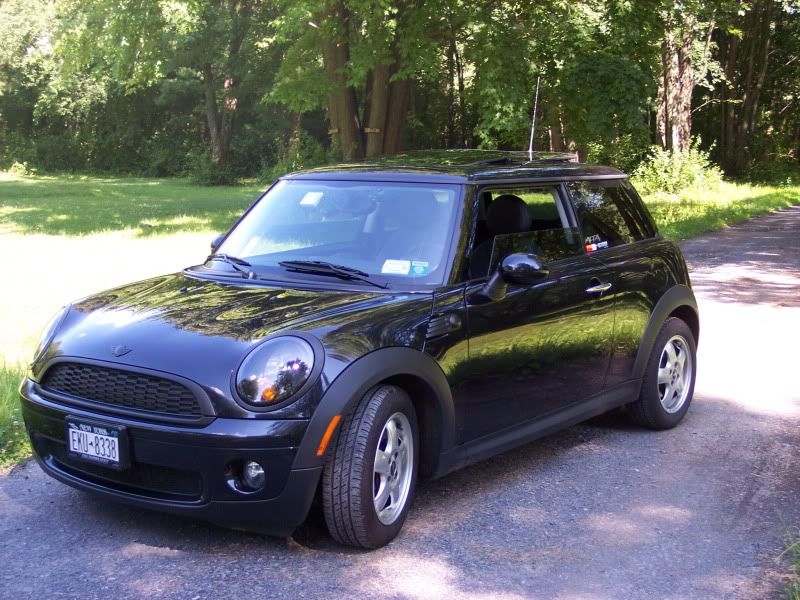
My Mini started out looking like this.
The Beltline
I purchased the kit from OutMotoring, cheap and good. Threw it on the car simple and easy. Take a little alcohol and clean it up first...then apply slowly and take your time...you get a little extra if you really mess up.
Allow the beltline to run a little bit over the black plastic on the ends because when it heats up it will shrink a tad bit.
After you put it on there is a clear plastic coating that you need to pull off on all the back trim...don't forget to take it off because if you do it will start to peal over time and when you do take it off all the black vinyl will have a sticky residue on it.
Side Reflectors
When you get your beltline kit order the side reflector tint...it's not a huge difference...but enough to make a nice subtle change.
The gas cap
Open the gas cap and on the inside of (+07 models) the cap their is a small clip which needs to be prided down a little bit with a flat head screw driver. While you are carefully prying this down grab the silver cap and turn it counter-clockwise and it should pop off with a little bit of force.
After that clean it with some alcohol and then use plasti-dip (lowes) and give it a nice even coat. Make sure it is suspended by the unpainted side and plasti dip likes to stick to everything. Do 3 coats...if you mess up don't worry...peal off and try again. Let dry and then put back on the car...it should click into place... wiggle it around some to make sure it stays in place.

Sorry...he's a bit dirty right now
Tail light Rings
Similar to the gas cap you need to pry the chrome trim off. Use a large flat head screwdriver and a micro fiber towel. Use the towel to protect the car, trim, and light from the metal screwdriver. Don't be a bi7ch and just go at them. Proceed to pop off the trim and be careful not to let it fall on the ground... as that's just not any good for the trim. Do the same thing and paint (3 coats) of plasti-dip on these bad boys. Avoid painting the tabs to heavy as this would create problems putting it back on. Let them dry and pop them back into place.
Head Light Rings
I did them with plasti dip... some people will say it will come off do to chipping from stones and stuff... I say if stone are hitting the front of your car then you have more thing to worry about then your plasti-dipped rings.
This is pretty simple...for (+07) the tabs wont break easy on these newer rings so not much to worry about. Simply open the hood and using a flat head press the tabs in around the ring carefully pulling them up. Once you have done this you can plasti dip them (4 coats min)
The trick here is that you need to cover both sides of the rings in order to get the palsti dip to stay, getting both sides leaves the edges totally covered and the plasti-dip will prevent itself from peeling, if you only do the one side it can easily peal...especially if a microfiber cloth catches it. Attempt to avoid the clips but its not a major deal...they will still work
If you have the washers-xenon-then do a similar thing painting both sides to prevent peeling, just cover the tabs and holes that the jets attach with. These can be easily taken off and the jets can be pulled out some to make it easier.

...ooooo
Side Scuttles
Slide off car...depending on which one you have tape off what you don't want painted...plasti-dip yet again (3 coats) and toss back on the car.


The Joey Mod (a.k.a) black headlights
This mod is not for everyone including the faint of heart, those that may be pregnant, nursing, or simply not technically inclined. Side effects may include and are not limited to swearing, nervous bladder, or a $500+ credit card charge for replacements.
For the willing. I found most my information here...
https://www.northamericanmotoring.co...tructions.html
I'll give some process notes too...
1. Remove the four bolts holding the headlights to the car
2. Unhook power and the washer jets (pull off clip and be careful not to send it flying or loose it)
3. Unscrew 2 torx holding the washer jets onto the headlamp.
4. Remove the 2 metal clips
5. Using a heat gun slowly heat the seal and pry with a flat head screwdriver.(You will probably mark up the edges where you use the screw driver... it is OK the thing will still seal back up just be careful doing this.
6. Once you get it started just keep heating and pulling it off.

7. Remove all the plastic chrome bits and scuff, clean with alcohol.


8. Paint..is up to you, and yes I know you had hopes that I would tell you the best paint you can use...sorry I just don't know. I used a plastic paint...it work well even on for 1 hour but it ended up melting in a half hour one day in one spot... on both lamps...I could suggest using primer and a high heat paint...although they suggest not to use primer with high heat...I remedied mine by using an auto quality carbon fiber sheeting with adhesive backing and some super glue. Due to the convex shape created on the black paint above the blinker it causes the pinpoint at the light to overheat and melt...after adding the carbon fiber with a glossy surface the melted part was covered and melting went away...problem solved.

9. You can darken the blinker by painting the chrome behind it also...I decided not too... but hey its your car...I hope
10. Reassemble the backing...make sure the inside of the lens is clean and dust free...use a clean microfiber cloth and some alcohol to clean it...using oily substances= bad idea.
10. Reheat and resemble the whole thing...put back in car and align lights
P.S Don't forget to reattach the blinker...save yourself some time in trying to get it back together all sealed up.
Rims
Using a can of plasti dip... I'm kidding, if you want... get your current nice rims powder coated. I got the bigger 18" JCW cross-spokes.
Here is what you do
1. Call Dealer
2. Ask for Nice black rims
3. Order Rims
4. Bring Car to dealer
5. Get hit by other car across street from dealer on way there (Don't worry, it's OK they hit me dead on the old rim, put a small cut into the rim but that's all...I got lucky)
6. Get rims installed...empty remaining cash leftover from purchasing Mini cooper on rims... sell house.
Door Handles
Yes I did install the black jack handles myself... but no I am not god and I will not explain how...instead here is a link for the guy that I got it from and he did a great job explaining the process. BTW this is a pain- but it can be done...I recommend a friend with time to help...not required. Do one a day as your hand will cramp up easily.
https://www.northamericanmotoring.co...nels-07-a.html
I attempted to do a blackout mod on the handles with plasti-dip but it is very difficult to do without taking them off and not having the plasti-dip peal when taking off the tape from masking the car. So I ditched that Idea and ended up doing this and presto... black jack flair.

In the future I plan on panting the wings of the emblems black and I have a interior red light kit coming. I decide not to do tinted windows because I don't like how it comes out with the rear window heater... and I don't like how everyone is always pushing you to do something illegal when it comes to tint...(in NY) when your red car already looks to fast sitting still
I also put in the carbon fiber boot and bonnet. Those are pretty much self explanatory.
Good luck with all your black out mods.
~RobBob


So here it goes.
My Mini started out looking like this.
The Beltline
I purchased the kit from OutMotoring, cheap and good. Threw it on the car simple and easy. Take a little alcohol and clean it up first...then apply slowly and take your time...you get a little extra if you really mess up.
Allow the beltline to run a little bit over the black plastic on the ends because when it heats up it will shrink a tad bit.
After you put it on there is a clear plastic coating that you need to pull off on all the back trim...don't forget to take it off because if you do it will start to peal over time and when you do take it off all the black vinyl will have a sticky residue on it.
Side Reflectors
When you get your beltline kit order the side reflector tint...it's not a huge difference...but enough to make a nice subtle change.
The gas cap
Open the gas cap and on the inside of (+07 models) the cap their is a small clip which needs to be prided down a little bit with a flat head screw driver. While you are carefully prying this down grab the silver cap and turn it counter-clockwise and it should pop off with a little bit of force.
After that clean it with some alcohol and then use plasti-dip (lowes) and give it a nice even coat. Make sure it is suspended by the unpainted side and plasti dip likes to stick to everything. Do 3 coats...if you mess up don't worry...peal off and try again. Let dry and then put back on the car...it should click into place... wiggle it around some to make sure it stays in place.
Sorry...he's a bit dirty right now
Tail light Rings
Similar to the gas cap you need to pry the chrome trim off. Use a large flat head screwdriver and a micro fiber towel. Use the towel to protect the car, trim, and light from the metal screwdriver. Don't be a bi7ch and just go at them. Proceed to pop off the trim and be careful not to let it fall on the ground... as that's just not any good for the trim. Do the same thing and paint (3 coats) of plasti-dip on these bad boys. Avoid painting the tabs to heavy as this would create problems putting it back on. Let them dry and pop them back into place.
Head Light Rings
I did them with plasti dip... some people will say it will come off do to chipping from stones and stuff... I say if stone are hitting the front of your car then you have more thing to worry about then your plasti-dipped rings.
This is pretty simple...for (+07) the tabs wont break easy on these newer rings so not much to worry about. Simply open the hood and using a flat head press the tabs in around the ring carefully pulling them up. Once you have done this you can plasti dip them (4 coats min)
The trick here is that you need to cover both sides of the rings in order to get the palsti dip to stay, getting both sides leaves the edges totally covered and the plasti-dip will prevent itself from peeling, if you only do the one side it can easily peal...especially if a microfiber cloth catches it. Attempt to avoid the clips but its not a major deal...they will still work
If you have the washers-xenon-then do a similar thing painting both sides to prevent peeling, just cover the tabs and holes that the jets attach with. These can be easily taken off and the jets can be pulled out some to make it easier.
...ooooo
Side Scuttles
Slide off car...depending on which one you have tape off what you don't want painted...plasti-dip yet again (3 coats) and toss back on the car.
The Joey Mod (a.k.a) black headlights
This mod is not for everyone including the faint of heart, those that may be pregnant, nursing, or simply not technically inclined. Side effects may include and are not limited to swearing, nervous bladder, or a $500+ credit card charge for replacements.
For the willing. I found most my information here...
https://www.northamericanmotoring.co...tructions.html
I'll give some process notes too...
1. Remove the four bolts holding the headlights to the car
2. Unhook power and the washer jets (pull off clip and be careful not to send it flying or loose it)
3. Unscrew 2 torx holding the washer jets onto the headlamp.
4. Remove the 2 metal clips
5. Using a heat gun slowly heat the seal and pry with a flat head screwdriver.(You will probably mark up the edges where you use the screw driver... it is OK the thing will still seal back up just be careful doing this.
6. Once you get it started just keep heating and pulling it off.
7. Remove all the plastic chrome bits and scuff, clean with alcohol.
8. Paint..is up to you, and yes I know you had hopes that I would tell you the best paint you can use...sorry I just don't know. I used a plastic paint...it work well even on for 1 hour but it ended up melting in a half hour one day in one spot... on both lamps...I could suggest using primer and a high heat paint...although they suggest not to use primer with high heat...I remedied mine by using an auto quality carbon fiber sheeting with adhesive backing and some super glue. Due to the convex shape created on the black paint above the blinker it causes the pinpoint at the light to overheat and melt...after adding the carbon fiber with a glossy surface the melted part was covered and melting went away...problem solved.
9. You can darken the blinker by painting the chrome behind it also...I decided not too... but hey its your car...I hope
10. Reassemble the backing...make sure the inside of the lens is clean and dust free...use a clean microfiber cloth and some alcohol to clean it...using oily substances= bad idea.
10. Reheat and resemble the whole thing...put back in car and align lights
P.S Don't forget to reattach the blinker...save yourself some time in trying to get it back together all sealed up.
Rims
Using a can of plasti dip... I'm kidding, if you want... get your current nice rims powder coated. I got the bigger 18" JCW cross-spokes.
Here is what you do
1. Call Dealer
2. Ask for Nice black rims
3. Order Rims
4. Bring Car to dealer
5. Get hit by other car across street from dealer on way there (Don't worry, it's OK they hit me dead on the old rim, put a small cut into the rim but that's all...I got lucky)
6. Get rims installed...empty remaining cash leftover from purchasing Mini cooper on rims... sell house.
Door Handles
Yes I did install the black jack handles myself... but no I am not god and I will not explain how...instead here is a link for the guy that I got it from and he did a great job explaining the process. BTW this is a pain- but it can be done...I recommend a friend with time to help...not required. Do one a day as your hand will cramp up easily.
https://www.northamericanmotoring.co...nels-07-a.html
I attempted to do a blackout mod on the handles with plasti-dip but it is very difficult to do without taking them off and not having the plasti-dip peal when taking off the tape from masking the car. So I ditched that Idea and ended up doing this and presto... black jack flair.
In the future I plan on panting the wings of the emblems black and I have a interior red light kit coming. I decide not to do tinted windows because I don't like how it comes out with the rear window heater... and I don't like how everyone is always pushing you to do something illegal when it comes to tint...(in NY) when your red car already looks to fast sitting still
I also put in the carbon fiber boot and bonnet. Those are pretty much self explanatory.
Good luck with all your black out mods.
~RobBob
Last edited by redbullfx2; 07-10-2009 at 09:43 PM.

#3
07-11-2009 | 05:34 AM
Are you also a sidewalk chalk artist on the side?
Welcome to the country...that's why i have a hard time keeping my car clean + I'm the only one who owns a Mini in my town... not to may waving opportunities.
#4
07-11-2009 | 10:44 AM
5th Gear
Joined: Jul 2008
Posts: 601
Likes: 0
I just did everythig you did a few months back except for the door handles because of the comfort access button and the rims. I'm going to order a set of hp blitz 17 inch wheels. As so the Joey mod. Once you do it you realize it's not that hard an well worth the four hours it took me to do. Oh and plastidip is a great invention.
#7
07-11-2009 | 03:01 PM
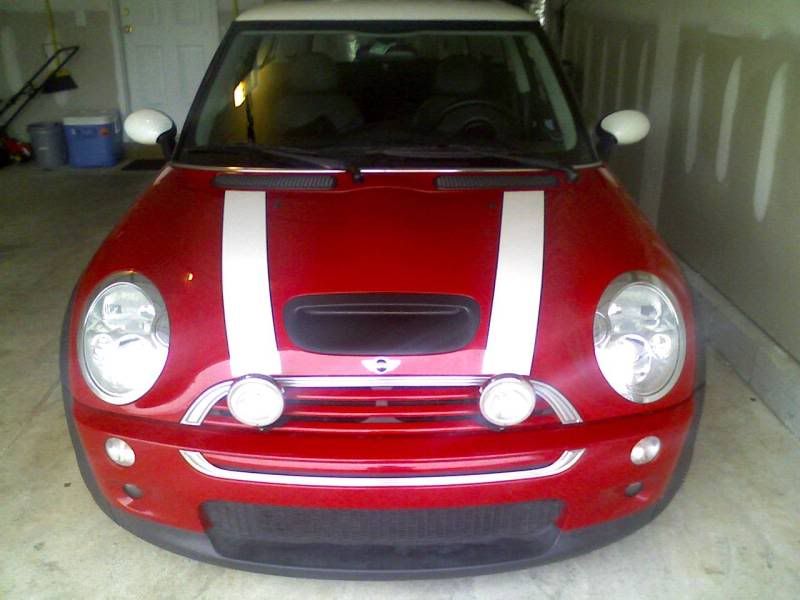
This is the best I could do... it have been pretty rainy lately and its in the garage but I opened all the door and hit all the lights I could.
The last few are some shots of what it looked like when i got it at the dealer...I included them because it was nice and bright out.


The last few are some shots of what it looked like when i got it at the dealer...I included them because it was nice and bright out.
Trending Topics
#9
07-11-2009 | 03:19 PM
I have some Prima wax and some cleaning stuff and a random orbital buffer on the way really soon so I plan on giving it a really good shine. When I do ill post some better photos.

#12
09-24-2009 | 11:00 AM

1st Gear
Joined: Sep 2009
Posts: 18
Likes: 0
#13
09-24-2009 | 11:55 AM
#14
09-24-2009 | 12:05 PM
1st Gear
Joined: Sep 2009
Posts: 18
Likes: 0
#17
12-07-2009 | 10:55 AM

3rd Gear
Joined: Mar 2008
Posts: 180
Likes: 1
From: Boynton Beach FL
Good thread and really looks nice, good job
Another option for the beltline BO is to get 150ft roll from:
3m.hillas.com/p-24305-3m-72893-scotchcal-striping-tape-low-gloss-black-3.aspx
Its 3/4 inch x150ft $31.55. They also have a glossy finish and pretty much any vinyl size you would ever need. The outmotoring vinyl is good and if you think you can do it perfectly the first time without any major screw ups then it should be fine. I purchased it and really screwed up and did not have enough for a redo. Now I have enough to last me for a looooooooong time
#19
01-26-2010 | 10:00 AM

1st Gear
Joined: Dec 2009
Posts: 38
Likes: 0
Plasti-dip is awesome. So far I have done my hood scoop and just finished the side mirrors(broke one of the tabs...ugh). Tomorrow I'm doing my wing =).....then when the weekend hits ill do the light rings, side scuttles, grille, and rally lights. I will post pictures then.
Last edited by New_sacred_cow; 01-26-2010 at 10:06 AM.

#22
01-28-2010 | 06:47 PM
#23
01-28-2010 | 07:48 PM