
Interior/Exterior Interior question
#1
 04-27-2010 | 02:13 PM

Thread Starter
|
Banned
Joined: Apr 2010
Posts: 71
Likes: 0
From: Dallas, Texas
Interior question
Just purchased my Mini last Saturday, and the down tubes and interior door handles are worn, and need to be repainted.
My question is how do you remove the the down tubes and the door handles.
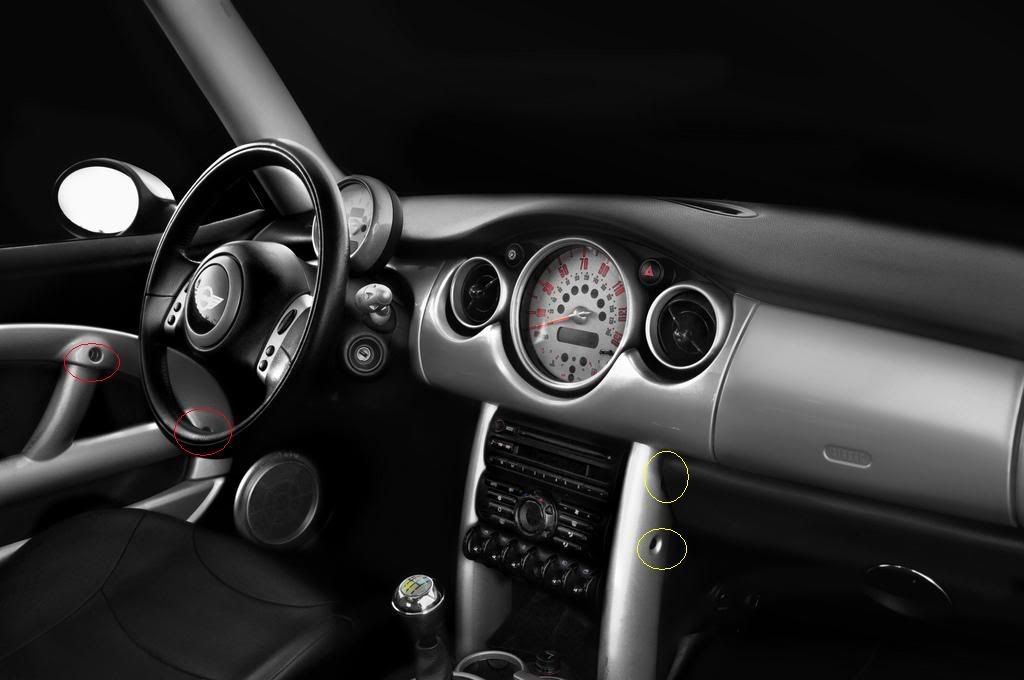
I noticed two screws on the downtubes as marked by yellow circles in the photo of my interior. The passenger side looks like a no brainer open the glove box to get to the top screw, how do you remove the top screw on the drivers side. Does that panel under the steering assembly come off.
On the door handles I have circled two of the screws with red circles, there is a third screw that didn't make it in the photo. If I remove those three screws will the door handle come off or are there more steps needed. I don't want to start hacking the car up, but want to bring them back to the showroom look.
Thanks in advance. Photo below.

My question is how do you remove the the down tubes and the door handles.
I noticed two screws on the downtubes as marked by yellow circles in the photo of my interior. The passenger side looks like a no brainer open the glove box to get to the top screw, how do you remove the top screw on the drivers side. Does that panel under the steering assembly come off.
On the door handles I have circled two of the screws with red circles, there is a third screw that didn't make it in the photo. If I remove those three screws will the door handle come off or are there more steps needed. I don't want to start hacking the car up, but want to bring them back to the showroom look.
Thanks in advance. Photo below.
#2
04-27-2010 | 02:24 PM
Best of luck with your new MINI !  And you have an awesome signature already
Panel below flips down and is hinged at bottom. Grab opening under the steering column and pull downwards hard. Sometimes I bang my knee doing this while seated as it seems to be the best position when doing so....
You also have to pop the center console panel for the heated seats and remove the phillips head screw(s) under there, and the ones at the bottom of the cup holders. This allows you to articulate the center console back some to free up the bottom of the down tubes.
And you have an awesome signature already Panel below flips down and is hinged at bottom. Grab opening under the steering column and pull downwards hard. Sometimes I bang my knee doing this while seated as it seems to be the best position when doing so....
You also have to pop the center console panel for the heated seats and remove the phillips head screw(s) under there, and the ones at the bottom of the cup holders. This allows you to articulate the center console back some to free up the bottom of the down tubes.
Last edited by -=gRaY rAvEn=-; 04-27-2010 at 02:34 PM.
#3
04-27-2010 | 02:30 PM
Look for heading "How to Remove Interior Bits" in this thread, has photos.
http://www.mini2.com/forum/faq.php?f...line_interrior
http://www.mini2.com/forum/faq.php?f...line_interrior
#4
04-27-2010 | 03:28 PM
Thread Starter
|
Banned
Joined: Apr 2010
Posts: 71
Likes: 0
From: Dallas, Texas
Best of luck with your new MINI ! And you have an awesome signature already
Panel below flips down and is hinged at bottom. Grab opening under the steering column and pull downwards hard. Sometimes I bang my knee doing this while seated as it seems to be the best position when doing so....
You also have to pop the center console panel for the heated seats and remove the phillips head screw(s) under there, and the ones at the bottom of the cup holders. This allows you to articulate the center console back some to free up the bottom of the down tubes.
And you have an awesome signature already Panel below flips down and is hinged at bottom. Grab opening under the steering column and pull downwards hard. Sometimes I bang my knee doing this while seated as it seems to be the best position when doing so....
You also have to pop the center console panel for the heated seats and remove the phillips head screw(s) under there, and the ones at the bottom of the cup holders. This allows you to articulate the center console back some to free up the bottom of the down tubes.
Thanks for the tips.
#5
04-27-2010 | 03:56 PM

Best of luck with your new MINI ! And you have an awesome signature already
Panel below flips down and is hinged at bottom. Grab opening under the steering column and pull downwards hard. Sometimes I bang my knee doing this while seated as it seems to be the best position when doing so....
You also have to pop the center console panel for the heated seats and remove the phillips head screw(s) under there, and the ones at the bottom of the cup holders. This allows you to articulate the center console back some to free up the bottom of the down tubes.
And you have an awesome signature already Panel below flips down and is hinged at bottom. Grab opening under the steering column and pull downwards hard. Sometimes I bang my knee doing this while seated as it seems to be the best position when doing so....
You also have to pop the center console panel for the heated seats and remove the phillips head screw(s) under there, and the ones at the bottom of the cup holders. This allows you to articulate the center console back some to free up the bottom of the down tubes.
On the door panels - bad news. The screws identified (plus one under the reflector near the rear of the door) must be removed to remove the panel, but the handle itself is attached to the panel with melted plastic 'rivets'. To remove the handle you need to grind/cut the rivets off, then glue it back on after painting.
#6
04-27-2010 | 05:14 PM

when i wrapped mine, i did the whole center console thing and still found it pretty difficult to take them out. it was hard to pull down and angle out... losening the dash seems like it wouldve been easier!
o well, good tip for next time.
#7
04-28-2010 | 08:52 AM
Thread Starter
|
Banned
Joined: Apr 2010
Posts: 71
Likes: 0
From: Dallas, Texas
On the door panels - bad news. The screws identified (plus one under the reflector near the rear of the door) must be removed to remove the panel, but the handle itself is attached to the panel with melted plastic 'rivets'. To remove the handle you need to grind/cut the rivets off, then glue it back on after painting.
Trending Topics

#9
04-28-2010 | 09:58 AM

Best of luck with your new MINI ! And you have an awesome signature already
Panel below flips down and is hinged at bottom. Grab opening under the steering column and pull downwards hard. Sometimes I bang my knee doing this while seated as it seems to be the best position when doing so....
You also have to pop the center console panel for the heated seats and remove the phillips head screw(s) under there, and the ones at the bottom of the cup holders. This allows you to articulate the center console back some to free up the bottom of the down tubes.
And you have an awesome signature already Panel below flips down and is hinged at bottom. Grab opening under the steering column and pull downwards hard. Sometimes I bang my knee doing this while seated as it seems to be the best position when doing so....
You also have to pop the center console panel for the heated seats and remove the phillips head screw(s) under there, and the ones at the bottom of the cup holders. This allows you to articulate the center console back some to free up the bottom of the down tubes.
#10
04-28-2010 | 10:01 AM
#12
04-28-2010 | 01:55 PM
Thread Starter
|
Banned
Joined: Apr 2010
Posts: 71
Likes: 0
From: Dallas, Texas
Just an FYI - the way I got the downtubes out without removing the cupholder was to remove the torx screw under the right hand side of the speedometer and removed the anthracite trim piece below the speedo. It allowed the downtubes to move enough from the top to be removed. Just my $.02
Thanks Billy!!!
#13
04-29-2010 | 02:21 AM
Are you sure about that? The '05+ has a removable armrest, but my '04 has the armrests stuck on, in addition to three *tiny* torx screws that can seemingly can only be accessed if the handle/armrest is removed.


#17
07-29-2010 | 02:09 PM
Thanks, as i said it was a first attempt, was thinking of doing black, but then i said, too much black, I may do the door trim black, just to see how it looks. I picked up all extra trim peices just incase I screwed up. Just waiting on the speedo and tach trim ring, and then I will paint that.
looked at your photo's and the red looks real nice, actually my favorite color on a Mini

Thread
Thread Starter
Forum
Replies
Last Post
igzekyativ
MINIs & Minis for Sale
34
07-16-2020 12:54 PM
chandler_vt
F55/F56 :: Hatch Talk (2014+)
51
04-29-2017 08:08 AM