
Interior/Exterior DIY VINYL over PlastiDip Headlight Rings
#1
 03-04-2011 | 05:00 PM

Thread Starter
|
3rd Gear
Joined: Nov 2010
Posts: 176
Likes: 0
DIY VINYL over PlastiDip Headlight Rings
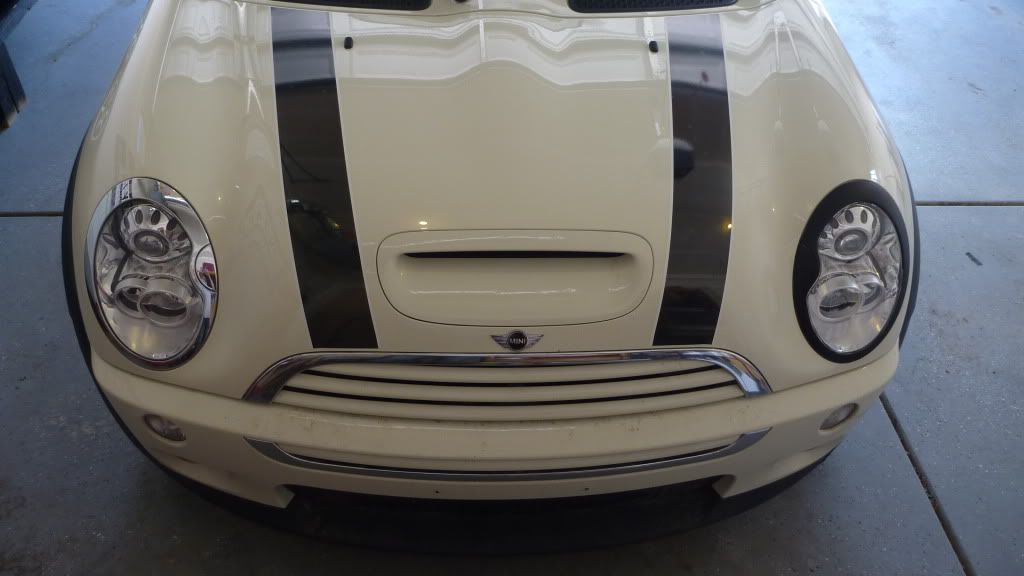
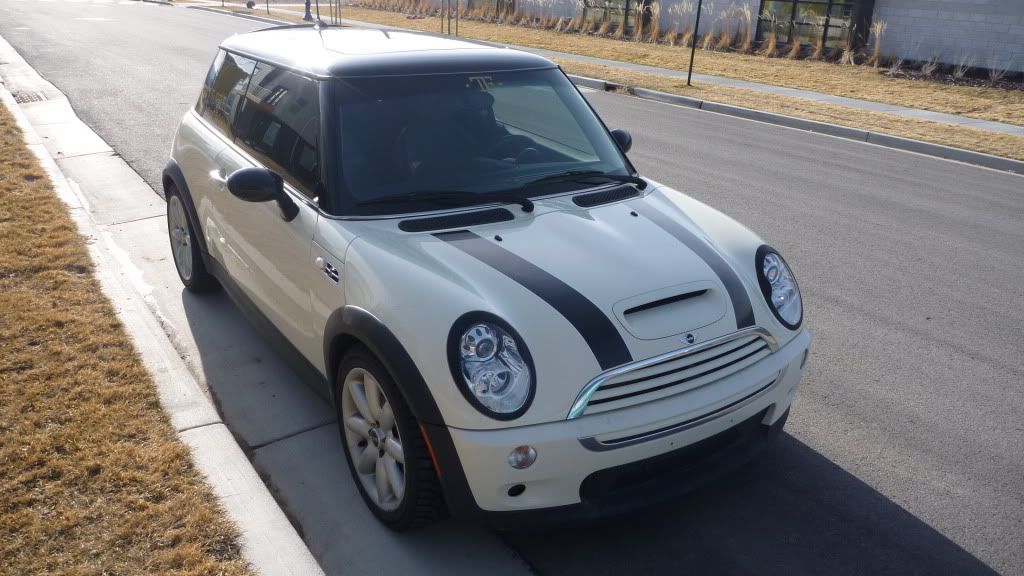
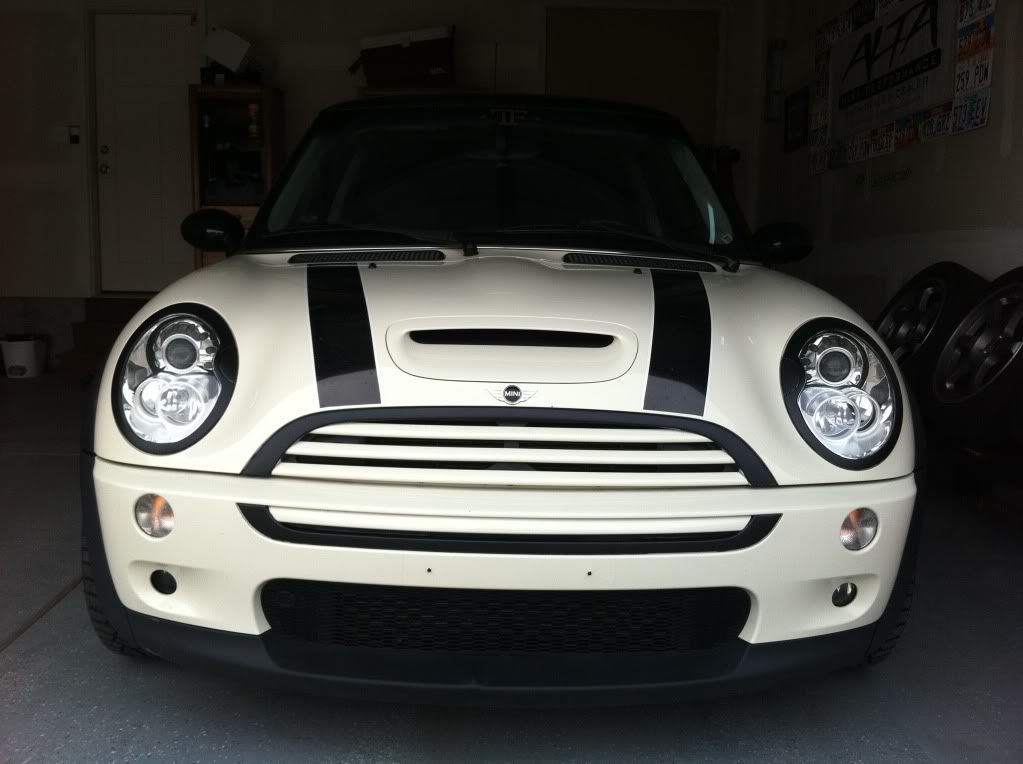
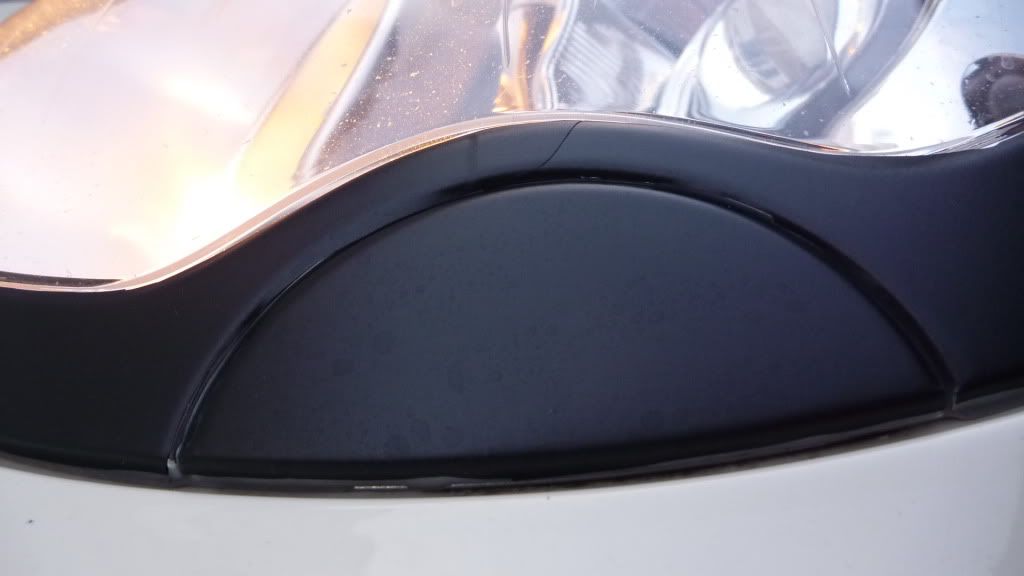
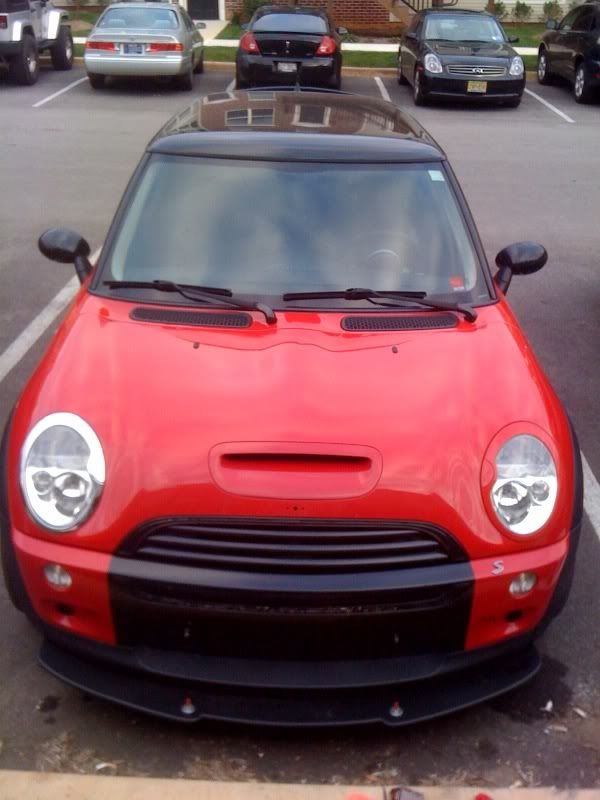
Taught myself to vinyl wrap. This was my first try ever. This cost me a lot less to do. Also I think if you get a kit it is probably equally hard to put on yourself. I think I could probably improve a bit, but I liked this option over painting the rings:
#2
03-04-2011 | 05:47 PM

6th Gear
Joined: Jun 2010
Posts: 3,334
Likes: 4
From: Vancouver Island, Canada


#6
03-05-2011 | 03:25 PM

1st Gear
Joined: Feb 2011
Posts: 42
Likes: 0
From: SF Bay Area, CA, USA
#7
03-05-2011 | 03:36 PM

Trending Topics
#8
03-05-2011 | 03:39 PM

4th Gear
Joined: Dec 2010
Posts: 450
Likes: 0
From: New York, NY
#9
03-05-2011 | 04:09 PM
Thread Starter
|
3rd Gear
Joined: Nov 2010
Posts: 176
Likes: 0
I have a good friend that does clear bra on a lot of really high end cars. He has done 2 Enzo's amongst other things. Anyway, I called him Friday on my way back from work and asked what he would charge me to do this for me? He said it was really easy to do and that I should just go to a sign shop and buy a roll of satin black vinyl.
-Vinyl is a generic brand from the local sign shop. Not a 3M or other name brand I recognized. I can call and ask to see exactly what they call it.
-No heat gun needed. The hardest part was tucking the edges. i need to play with that a bit more, mine definitely are not perfect, but aren't terrible. No wrinkles, bubbles, magic leprechauns etc.
-As for the amount of skill and time etc, I would say it will be different for everyone. I have worked with a lot of different media's in the past, so this was just a small curve, but I understand it pretty well already. I think if I were to do one more car (I will be doing my wife's black mini next week) I would feel confident enough to start doing vinyl work for locals out of our shop. I am pretty sure I could do tail lights and badges as well.
A roll of vinyl isn't too expensive though I don't know the exact brand of mine.
-My advice is to just buy a little vinyl and see if you can do it or not? I don't think it was hard compared to the amount of time it took me to do motor work on my car. Even the sway bar kills this for time taking. I think some people can do this easily, and it could be difficult for others.
-I also ran a small strip around some of the edges to really hide the chrome. I don't know if this technique will work with other colors, but the satin black completely hides the lines from layering the vinyl on top of itself.
OK any other questions? I will report on how well it lasts. It wasn't that expensive though so if I have to pull it off in 6 months and re do it, I won't be too bothered.
I will make a video maybe when I do the next one. I may make some really cheap kits I can sell you guys to do it. Basically just charge the cost of materials and shipping.
#10
03-09-2011 | 03:17 PM

2nd Gear
Joined: Feb 2011
Posts: 136
Likes: 0
HELP!!
Tanuki,
I purchased a $50 roll of ORACAL vinyl which I am told is an excellent product. Tonight I attempted to wrap a headlight ring and failed terribly.
I tries using it dry and wet with a 50/50 alcohol water mix.
I made a donut about one inch wider than the headlight ring and made slices with a razor every inch to allow for wrapping due to the curves. I had wrinkle after wrinkle and I was told be careful not to pull too much and stretch the vinyl.
I have built RC Airplanes and i am not "hobby challenged".
I tried my head gun and iron to smooth the wrinkles but nothing helped. I ruined two large pieces of vinyl am frustrated.....any help..from anyone?
#11
03-09-2011 | 05:01 PM
Thread Starter
|
3rd Gear
Joined: Nov 2010
Posts: 176
Likes: 0
Mini15235,
How much of the vinyl do you have left?
In my opinion, the best thing you can do is start with a square/ rectangle rather than cutting the center out from the get go.
Start on the outside edge and press as you continue around the ring.
I have the wiper cleaners so what I did, was wrap till I was halfway around the wiper cleaner. Then I wrapped from the other side till I was about halfway around the wiper cleaner. At this point you should have pushed the bumps and wrinkles from both sides to one central and large wrinkle. Make a slit in that wrinkle and adjust the to points so that they line up. You result with a very small seam, but the line is so tiny there and the material is so thin, that you won't ever notice it. I will go take pics of mine now and post up.
Also I will be making some kits to do this and sell them for $35 bucks including the knife I like to use and vinyl to do both headlights.
My vinyl goes on dry and is pretty forgiving. BRB with pics.
#12
03-09-2011 | 05:22 PM
2nd Gear
Joined: Feb 2011
Posts: 136
Likes: 0
OK, My buddy said the same thing after I called him. He suggested that I keep a square and stretch it across the ring like a drum. I also tried it a second time and used a little water and soap all over the entire piece of vinyl. As it dried over 30 minutes I was able to stretch it and get it to lay down much better! However it didnt look like it was painted on like the plastic-dip does. I was going for a no seam look like the pics on www.vinylstyles.com
He seems to do amazing work. Am I being too pickey trying for no seams and a paint like finish?
He seems to do amazing work. Am I being too pickey trying for no seams and a paint like finish?
#13
03-09-2011 | 05:30 PM
Thread Starter
|
3rd Gear
Joined: Nov 2010
Posts: 176
Likes: 0
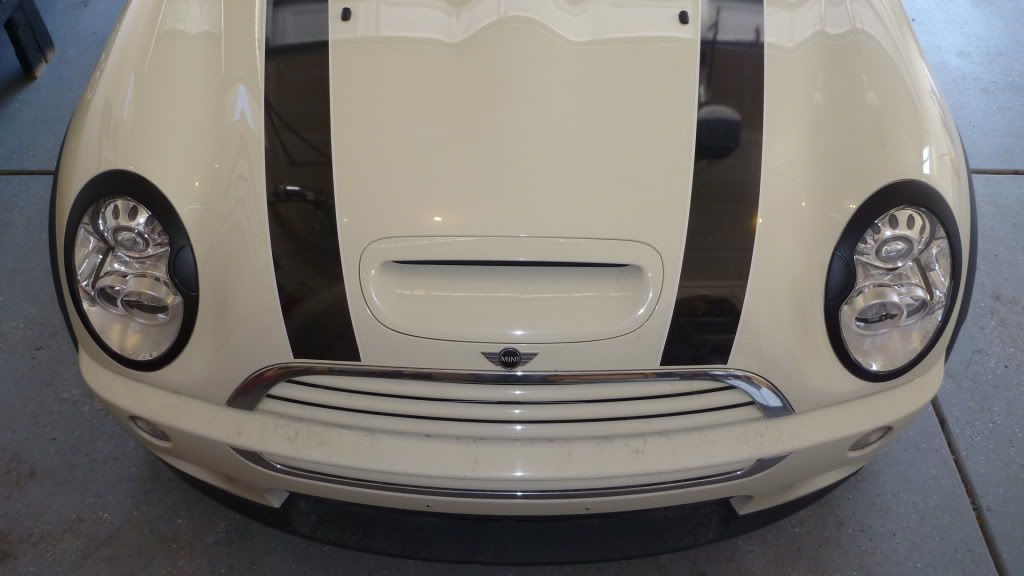
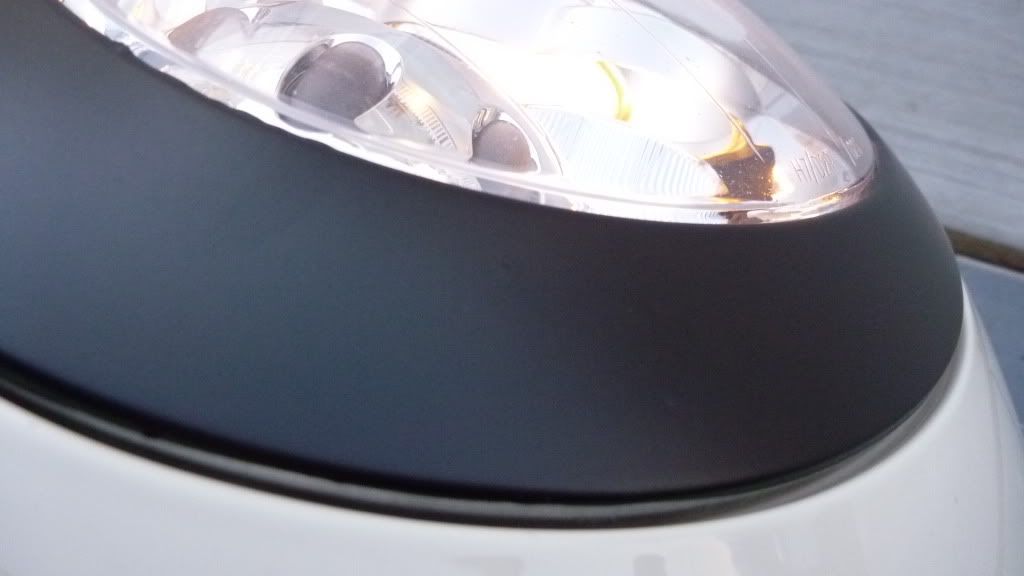
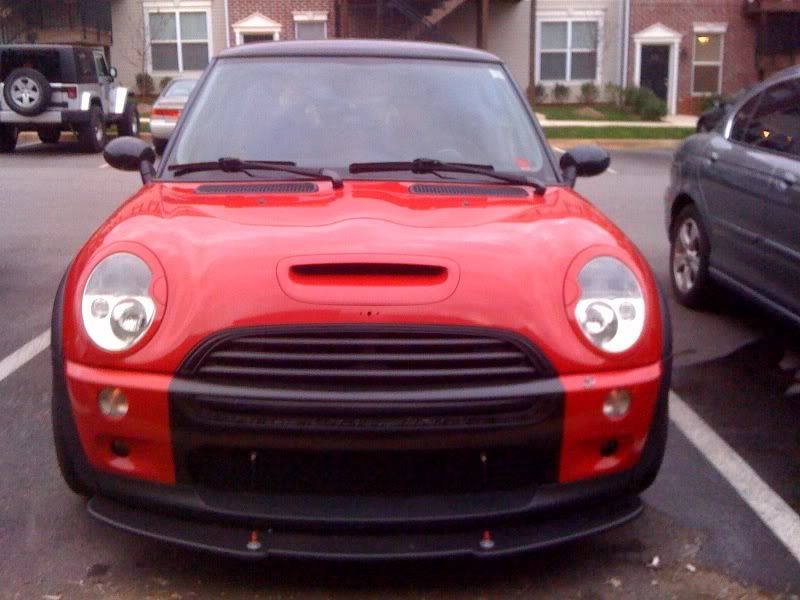
This was the first one I did. I actually overlapped it as you can see. I would suggest leaving maybe half that much material in overlap. Also remember that the camera is focused on that small area so it looks a lot bigger in that image than it really appears on the car. I would imagine with a blow dryer and much more patience, you could do the job without that slit, but like I said the pictures don't do it justice, you cant even tell unless you are looking for it.
#14
03-14-2011 | 11:31 AM

4th Gear
Joined: Dec 2008
Posts: 525
Likes: 1
I then decided to vinyl wrap my headlight rings. I went to a sign shop and they ordered me vinyl to color-match. It cost me less than $20 and about an hour. It�s really not hard and you can do it yourself.
I drew an approximate outline on the back of the vinyl before I started. You kind of trace the passenger headlight ring (between the chrome ring and paint, not between the chrome ring and light) to use on the driver�s side and vice versa. Then cut a hole in the center of your drawing.
It looks like this:
Driver�s side trace
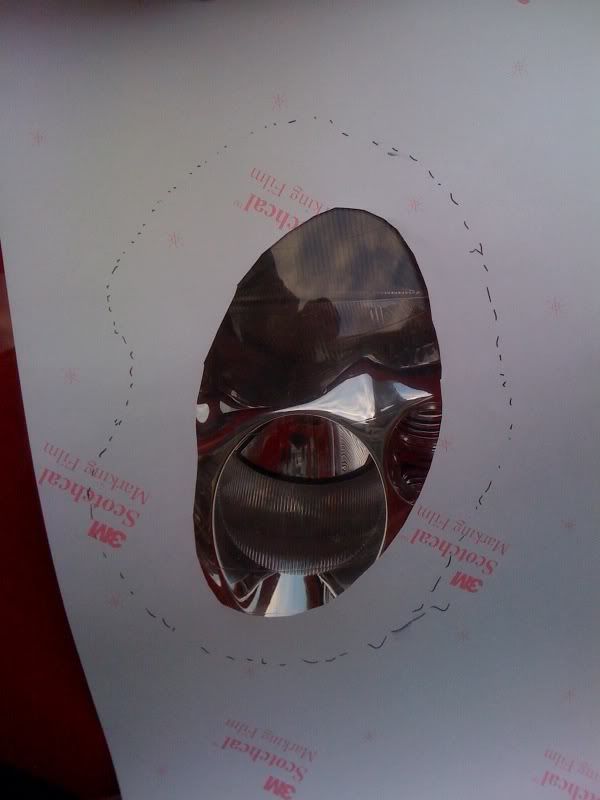
For passenger side application
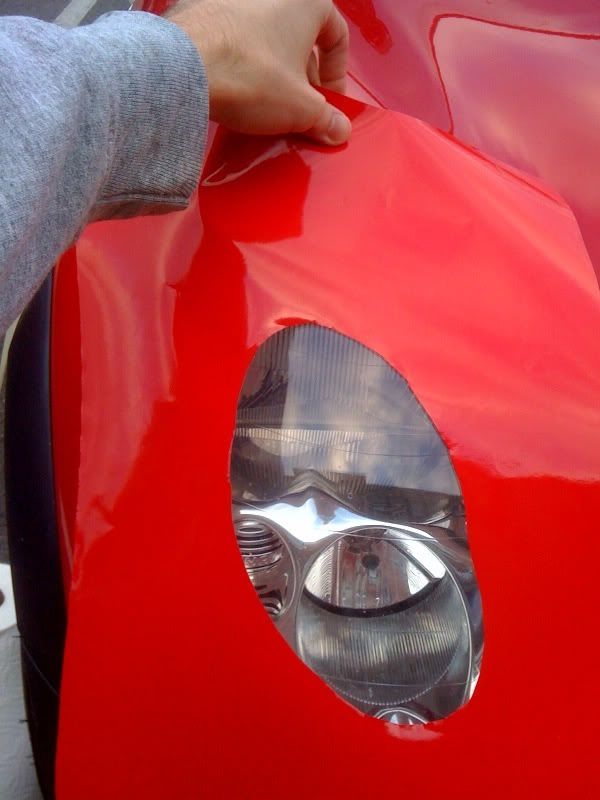
You then start sticking it down on your chrome ring. Pick a place on the ring to start and work your way around the ring without creasing the vinyl. Go ahead and let it stick to the headlight and hood, this will get cut off later. You will have to cut a seam, or else you end up with a lot of wrinkles as you work your way around back to your starting point. (sorry, no pics of that)
One done!
Both done!
I drew an approximate outline on the back of the vinyl before I started. You kind of trace the passenger headlight ring (between the chrome ring and paint, not between the chrome ring and light) to use on the driver�s side and vice versa. Then cut a hole in the center of your drawing.
It looks like this:
Driver�s side trace
For passenger side application
You then start sticking it down on your chrome ring. Pick a place on the ring to start and work your way around the ring without creasing the vinyl. Go ahead and let it stick to the headlight and hood, this will get cut off later. You will have to cut a seam, or else you end up with a lot of wrinkles as you work your way around back to your starting point. (sorry, no pics of that)
One done!
Both done!
OP did a great job on the seam location.
I found that a folded piece of cardboard ripped off a cereal box helped me wrap the edges in the groove you can't really get your fingers into.
#15
03-14-2011 | 11:51 AM
2nd Gear
Joined: Feb 2011
Posts: 136
Likes: 0
Thanks for the pics and detailed response. So are u saying that u never removed the rings from the car at all? I would assume that in order to wrap the edge around really well u would need to run ur finger along the backside. How have yours held up to washing and rain?...any lifting...thanks again.....i will give it another shot
#16
03-14-2011 | 12:44 PM
Thread Starter
|
3rd Gear
Joined: Nov 2010
Posts: 176
Likes: 0
Thanks for that write up and images!
Mine has been fine and I even pressure washed the car last week!
I have a couple of small spots that came up a tiny bit because they weren't trimmed well enough, but I just cut off the excess as I saw it. I get a lot of compliments on them everywhere I go.
I never took the rings off. Something you can do to help wrap the edges of the rings is make slits in them every so often to fold over easier. it is basically like a tab you create.


#18
03-14-2011 | 11:36 PM
2nd Gear
Joined: Feb 2011
Posts: 136
Likes: 0
XXLI,
Your paint job looks great!!
Especially the painted bonnet stripes. I see your sig file says you have an 2006 MINI, can I ask why you had the hood and roof repainted?
I would think the black roof would be bullet proof and that even if it looked crappy, you could have picked a cool roof graphic to cover it and possibly save money on a repaint job.
Did you have any trouble with the newly painted parts not matching up with the other body panels that have been weathered and sun faded for 5 years?
I'm just curious because I have never had to have body/paint work done to a vehicle.
#19
03-15-2011 | 08:26 PM
Long story short, a carwash door came down on my car as i was entering it scratching it from end to end. The gas station co. paid for the repairs and for 88 bucks i had some rock chips fixed up and the rings painted. It was about 1850 for the hood and roof. I could not be happier with the end result. The stripes are actually just oem. Car was sent to Jimmy Buffits in Indy and they def do some great work! Cheers! 

Thread
Thread Starter
Forum
Replies
Last Post
Sterling Thompson
MINI Parts for Sale
0
09-09-2015 08:16 PM
bbak11010
MINI Parts for Sale
0
09-07-2015 08:08 PM
bbak11010
MINI Parts for Sale
0
09-07-2015 08:03 PM