
Interior/Exterior Sonar/Spyder Projector Headlamps
#1
 05-07-2012, 03:33 PM


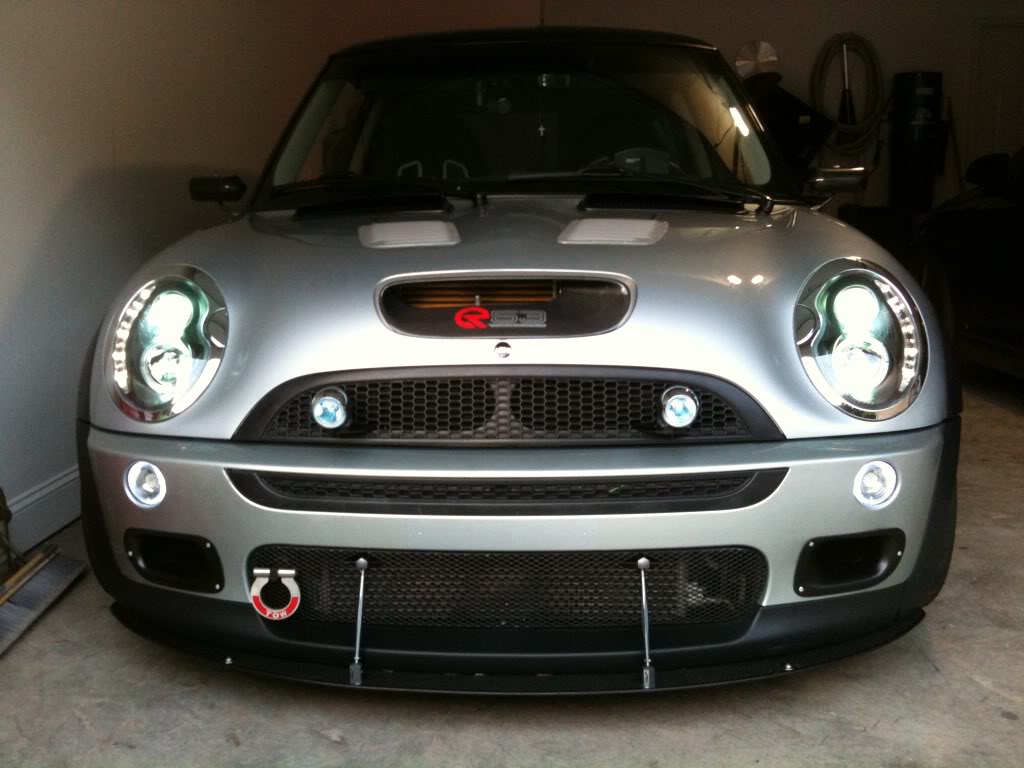
Sonar/Spyder Projector Headlamps
Just wondering if anyone's already installed this projector lamp and if you could shed some light on how to wire the LED and halo ring to run with park lamps? There's barely an instruction...two mystery wires (black/red) coming out from under the front of the lamps...any help would be appreciated...


#2
05-07-2012, 05:52 PM

#3
05-07-2012, 06:25 PM
#4
05-07-2012, 10:45 PM
When I did my projector rings I ran the wires across the hood right to left under the heat padding, spliced them together and ran it down the hood with the exhisting wires & washer hose, tapped the ground right in at the grounding bolt by the hinge, ran the hot up to the left side marker & tapped in there.

#6
07-02-2012, 07:22 AM


#7
07-05-2012, 09:43 PM

2nd Gear
Join Date: Apr 2012
Location: Bay Area, Ca.
Posts: 123
Likes: 0
Received 0 Likes
on
0 Posts
Trending Topics
#11
07-06-2012, 09:12 AM

#12
07-07-2012, 06:23 AM

3rd Gear
#13
07-07-2012, 07:59 AM
The slim HID kit I used is 55watt with H1-6000k...the hi/low uses separate bulbs...nice thing is that the low stays on when hi is on making the road markers light up for miles on the back roads...

#14
07-07-2012, 09:47 AM
3rd Gear
I really like the way you modified your R53.
You have done a ton but not flashy. I love when beauty meets function and you did just that.
I may end up doing just the low beam with HID and keep the high halogen as it comes up fast so if I have to flash somebody I can do that.
Did you get your LED and halo hooked up?
You have done a ton but not flashy. I love when beauty meets function and you did just that.
I may end up doing just the low beam with HID and keep the high halogen as it comes up fast so if I have to flash somebody I can do that.
Did you get your LED and halo hooked up?
#15
07-07-2012, 10:37 AM
I really like the way you modified your R53.
You have done a ton but not flashy. I love when beauty meets function and you did just that.
I may end up doing just the low beam with HID and keep the high halogen as it comes up fast so if I have to flash somebody I can do that.
Did you get your LED and halo hooked up?
You have done a ton but not flashy. I love when beauty meets function and you did just that.
I may end up doing just the low beam with HID and keep the high halogen as it comes up fast so if I have to flash somebody I can do that.
Did you get your LED and halo hooked up?
#16
07-07-2012, 01:31 PM
3rd Gear
I am from Charlotte, NC, just noticed you are from Greensboro. Precisely speaking Fort Mill, SC which is like 5 miles south of South Charlotte.
How is the light holding up so far? Is the adjustment easy to do on these lights?
I see that you removed the hood insulation, particular rhyme or reason?
I still have these guys in the box and picked up Squaretrade warranty on these as I hear the DRL leds don't last long.
How is the light holding up so far? Is the adjustment easy to do on these lights?
I see that you removed the hood insulation, particular rhyme or reason?
I still have these guys in the box and picked up Squaretrade warranty on these as I hear the DRL leds don't last long.
#17
07-07-2012, 01:42 PM

#18
08-22-2012, 08:48 PM

1st Gear
Join Date: Aug 2010
Location: Texas!
Posts: 13
Likes: 0
Received 0 Likes
on
0 Posts
MSFIT,
I bought the same lights but with the black insides, had a body shop install them when they repainted the hood/ rings. I got the car and the lights do a 3/4 moon effect with both lights going high to the right. Did you have any issues with this? I dont know if its the bulbs or if the lens is making the odd shape but its horrible for night time driving and the lights bouce around so much because there is no auto-level it just floats in there. Any ideas or suggestions?
I bought the same lights but with the black insides, had a body shop install them when they repainted the hood/ rings. I got the car and the lights do a 3/4 moon effect with both lights going high to the right. Did you have any issues with this? I dont know if its the bulbs or if the lens is making the odd shape but its horrible for night time driving and the lights bouce around so much because there is no auto-level it just floats in there. Any ideas or suggestions?
#19
08-23-2012, 12:14 PM
MSFIT,
I bought the same lights but with the black insides, had a body shop install them when they repainted the hood/ rings. I got the car and the lights do a 3/4 moon effect with both lights going high to the right. Did you have any issues with this? I dont know if its the bulbs or if the lens is making the odd shape but its horrible for night time driving and the lights bouce around so much because there is no auto-level it just floats in there. Any ideas or suggestions?
I bought the same lights but with the black insides, had a body shop install them when they repainted the hood/ rings. I got the car and the lights do a 3/4 moon effect with both lights going high to the right. Did you have any issues with this? I dont know if its the bulbs or if the lens is making the odd shape but its horrible for night time driving and the lights bouce around so much because there is no auto-level it just floats in there. Any ideas or suggestions?
I'm not sure why your lights are bouncing unless who ever installed them damaged the lamp adjustment which is easy to do if you forced the bulbs too much when installing them and snap the internal mount...they should be fixed by the up/down, left/right adjustment fixture on the inside...if broken, you'd probably have to take the lamp apart...

#20
08-25-2012, 03:59 PM

Just posted my Spyder lights over here
https://www.northamericanmotoring.co...ting-mods.html
I'm impressed, but i'm kinda displeased about the lighting capability of the angel eye. Contemplating ripping open the assembly again and just re0running all new LEDS into a ring, instead of using the stock.
https://www.northamericanmotoring.co...ting-mods.html
I'm impressed, but i'm kinda displeased about the lighting capability of the angel eye. Contemplating ripping open the assembly again and just re0running all new LEDS into a ring, instead of using the stock.
#21
08-31-2012, 08:21 PM
3rd Gear
#22
09-15-2012, 08:11 PM
3rd Gear
#23
11-27-2012, 05:23 PM
3rd Gear
#24
11-28-2012, 06:40 AM
If you mean mine, I don't remember where I got them but they're were called angel eye parking lamps for the Mini...
