Interior/Exterior Plasti-Dip Rim Short Write Up/Review!
#1
Plasti-Dip Rim Short Write Up/Review!
Heya guys! So yesterday I was deeply researching Plasti-Dip as I have before. Debating on if I should do it or not.. I said screw it, lets try this! It peels right off, after all.. So I make my way down to Home Depot where I had purchased 3 cans of Plasti-Dip Black for $5.98 and some 1" Painters Tape for $3.95. Got a nice car wash on the way home too!
Steps on Plasti-Dipping your rims!
1. Wash your car, just wash the whole damn thing!
2. Wash your rims extra good. I only used a wet cloth as well as a dry one, but make sure the rim is dry before you apply anything on it!
3. Some people take the wheels off, I left them on. I simply took 3 plastic bags, tied each end together and just put it behind the wheel preventing from anything else getting Plasti-Dip on! I also took the Painter's Tape and taped off the MINI symbol as well as the nuts.

Uploaded with ImageShack.us
4. I began to spray lightly. FOCUS ON YOUR ANGLES! This is important because you want to hit all angles of your rim to get a full cover. The first time you only want to get the rim to about 50% transparency.

Uploaded with ImageShack.us
5. I then wait just about 15 minutes to let it set. Once those 15 minutes are up I begin to layer another coat until I've reached a total of 4 coats, just to make sure everything is covered.
6. Wait until the last coat dries! Then CAREFULLY pull the tape off and the plastic bags or whatever you used from behind the wheel. The Plasti-Dip will chip if you're not careful since it's not yet completely dry.
7. Show off your new sick *** rims! Also, if you're wanting them to be shiny, Paslti-Dip sells a Glossifier!
BEFORE!

Uploaded with ImageShack.us
AFTER!

Uploaded with ImageShack.us
OVERALL REVIEW!
I think this most definitely gave some life to my car. I even got kind of carried away and Plasti-Dip'd the "Cooper" on the back and left the S red. Looks pretty cool! Anyways, it's an EASY process, it will take some time only because of the wait to dry. This stuff does is pretty strong to your nostrils. I used my shirt and hand to cover my nose and mouth, but do whatever you want! All my friends saw my car last night and are now in love!
Cool Things About This!
If you do not like it, you can peel it right off by taking a toothpick and just cutting into it! I do not recommend using anything else really, due to the possibility of scratching your rims. But that's up to you! Also, I spent a total of $23.62 on this rather than spending $400+ on black rims or to get them painted. I assumed I was going to use a lot.... Though after 4 coats on EVERY rim, I burnt thru 1 can. So 2 cans is enough! I bought 3 just in case though
Happy Coopin and Happy Plasti-Dip'n!
Steps on Plasti-Dipping your rims!
1. Wash your car, just wash the whole damn thing!
2. Wash your rims extra good. I only used a wet cloth as well as a dry one, but make sure the rim is dry before you apply anything on it!
3. Some people take the wheels off, I left them on. I simply took 3 plastic bags, tied each end together and just put it behind the wheel preventing from anything else getting Plasti-Dip on! I also took the Painter's Tape and taped off the MINI symbol as well as the nuts.

Uploaded with ImageShack.us
4. I began to spray lightly. FOCUS ON YOUR ANGLES! This is important because you want to hit all angles of your rim to get a full cover. The first time you only want to get the rim to about 50% transparency.

Uploaded with ImageShack.us
5. I then wait just about 15 minutes to let it set. Once those 15 minutes are up I begin to layer another coat until I've reached a total of 4 coats, just to make sure everything is covered.
6. Wait until the last coat dries! Then CAREFULLY pull the tape off and the plastic bags or whatever you used from behind the wheel. The Plasti-Dip will chip if you're not careful since it's not yet completely dry.
7. Show off your new sick *** rims! Also, if you're wanting them to be shiny, Paslti-Dip sells a Glossifier!
BEFORE!

Uploaded with ImageShack.us
AFTER!

Uploaded with ImageShack.us
OVERALL REVIEW!
I think this most definitely gave some life to my car. I even got kind of carried away and Plasti-Dip'd the "Cooper" on the back and left the S red. Looks pretty cool! Anyways, it's an EASY process, it will take some time only because of the wait to dry. This stuff does is pretty strong to your nostrils. I used my shirt and hand to cover my nose and mouth, but do whatever you want! All my friends saw my car last night and are now in love!
Cool Things About This!
If you do not like it, you can peel it right off by taking a toothpick and just cutting into it! I do not recommend using anything else really, due to the possibility of scratching your rims. But that's up to you! Also, I spent a total of $23.62 on this rather than spending $400+ on black rims or to get them painted. I assumed I was going to use a lot.... Though after 4 coats on EVERY rim, I burnt thru 1 can. So 2 cans is enough! I bought 3 just in case though

Happy Coopin and Happy Plasti-Dip'n!
#5
I initially was only going to Plastidip the wheels but then it got out of control after seeing the excellent results on the wheels and the following fell victim to the "black rubber rattle can": upper and lower grill, fog light surrounds, headlight rings, intercooler inlet, mirror caps, door handles, boot handle, MINI emblems and finally the COOPER badge. It took about 4 cans. Lowes, Home Depot and Menards have the best pricing at $5.98 a can. So after six years of ownership this makeover turned out far better than expected. The best part is that if I tire of it, just peel it off. PS: Discovered after numerous remakes that Frog Tape is the best product for masking.
#7
Can you post back next week and tell us how easy/hard it is to clean MINI brake dust out of plasti dip wheels? And what it takes.
I've searched the internet and there's a million people that dip their wheels, and none of them mention brake dust clean up. that's the only thing so far stopping me from dipping my wheels.
I've searched the internet and there's a million people that dip their wheels, and none of them mention brake dust clean up. that's the only thing so far stopping me from dipping my wheels.
Trending Topics
#8
Can you post back next week and tell us how easy/hard it is to clean MINI brake dust out of plasti dip wheels? And what it takes.
I've searched the internet and there's a million people that dip their wheels, and none of them mention brake dust clean up. that's the only thing so far stopping me from dipping my wheels.
I've searched the internet and there's a million people that dip their wheels, and none of them mention brake dust clean up. that's the only thing so far stopping me from dipping my wheels.
#9
#10
I was lucky to find some white Plasti-Dip locally and did my wheels yesterday:


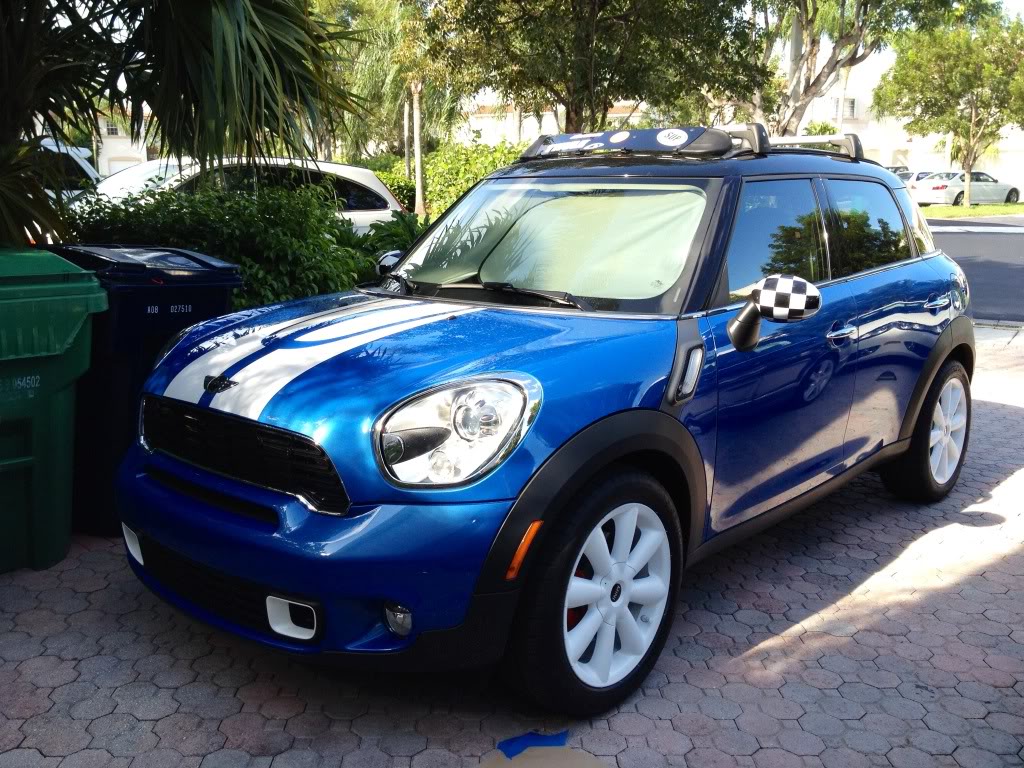
Overall I'm really pleased with the results, and like the look of the white wheels with the white roof, mirrors, and stripes. I'm gonna see how it wears & cleans up over the next few months. If that goes well I think I'll redo the wheels come fall and maybe add a coat of the PD glossifier too.


Overall I'm really pleased with the results, and like the look of the white wheels with the white roof, mirrors, and stripes. I'm gonna see how it wears & cleans up over the next few months. If that goes well I think I'll redo the wheels come fall and maybe add a coat of the PD glossifier too.
#11
Looks really good. Keep us updated on the upkeep of it. Hope it's easy to clean brake dust off.
You know hat might had a little extra detail; if you take a tooth pick or something and pull the plastidip out from the rivets around the rim. I think it would make the wheels pop out even more. Time consuming though.
You know hat might had a little extra detail; if you take a tooth pick or something and pull the plastidip out from the rivets around the rim. I think it would make the wheels pop out even more. Time consuming though.
#12
Looks really good. Keep us updated on the upkeep of it. Hope it's easy to clean brake dust off.
You know hat might had a little extra detail; if you take a tooth pick or something and pull the plastidip out from the rivets around the rim. I think it would make the wheels pop out even more. Time consuming though.
You know hat might had a little extra detail; if you take a tooth pick or something and pull the plastidip out from the rivets around the rim. I think it would make the wheels pop out even more. Time consuming though.
 I replaced my front brakes w/in the past 3000 miles with ceramics, which drastically cut the brake dust. The difference was noticeable even with the stock alloy/polished finish. Unfortunately the rear pads are still OEM so I know I'll have a mess on my hands 'til my next oil change, when the rears will get swapped out. Running white wheels full-time would almost necessitate ceramics IMHO.
I like your idea about removing the dip from the rivets. I just might try that when I get ready to respray this fall. Bada$$ look I'm sure, just depends on how long doing each one might take.

#13
Overall I'm really pleased with the results, and like the look of the white wheels with the white roof, mirrors, and stripes. I'm gonna see how it wears & cleans up over the next few months. If that goes well I think I'll redo the wheels come fall and maybe add a coat of the PD glossifier too.
#14
I did four coats on each wheel and went through almost two cans yesterday but can see how the second coat - if I do the insides - would require double the amount.
Good luck; looking forward to seeing your pics!
#15
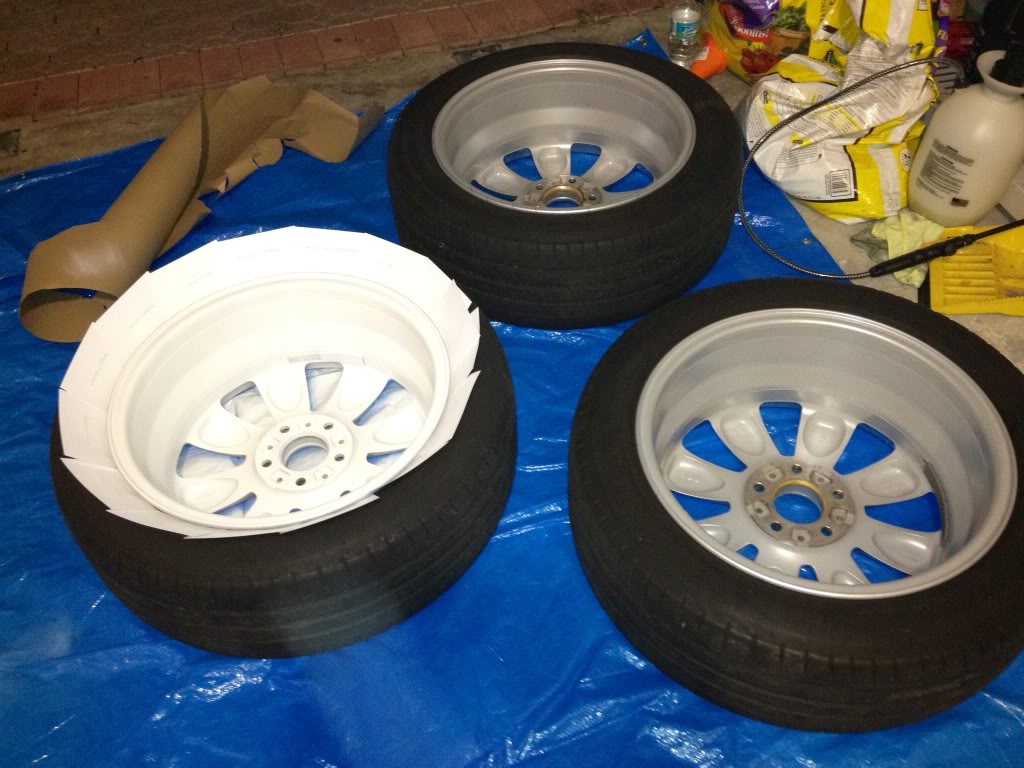
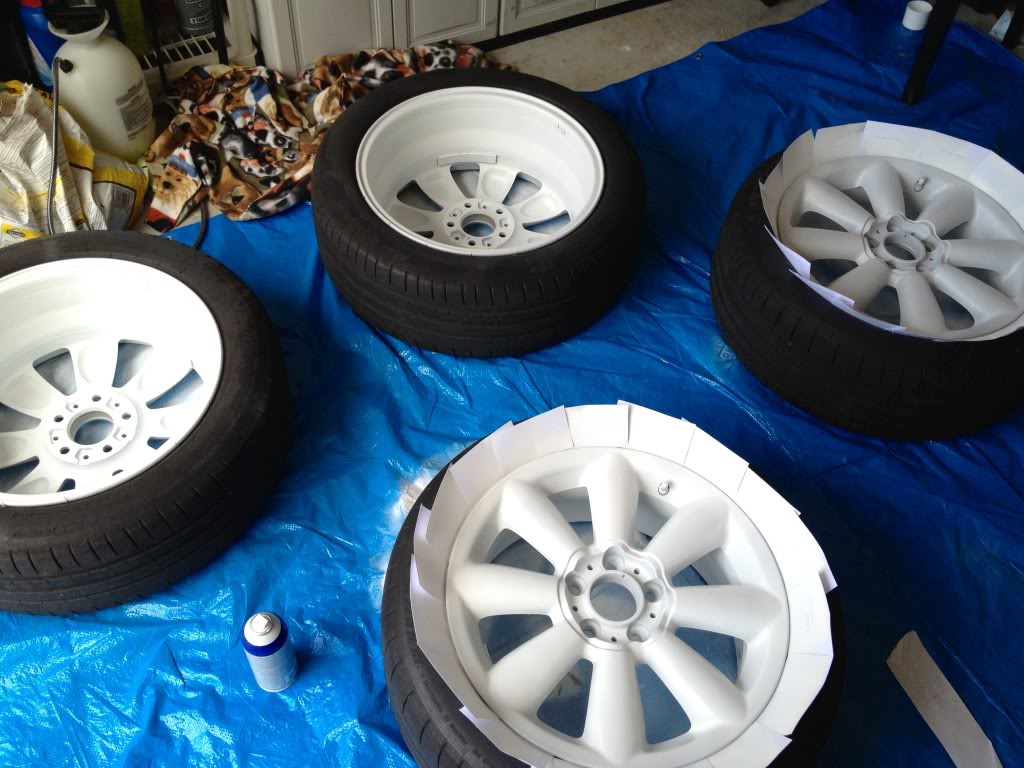
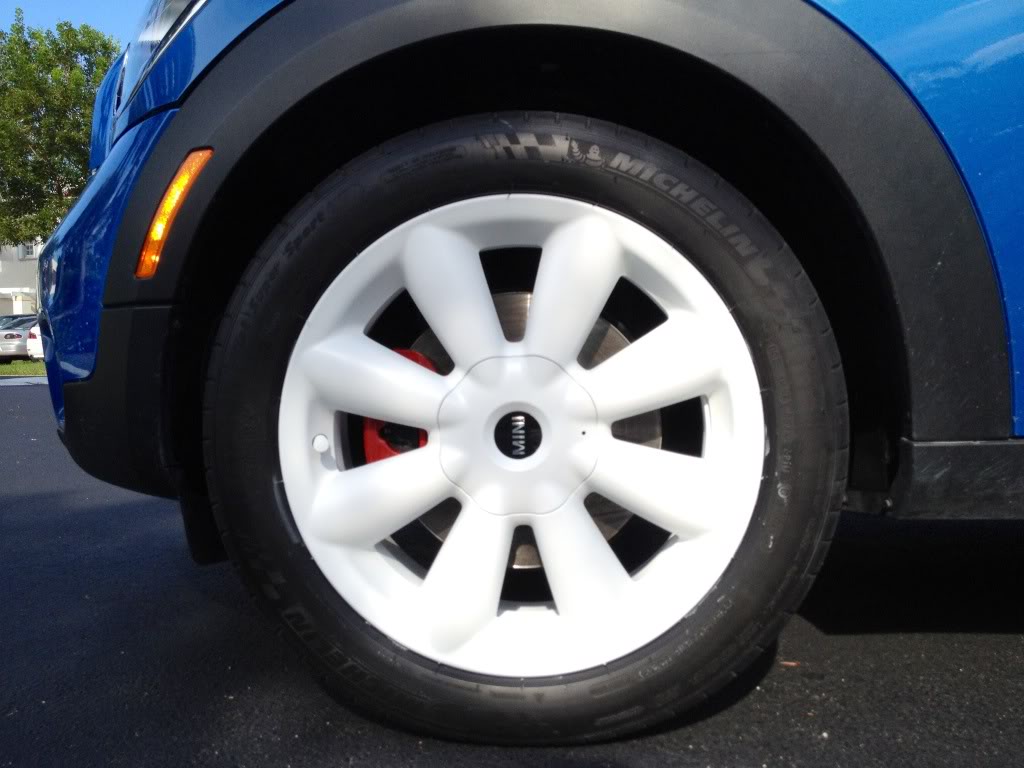
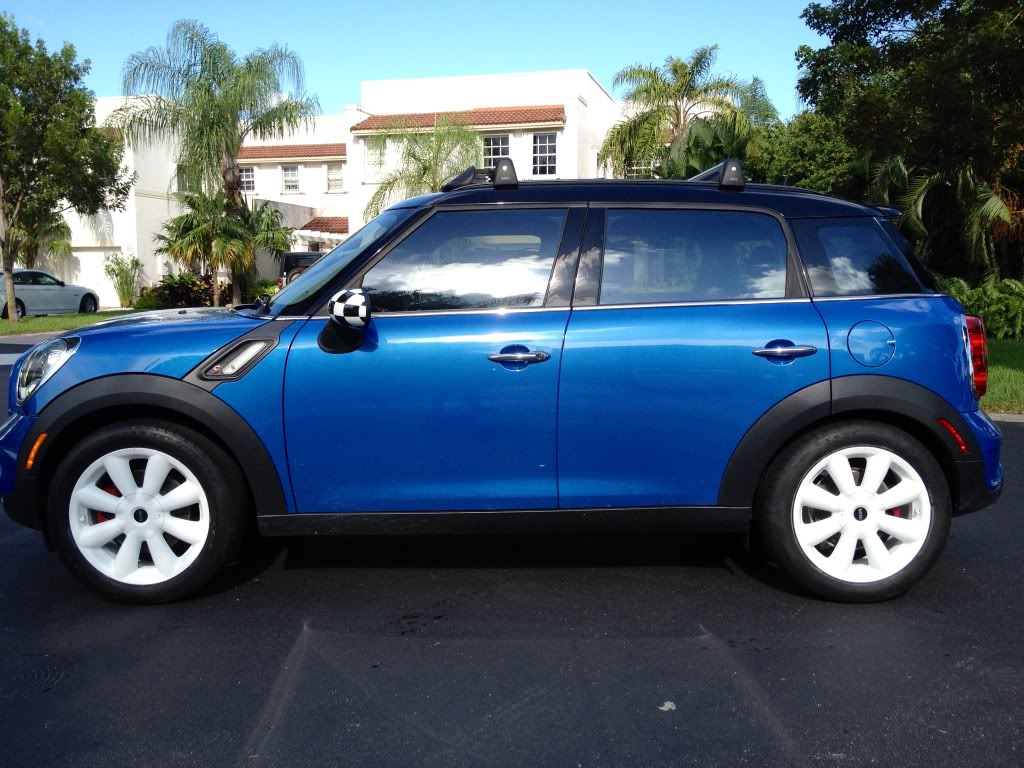
I just finished installing my wheels and I think the car looks really cool now. I always wanted white wheels and no one would trade me their white for my silver soo... I made my own! I used 7.5 cans in total as the white does not cover as good as the black plasti-dip. Here are some (iPhone as my camera is MIA) pics.


#16
Your wheels are dope! 
You did a great job, the CM looks fantastic. I like the white intakes near the front wheels - front brake cooling correct? Nice detail.
Out of interest, how long did it take you? I notice you're in Miami, I'm in Tampa Bay. My job took 6+ hours all told, and I put the driver's side wheels on when they weren't 100% dry. The can said "do not use in high humidity", which contributed to a couple imperfections on mine that I'll correct this fall when it's cooler & drier.
I'm planning to get two more jack stands before I do this again so I can spray all four wheels at a time & hopefully cut the time by 2 hours or so. Caveat: I think I'll copy you & do the insides next time, so I might still be at 6 hrs...
Again, nice job, and I'm glad to see another NAMer taking the plunge with white!

#17
fridayxiii, thank you! yours are awesome too!
I now have white wheels because of you. You were the one who said you were doing them in white so I just got the courage and did mine. It took me 10-12 hrs overall because I ran out of plasti-dip 2 times... and white its no so easy to find, I now know every Ace Hardware within a 35 mile radius lol. mine also have some weird texture on some spots and I think it really was the humidity. For me the inside of the wheel is much more time consuming than the face. I'm sure yours are going to look better longer than mine because I have the stock brake pads and those things dust even when stationary lol. Oh! and the brake cooling ducts are also plastidipped.
I now have white wheels because of you. You were the one who said you were doing them in white so I just got the courage and did mine. It took me 10-12 hrs overall because I ran out of plasti-dip 2 times... and white its no so easy to find, I now know every Ace Hardware within a 35 mile radius lol. mine also have some weird texture on some spots and I think it really was the humidity. For me the inside of the wheel is much more time consuming than the face. I'm sure yours are going to look better longer than mine because I have the stock brake pads and those things dust even when stationary lol. Oh! and the brake cooling ducts are also plastidipped.

#18
Ace HW for you too huh? I checked four various chain stores and only found black spray at two of them, then hit my neighborhood Ace for the hell of it, and S-C-O-R-E. 
You get some bonus points for doing the ducts, that's a sweet touch. You'll be ecstatic when the day comes you can change the OEM brake pads, they really shed some crap. I can't wait to change my back pads already. Maybe apply a coat of wax to wheels: it won't help slow/stop the dusting, but the cleanup is loads easier. I did that on my undipped wheels and will probably wax up the white ones next weekend.
Motor On!
#20
Awesome posts guys! I personally thought white would look weird... But damn do they look good on your Coops! I live in Las Vegas and even with the 113+ temperature and even HOTTER while driving on black top, these rims are still going strong! Just washed my car the other day, no problems! I even scrubbed my rims. Not even a chip in the Plasti-Dip. I also took it through the carwash, still didn't have any problems xD.
#21
Awesome posts guys! I personally thought white would look weird... But damn do they look good on your Coops! I live in Las Vegas and even with the 113+ temperature and even HOTTER while driving on black top, these rims are still going strong! Just washed my car the other day, no problems! I even scrubbed my rims. Not even a chip in the Plasti-Dip. I also took it through the carwash, still didn't have any problems xD.
__________________
Your Trusted Source For DIY and Parts
FREE SHIPPING over $99 click here
MINI Parts | DIY Help | Facebook | Twitter | Instagram | YouTube | Promos
888.280.7799 | 6am - 5pm PST

FREE SHIPPING over $99 click here
MINI Parts | DIY Help | Facebook | Twitter | Instagram | YouTube | Promos
888.280.7799 | 6am - 5pm PST

#23
#24
It took 3 cans of black to put 5 coats on my wheels and 3/4 of a can of red to paint the mirror caps and SC intake with 4 coats.


