
Interior/Exterior LED door sill
#1
 07-29-2013, 12:47 PM


Join Date: Jun 2013
Location: South West Florida
Posts: 59
Likes: 0
Received 0 Likes
on
0 Posts
LED door sill
Hello,
I saw that Mini sells a LED door sill and thought I could do my own. I have the LED's for the project so I can have I the "cooper" portion in blue and the "S" in red. What I am curious about is e best way to go about cutting out the lettering in the aluminum (I assume that is what the sill is made of). I have a dremmel but not sure what the best bit to use for this job would be. Anyone have any experience with this sort of cutting? I would appreciate any recommendations .
I saw that Mini sells a LED door sill and thought I could do my own. I have the LED's for the project so I can have I the "cooper" portion in blue and the "S" in red. What I am curious about is e best way to go about cutting out the lettering in the aluminum (I assume that is what the sill is made of). I have a dremmel but not sure what the best bit to use for this job would be. Anyone have any experience with this sort of cutting? I would appreciate any recommendations .

#3
07-29-2013, 01:48 PM

3rd Gear
Join Date: Sep 2012
Location: Elgin, IL
Posts: 175
Likes: 0
Received 0 Likes
on
0 Posts
Personally, instead of trying to cut out each letter... I would cut out a large rectangle.
Then I'd have a thin sheet of plexiglass made to over the square you just cut out. Take that to a vinyl shop and have them put vinyl everywhere you don't want the light to show through.
This would work out much easier, and probably run about $25 - $30... maybe a little more.
Then I'd have a thin sheet of plexiglass made to over the square you just cut out. Take that to a vinyl shop and have them put vinyl everywhere you don't want the light to show through.
This would work out much easier, and probably run about $25 - $30... maybe a little more.
#5
07-29-2013, 02:56 PM

#6
07-29-2013, 03:44 PM
Join Date: Jun 2013
Location: South West Florida
Posts: 59
Likes: 0
Received 0 Likes
on
0 Posts
#7
07-29-2013, 03:46 PM
Join Date: Jun 2013
Location: South West Florida
Posts: 59
Likes: 0
Received 0 Likes
on
0 Posts
Personally, instead of trying to cut out each letter... I would cut out a large rectangle.
Then I'd have a thin sheet of plexiglass made to over the square you just cut out. Take that to a vinyl shop and have them put vinyl everywhere you don't want the light to show through.
This would work out much easier, and probably run about $25 - $30... maybe a little more.
Then I'd have a thin sheet of plexiglass made to over the square you just cut out. Take that to a vinyl shop and have them put vinyl everywhere you don't want the light to show through.
This would work out much easier, and probably run about $25 - $30... maybe a little more.
Trending Topics
#8
07-29-2013, 03:50 PM
Join Date: Jun 2013
Location: South West Florida
Posts: 59
Likes: 0
Received 0 Likes
on
0 Posts
Yeah, I will get some cutting practice on a scrap piece to see how good I can get the details. Not sure where I can find a shop with a Water jet cutter, also sounds expensive. I will look into this option as well.
#9
07-29-2013, 05:51 PM

I'd talk to a sign-making company or a custom audio shop. Those guys are super handy at this kind of stuff and give you ideas. You can have it made of acrylic or a composite at a sign company, but yes aluminum would be nice. I made custom door sills for Koopa which came out pretty nice (I think) but I also thought it would look so cool if it was cut with lighting behind it. I just have aluminum with vinyl on top.
#10
07-31-2013, 10:49 AM
4th Gear
I guess the worst case scenario is you completely tear up the sill you are trying to cut and have to buy the lighted ones from a dealer? I'm really interested to see what you end up doing, as it's a great idea and if you can make it happen, I'm likely to follow suit and do something similar myself. Best of luck!
Mike
Mike
#11
07-31-2013, 10:56 AM
Join Date: Jun 2013
Location: South West Florida
Posts: 59
Likes: 0
Received 0 Likes
on
0 Posts
After trying the cutting, it looks like that will not work for me. I am going to try the other method mentioned above and use some plexiglass . I can either use a custom vinyl or do some etching in the plexiglass for the logo. I will update when I start the project, most likely this weekend.
#12
07-31-2013, 11:30 AM

Platinum Sponsor
Sounds like another cool DIY. Let us know how it goes.
In case you do decide to go with Genuine MINI door illuminted sills, we do have them here.

These are not for the MINI Clubman, due to the sill on the right being longer.
Illuminated "MINI Cooper S" Door Sill Kit Part number 51470417692
http://www.ecstuning.com/Search/SiteSearch/51470417692/
&
Illuminated "MINI" Door Sill Kit
http://www.ecstuning.com/Search/SiteSearch/51470417688/
&
Illuminated JCW Stainless Door Sill Kit Part number 51470444200
http://www.ecstuning.com/Search/SiteSearch/51470444200/
&
Illuminated Union Jack Door Sill Kit Part number 51470417011
http://www.ecstuning.com/Search/SiteSearch/51470417011/
Thanks and good luck.
In case you do decide to go with Genuine MINI door illuminted sills, we do have them here.
These are not for the MINI Clubman, due to the sill on the right being longer.
Illuminated "MINI Cooper S" Door Sill Kit Part number 51470417692
http://www.ecstuning.com/Search/SiteSearch/51470417692/
&
Illuminated "MINI" Door Sill Kit
http://www.ecstuning.com/Search/SiteSearch/51470417688/
&
Illuminated JCW Stainless Door Sill Kit Part number 51470444200
http://www.ecstuning.com/Search/SiteSearch/51470444200/
&
Illuminated Union Jack Door Sill Kit Part number 51470417011
http://www.ecstuning.com/Search/SiteSearch/51470417011/
Thanks and good luck.
__________________

MINI Guru/ MINI Owner Since 2004 | NEW Lifetime Part Replacement | Local Pickup
Milltek | Genuine MINI | Forge Motorsport | NM Engineering | ECS Performance | M7 Speed
Customer Service Hours: 8am-8pm EST|Sales Team Hours: 8am-11pm | SAT 10am-7pm 800.924.5172
MINI Guru/ MINI Owner Since 2004 | NEW Lifetime Part Replacement | Local Pickup
Milltek | Genuine MINI | Forge Motorsport | NM Engineering | ECS Performance | M7 Speed
Customer Service Hours: 8am-8pm EST|Sales Team Hours: 8am-11pm | SAT 10am-7pm 800.924.5172
#13
08-10-2013, 07:15 AM
Join Date: Jun 2013
Location: South West Florida
Posts: 59
Likes: 0
Received 0 Likes
on
0 Posts
Still working on this project....still trying various methods of getting this done. Good thing I I have only spent 20$ total. Had to get different LEDs . I did a quick and irty mock up to test the plexiglass glass method. I used some vinyl letters and painted over them . Looks like crud, but it is only a "rough draft".


#14
08-10-2013, 03:59 PM
4th Gear
This looks good from here. What voltage do the LEDs run, and where are you powering them from? Is the perspex flush with the rest of the sill, or just sitting on top of it? I think the biggest challenge will be cutting the hole in the sill for the perspex, getting it flush and making it stay there.
Keep us posted - if you can make it look good, I am tempted to give it a shot myself.
Good luck.
Mike
Keep us posted - if you can make it look good, I am tempted to give it a shot myself.
Good luck.
Mike
#15
08-10-2013, 06:10 PM
Join Date: Jun 2013
Location: South West Florida
Posts: 59
Likes: 0
Received 0 Likes
on
0 Posts
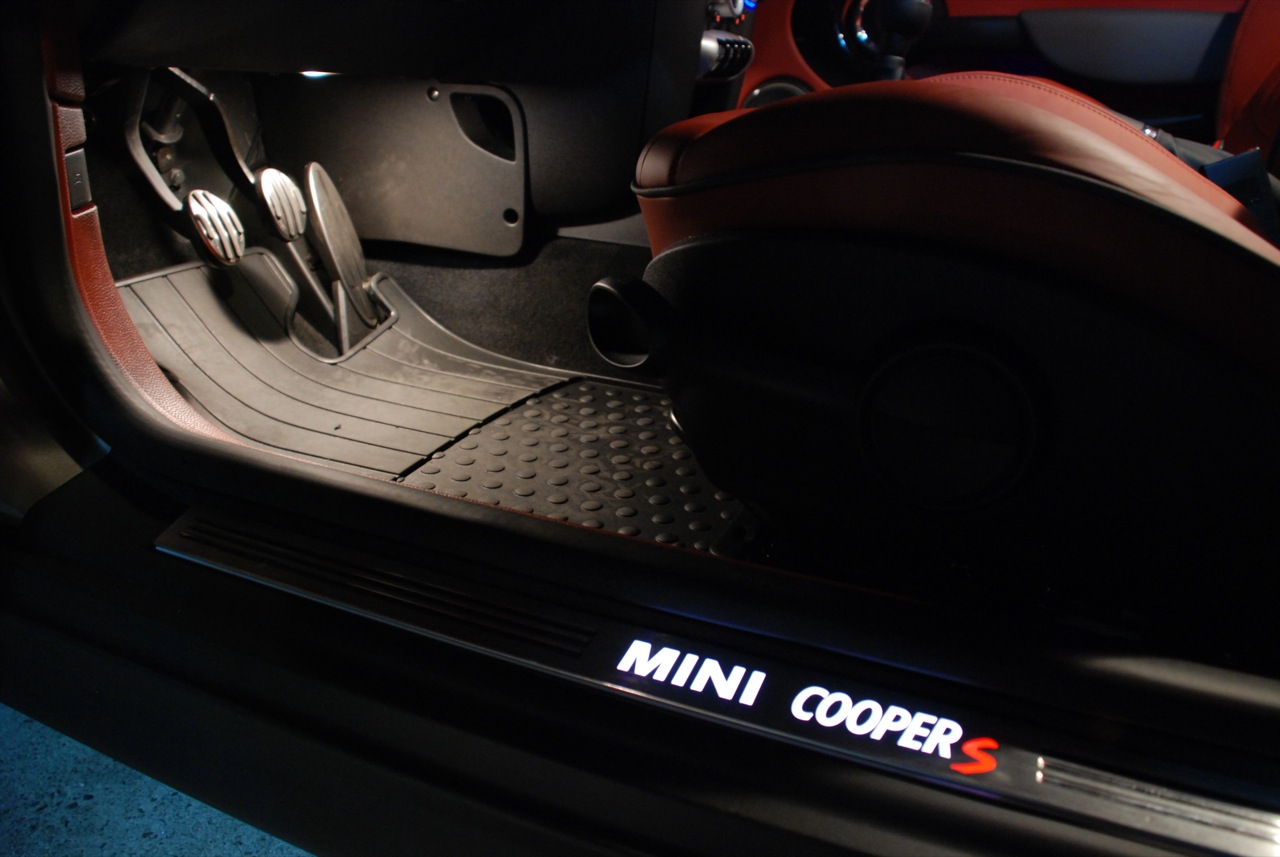
They are 12v led strips. I tapped into the foot well lights for power. I carved grooves in the sill to set the led strips in and drilled a small hole thought the metal lip under the rubber seal for the wires.the grooves make it so the sill will set flush like stock. For the final, I will use smaller letters so I can fit the MINI COoPER S logo. I sanded the back of the plexiglass glass so the light would be dispersed better. Here is another shot after I routed the wiring and cleaned it up a bit....

You can still see the direct LEDs through the paint, but again, this is just a mock up test.

You can still see the direct LEDs through the paint, but again, this is just a mock up test.

#17
08-17-2013, 10:46 PM
4th Gear
I really like them both. I totally dig the lights bordering the first one, and the second one looks super too! Are you going to perchance market these? I'd like to see closeup shots of the surfaces and how they butt up against each other. Thanks for the info on the LEDs you sent the other day too BTW.
Mike
Mike
#19
09-09-2013, 08:22 AM
Join Date: Jun 2013
Location: South West Florida
Posts: 59
Likes: 0
Received 0 Likes
on
0 Posts


#25
09-26-2013, 09:11 AM
Join Date: Jun 2013
Location: South West Florida
Posts: 59
Likes: 0
Received 0 Likes
on
0 Posts
Okay, it took a little longer than I expected to get to this....
Items needed:
1/4" vinyl letters available at Office Depot 3$
28"x30" piece of optix plastic sheet 14$ (I had lowes cut this into 30" strips using the original sill as a template for width)
Aluminum colored spray paint 5$ (I used satin finish, but you may prefer a more glossy look)
Pin striping 3$
3m double sided tape 6$
30cm LED strips (color of your choice ) 8$ for 5 strips
Now you can get the LED anywhere. I found that superbrightleds.com have he brightest LED strips, but for this project they were not low a profile enough. I went with strips from an eBay seller, sunvalleyus, they have quick shipping in the us and their led strips have nice low profile. These LEDs are also wired at both ends so you can wire them in tandem which is important for this project.
Remove one side of the protective plastic from one of the plastic strips
Clean the strip with a mild detergent
Next up, line the strip up with the sill in the car to get the edges right and make sure your length is good
Mark where you want your lettering to go using the original sill as a template
Then start placing your adhesive vinyl letters on the strip. Be sure they are on their good as you do not want any paint to get underneath them.
As an option, as I did, you can use the pin striping to add a line to either side of the logo.

Next up lay the spray paint down. You want to use enough coats so that no light seeps through the painted areas. I found that 3 light coats of rustoleum gets the job done. Just check it be putting the plastic against a light source once dry and see if any light shines through the paint.

After that is fully dry, you can remove the vinyl lettering and pin striping.
Next remove the plastic coating from the back side of your plastic strip and begin sanding the unpainted back side. This is to create a "dispersing" effect so that the LEDs will have their light dispersed a bit throughout the plastic.
Boom! Done with that!
Next, on to the LEDs ......
First thing I did was install the LEDs. I used the wiring for the foot well light as a connection point and ran some wire down the weatherstripping to the sill area for power.
I drilled a small hole through the metal lip under the weather stripping to run the wires from the LEDs through

To try and make the sill set flush, I used a dremmel to cut a groove into the plastic to lay the LEDs strips in

I would recommend laying the LEDs out first and laying your new sill down on top to see how the light works before you start dremmeling.
Next you can lay the led strips into the grooves

You can see in my screen shot, I have varying lengths of LEDs wired a bit hodge podgy. This is because I have tried multiple iterations of this project and have cut my LEDs up to all sorts of lengths for experimentation. I just ordered some new strips from the above mentioned seller which I will use this weekend .
Once you have the LEDs set and working, you can lay some double sided tape on the back of the sill and lay it down over the LEDs and your done.

Now, these will not look as a good as the ones available by sellers, but at 450$ they are a pretty high grade option. These will cost you less than 40$ and you can customize as you want.
If you have questions, I would be happy to answer as best I can and provide any more pictures you may want to see.