
Interior/Exterior Rear Seat Delete My Way
#1
 08-11-2013 | 01:55 PM

Rear Seat Delete My Way
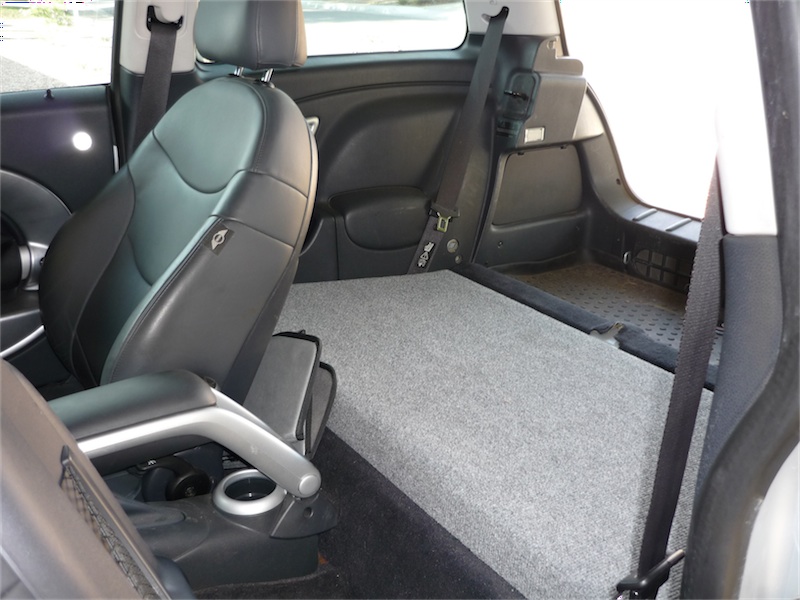
The rear seating situation in my Cooper S was abysmal at best. With no immediate need to transport any adults other than a single passenger, I decided to remove the rear seats and install my own rear seat delete solution.
After spending many hours looking at everybody elses RSD solution on this forum and some others, I had an idea of how I would go about it. For me, the subtraction of the weight of the rear seats was not a big deal...I just wanted more storage room for carting my lighting gear and photography equipment. That being said, my main construction materials were MDF (medium density fiber board), wood glue, some screws and speaker box carpet.
My design goals were to make the RSD modular. It had to be easily removed should I decide to put the seats back in, and it needed the ability to be customizable in the future. I achieved my goals and am happy to share my notes about what I did.
Please excuse the iPhone pics. The charcaol grey carpet actually more closely matches the charcoal interior in person.
My RSD is comprised of three simple pieces that work together to keep everything snug and rattle free.
This is everything installed.

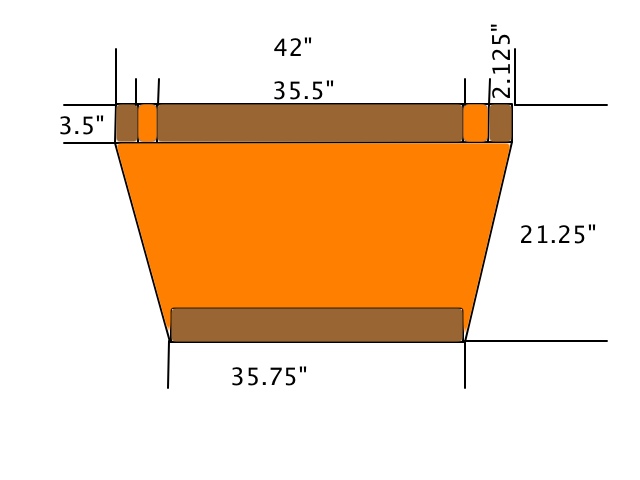
The RSD consists of a main brace right behind the front seats that is constructed in such a way that it rests snugly between the rear body trim panels and over the top of the forward seat hooks. The main portin of this brace is made from 3 pieces of 3/4" MDF approx. 2 1/4 inches tall and wide enough to fit between the trim walls. The pieces are sandwiched together with wood glue, clamped and allowed to dry. The middle piece is a little shorter on the ends, just enough to allow the brace to fit firmly over the forward seat hooks. The piece is finished in carpet and a fourth piece of 3/4" MDF is added to create a shelf for the subfloor to rest on.


The second piece of the puzzle is what I call the sub floor. I cut it out of 1/2" MDF and it has a 2 1/4" lip glued and screwed to the back end of it. The piece will rest on the shelf of the forward brace and the back lip acts as a riser that sits on the rearward seat hooks. Again, everything fits snugly and there is no movement forward or back or side to side. The carpet helps tighten things up.
Here is a shot of the subfloor, from the front. It is lifted up a bit so you can see the lip that it will rest on the forward brace.

Now, you could really stop here if you wanted to, but my goal was to have a system in place so I could change out the top finish piece for different uses. So, I used 1/8" Masonite board that is cut to fit from the front of the front brace and goes all the way over the subfloor and ends just covering the rear hump before the cargo boot area.
I did this so that if I decide to change out or modify the appearance of the floor, it would be easy. I can add shapes and designs under the carpet, or use a thicker finish board to add hooks for tie downs, etc.
Here is a shot of the forward brace and the subfloor without the finish panel on it.

You can see that it fits very nicely and with the addition of the finish panel, the seams are hidden and the floor comes all the way over the rear hump.

The final goal will be to add the hook portion of Velcro fastener tape to the bottom of the finish panel to keep it grippy, but in testing it, I found that it doesnt move at all due to the friction between the carpeted pieces.
I will eventually create another piece to cover the boot well, but right now I am engineering a subwoofer solution that will integrate into it as well. I hope you find this helpful and if I can answer any questions, I would be more than glad to.
After spending many hours looking at everybody elses RSD solution on this forum and some others, I had an idea of how I would go about it. For me, the subtraction of the weight of the rear seats was not a big deal...I just wanted more storage room for carting my lighting gear and photography equipment. That being said, my main construction materials were MDF (medium density fiber board), wood glue, some screws and speaker box carpet.
My design goals were to make the RSD modular. It had to be easily removed should I decide to put the seats back in, and it needed the ability to be customizable in the future. I achieved my goals and am happy to share my notes about what I did.
Please excuse the iPhone pics. The charcaol grey carpet actually more closely matches the charcoal interior in person.
My RSD is comprised of three simple pieces that work together to keep everything snug and rattle free.
This is everything installed.
The RSD consists of a main brace right behind the front seats that is constructed in such a way that it rests snugly between the rear body trim panels and over the top of the forward seat hooks. The main portin of this brace is made from 3 pieces of 3/4" MDF approx. 2 1/4 inches tall and wide enough to fit between the trim walls. The pieces are sandwiched together with wood glue, clamped and allowed to dry. The middle piece is a little shorter on the ends, just enough to allow the brace to fit firmly over the forward seat hooks. The piece is finished in carpet and a fourth piece of 3/4" MDF is added to create a shelf for the subfloor to rest on.
The second piece of the puzzle is what I call the sub floor. I cut it out of 1/2" MDF and it has a 2 1/4" lip glued and screwed to the back end of it. The piece will rest on the shelf of the forward brace and the back lip acts as a riser that sits on the rearward seat hooks. Again, everything fits snugly and there is no movement forward or back or side to side. The carpet helps tighten things up.
Here is a shot of the subfloor, from the front. It is lifted up a bit so you can see the lip that it will rest on the forward brace.
Now, you could really stop here if you wanted to, but my goal was to have a system in place so I could change out the top finish piece for different uses. So, I used 1/8" Masonite board that is cut to fit from the front of the front brace and goes all the way over the subfloor and ends just covering the rear hump before the cargo boot area.
I did this so that if I decide to change out or modify the appearance of the floor, it would be easy. I can add shapes and designs under the carpet, or use a thicker finish board to add hooks for tie downs, etc.
Here is a shot of the forward brace and the subfloor without the finish panel on it.
You can see that it fits very nicely and with the addition of the finish panel, the seams are hidden and the floor comes all the way over the rear hump.
The final goal will be to add the hook portion of Velcro fastener tape to the bottom of the finish panel to keep it grippy, but in testing it, I found that it doesnt move at all due to the friction between the carpeted pieces.
I will eventually create another piece to cover the boot well, but right now I am engineering a subwoofer solution that will integrate into it as well. I hope you find this helpful and if I can answer any questions, I would be more than glad to.


#6
08-16-2013 | 07:56 AM

#7
10-19-2013 | 10:29 PM

1st Gear
Joined: Jul 2013
Posts: 22
Likes: 0
From: Edmonton, AB, Canada
Trending Topics


#9
11-16-2013 | 04:33 PM


Thread
Thread Starter
Forum
Replies
Last Post