
Interior/Exterior You-ification: show 'em


#104
 10-26-2006 | 09:29 AM

6th Gear
Joined: Jul 2004
Posts: 3,054
Likes: 9
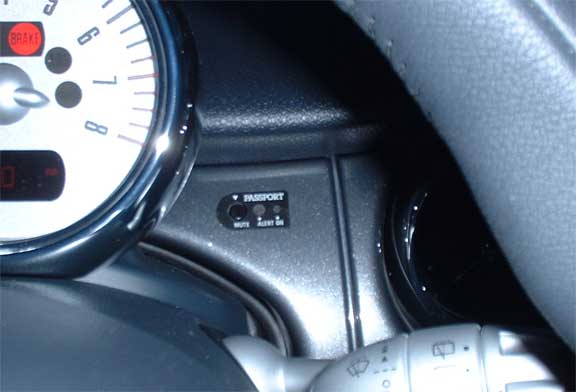
I've got a pretty big collection of mods that I love... painted arches and the Grillcraft lower grill... Whalen shift **** w/ a custom finish... Redline shift boot and e-brake boot... but I've done one mod that I haven't seen in any other MINI... a full custom job that I did w/ my own two hands: A custom remote mounting for the controls of my Passport 8500 Radar Detector.
The Passport 8500 has a remote visual alert and mute button that you can use in conjunction with a permanently wired soulution I couldn't find a satisfactory place to put it where the light would be in my line of sight while driving, so I got creative! :D
The install was inspired by this: http://www.audi-tt.org/tech/elec102.shtml
He did such a great job with pictures and documentation that I didn't bother.
The install went something like this:
- Remove the painted dash piece that is over the steering column
- Trim and file away some of the excess plastic bracing on the dash piece
- Disassemble the remote mount and file away large portions of the housing. Save the sticker that lables the buttons and LED's.
- Reassemble the remote mount
- Drill 3 holes through the dash piece for the mute button and 2 LEDs
- Superglue the remote mount to the back side of the dash
- Afix the sticker to the front of the dash for a clean look
- Hardwire the detector following Passport's directions - using Add-a-Circuit


#107
10-27-2006 | 01:03 PM
6th Gear
Joined: Jul 2004
Posts: 3,054
Likes: 9
I got a Union Jack on a bead-blasted Whalen ****. I didn't like the bead blasted finish at all (nails-on-a-chalkboard texture, grabbed dirt and oil off of your hand very quickly and looked nasty after 10 minutes) so I figured 'why not?" and got out a microfiber and the Wenol Blue (fine metal polish). It took about an hour of 'polishing my ****' (I made the joke so you wouldn't have to) to get an even finish all the way around.
In the end, I got a nice polished finish that doesn't show fingerprints like the normal Whalen **** and it has a very nice feel to it. It also looks a bit richer than the machine polished ****, so it fits in a bit better w/ my anthracite dash and downtubes.
A similar Whalen **** with a bead-blasted finish:
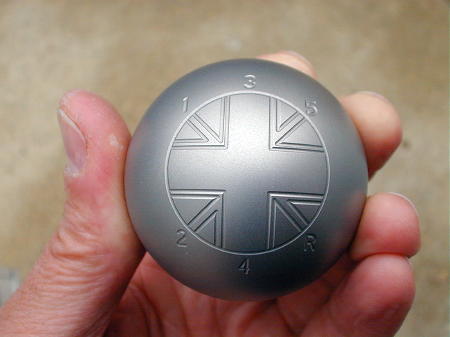
My **** after an hour of polishing w/ Wenol Blue:
The finished interior:

#108
11-05-2006 | 10:03 PM

#109
11-05-2006 | 10:43 PM

6th Gear
Joined: Sep 2002
Posts: 2,010
Likes: 0
From: Huntsville, Alabama
John, I'm working on something similar. I just need to figure out how to diffuse the light and where to pick up power to work when the running lights come on.

I posted this in another thread as I didn't know about this one at the time. I added stripes on the M7 bar to match the stripes on the car. Now I have to get a DFIC so it will be flat for me to add stripes to the IC.

I posted this in another thread as I didn't know about this one at the time. I added stripes on the M7 bar to match the stripes on the car. Now I have to get a DFIC so it will be flat for me to add stripes to the IC.
#110
11-06-2006 | 07:19 AM
6th Gear
Joined: Jul 2004
Posts: 3,054
Likes: 9
#111
11-07-2006 | 11:59 AM

1st Gear
Joined: Oct 2006
Posts: 32
Likes: 0
From: Huddersfield, UK
One of a kind DIY mods 
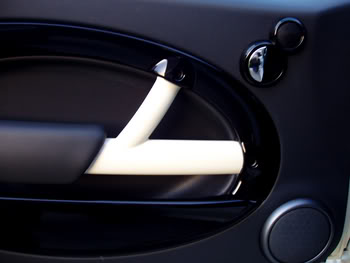
Having a black roof I wanted a black 3rd brake light and no-one made any, so I did my own
I bought a piece of dark smoke film and fitted it over the light, not as easy as it sounds Firstly the raised lettering had to be removed to get a fully flat surface and then once the film was on the main face, getting it to sit properly on the corners was a nightmare heat, stretch, pull and keep repeating until all creases/folds were gone.
My first attempt went all crinkly

2nd attempt worked better


18months later it still looks as good as the day I did it
Having a black roof I wanted a black 3rd brake light and no-one made any, so I did my own
I bought a piece of dark smoke film and fitted it over the light, not as easy as it sounds
Firstly the raised lettering had to be removed to get a fully flat surface and then once the film was on the main face, getting it to sit properly on the corners was a nightmare heat, stretch, pull and keep repeating until all creases/folds were gone.My first attempt went all crinkly

2nd attempt worked better


18months later it still looks as good as the day I did it
#112
11-07-2006 | 12:10 PM
1st Gear
Joined: Oct 2006
Posts: 32
Likes: 0
From: Huddersfield, UK
One of my fave mods is my custom badges
I thought the standard 'MINI' badge was a bit errrrrr dull so I had some custom PW 'S' badges made for the wheels, front/rear and steering wheel badges


I then decided I didn't like the red 'S' logos on the side repeaters, so I made some PW ones
I removed the red parts and cleaned all the glue out, then placed a piece of vinyl over the badge. This was pushed into the 'S' shape making sure it was pushed fully into the edges, then with a very sharp blade the waste was cut off. Appologies for the lighting in the first 2 pics


I thought the standard 'MINI' badge was a bit errrrrr dull
so I had some custom PW 'S' badges made for the wheels, front/rear and steering wheel badges 

I then decided I didn't like the red 'S' logos on the side repeaters, so I made some PW ones
I removed the red parts and cleaned all the glue out, then placed a piece of vinyl over the badge. This was pushed into the 'S' shape making sure it was pushed fully into the edges, then with a very sharp blade the waste was cut off. Appologies for the lighting in the first 2 pics


#113
11-07-2006 | 12:22 PM
6th Gear
Joined: Jul 2004
Posts: 3,054
Likes: 9
Very nice!
www.Bimmian.com sells vinyl "S" replacements like you made, but I don't think they have PW.
www.Bimmian.com sells vinyl "S" replacements like you made, but I don't think they have PW.
#114
11-07-2006 | 12:31 PM

6th Gear
Joined: Sep 2006
Posts: 1,518
Likes: 0
From: Rowland Heights, CA
One of my fave mods is my custom badges
I thought the standard 'MINI' badge was a bit errrrrr dull so I had some custom PW 'S' badges made for the wheels, front/rear and steering wheel badges
I then decided I didn't like the red 'S' logos on the side repeaters, so I made some PW ones
I removed the red parts and cleaned all the glue out, then placed a piece of vinyl over the badge. This was pushed into the 'S' shape making sure it was pushed fully into the edges, then with a very sharp blade the waste was cut off. Appologies for the lighting in the first 2 pics
I thought the standard 'MINI' badge was a bit errrrrr dull
so I had some custom PW 'S' badges made for the wheels, front/rear and steering wheel badges I then decided I didn't like the red 'S' logos on the side repeaters, so I made some PW ones
I removed the red parts and cleaned all the glue out, then placed a piece of vinyl over the badge. This was pushed into the 'S' shape making sure it was pushed fully into the edges, then with a very sharp blade the waste was cut off. Appologies for the lighting in the first 2 pics


#117
11-07-2006 | 08:59 PM
6th Gear
Joined: Sep 2006
Posts: 1,518
Likes: 0
From: Rowland Heights, CA
#118
11-08-2006 | 09:17 AM

2nd Gear
Joined: Apr 2006
Posts: 142
Likes: 0
The Passport 8500 has a remote visual alert and mute button that you can use in conjunction with a permanently wired soulution I couldn't find a satisfactory place to put it where the light would be in my line of sight while driving, so I got creative! :D
The install went something like this:
- Remove the painted dash piece that is over the steering column
- Trim and file away some of the excess plastic bracing on the dash piece
- Disassemble the remote mount and file away large portions of the housing. Save the sticker that lables the buttons and LED's.
- Reassemble the remote mount
- Drill 3 holes through the dash piece for the mute button and 2 LEDs
- Superglue the remote mount to the back side of the dash
- Afix the sticker to the front of the dash for a clean look
- Hardwire the detector following Passport's directions - using Add-a-Circuit
My Mods are WAY too many to list, especially with all of the bling, but the cheap mods I have done, cost me all of maybe $32.00 altogether - was to "screen off" those two ugly holes under the bonnet that hold the Master Brake Cylinder, and it's ABS hoses - and painting my Coolant Tank (red) - that "grey/beige"plastic gets real ugly after a couple of years:

And the third was to remove the under-hood insulation and replace it with some heat-shield silver insulation:

Altogether, it makes a big difference AND costs under $40.
-B

#120
11-08-2006 | 02:13 PM
6th Gear
Joined: Jul 2004
Posts: 3,054
Likes: 9
If you do this, be sure to take your time and test-fit, test-fit, test-fit. The key is to get a large flat face on the front of the remote detector so it will superglue properly to the back of the dash piece. I had to trim / dremmel / file away some bits on the back of the dash as well as almost destroy the housing of the remote mount... I took the face sticker off, removed the electronics and then spent a few hours (while watching TV), using a long flat rasp (file) to remove lots of excess plastic from the remote housing. I got in a hurry (big mistake) when I was drilling the holes... it was one of the last steps and I got anxious. The whole key to getting this right is to take your time and line it all up, file a bit, line it up again, file some more...
I got lucky when I screwed up the drilling (my holes were neither straight nor the correct distance apart... the bit kept wandering on the smooth dash), because the face sticker is very forgiving.
Also, be careful when you superglue the remote to the back of the dash. If there is any pressure on the side of the mute button, it will get stuck in the 'pressed' state. Remember that the button hole will be covered by the sticker, so you can drill it a bit large (or even a bit cockeyed / oval-ish to adjust the position of the housing) and you will still be OK. Drill the button hole first... check that the housing fits, the button works and that the housing is level... then mark and drill the light holes.
When I connect the detection unit, I use the visor clip and attach it to the headliner, just to the left of the rear veiw mirror. I ran the power cable up the driver's side A pillar and above the headliner. I just tuck it into the headliner when I'm not using the detector and no traces (other than the dash piece) are visable.
Good luck and ask me questions if you have any!
Aaron
#121
11-09-2006 | 07:34 AM

5th Gear
Joined: Jul 2005
Posts: 746
Likes: 0
From: Miami, FL
This is AWESOME! I am doing this to mine this weekend.....it looks SO damn custom!
My Mods are WAY too many to list, especially with all of the bling, but the cheap mods I have done, cost me all of maybe $32.00 altogether - was to "screen off" those two ugly holes under the bonnet that hold the Master Brake Cylinder, and it's ABS hoses - and painting my Coolant Tank (red) - that "grey/beige"plastic gets real ugly after a couple of years:
My Mods are WAY too many to list, especially with all of the bling, but the cheap mods I have done, cost me all of maybe $32.00 altogether - was to "screen off" those two ugly holes under the bonnet that hold the Master Brake Cylinder, and it's ABS hoses - and painting my Coolant Tank (red) - that "grey/beige"plastic gets real ugly after a couple of years:
#122
11-09-2006 | 04:28 PM
2nd Gear
Joined: Apr 2006
Posts: 142
Likes: 0
I'm glad you liked the radar remote install. I got the "Direct Wire" kit from Passport (http://www.escortradar.com/shop.htm) and started with that.
If you do this, be sure to take your time and test-fit, test-fit, test-fit. .......
Good luck and ask me questions if you have any!
Aaron
If you do this, be sure to take your time and test-fit, test-fit, test-fit. .......
Good luck and ask me questions if you have any!
Aaron
And, your info is AWESOME! - This is the kind of detail that I like giving over to people when they need to know stuff that I have done.......for instance....
1. Make sure engine is NOT hot/warm.
2. Siphen, drain, turkey baster etc.....to empty tank.
I used a long thin piece of silicone tubing (the kind you can see "dressing up" my engine hoses), and I siphened out the fluid in the holding tank, into a bucket.
(Some will tell you to keep this fluid and put it back in afterwards - I dumped it and got Prestone "Yellow" - guaranteed good for use "ON ALL VEHICLE TYPES")
3. Remove hoses (side and bottom) of tank, held on by simple, squeeze-type hose clamps.
4. Remove screw on top/rear of tank (the one right behind the cap).
5. Bend top of tank towards you while lifting up. Bottom rear of tank has two "posts" that fit into metal retainers in firewall.
6. Sand tank well and Spray paint.
(I used a wire hanger through the top loop of the tank, to hold it up while I sprayed, in order to get all around while I did it.)
7. Reverse removal for install - Fill tank ONLY ABOUT 1/4 - 1/3 of the way up, with new antifreeze.
Note: I bought a NEW tank (my old one was really greasy/ratty) and painted that, and kept my old tank just in case. My MINI dealership sold me the new one for ONLY $22.50 - so it might be worth it to do it that way.
Good Luck - ask me if you need any more help.
-B
#123
11-09-2006 | 08:36 PM

5th Gear
Joined: Dec 2005
Posts: 603
Likes: 1
This is AWESOME! I am doing this to mine this weekend.....it looks SO damn custom!
My Mods are WAY too many to list, especially with all of the bling, but the cheap mods I have done, cost me all of maybe $32.00 altogether - was to "screen off" those two ugly holes under the bonnet that hold the Master Brake Cylinder, and it's ABS hoses - and painting my Coolant Tank (red) - that "grey/beige"plastic gets real ugly after a couple of years:
And the third was to remove the under-hood insulation and replace it with some heat-shield silver insulation:
Altogether, it makes a big difference AND costs under $40.
-B
#124
11-10-2006 | 03:39 AM
3rd Gear
Joined: Jun 2002
Posts: 291
Likes: 0
From: Orlando, Fl. USA
Cosmetic mod
Man, there are some great mods here. Check my gallery for my own design side stripe. When I try to post pics, it says they're to large and I don't know how to make them smaller. If anyone can help me out and post one, I'd be very grateful. 4 1/2 years and 57k miles and I enjoy this car as much as day one. Minzila's born date is 1/16/02. Serial # 168.
Motor On
MB
Motor On
MB
Last edited by Minzila; 11-10-2006 at 04:00 AM. Reason: spelling
