
Interior/Exterior Need Help with Driving Light Install
#1
 09-29-2006, 05:46 PM

Join Date: Sep 2006
Location: Omaha
Posts: 101
Likes: 0
Received 0 Likes
on
0 Posts
Need Help with Driving Light Install
Tomorrow I am going to be installing a set of driving lights - Hella FF200 kit from Atlantic British (minicarparts.net), and the OEM iPod retrofit on my 2004 MCS.
I have been looking at the instructions that came with my driving lights - the wonderful illustration only kind, and have a question about how they switch on/off, and where to hook up the positive and ground wire on my MCS.
The kit appears to be switched by a green wire from the relay that is clipped onto the OEM highbeam wire (blue and yellow) near the headlight assembly on the right side. From looking at this, it appears that these driving lights will come on anytime I switch on my highbeams.
1) Is there a procedure for adding in a toggle for these? For example, can I safely cut the green wire meant to run from the relay to the highbeam wire and insert a toggle switch (with appropriate lengths of wire to put the switch inside the car of course).
2) Where is the best place to attach the red (+) wire - is it best to attach this to the jump post, or should it be attached to the positive in the fuse box.
3) Black wire - where is the best place to attach this wire?
The wire loom that came with the lights and how they appear to be installed is as follows:
Blue wire for right light - (from light) screwed to body
Blue wire for left light - (from light) screwed to body
Brown wire for right light - (from light) attached to relay
Brown wire for left light - (from light) attached to relay
Red wire w/Inline 15 Amp fuse - (from relay) attached to battery lead
Black wire (ground) - (from relay) attached to body.
Green wire (switch?) - (from relay) attached to highbeam wire with blue splicing clip.
Thanks in advance for any help.
#2
09-29-2006, 06:20 PM

Banned
The best place for the ground is at the body where the hood ground strap bolts( drivers side). The positive can go on the back of the fuse box, there is a 10mm bolt providing power to the box, you'll need an eye type connector.
I'm suprised the kit has no switch. Do not wire a switch on the wire to the lamp, only the switching side of the relay where the amp draw is low. I also prefer to tap in the high beam wire next to the glove box inside the car. There is a large harness running up the a-pillar, find a yellow with green stripe. There are 2, use the one with the larger wire diameter and run your wire to it behind the heater box (you may need to make a wire fish with a coat hanger). Good luck
-Dan
#3
09-30-2006, 10:28 AM

First, you can ignore the high beam relay wiring if you want and just run the relay to the parking light circuit. That way, you can use the lights when ever you want (albeit probably not the legal way to do that).
Second, buy a switch or new harness. Hella switches are here http://www.rallylights.com/hella/swi...ted_rocker.asp if you dont get a new harness
You can draw the positive wire directly (with an inline fuse) from the main post under the bonnet. As grassroots said, I believe the switch goes on the relay side of the circuit.
Be careful where you stash the relay ... Mine was under the bonnet tucked up under the wiper area and it got wet ... and fried.
#4
09-30-2006, 11:51 PM
I believe that LEGALLY you're supposed to wire the driving lamps into your high beams, so that they only go on when you use those headlights, so the wiring yours came with sounds like someone that knew that set it up.
I have mine set up with a switch, though, so it's certainly possible. I like Phil's LED toggle switches from Oznium.com, as they are round and install easily into a drilled hole. You can get illuminatred or non-illuminated, whicever you prefer. Plus they're not expensive and he doesn't rape you on shipping like lots of places.
As for the relay, it depends on where you have the lamps mounted... If they're on the bonnet brackets, use one of the recesses in the hood panel beneath the "blanket" and if they're on the lower brackets then I'd seal it totally with silicone and tape (just buy a $3 tube of bathtub caulk and smear it all over the contacts and the box, then wrap it in tape when it dries... that should seal the sucker.
Good luck!
#5
10-01-2006, 05:10 PM
Join Date: Sep 2006
Location: Omaha
Posts: 101
Likes: 0
Received 0 Likes
on
0 Posts
#6
10-04-2006, 10:26 PM

Join Date: Oct 2006
Location: Vancouver, British Columbia, Canada
Posts: 975
Likes: 0
Received 0 Likes
on
0 Posts
#7
10-04-2006, 11:16 PM

Trending Topics
#8
10-04-2006, 11:21 PM
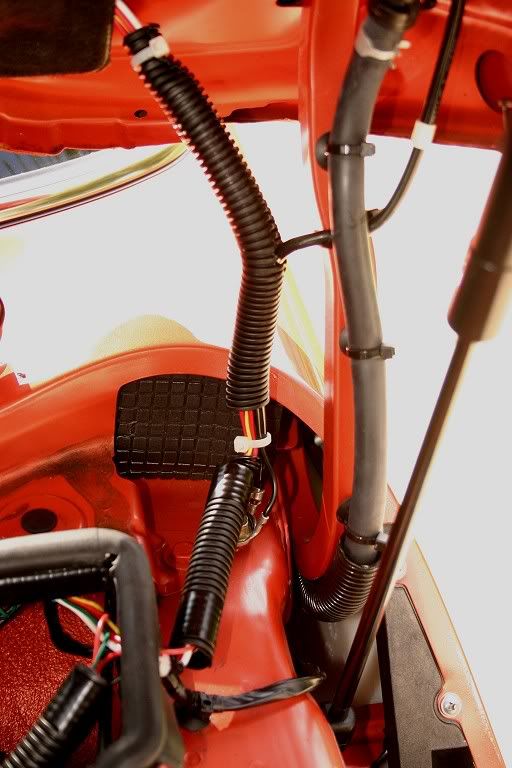
Here's the firewall pass-through. Mine was covered with Gorilla Tape (likely for soundproofing reasons). there are wires in there already, but there's plenty of room left over - I've run at least half a dozen more in through there. This is looking back from the front directly towards the driver's side.
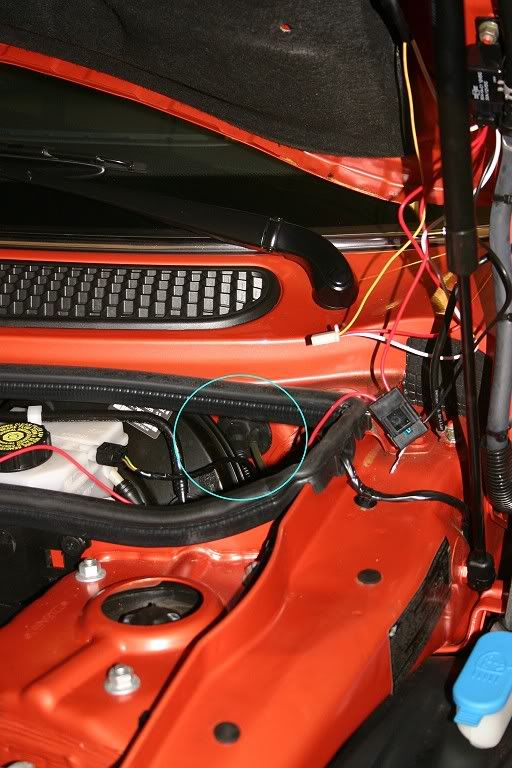
PS- this was in the middle of my install... All those wires on the right and the relay they drive ended up tucked inside the bonnet "blanket" at the top, up inside one of the hollows under there. This is what the wiring loom looks like today, thenks to a few zip ties and a package of split-loom covering material form Radio Shack - MUCH better!
PS- this was in the middle of my install... All those wires on the right and the relay they drive ended up tucked inside the bonnet "blanket" at the top, up inside one of the hollows under there. This is what the wiring loom looks like today, thenks to a few zip ties and a package of split-loom covering material form Radio Shack - MUCH better!
#9
10-04-2006, 11:41 PM
#10
10-04-2006, 11:45 PM
I just grabbed it and pulled. I had to work at it for a bit (Gorilla Tape is tough) but eventually, like everything else on the MINI, after some tugging and cussing it surrendered. there should be enough room next to the existing wires after the tape is off to simply thread the wires in. then pop down the knee bolster on the driver's side and look UP towards the top for your wires. Some people have reported success with using a straightened coat hanger as a "fish" as well, but I worry about snagging any existing wires.... I've been burned by that before.
#11
10-05-2006, 12:33 AM
3rd Gear
Join Date: May 2004
Location: Temple City
Posts: 229
Likes: 0
Received 0 Likes
on
0 Posts
#12
10-05-2006, 12:33 AM
3rd Gear
Join Date: May 2004
Location: Temple City
Posts: 229
Likes: 0
Received 0 Likes
on
0 Posts
#13
10-05-2006, 08:05 AM
Banned


Last edited by Grassroots Garage; 10-05-2006 at 08:07 AM.
#14
10-05-2006, 10:47 AM

6th Gear
Join Date: Oct 2005
Location: Clarks Summit, PA
Posts: 3,637
Likes: 0
Received 0 Likes
on
0 Posts
You can pry out/open the grommet, but as ImagoX indicated, expect some foul language in the process. On my set (Vision lights) I had to get the plastic connector for the switch through that hole, and slicing open the grommet (while an excellent idea if it will work for you) wasn't an option.
#15
10-05-2006, 12:07 PM
6th Gear
Join Date: Sep 2002
Location: Just around the corner from the Dragon :~)
Posts: 4,099
Likes: 0
Received 0 Likes
on
0 Posts
I've since moved the hella wiring to be more like then install method I used on my son's car. Doing this allowed me to clean up a lot of wiring and make shorter runs. I though I posted a follow up showing the rewire but I'll have to do some searching to find it.

Thread
Thread Starter
Forum
Replies
Last Post
Wohnson89
R50/R53 :: Hatch Talk (2002-2006)
4
06-10-2020 04:53 AM
ryGuyMCS
MINI Parts for Sale
2
10-20-2015 02:24 PM
squawSkiBum
MINI Parts for Sale
15
10-02-2015 09:21 AM