
Interior/Exterior Door Mod: LED Puddle Lights and Map Compartment Light


#53
 02-04-2007 | 10:03 AM

OVERDRIVE
Joined: May 2005
Posts: 8,233
Likes: 123
From: San Francisco


#57
02-04-2007 | 10:34 AM

5th Gear
Joined: Oct 2005
Posts: 942
Likes: 4
A wiring diagram would be nice. Just tap into the wires that light your footwell lights.. They will come on and go off already at the right times.
The hard part will be running a wire from the cabin through the rubber tunnel and into the door. The tunnel is there, so just fish another pair of wires through it (I know, easier said than done).
YD
The hard part will be running a wire from the cabin through the rubber tunnel and into the door. The tunnel is there, so just fish another pair of wires through it (I know, easier said than done).
YD
#58
02-04-2007 | 10:48 AM

5th Gear
Joined: Oct 2004
Posts: 835
Likes: 1
From: Manassas, Virginia
A wiring diagram would be nice. Just tap into the wires that light your footwell lights.. They will come on and go off already at the right times.
The hard part will be running a wire from the cabin through the rubber tunnel and into the door. The tunnel is there, so just fish another pair of wires through it (I know, easier said than done).
YD
The hard part will be running a wire from the cabin through the rubber tunnel and into the door. The tunnel is there, so just fish another pair of wires through it (I know, easier said than done).
YD
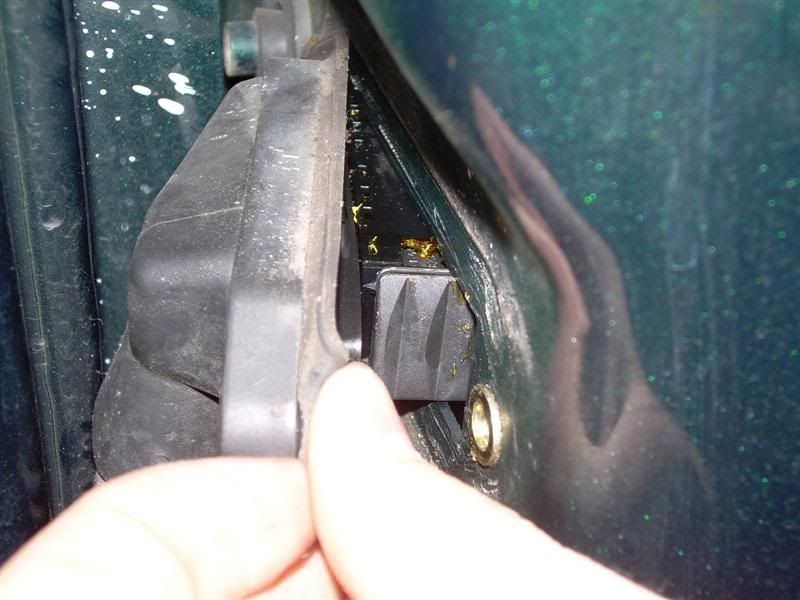
There's a "Connector" blocking your way. Where the rubber boot meets the cabin.
See the "connector" Much easier said then done. I still haven't got to mine yet. And if you want to run wires people say you can drill through the "connector" Thats what some have done for upgraded speaker wires.
#59
02-04-2007 | 10:57 AM
OVERDRIVE
Joined: May 2005
Posts: 8,233
Likes: 123
From: San Francisco
#60
02-10-2007 | 06:26 PM

If you do that, I'd suggest positioning it inwards towards the door hinge, and also continue to use the stock puddle light but replace the bulb with these from v-leds: http://cgi.ebay.com/ebaymotors/2-V-L...9047QQtcZphoto. I wrote about the v-leds bulb in this thread (see posts from #197 to 207).
I don't have OEM puddle lights ('04) so I'll test what position looks the best before I go drilling holes - I was thinking near the center would be a good spot.
#62
02-11-2007 | 04:03 PM
5th Gear
Joined: Oct 2004
Posts: 835
Likes: 1
From: Manassas, Virginia
Maybe I have to look again. I think theres a "connector" in the rubber boot too.... So you gotta get past that first... I'll look again
#63
03-20-2007 | 09:23 PM

3rd Gear
Joined: Aug 2005
Posts: 204
Likes: 0
From: Pulaski, TN
I finally got the 9.5" strips zip tied to the bottom of the seats. I haven't run the wiring yet, I'm clipped to the puddle light on the passenger door for the pic. I just used 2 zip ties to connect oznium's LED strips to the metal bars under the seat bottom front and back. The front wasn't that hard, but the back was a pain. I ended up cutting the hook part off a clothes hanger, squishing it a bit and taping the zip tie to it in order to fish the zip tie over the bar in the back. It's tight and the seat cushion rests on the bar.
Footwell and Puddle Lights - Stock lens with 90 deg blue LEDS
Door Panel - 2 orange superflux LEDS
Seat bottom 1 blue 9.5" LED strip front and 1 blue 9.5" LED strip rear

The lights appear brighter in this pic than in person, but they still look great. I don't think I'd go any brighter.
Footwell and Puddle Lights - Stock lens with 90 deg blue LEDS
Door Panel - 2 orange superflux LEDS
Seat bottom 1 blue 9.5" LED strip front and 1 blue 9.5" LED strip rear
The lights appear brighter in this pic than in person, but they still look great. I don't think I'd go any brighter.
#64
03-20-2007 | 11:39 PM
Thread Starter
|
6th Gear
Joined: Jun 2006
Posts: 5,692
Likes: 2
Looks GREAT, Pred!! 
Wiring and zip-tying stuff under the seat IS a pain... And MY lights are cathodes, so I had to attach rigid bars AND a transformer on each side... If I had it to do over, I'd simply unbolt the seat and do it out of the car - that way I could zip tie and attach wires in comfort AND run the power leads quite easily. Ah well - live and learn, right?
Wiring and zip-tying stuff under the seat IS a pain... And MY lights are cathodes, so I had to attach rigid bars AND a transformer on each side... If I had it to do over, I'd simply unbolt the seat and do it out of the car - that way I could zip tie and attach wires in comfort AND run the power leads quite easily. Ah well - live and learn, right?
#65
03-21-2007 | 12:55 AM
OVERDRIVE
Joined: May 2005
Posts: 8,233
Likes: 123
From: San Francisco
The wiring is a pain to do properly. I did take my seats out, along with the long trim piece that makes up the inner door sill and kick panel. Then I was able to run the wires alongside the existing wiring harnesses, completely hidden and protected. You can save a lot of work if you are satisfied to tuck wires behind the edges of the trim panels.
I'm not sure I follow why you found it difficult to attach the LED strips under the seats. Here's a picture of the LED strip under my passenger front seat that lights up the rear footwell. The bar I attached it to is easy to access.

I'm not sure I follow why you found it difficult to attach the LED strips under the seats. Here's a picture of the LED strip under my passenger front seat that lights up the rear footwell. The bar I attached it to is easy to access.
#66
03-21-2007 | 06:42 AM
3rd Gear
Joined: Aug 2005
Posts: 204
Likes: 0
From: Pulaski, TN
The front one was a snap. I've got one on the same bar pointed toward the front. The rear one was a pain. There is a bar back there, but it's tucked up against the seat pad. It's also close to the rear cover which makes getting a zip tie around it a pain. It would probably have been much easier to pull the seat instead of trying to fish them.
#67
03-21-2007 | 06:56 AM
Thread Starter
|
6th Gear
Joined: Jun 2006
Posts: 5,692
Likes: 2
See, *I* attached the cathode tubes to the plastic seat back sheild and not that bar. I did this because cathode bars are breakable (unlike LED strips) and I was worried that my teen's boat0like sneakers might FUBAR them. I also wanted the glow to only show when the seat back is pulled forward, which this installation accomplishes. I did NOT pull out my seats, so cramming my hand under there to pull tight the zip ties was a bit of a chore.
That said... I used cathodes because they were all that were available (Oznium released the LED strips a few months after I did the MOD) and I plan to replace them this suummer with strips. Honestly, I WOULD have already (I have to use a relay to drive the cathodes off the diming cabin lighting due to technical reasons) but the blue light from the cathodes is cooler and less green than the LED light, and I like the color.
That said... I used cathodes because they were all that were available (Oznium released the LED strips a few months after I did the MOD) and I plan to replace them this suummer with strips. Honestly, I WOULD have already (I have to use a relay to drive the cathodes off the diming cabin lighting due to technical reasons) but the blue light from the cathodes is cooler and less green than the LED light, and I like the color.
#69
03-21-2007 | 08:24 AM
Thread Starter
|
6th Gear
Joined: Jun 2006
Posts: 5,692
Likes: 2
All resistors are pre-wired and sealed inside silicone - these will work even underwater!
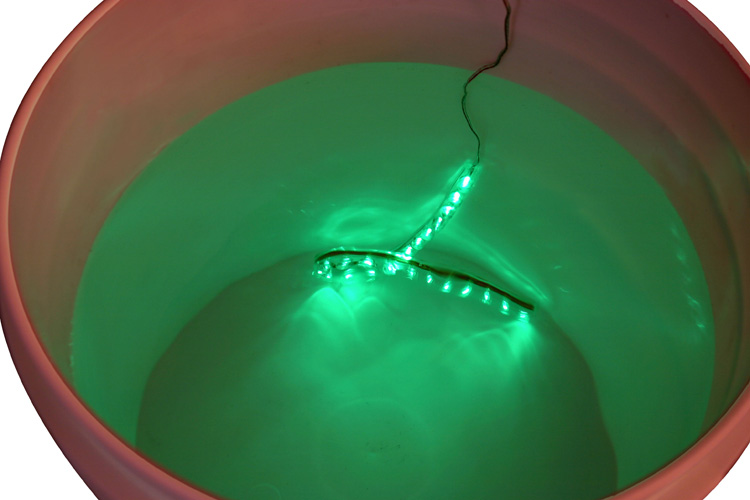
Just hook them to a 12V power supply (remember to use a fuse unless you tap into the cabin wiring like I did -it's all fused already) and you're good to go! LEDs will handle being "dimmed" just like an incandescent bulb (unlike cathodes) so you don't have to worry about that either.
Just hook them to a 12V power supply (remember to use a fuse unless you tap into the cabin wiring like I did -it's all fused already) and you're good to go! LEDs will handle being "dimmed" just like an incandescent bulb (unlike cathodes) so you don't have to worry about that either.
#71
03-21-2007 | 09:43 AM
3rd Gear
Joined: Aug 2005
Posts: 204
Likes: 0
From: Pulaski, TN
I don't have the strips in orange, but there are 2 of the orange superflux LEDs in door pockets of my pic. They match very well with the stock lighting. If the strips are the same I'd say pretty well dead on. I'm only 50 min north of you if you wanted to get together or had questions about an install.
I think the Nashville group is going to get together sometime before the Dragon for a mod party. I'm not sure if you've been or I have met you, but some of the Huntsville/Birmingham BAMA Mini guys have been up to mod with us. We'll probably meet at Monk's place just off the Spring Hill exit on 65. Probably about an hour or so from HuntsVegas if you're interested.
I think I'll be doing at least 1 LED boot mod at the next meet.
Oh, and the dimming is way cool!
#72
03-21-2007 | 10:17 AM
Thread Starter
|
6th Gear
Joined: Jun 2006
Posts: 5,692
Likes: 2
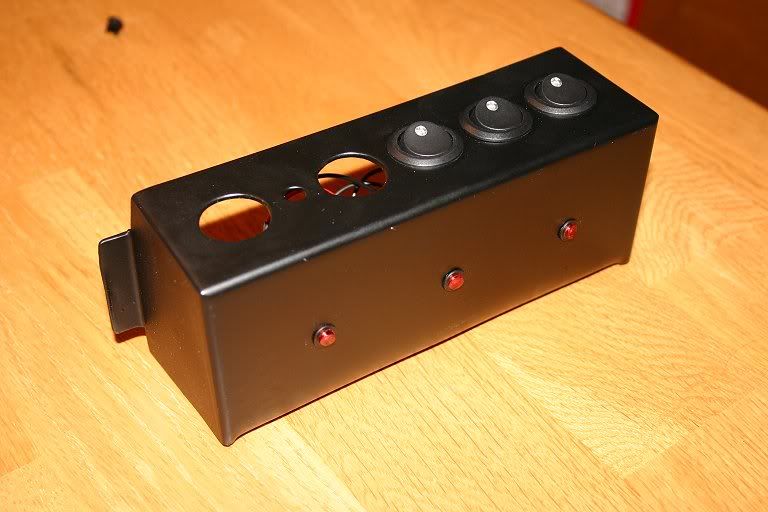
Remember as well that LEDS and strips can be "tinted" using Sharpie markers iif the color needs to be adjusted. I ordered some individual orange LEDs for my switch box, for example, that turned out to be more yellow than the MINI OEM lighting. I put about 7 coats of red Sharpie on the LEDs until the color had deepened to an exact match. The "red" LEDS you see here actually started out as clear w/ an orange diode, then I ground off the tips (makes for a more "soft, glowing" effect) and hit 'em with my Sharpie. You can also do things like add blue or purple Sharpie to red LED strips for some truly custom colors.
#73
03-21-2007 | 12:45 PM
6th Gear
Joined: Dec 2005
Posts: 1,140
Likes: 0
From: Germany
OK, here's a wiring question... how would I wire a LED strip into the footwell to be lit while the headlights are on, but turn off when the door opens? I like the std footwell light when the door's open cause that's when you want visibility, but when the door's closed it would be cool if the LED strip was on 
Am I making any sense? I haven't had any coffee for 15 minutes or so :impatient
Am I making any sense? I haven't had any coffee for 15 minutes or so
:impatient
#74
03-21-2007 | 01:14 PM
Thread Starter
|
6th Gear
Joined: Jun 2006
Posts: 5,692
Likes: 2
OK, here's a wiring question... how would I wire a LED strip into the footwell to be lit while the headlights are on, but turn off when the door opens? I like the std footwell light when the door's open cause that's when you want visibility, but when the door's closed it would be cool if the LED strip was on
Am I making any sense? I haven't had any coffee for 15 minutes or so :impatient
Am I making any sense? I haven't had any coffee for 15 minutes or so
:impatienthttp://www.oznium.com/forum/topic10892
Turning them OFF with the door open, though? Hmmm... How about using a momentary switch, placed inside the door (so the switch pops OFF when the door opens and is depressed ON when it closes) to interrupt the current? Your circuit then would be:
Power (turn signal lights) -> Relay -> Momentary Switch in door -> LEDs.
#75
03-21-2007 | 01:25 PM
3rd Gear
Joined: Aug 2005
Posts: 204
Likes: 0
From: Pulaski, TN
What he said!
I don't know that I wouldn't install a temporar switch to get an idea of how they work when driving @ night or just grap a 12v battery and test away.
What color are you going with? I don't know that I'd want my blue strips on when I'm driving. Might cause too much eye strain.
I don't know why the drivers side rear was such a pain form me. I had the passenger side front and back done in less than 15 min at lunch today.
Now for the wiring! I wish my EAS trim tools were in already. They look like they will be handy for the wiring run. I've also got a Dice iPod adapter installed. Its wiring is running up the passenger side and needs to be tucked away as well.