
Interior/Exterior Door Mod: LED Puddle Lights and Map Compartment Light
#1
 11-23-2006 | 08:48 AM

Thread Starter
|
6th Gear
Joined: Jun 2006
Posts: 5,692
Likes: 2
Door Mod: LED Puddle Lights and Map Compartment Light
The idea here was to add in a set of brighter puddle lights in the door sill, using blue LEDs (to match the rest of my interior).
To do this, I constructed a number of small "can lights" using brass tubing. the LEDs were set into the can and sealed with clear silicone. the tubing was then inserted through closed-cell foam blocks and the whole assembly was attached to the inside of the door with more silicone. This seals the entire assembly and prevents any moisture from getting up inside the door:
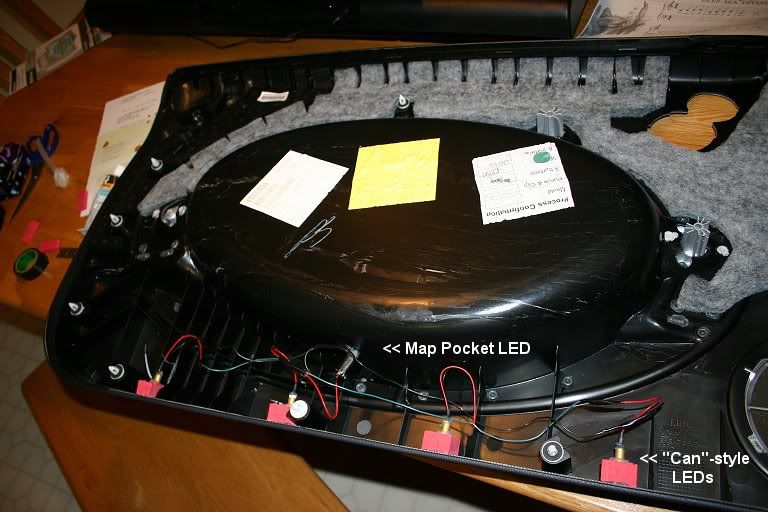
While I was in there, I realized I had two extra LEDs (I got spares in case I broke any) and I put that last set into the bottom edge of the map pocket:
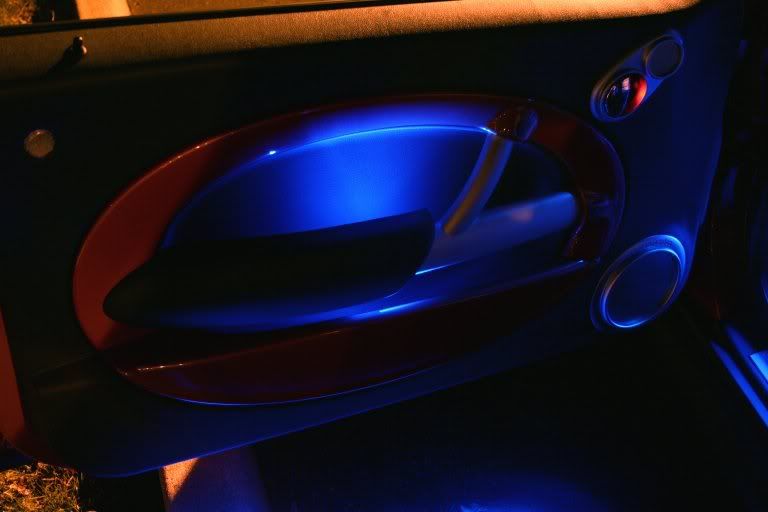
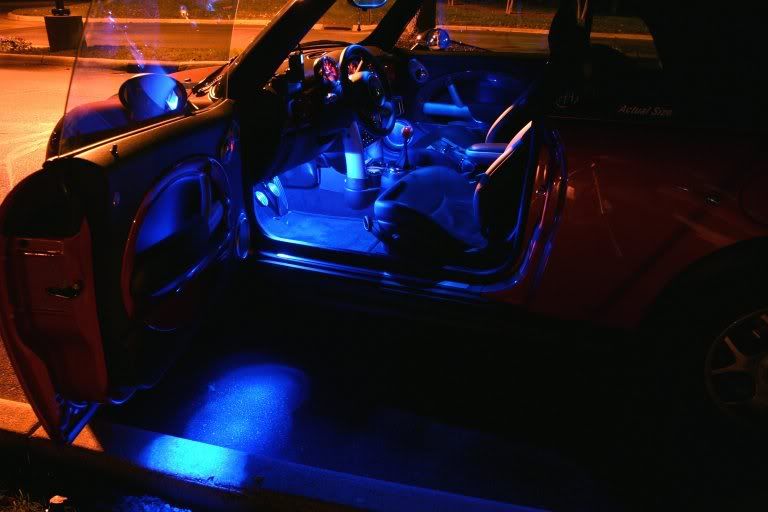
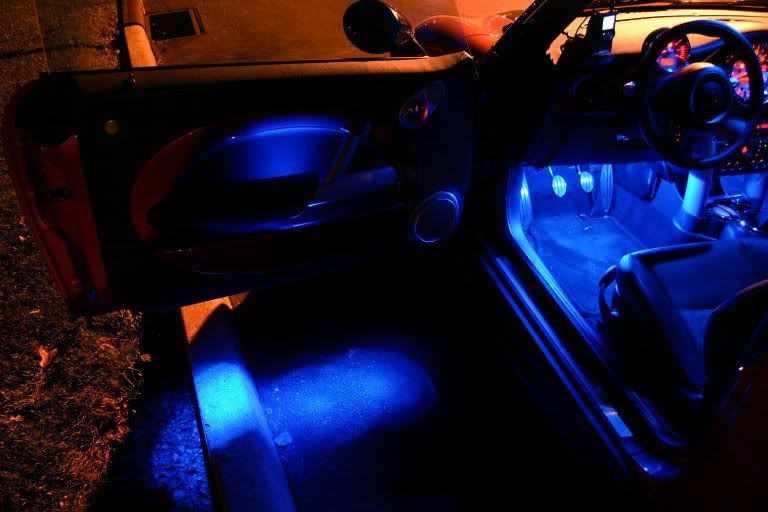
As you can see, the 4 puddle lights are much brighter than the OEM white light. These are wired right into the existng puddle lamp wires, so they dim along with the rest of the cabin lights:
Not everyone's cup of tea, I realize, but it's different, anyway, and it's got me a number of comments so far.
To do this, I constructed a number of small "can lights" using brass tubing. the LEDs were set into the can and sealed with clear silicone. the tubing was then inserted through closed-cell foam blocks and the whole assembly was attached to the inside of the door with more silicone. This seals the entire assembly and prevents any moisture from getting up inside the door:
While I was in there, I realized I had two extra LEDs (I got spares in case I broke any) and I put that last set into the bottom edge of the map pocket:
As you can see, the 4 puddle lights are much brighter than the OEM white light. These are wired right into the existng puddle lamp wires, so they dim along with the rest of the cabin lights:
Not everyone's cup of tea, I realize, but it's different, anyway, and it's got me a number of comments so far.
#3
11-23-2006 | 09:01 AM
Thread Starter
|
6th Gear
Joined: Jun 2006
Posts: 5,692
Likes: 2


#7
11-23-2006 | 10:34 AM

Trending Topics
#8
11-24-2006 | 12:36 PM
Thread Starter
|
6th Gear
Joined: Jun 2006
Posts: 5,692
Likes: 2
I get all my LEDs from Oznium.com. He sells ones pre-wired with an attached resistor, so installation is very simple:
http://www.oznium.com/prewired-leds
http://www.oznium.com/prewired-leds


#14
11-24-2006 | 06:24 PM
Thread Starter
|
6th Gear
Joined: Jun 2006
Posts: 5,692
Likes: 2
I used the 5MM ones, but I WOULD have actually used the 10MM ones from Oznium instead, because the 10MM are much more "directional" and would have resulted in more discreet "spots" when lit. I ended up not using the 10MM ones though because:
1. it would have resulted in HUGE holes in the door plastic and it's a bit tight inside the door and
2. Oznium doesn't make pre-wired 10MM LEDs and I didn't want to hand-solder 8 of the buggers.
In the end the 5MM ones worked perfectly - the foam blocks securing the cans fit just right with a bit of trimming and the lights still are spotlit enough. I set the LEDs just inside the cans, but probably could have got more of a "spot" effect by moving them 3mm or 4mm back into the can. Next time...


#17
11-24-2006 | 06:33 PM
2nd Gear
Joined: Oct 2006
Posts: 57
Likes: 0
From: Motoring in Florida
#18
11-24-2006 | 06:51 PM
Thread Starter
|
6th Gear
Joined: Jun 2006
Posts: 5,692
Likes: 2
LOL... they're discarded foam blocks that were my son's toy. They were all chewed up and desined for the trash and I rescued them. I'm not sure where my wife bought them but they're dense foam, the same kind that you sometimes sold as "tub blocks" for the bath. Just check at KB Toys or Toys R Us and look for the kind that are really dense. I cut them to shape with a steak knife and drilled the holes for the tubing with a standard drill bit a few mm smaller than then tubing.
If you can't find them I have a whole bagful left.
If you can't find them I have a whole bagful left.

#23
11-24-2006 | 07:05 PM
Thread Starter
|
6th Gear
Joined: Jun 2006
Posts: 5,692
Likes: 2
That foam's good for all kinds of things. I used blocks of it under my MP3 player bracket to cushion it aginst the dash (they seem impervius to summertime heat) and I also used it to space out 2 cold cathode bars inside the engine bay - they're dual-purpose spacers and shock-absorbers. 
As for the location, I still have the OEM light in there, it's just disconnected. I drilled 4 holes in the sill equidistantly spaced and taking into account the supports inside the door liner then put the cans on those holes.
As for the location, I still have the OEM light in there, it's just disconnected. I drilled 4 holes in the sill equidistantly spaced and taking into account the supports inside the door liner then put the cans on those holes.
#24
11-24-2006 | 11:02 PM
5th Gear
Joined: Nov 2004
Posts: 1,041
Likes: 18
From: Bedford, TX.
#25
11-24-2006 | 11:36 PM
Thread Starter
|
6th Gear
Joined: Jun 2006
Posts: 5,692
Likes: 2
I can put it in here...
I'm VERY wary of moisture as well, so first I sealed up the entire end of the brass tube (where the wires are inserted) with clear silicone. I put it on the wires themselves and pulled the LED into the tube, dragging the silicone behind - that way the entire interior of the tube was sealed but the LED itself wasn't obscured with slicone.
Then I pushed the tube through the foam block. I drilled a hole in the senter of the foam a few millimeters smaller than the tube so the assembly would sit inside very tightly. I pushed the "can" through, allowing only about 1mm-2mm of the tube to protrude through the "bottom" of the foam. This would be my "lip" to aid in installation in the door peice.
To attach the blocks, I drilled holes in the door sill the same diameter as the tube, then put silicone on the "bottom" edge of the foam (the side that would, in effect, be "glued" to the plastic with the silicone). I spread the silicone evenly around the tube, keeping it about a millimeter away from the brass. A quick press and I could see silicone oozing through the hole, indicating that I had a 360-degree seal. A quick swab with a Q-tip cleaned up any residue protruding into the can opening.
I let the silicone cure for about 3 hours and wired everything up and I was done. The doors don't geta LOT of moisture but they must get some since I notice my interior door sills are wet after a rain. I plan to check the can lights every season or so just to be sure, but I doubt they'll leak - the OEM light is only a plastic lens clipped into the bottom edge of the door and I think my lights are MUCH better sealed then those are.
The LEDs that shine up into the map pocket aren't sitting insode anyhting - all I did was drill a hole about 4.5mm or a bit larger in the plastic, so the LED had to be wiggled a bit to push it into the plastic (be careful to not bend or break your resistor or the solder. Since the resistor had heat-shrink material aorund it, it was slightly larger than 5MM, so that served as a "stop". I then put a generous blob of silicone over the entire back side, smoothing it down with a coffee stirrer (the kind from McDonalds that looks like a tiny oar - I have hundreds of thethings for modeling work). It then serves as glue and sealent simultaneously.