
Interior/Exterior Light that boot! (LED trunk light MOD)
#276
 08-10-2007, 06:35 AM

You can wire them to the tail lights, or the rear arch parking lights (the red ones embedded in the trim). The brake light bulbs probably have two "hot" wires and one ground leading to them - there are actually two filaments in those bulbs - one is on whenever the lights are on. The other is on when the brakes are pressed - so it's not really one filament getting "brighter" - so no, wiring the LED's to the brakes wouldn't be dim, then bright when the brakes are pressed.
You could tap into the parking light or arch light "hot" wire with no issues - the LEDs add negligible load. According to my Bentley manual, wires are:
* left parking lights (sides and front) - Black/Green
* right parking lights - Black/Blue
* left taillight - Green/Violet
* right taillight - Green/yellow
* License Plate light - Green/yellow
Note that you need to actually see where the wires go, in addition to seeing the color - there are sometimes multiple wires in the car with the same color code that do different things...
#277
08-10-2007, 07:34 AM
It depends on the length of the LED strip, of course, but if you use a short length the extra draw is literally measured in milliamps, so the extra load really shoud not be an issue. Unless you're thinking of using 6 foot lengths or something?
If you want them "always on" with the position 1 on the light switch (parking lights), I'd tap the arch light wire like Blimey indicated - it should be right there where you need it. If you need them to come on with the brakes, use the brake lamp wire.
The wires can then be run inside the plastic wheel shield to wherever your final installation point is. I'd cover the wires with 1-2 layers of heat-shrink material where they run into the plastic wheel liner, just to be 110% sure that they won't rub - it will add about $2 and 10 minutes to the installation time, but will assure years of hassle-free operation.
#278
08-10-2007, 07:36 AM

Former Vendor

 I'll post pictures of my setup when done.
#280
08-10-2007, 07:43 AM

Former Vendor
Note that we offer a multi-LED panel that is quite bright, that should work in this cabrio trunk application. You can find it HERE. See the "LED Dome Lamp Panel - 2007+ MINI" in the upper right. It's available in white, blue, or red.
--Dan
Mach V
FastMINI.net
--Dan
Mach V
FastMINI.net
#281
08-10-2007, 08:05 PM

5th Gear
I have come across a issue with my Boot Light. One of the 2 strips that make up my boot light has gone out and i dont know if its a short or it just went out. But aside from buy another strip im not sure 1) the best way to replace it and 2) a method of either making it better so it wont go out again or making it easier to take on and off if need be. My method for the project was to use black silicon adhesive to mount the LED strips and then i soldered the wires together and put heat shrink around them. So i have to remove the bad one and some how loosen it from the silicon and the solder and then mount the new one but if it happens again i need to to know why its happening and then a way to fix it or make it not so permanent so i can take them off and on whenever one stops working.
#282
08-11-2007, 08:56 AM
Did you get it from Oznium? If so, just let him know it failed (I can get you his email if you can't locate it on the site) and I'd be shocked if he didn't just send you another one for free.
I'd just replace it - the silicone should just peel out - snip the bad unit off and replace it. I don't think you'd need to solder - the boot gets no moisture - so just use crimp-on butt connectors or even plain ol' twist-and-wrap. I've never heard of an LED strip going bad (the ones in my engine bay that get wet and hot are still running fine) but anything mass produced can have occasional defects. If you got them from Phil at Oznium though at least you have a very high chance that he'll just replace it free of charge - he usually does rather than risk a dissatisfied customer in my experience.
I'd just replace it - the silicone should just peel out - snip the bad unit off and replace it. I don't think you'd need to solder - the boot gets no moisture - so just use crimp-on butt connectors or even plain ol' twist-and-wrap. I've never heard of an LED strip going bad (the ones in my engine bay that get wet and hot are still running fine) but anything mass produced can have occasional defects. If you got them from Phil at Oznium though at least you have a very high chance that he'll just replace it free of charge - he usually does rather than risk a dissatisfied customer in my experience.
#283
08-11-2007, 09:10 AM
5th Gear
#285
08-14-2007, 04:34 PM
WooHoo!!! I installed my strip (19") yesterday and love it  Oznium is awesome. I ordered my lights Friday, and had them Monday morning (Cali to Indiana). I also wired in a DC Jack (from Radio shack) and have the LED's connected to a 90 degree DC plug (also from radio shack). Absolutely amazing. Great mod you guys!!!
I'll post pictures tomorrow.
P.S. Someone questioned about the LED's dimming like the stock light used to... My stock light dimmed, and my LED's do as well. They slowly illuminate powering up, and dim when turning off
P.S.S. While I was at it, I blacked out my sidemarkers, and shaved my rear wiper Yesterday was a "the Mod bug bit me" day
Oznium is awesome. I ordered my lights Friday, and had them Monday morning (Cali to Indiana). I also wired in a DC Jack (from Radio shack) and have the LED's connected to a 90 degree DC plug (also from radio shack). Absolutely amazing. Great mod you guys!!!I'll post pictures tomorrow.
P.S. Someone questioned about the LED's dimming like the stock light used to... My stock light dimmed, and my LED's do as well. They slowly illuminate powering up, and dim when turning off
P.S.S. While I was at it, I blacked out my sidemarkers, and shaved my rear wiper
Yesterday was a "the Mod bug bit me" day
Last edited by skillet; 08-14-2007 at 04:59 PM. Reason: Added pictures
#286
08-14-2007, 09:39 PM
LEDs have no issues dimming as you noticed - hooking them to the dimming cabin lighting is no problem whatsoever.
Cold Cathodes, however, will fry their transformer in short order when sent undervoltage on a regular basis - if hooking to a dimming power source, you'll need to also use a relay to switch them on and off with no dimming feature.
I love the glow that you get from cathodes, but the durability, dimming capability and waterproof nature of the LED strips are swiftly making them my favorite glow appliance.
#288
08-15-2007, 11:40 AM
#289
05-09-2008, 08:44 AM
3rd Gear
Join Date: Mar 2008
Location: Madison, MS
Posts: 180
Likes: 0
Received 0 Likes
on
0 Posts
LED Question
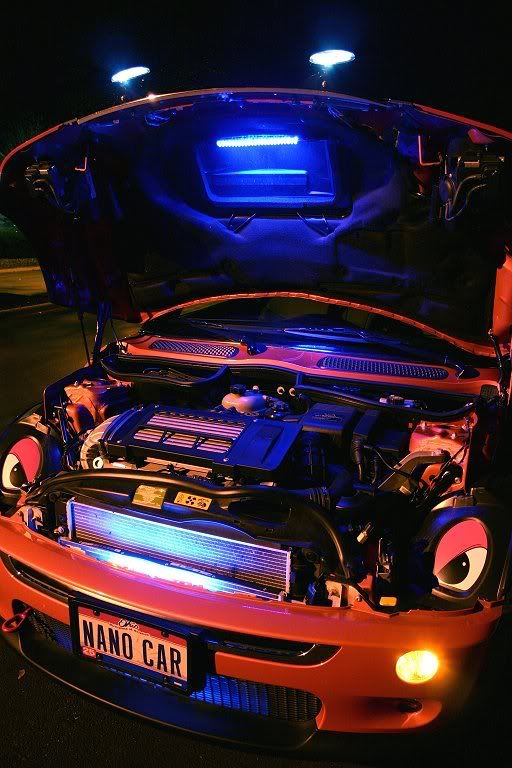
I know NANO MINI is DOA  I saw the article in Alliance,
but. . . .
my electrical engineers question is, "How do they take the heat?"
LED's don't like heat. Did you notice anything placing them so close to the Supercharger Intake?
 I saw the article in Alliance,
but. . . .
my electrical engineers question is, "How do they take the heat?"
LED's don't like heat.
Did you notice anything placing them so close to the Supercharger Intake?
#290
05-09-2008, 08:56 AM
3rd Gear
Join Date: Mar 2008
Location: Madison, MS
Posts: 180
Likes: 0
Received 0 Likes
on
0 Posts
#291
05-09-2008, 10:13 AM
Since I'm a 2 day guy (I never get 5:00 shadows...) 
I removed the wiper, took out the motor, and used a plug to fill the hole in the rear window
I'd post a pic, but I don't have one...there are some threads on this, though (with pictures).
I removed the wiper, took out the motor, and used a plug to fill the hole in the rear window
I'd post a pic, but I don't have one...there are some threads on this, though (with pictures).
#292
05-09-2008, 04:35 PM
3rd Gear
Join Date: Mar 2008
Location: Madison, MS
Posts: 180
Likes: 0
Received 0 Likes
on
0 Posts
Supercharger Intake Lights

#293
05-09-2008, 05:16 PM
#294
05-11-2008, 04:46 PM

OKay, having read through this entire thread in awe, I just order myself some lights for my boot, footwells, and engine bay from Oznium.com.
I have one question though, how do I wire the lights that are going into the engine bay? I don't want them running constantly (because their blue, and that's illegal). Should I buy a switch? How do I run the wires through to the cabin and to the switch?
I have ZERO experience in electrical anything, so some really dumbed down instructions would be GREATLY appreciated! :D
Thanks a million to everyone in this thread for giving me the inspiration to start this project!
~MM
#295
05-11-2008, 06:22 PM

Really depends on the application, but this general order can be followed for wiring up switched lights:
power source>switch>light(s)>ground
Because we are just talking about little LED you shouldn't have to worry about running relays, which really makes things easy. A good place to run wire from the passenger compartment is through the rubber boot in the drivers side cowl area. It is easily identifiable by the large red cable that runs though it.
#296
05-12-2008, 08:02 AM
Here is a good thread with some diagrams:
http://www.oznium.com/forum/topic3633
For LEDs (assuming you're using Oznium's pre-wired LEDS or the LED strips, all of which are already fitted with resistors) use the diagram labeled "LED Wiring Diagram" and "Similar LED Wiring Diagram" - it's the same for strips that it is for individual LEDs.
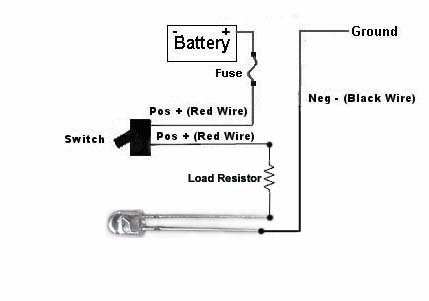
FOR MULTIPLES (PARALLEL INSALLATION):
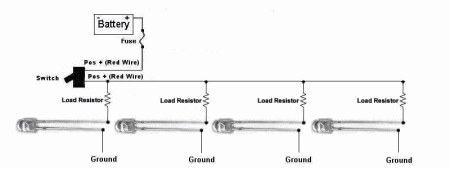
Be sure to note that a FUSE is fitted between the battery (the power supply) and the accessory - you must must MUST always fit a fuse to any accessory for safety. If you tap int an existing power source to drive the accessory (the wiring leading to the white foot well lighting is a popular place to power cabin lighting, as the lights wil come on when the door is opened that way), you do NOT need to us an additional fuse - the cabin lighting is already fused.
If you want an "always on" power source to switch on your engine lighting, however, I recommend running a new positive wire from the battery and into the cabin. Install the fuse within 10 inches of the battery - closer is always better. The ground nut on the R50-R53 is on the driver's side, near the bonnet support.
I'll actually be doing an article for the NAM Alliance E-zine in a few weeks with a bunch of basic info, as well as a How-to on installing an accessory fuse box and basic switch theory if you can wait - or you can PM me with any questions.
http://www.oznium.com/forum/topic3633
For LEDs (assuming you're using Oznium's pre-wired LEDS or the LED strips, all of which are already fitted with resistors) use the diagram labeled "LED Wiring Diagram" and "Similar LED Wiring Diagram" - it's the same for strips that it is for individual LEDs.
FOR MULTIPLES (PARALLEL INSALLATION):
Be sure to note that a FUSE is fitted between the battery (the power supply) and the accessory - you must must MUST always fit a fuse to any accessory for safety. If you tap int an existing power source to drive the accessory (the wiring leading to the white foot well lighting is a popular place to power cabin lighting, as the lights wil come on when the door is opened that way), you do NOT need to us an additional fuse - the cabin lighting is already fused.
If you want an "always on" power source to switch on your engine lighting, however, I recommend running a new positive wire from the battery and into the cabin. Install the fuse within 10 inches of the battery - closer is always better. The ground nut on the R50-R53 is on the driver's side, near the bonnet support.
I'll actually be doing an article for the NAM Alliance E-zine in a few weeks with a bunch of basic info, as well as a How-to on installing an accessory fuse box and basic switch theory if you can wait - or you can PM me with any questions.
Last edited by ImagoX; 05-12-2008 at 10:11 AM.
#297
05-12-2008, 08:25 AM
#298
05-15-2008, 05:23 AM
I am so installing LEDs under my bonnet. I have done front foot wells, under both seats, boot, and all the white lights that come on when you open a door (all in blue). I have the wiring run under the carpet and just to the 12V so if a cop pulls me over im all good to turn them off.
Im still a bit confused as to the bonnet ones though (and undercars for that matter). All exterior blue lights are illegal here so I have to have them switch on and off easily. How did you go about doing the bonnet LEDs, im a bit concerned about wiring into my battery and adding fuses and switches. I have already been electrocuted by these lil cars. Is it best to get an electrician to do it properly?
Im still a bit confused as to the bonnet ones though (and undercars for that matter). All exterior blue lights are illegal here so I have to have them switch on and off easily. How did you go about doing the bonnet LEDs, im a bit concerned about wiring into my battery and adding fuses and switches. I have already been electrocuted by these lil cars.
Is it best to get an electrician to do it properly?
Last edited by 07BPB; 05-15-2008 at 05:26 AM.
#299
05-15-2008, 05:31 AM
#300
05-18-2008, 06:45 PM
Any suggestions on how to mount the lights inside the bonnet? Right now I have mine attached via Zippy-Tie to that foam thing under the hood scoop. I think that the 3M tape would loose it's stickyness due to the heat inside the engine compartment.
I'll post some pics up of the other lights I did soon. Eveything turned out great!
~MM
I'll post some pics up of the other lights I did soon. Eveything turned out great!
~MM