
Interior/Exterior Switchbox (yet another glowy-type MOD)!
#1
 12-28-2006, 03:34 PM


Switchbox (yet another glowy-type MOD)!
Well, seeing as how I have a few things now controlled by cabin switches (my driving lights as well as my blue grille lights currently, possibly some additional underbody lighting at some later date), I decided the time had come to mount all my various switches - they had simply been hanging, stashed behind stuff before now.
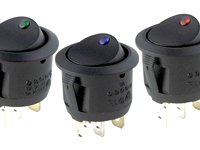
I started with 4 of these 2-position, blue LED switches from Oznium:
I also had a 3-position (on/off/on) switch that I got for my driving lights, a set of Optilux 2500 lights with “angel eyes” – one position was on for the lights and the other on position controlled the ring lights. Trouble is, Oznium does not carry a matching round LED switch… I’d have to wire in a separate LED that would come on when either pole was switched on (for more information on how I had to wire this, using non-illuminating diodes, see THIS THREAD over at Oznium).
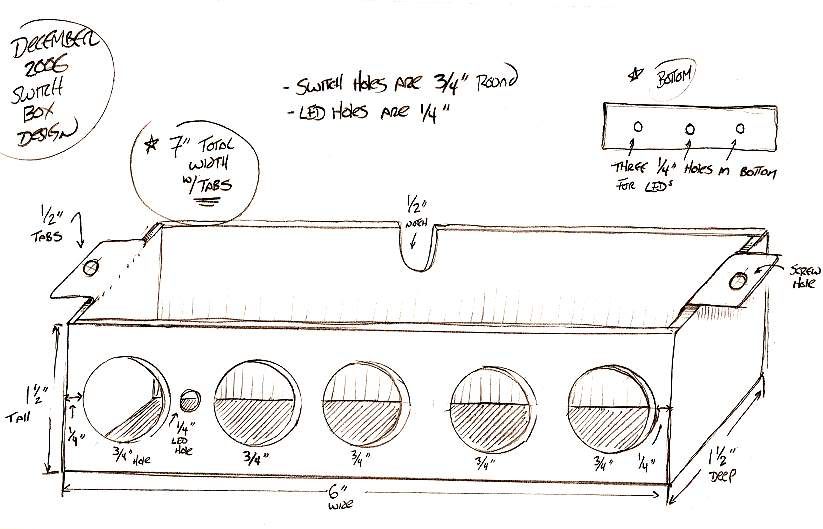
OK, moving on... after procuring all my switches and measuring, I came up with this drawing for the schematic:
My material would be (hopefully) aluminum. Next problem: I don’t have fabrication tools. Luckily for me, my awesome, incredible, totally amazing cousin, Adam, who also happens to be a NAM member and poster here, heard me talking about the project and all on his own decided to volunteer his time and tools. This is what he came up with, all on his own:
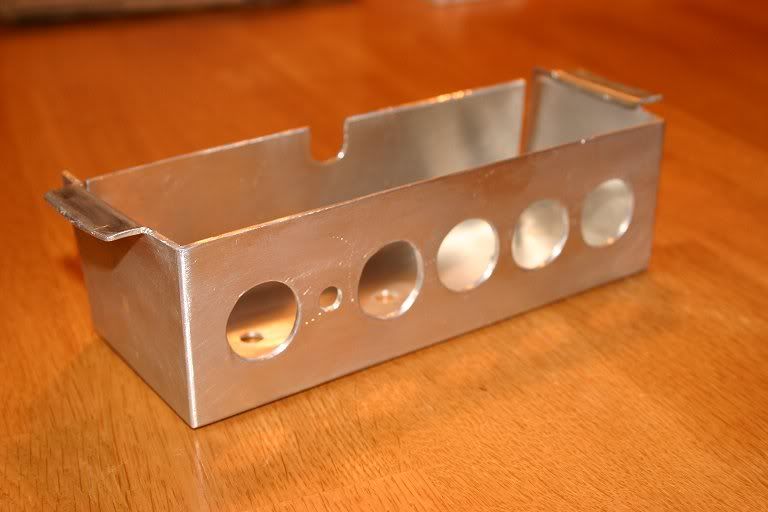
SWEET!! Notice the open back edges… they’re that way for a reason - I’ll explain why in a moment, but I will say that Adam had a GREAT IDEA for attaching the box…
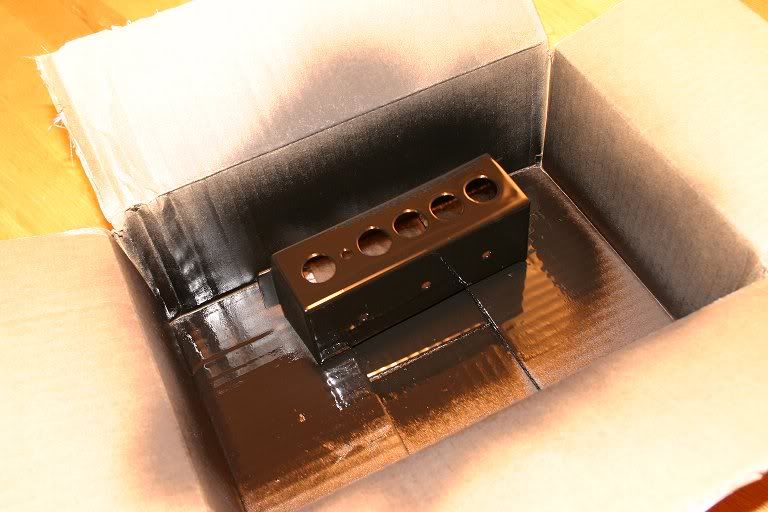
New problem: I mis-measured the switch holes and had to Dremel them out an extra 1/8” so that my switches fit. No biggie – I have THAT tool. A quick rout job and I was ready for paint:
Now the OEM switch box has down-facing LEDs to light up the little tray under the stereo, and I knew that the new box (which attaches under that switch panel) would block them, so I ordered an extra 3 orange LEDs from Oznium and installed them in the bottom of the box:
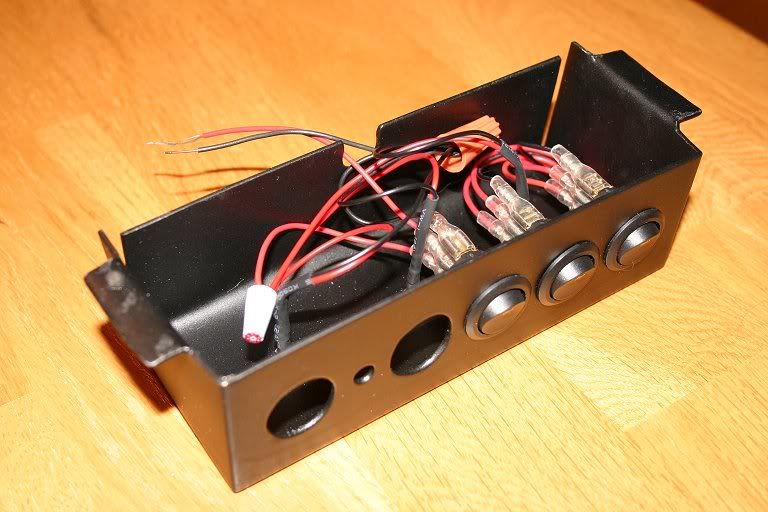
Oznium’s orange LEDs were pretty nice, but they were a bit less red than the OEM cabin LEDs, so I ground off the tips of the new LEDs with my Dremel (doing this makes the light more diffuse and soft, as well) and coated them with layers of red Sharpie marker until they matched. I think I used 7 separate coats of red Sharpie – after that they were almost a perfect color match.
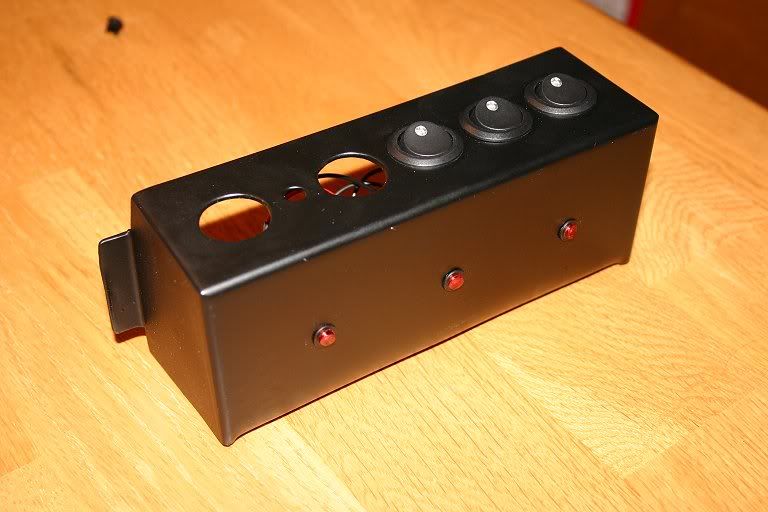
The box installed in the daytime. Remember the open back sides I pointed out earlier? Turns out that doing it like this makes the box basically “grip” the sides of the down tubes such that the whole thing stays in purely by friction alone! This is VERY nice because if/when I need to pull out the box, all I need to do is reach back and pinch the corners shut a bit and the whole thing pops right out.

Here’s the box lit in the day – note that the new orange LEDs on the underside (controlled via one of the blue-lit switches) is quite bright and shows even in daylight. I decided to switch it on and off in case it was TOO bright actually.
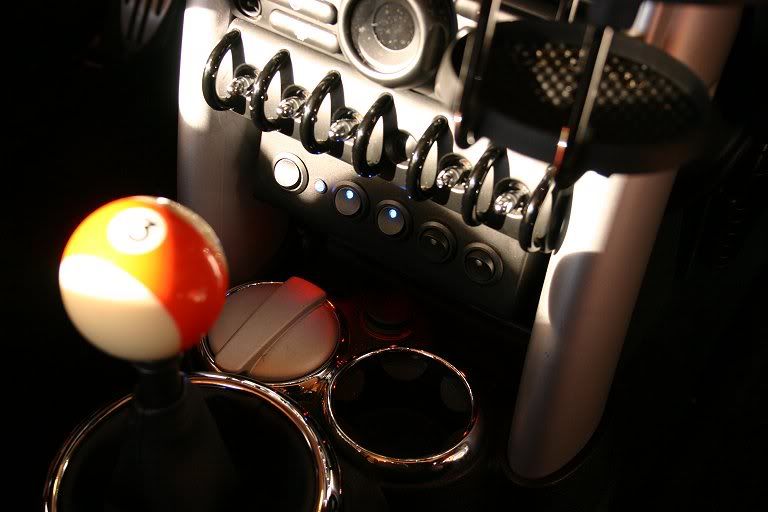
And here’s the final product at night, matching my blue cabin lighting.

Click HERE for a full-size image...
And there you have it! Thanks again, Adam, for your help and thanks to Oznium.com for the consistently high-quality products!
I started with 4 of these 2-position, blue LED switches from Oznium:
I also had a 3-position (on/off/on) switch that I got for my driving lights, a set of Optilux 2500 lights with “angel eyes” – one position was on for the lights and the other on position controlled the ring lights. Trouble is, Oznium does not carry a matching round LED switch… I’d have to wire in a separate LED that would come on when either pole was switched on (for more information on how I had to wire this, using non-illuminating diodes, see THIS THREAD over at Oznium).
OK, moving on... after procuring all my switches and measuring, I came up with this drawing for the schematic:
My material would be (hopefully) aluminum. Next problem: I don’t have fabrication tools. Luckily for me, my awesome, incredible, totally amazing cousin, Adam, who also happens to be a NAM member and poster here, heard me talking about the project and all on his own decided to volunteer his time and tools. This is what he came up with, all on his own:
SWEET!! Notice the open back edges… they’re that way for a reason - I’ll explain why in a moment, but I will say that Adam had a GREAT IDEA for attaching the box…
New problem: I mis-measured the switch holes and had to Dremel them out an extra 1/8” so that my switches fit. No biggie – I have THAT tool. A quick rout job and I was ready for paint:
Now the OEM switch box has down-facing LEDs to light up the little tray under the stereo, and I knew that the new box (which attaches under that switch panel) would block them, so I ordered an extra 3 orange LEDs from Oznium and installed them in the bottom of the box:
Oznium’s orange LEDs were pretty nice, but they were a bit less red than the OEM cabin LEDs, so I ground off the tips of the new LEDs with my Dremel (doing this makes the light more diffuse and soft, as well) and coated them with layers of red Sharpie marker until they matched. I think I used 7 separate coats of red Sharpie – after that they were almost a perfect color match.
The box installed in the daytime. Remember the open back sides I pointed out earlier? Turns out that doing it like this makes the box basically “grip” the sides of the down tubes such that the whole thing stays in purely by friction alone! This is VERY nice because if/when I need to pull out the box, all I need to do is reach back and pinch the corners shut a bit and the whole thing pops right out.
Here’s the box lit in the day – note that the new orange LEDs on the underside (controlled via one of the blue-lit switches) is quite bright and shows even in daylight. I decided to switch it on and off in case it was TOO bright actually.
And here’s the final product at night, matching my blue cabin lighting.
Click HERE for a full-size image...
And there you have it! Thanks again, Adam, for your help and thanks to Oznium.com for the consistently high-quality products!
#2
12-28-2006, 03:50 PM

#3
12-28-2006, 03:56 PM

#7
12-28-2006, 04:45 PM

Trending Topics


#9
12-28-2006, 06:22 PM

#11
12-28-2006, 06:27 PM
#12
12-28-2006, 06:28 PM

#13
12-28-2006, 06:32 PM
#15
12-28-2006, 06:59 PM
#16
12-28-2006, 07:44 PM
I don't think it will rattle. The worst I would expect would be a rubbing noise like you anticipated, although you could probably solve that with felt tape if it does happen. If it ever does get shifty or rattley (is that even a word?) I would just bend the tabs out furter to increase the holding tension. I was really surprised at how solid it held in there when I did it. I pulled down on it REALLY hard and it would not budge, just fore and aft movement.
#17
12-28-2006, 08:01 PM
Felt tape... Hmmmmmmmmmmm... That's a great idea! I think I'll do that, just to make them even a bit more secure.
As for the tabs - you only made them 1/4" Adam? I measured 7" total width between the down tubes, and the box is 6" wide, so shouldn't each tab be 1/2"? Of course, YOU actually fabricated it, so you would know best. Maybe the narrpwer width is because the down tubes are rounded slightly and narrow a bit at the apex of the curve?
Oh, and the "U" shaped channel at the back for the wires works, but it's not optimal. What I'd do if I had it to do over again is I'd drill a 1/2" hole about 1/2" from the top of the rear peice, then cut a narrow (like 1/8") slit opening it up to the upper edge of the back... so like a sort of inverted keyhole shape. That way, you could slide a single wire at a time down through that slit and into the larger hole and the wires would stay put. As it is, when you go to put the box into the space between the tubes, you have to sort of hold the wires down into the slot with a finger and they tend to pop out. No big deal though...
#18
12-28-2006, 10:02 PM
Whoops...I didn't realize that was drawing #2...I just recall making it to the original drawing and then having to remove ~1/4" from each tab to get it to fit. I never did get a final width measurment after all of the trimming and bending. I was just happy that I didn't have to figure out how to get screws in there at that point.
As for the wire retaining issue you may want to try gluing a 1/2" i.d. rubber grommet in the slot and cutting a slit in the top so you can "pop" the wire past the rubber and into the hole, it should hold them in place during installation. It would not take much, just a knife cut.
As for the wire retaining issue you may want to try gluing a 1/2" i.d. rubber grommet in the slot and cutting a slit in the top so you can "pop" the wire past the rubber and into the hole, it should hold them in place during installation. It would not take much, just a knife cut.
#20
12-29-2006, 07:28 AM

yah, i was thinking Hot Import Nights or something. i think you will
do very well.

#22
12-29-2006, 10:49 AM

Former Vendor

#23
12-29-2006, 05:26 PM

4th Gear
Join Date: Aug 2006
Location: Cincinnati Ohio area
Posts: 411
Likes: 0
Received 0 Likes
on
0 Posts
 You do some of the best stuff
#25
12-29-2006, 06:41 PM

But hey, feel free to drive up whenever you want...
