
JCW jcw gp 2 diffuser


#452
 08-02-2013, 03:59 PM
#455
08-02-2013, 05:26 PM


#456
08-02-2013, 05:35 PM

Yes someone on this forum has painted it. It was red to match the car color. I didn't think it looked that good, but that's just me as I like it as is on a midnight black MINI. Also should have little damage from the road, as its on the back of the car. My front from 150 a day drive is not in great shape, but the rear of my car as well as my diffuser is better than new.
#457
08-02-2013, 05:40 PM
I think there's more than one approach to make a MINI look great. Classy is just one of them. Not necessarily my preferred style though. I'll leave that up to the no-stripes, black-out everything that shines, body-color roof crowd. I tend to like MINIs that POP !


Subtle is just not my style when it comes to MINIs.
Subtle is just not my style when it comes to MINIs.

#460
08-02-2013, 07:58 PM
Thanks, two of those are ones that we've sold. Need to get some updated pics of the two R50s and the R60 that we still have to go along with my new JCW.
Appreciate the input, glad I'm not the only one who thought of painting a diffuser. 
#461
08-03-2013, 05:07 PM
#462
08-03-2013, 05:12 PM
#463
08-03-2013, 05:38 PM
#464
08-06-2013, 10:14 AM

3rd Gear
Join Date: Apr 2004
Location: Chicago N burbs
Posts: 240
Likes: 0
Received 0 Likes
on
0 Posts
#465
08-26-2013, 07:06 AM

I installed mine this weekend. Really happy with this, as it sort of ties in all the black around the bottom edge of the car and really makes it look sportier - not to mention easy to install.
Sorry if this has all been suggested before by someone else in this thread; but here are some pointers:
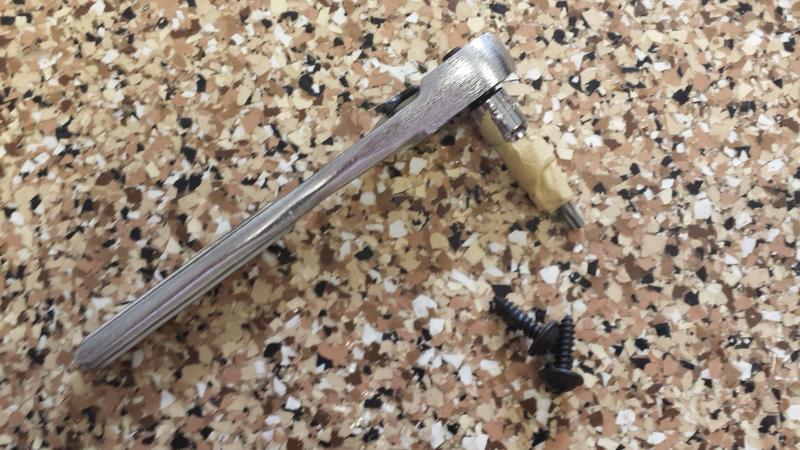
Use a small 1/4" ratchet w/1/4" socket on your torx driver (pic below) for the 'sideways screws' at the corners. I wrapped it up with some tape so the torx driver wouldn't fall out of the 1/4" socket. I had the screws removed in 2 minutes. Getting them back in was a little more work just to get things aligned w/the new diffuser. Which is my second tip: install ALL BOLTS/SCREWS loose then work your way back to front, tightening the sideways corner screws up to the tunnels then to the clips, finally tightening the exhaust hanger bolts with a long extension and swivel (easier than it sounds - plenty of room to get in from the muffler side). My mistake was to tighten everything and leave the sideways screws last...the tunnel was too far back by about 1/8" which left the 'sideways' screw misaligned. Had to loosen up everything on that side to get it all to fit properly.
Edit: saw someone else posted to just remove the right and left trim pieces that attach to the trim/diffuser, then those torx screws are easy to get to, I'd do that if I did this install again.


Sorry if this has all been suggested before by someone else in this thread; but here are some pointers:
Use a small 1/4" ratchet w/1/4" socket on your torx driver (pic below) for the 'sideways screws' at the corners. I wrapped it up with some tape so the torx driver wouldn't fall out of the 1/4" socket. I had the screws removed in 2 minutes. Getting them back in was a little more work just to get things aligned w/the new diffuser. Which is my second tip: install ALL BOLTS/SCREWS loose then work your way back to front, tightening the sideways corner screws up to the tunnels then to the clips, finally tightening the exhaust hanger bolts with a long extension and swivel (easier than it sounds - plenty of room to get in from the muffler side). My mistake was to tighten everything and leave the sideways screws last...the tunnel was too far back by about 1/8" which left the 'sideways' screw misaligned. Had to loosen up everything on that side to get it all to fit properly.
Edit: saw someone else posted to just remove the right and left trim pieces that attach to the trim/diffuser, then those torx screws are easy to get to, I'd do that if I did this install again.


Last edited by koopy; 08-26-2013 at 11:30 AM.

#467
09-22-2013, 04:14 PM

Were all the clips and other hardware included in the kit? I'm getting ready to order mine, and I don't want to have to go through what I went through with the front under tray, where none of the three styles of clips are included and need to be ordered separately.

#469
09-23-2013, 05:10 AM
Everything was included except two of the four clips for the tunnel to panel connection...I just made due with a screw and lock nut. I believe they intended to send all the right hardware though.
#470
09-23-2013, 05:58 AM
Yes we include the hardware with the kit when you order it from us
http://www.waymotorworks.com/gp-2-re...fuser-kit.html
http://www.waymotorworks.com/gp-2-re...fuser-kit.html


#472
09-23-2013, 07:29 PM
The clips for the front panels are not included as most people don't have those panels so they don't need them, but we've also seen cars that did have the panels had the clips on them already.
#473
09-23-2013, 07:39 PM
Way, I see that you just got the GP2 front under carriage panel are there middle section panels and do you carry them?
#474
09-23-2013, 08:01 PM
We do have the middle sections, but your better off to go to your local dealer and get them. Because of the length of them they car considered oversize and shipping will cost you more than any money we can save you.
#475
09-23-2013, 08:13 PM
http://www.waymotorworks.com/mini-ha...tml?quantity=1
the same as:
http://www.minigenuineparts.co.uk/mi...2_338_554.html
that a lot of people here are installing. Getting them from you wouldbe much better.