
JCW jcw gp 2 diffuser
#501
 11-18-2013, 12:30 PM


5th Gear
Join Date: Jul 2011
Location: Los Angeles
Posts: 1,025
Likes: 0
Received 0 Likes
on
0 Posts
#502
11-18-2013, 01:45 PM

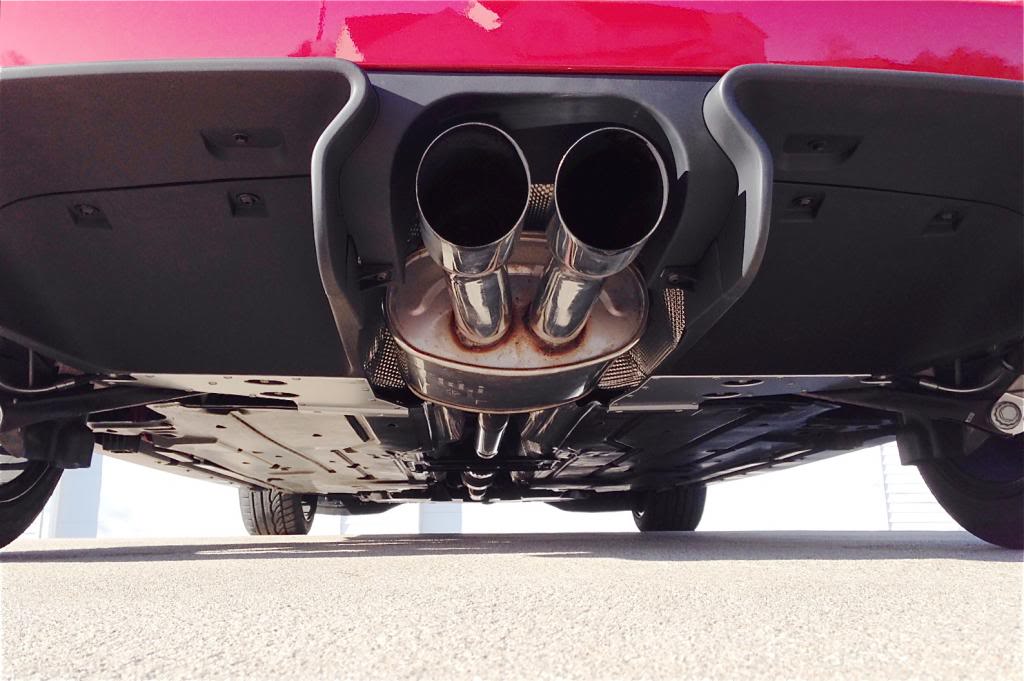
Instead of posting another obligatory shot of the rear end of my JCW, here's what my smooth bottom looks like.  I've got both the GP2 rear diffuser and the front undertray installed, which completes the aero package since all JCWs are delivered with the panels under the passenger compartment.
I like the whole system because it's cool looking, but it certainly will help keep the winter crud off the bottom of the car and protect it from road debris - plus I think there's a little less road noise. I've also seen reports that the whole bottom aero setup contributes up to 1.3 mpg on the highway, but I think that's way too much to realistically expect.
My rear diffuser came from ECS Tuning: best price, great service, everything necessary for installation and quick delivery.
I've got both the GP2 rear diffuser and the front undertray installed, which completes the aero package since all JCWs are delivered with the panels under the passenger compartment.I like the whole system because it's cool looking, but it certainly will help keep the winter crud off the bottom of the car and protect it from road debris - plus I think there's a little less road noise. I've also seen reports that the whole bottom aero setup contributes up to 1.3 mpg on the highway, but I think that's way too much to realistically expect.
My rear diffuser came from ECS Tuning: best price, great service, everything necessary for installation and quick delivery.

#503
11-18-2013, 07:09 PM

#504
11-18-2013, 07:52 PM
Sorry, I can't tell you about specific hardware because I had the dealer install the rear diffuser along with a 22-mm rear sway bar as part of a package deal. (Laying on the ground under a car on jackstands in my garage when the wind chill was 10 degrees didn't appeal to me.) The only thing I remember is that ECS Tuning included 6 hex bolts with washers in its "kit," so maybe you could contact them.
Update: You got me wondering, so I just went out and looked under my car. The bolts on both sides of the exhaust are exactly the same as the two that are on each tunnel, toward the back of the car. The single bolts on each side, farthest back and closest to the bumper cover, are smaller.
Update: You got me wondering, so I just went out and looked under my car. The bolts on both sides of the exhaust are exactly the same as the two that are on each tunnel, toward the back of the car. The single bolts on each side, farthest back and closest to the bumper cover, are smaller.
Last edited by Spa2k; 11-18-2013 at 08:08 PM.
#505
11-19-2013, 12:24 AM


#506
11-19-2013, 07:25 AM
Sorry, I can't tell you about specific hardware because I had the dealer install the rear diffuser along with a 22-mm rear sway bar as part of a package deal. (Laying on the ground under a car on jackstands in my garage when the wind chill was 10 degrees didn't appeal to me.) The only thing I remember is that ECS Tuning included 6 hex bolts with washers in its "kit," so maybe you could contact them.
Update: You got me wondering, so I just went out and looked under my car. The bolts on both sides of the exhaust are exactly the same as the two that are on each tunnel, toward the back of the car. The single bolts on each side, farthest back and closest to the bumper cover, are smaller.
Update: You got me wondering, so I just went out and looked under my car. The bolts on both sides of the exhaust are exactly the same as the two that are on each tunnel, toward the back of the car. The single bolts on each side, farthest back and closest to the bumper cover, are smaller.
#507
11-26-2013, 08:27 AM

Platinum Sponsor
G33KGUY - Thanks
Your are welcome. Wow does your R58 look good. Great fall photo with the leaves.
Spa2k - Nice shot , it shows you how smooth the back end looks. Glad you got it installed.


"My rear diffuser came from ECS Tuning: best price, great service, everything necessary for installation and quick delivery. "
Welcome again. Great looking mods.
We have them back in stock if anyone else needs them. Part # 51747330558KT
http://www.ecstuning.com/Search/SiteSearch/51747330558KT/
Thanks
__________________

MINI Guru/ MINI Owner Since 2004 | NEW Lifetime Part Replacement | Local Pickup
Milltek | Genuine MINI | Forge Motorsport | NM Engineering | ECS Performance | M7 Speed
Customer Service Hours: 8am-8pm EST|Sales Team Hours: 8am-11pm | SAT 10am-7pm 800.924.5172
MINI Guru/ MINI Owner Since 2004 | NEW Lifetime Part Replacement | Local Pickup
Milltek | Genuine MINI | Forge Motorsport | NM Engineering | ECS Performance | M7 Speed
Customer Service Hours: 8am-8pm EST|Sales Team Hours: 8am-11pm | SAT 10am-7pm 800.924.5172
#508
01-24-2014, 09:13 PM

Moderator
Hey ECS,
How about coming up with a package that includes all the parts to switch over from the standard R56 rear bumper to the JCW rear bumper plus GP2 diffuser?
I have been trying to figure this out, so far I have:
JCW GP 2 Rear Center Diffuser Retrofit Kit ES#2626525 Mfg#747330558KT $260.55
Rear JCW Aerodynamic Bumper Panel - W/O PDC ES#75494 Mfg#51120404110 $217.31
Center Grid Grille ES#75526 Mfg#51120413256 $19.11
Grille - Air Discharge - Left ES#75527 Mfg#51120413257 $22.32
Grille - Air Discharge - Right ES#75528 Mfg#51120413258 $22.32
Width Extension Black - Rear Right ES#75523 Mfg#51120413250 $25.65
Width Extension Black - Rear Left ES#75524 Mfg #51120413254 $10.41
Total: $603.32
But I haven't figured out the lights and some of the trim bits. Having a kit with all the right parts would be great. Thanks in advance.
#509
01-27-2014, 06:04 AM
Platinum Sponsor
Hello squaWSkiBum,
There is a little more into it. Dependent on year options / Rear fog lights or not / rear back up light or not. Painted arches so you can get the primed lower trims. And the year / model and then the hardware. Shoot me a PM and I can help you out with options and what you want.
Thanks
There is a little more into it. Dependent on year options / Rear fog lights or not / rear back up light or not. Painted arches so you can get the primed lower trims. And the year / model and then the hardware. Shoot me a PM and I can help you out with options and what you want.
Thanks
__________________
MINI Guru/ MINI Owner Since 2004 | NEW Lifetime Part Replacement | Local Pickup
Milltek | Genuine MINI | Forge Motorsport | NM Engineering | ECS Performance | M7 Speed
Customer Service Hours: 8am-8pm EST|Sales Team Hours: 8am-11pm | SAT 10am-7pm 800.924.5172
MINI Guru/ MINI Owner Since 2004 | NEW Lifetime Part Replacement | Local Pickup
Milltek | Genuine MINI | Forge Motorsport | NM Engineering | ECS Performance | M7 Speed
Customer Service Hours: 8am-8pm EST|Sales Team Hours: 8am-11pm | SAT 10am-7pm 800.924.5172
#510
01-27-2014, 06:53 AM

3rd Gear
Join Date: Oct 2013
Location: Kansas City, MO
Posts: 154
Likes: 0
Received 0 Likes
on
0 Posts


#512
01-31-2014, 11:08 AM
Platinum Sponsor
Rum4 - post up some pics. Really look good on the roadsters.
__________________
MINI Guru/ MINI Owner Since 2004 | NEW Lifetime Part Replacement | Local Pickup
Milltek | Genuine MINI | Forge Motorsport | NM Engineering | ECS Performance | M7 Speed
Customer Service Hours: 8am-8pm EST|Sales Team Hours: 8am-11pm | SAT 10am-7pm 800.924.5172
MINI Guru/ MINI Owner Since 2004 | NEW Lifetime Part Replacement | Local Pickup
Milltek | Genuine MINI | Forge Motorsport | NM Engineering | ECS Performance | M7 Speed
Customer Service Hours: 8am-8pm EST|Sales Team Hours: 8am-11pm | SAT 10am-7pm 800.924.5172

#514
01-31-2014, 04:40 PM

Yes the rear diffuser looks great on the roadster. But I forgot how bad the stock tails look. Find a picture of the Blackline rear tails. I'd post a picture if I had a good one, but I do not. OK just took a quick pic in the dark to give you an idea. Looks great on a midnight black roadster.

Last edited by jkapinos; 01-31-2014 at 04:46 PM.


#517
02-02-2014, 05:59 AM
3rd Gear
Join Date: Oct 2013
Location: Kansas City, MO
Posts: 154
Likes: 0
Received 0 Likes
on
0 Posts
It's straight forward. There was no PDF when I bought mine from Outmotoring. Just share the video or find another shop.
Last edited by tigerwong58; 02-02-2014 at 07:31 AM.
#518
02-10-2014, 02:44 PM
I did mine watching the YouTube video. How to install a MINI Motoring Accessories GP2 Rear Diffuser on a 2012 MINI Cooper JCW Hatchback - YouTube
It's straight forward. There was no PDF when I bought mine from Outmotoring. Just share the video or find another shop.
It's straight forward. There was no PDF when I bought mine from Outmotoring. Just share the video or find another shop.
Just finished watching the video, can you tell me about what the time-
frame was for the installation. Thanks.
#519
02-10-2014, 02:56 PM
3rd Gear
Join Date: Oct 2013
Location: Kansas City, MO
Posts: 154
Likes: 0
Received 0 Likes
on
0 Posts
I backed it up onto ramps, and it took about 45 minutes, it took the longest for the 2 original screws on each side. Also when installing the diffuser make sure all the tabs snap in. For the 2 brackets, just bolt them up first, there is no movement or adjusting with them so it's OK to tighten them up.
#521
02-11-2014, 10:43 AM
Platinum Sponsor
Yes the rear diffuser looks great on the roadster. But I forgot how bad the stock tails look. Find a picture of the Blackline rear tails. I'd post a picture if I had a good one, but I do not. OK just took a quick pic in the dark to give you an idea. Looks great on a midnight black roadster.

+1 on the BlackLine 8/2010+ R56 R57 R58 R59 MINI Cooper Taillights. They look great, especially on black.
These are for people with the JCW Aerodynamic rear bumper ( no blackline rear fogs for that version )
Retrofit Kit For MINI Black Line Lights part #63212320381
http://www.ecstuning.com/Search/SiteSearch/63212320381/
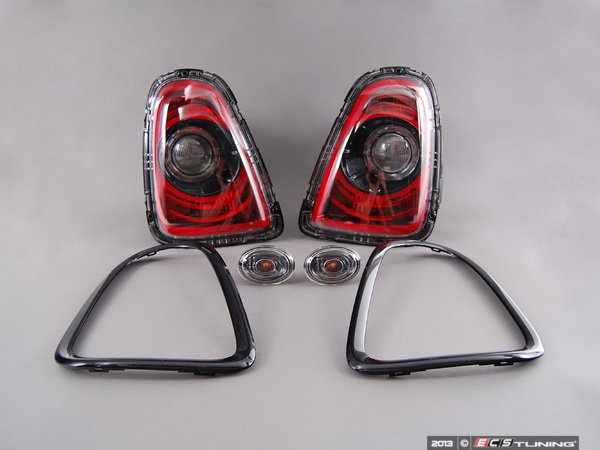
&&
And then the 8/2010+ Cooper S/JCW R56 R57 R58 R59 ( Non JCW rear bumper ) Comes with the lower left and right bumper backup/fog lights. Part #63212296298
http://www.ecstuning.com/Search/SiteSearch/63212296298/
&&
For the Onwers with the Cooper ( Non S ) or "Justa Cooper" without the JCW rear bumper. Stock bumper with center light .
#1 below Retrofit Kit For MINI Black Line Lights part #63212296299
http://www.ecstuning.com/Search/SiteSearch/63212296299/

Thanks
__________________
MINI Guru/ MINI Owner Since 2004 | NEW Lifetime Part Replacement | Local Pickup
Milltek | Genuine MINI | Forge Motorsport | NM Engineering | ECS Performance | M7 Speed
Customer Service Hours: 8am-8pm EST|Sales Team Hours: 8am-11pm | SAT 10am-7pm 800.924.5172
MINI Guru/ MINI Owner Since 2004 | NEW Lifetime Part Replacement | Local Pickup
Milltek | Genuine MINI | Forge Motorsport | NM Engineering | ECS Performance | M7 Speed
Customer Service Hours: 8am-8pm EST|Sales Team Hours: 8am-11pm | SAT 10am-7pm 800.924.5172
Last edited by ECSTuning; 02-11-2014 at 01:41 PM.


#524
02-26-2014, 12:25 PM
Platinum Sponsor
Hello Champ.
Yes, and its easy. Take a Phillips head screw driver, hold the center of the very light plastic belly pan with one hand. Then with the other hand and tool work your way around the speed clips are made to come out with about half a turn. So you are not holding the pan and constantly turn a long screw. Lift the back down first and the front pulls back a inch out of the bottom and it comes out. Install in reverse. All the speed clips and hardware will stay in place as its retained on the pan, so no screw to drop or anything.
Its a really slick belly pan kit.
I have done many oil changes with mine and no problem.
Hope that helps.
__________________
MINI Guru/ MINI Owner Since 2004 | NEW Lifetime Part Replacement | Local Pickup
Milltek | Genuine MINI | Forge Motorsport | NM Engineering | ECS Performance | M7 Speed
Customer Service Hours: 8am-8pm EST|Sales Team Hours: 8am-11pm | SAT 10am-7pm 800.924.5172
MINI Guru/ MINI Owner Since 2004 | NEW Lifetime Part Replacement | Local Pickup
Milltek | Genuine MINI | Forge Motorsport | NM Engineering | ECS Performance | M7 Speed
Customer Service Hours: 8am-8pm EST|Sales Team Hours: 8am-11pm | SAT 10am-7pm 800.924.5172