When you click on links to various merchants on this site and make a purchase, this can result in this site earning a commission. Affiliate programs and affiliations include, but are not limited to, the eBay Partner Network.
One more detail.. just thought I�d upload a clip detailing the condition of my SC rotors. A few imperfections, but overall no notable damage or wear to the Teflon coating. Notice the darker coating (blackish) color of the 05-06 years.
Fitted my Schroth quick fit harness today. I�m happy with the understated look paired with the black English leather sport seats. I guess it�s about as subtle as a racing harness can be.
Super snug fit sitting in the driveway. Hope to try these out at a track day before the summer ends.
Black on black with black neoprene pads
Last edited by Tragesaurusrex; 07-05-2020 at 08:14 PM.
Awesome, all looks so familiar as I am following the same route as you, although not as thorough. I see a lot of rust on your car, and it's good to see you are not cutting corners (mad respect!). Also the lobes on the m45 look very good on your car.
Yeah nd I live in North Carolina now but i was born in NY and spent the first 26 years of my life there. The winters and the road salt that comes with it are extremely hard on vehicles up there. I bought my 03 R50 in Virginia with 82,000 miles on it and it is extremely clean. It was garage kept by the previous owner.
@JerBear@nd-photo.nl Thanks to you both for taking the time to read through my work and for the kind words! I feel in great company since we�ve all got our own build threads going at the moment.
@JerBear I was starting to doubt how common my rust was on NE MINIs by a few folks being shocked at the rust on mine haha. Thanks for the sanity check. It�s certainly not ideal, but I don�t think it�s all that bad for a 14 year old NJ car.
@nd-photo.nl How do the local transportation authorities handle icy road conditions in your area?
I mentioned earlier that the paint was in relatively good shape for it�s age, but it definitely needed some love to restore its former glory.
The chemical bros kit I purchased had four steps, from v32 heavy cutting, to v38 final polish.
I also got some foam pads and polish lube and away we went.
This was the starting point. Very heavy swirls and light scratches.
The black roof was also very heavily swirled with the beginnings of UV damage/oxidation to the clear coat.
First pass with V34 to remove the deepest swirls. It looked better but also strangely dull due to the ADDITION of fine swirls fro the cutting compound.
Second pass with V36. Looked much better. Only fine swirls left to remove.
Final result after the third pass with V38, and a wipe down with a liquid hybrid wax. Soooo much better, and rivaled our much newer, freshly polished sonata in the background.
Now that the structural subframe and joints were in good shape it was time to move on to upgrades.
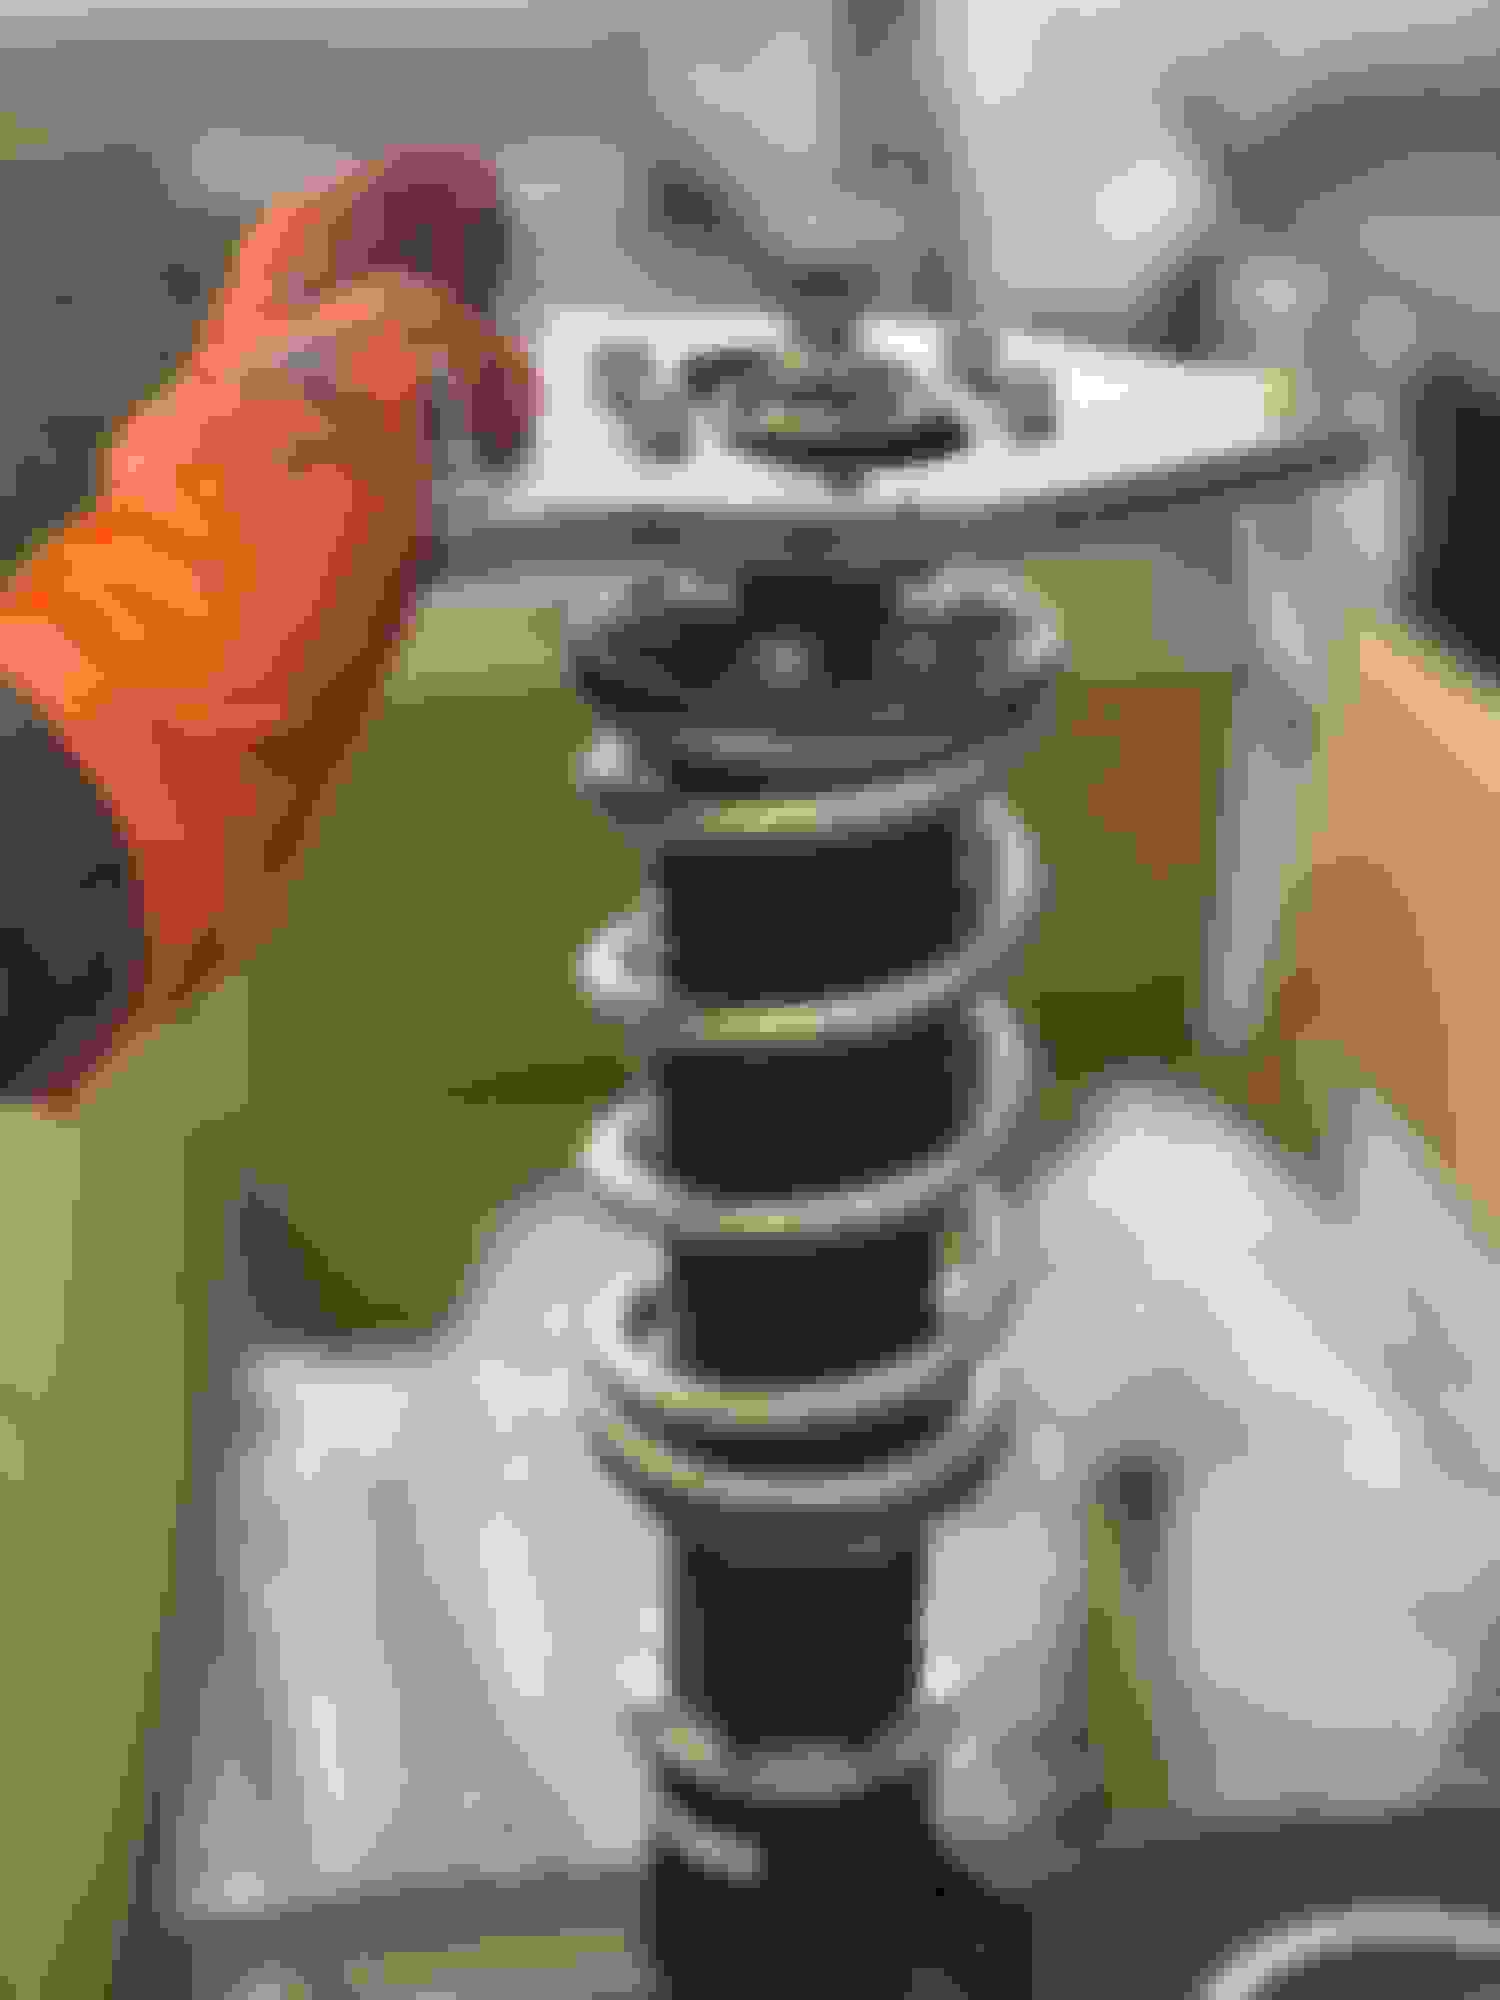
I did a ton of research into which setup would be best to meet my needs and finally landed on BC BR series coilovers with custom springs from Swift.
I didn�t want to �drop� it by any means. On the contrary, I looked into what setup would allow me to get back to stock ride height (or at least close) if I wanted. With BC, I can get back to within 0.7� of stock height at max. The independent ride height vs. preload adjustability of the BCs was a big attraction without having to plunk down $2k for some of the premium systems out there.
I still worried about the quality and accuracy of the standard BC spring rates though, so I opted for a Swift upgrade from the factory. 7k front and 5k rear were the rates Swift suggests for the weight distribution of the R53s. I was tempted to got 1k softer in each respectively in hopes of an even more luxurious ride, but that simply conflicted with the rest of my build plans.
A few weeks later they showed up at my door, along with a few other bits from ECS to complete the overhaul.
Well aren�t you special...
What great looking parts! Metallic gold fleck sprigs, gold anodized plates and locking rings over a gloss black body. I was impressed right out of the box.
The right side was very simple. Unbolt the old strut and shock assembly then bolt in the new. Also replaced the pinch bolt as these are known to be a nightmare after a few years.
New end links for the front to prevent the front sway bar from colliding with the control arm after lowering.
One side down.
Left side all stripped down, including the knuckle.
You may remember form a previous chapter that the left front strut pinch bolt was sheared off and seized up from before I owned her. I thought about drilling and tapping the old knuckle, but the work and time involved didn�t justify the money I�d save.
Here�s the seized left pinch bolt.. no thanks.
The wheel speed sensor was also seized in place. After 15min of fighting with it just cut the dang thing free and ordered a new one.
Good riddance!
New (used) left side knuckle in MUCH better condition than my existing one. It felt so refreshing to replace my rusty suspension components.
Moving to the rear - I also swapped the rear sway bar for a Whiteline 20mm bar. (Another great looking metallic silver part!)
...and finally adjustable lower rear control arms. I chose not to go with the fan favorite Hotchkis. These Godspeed arms had great reviews and no reports of the infamous Alta clunk from their spherical bearings. Time will tell of the risk pays off.
Rear subframe and suspension bolted back up.
Adjustable control arms in. I wasn�t crazy about the red and really wish they came in black. But I didn�t want to paint over the powder coating either (which was A decent quality metallic cherry color), and they�re really not very visible on the road.
The rear ride height was a little low for my liking. After a few trial and error sessions, 45mm of ride height on the threaded strut body gave me the profile I wanted.
The front ride height was actually spot on out of the box. About one finger of gap left for that sophisticated �I�m an adult� stance.
Final height! Just over an inch lower than stock height and balanced front to rear.
For now my dampers are set to 10 from full soft on all corners (out of 30). Definitely a stiff setup overall for the low-speed crumbling roads around my house, but once i get out on the highways these ride SO much nicer than the tired old rusty things I removed.
I�ll let the set settle in on the current setting for a few weekend drives before testing anything softer. I�ve heard 7 from soft is optimal for comfort on the 7/5k Swifts.
In the end I�m happy with my choices. I thought I might regret going coilovers instead of koni yellows and a fixed lowering spring, but at the end of the day the peace of mind I get from adjustability is worth it to me.
Last edited by Tragesaurusrex; 07-15-2020 at 09:24 PM.
Earlier this week after work I went for a nice drive through the pine barrens (Woodsy part of south New Jersey). The throttle was snappy, idle was buttery smooth, reduction pulley made her scream like a banshee! The suspension was firm but balanced and the new RSB meant taking clover leaves at 60mph with almost no rear end movement. Well hot dog! She drove like a dream and when I got back home I covered her up and thought, �well isn�t this nice to be done for a while.�
I should have known... The MINI gods looked down, saw my contentment, and put a hex on me right then and there.
Today I went to move her out of the driveway just for a minute, turned the key, and heard the worst sound you can hear when starting up your baby. Silence.
Okay maybe not the worst sound, but still. Luckily one of the minor mods I made early on was to replace the center console 12v outlet with a dual USB voltmeter unit, so I can always check real-time voltage.
With the ignition in position 1 and 2 (accessory mode), I was reading a steady 12.4v, which was normal.
The battery (Interstate) was also just replaced in January as a part of my purchase deal, so I have no reason to suspect it�s a battery health issue.
I tried to turn the engine over a few more times (mostly out of frustration), but all I get is the starter motor solenoid clicking intermittently.
I know BMWs and MINIs are notorious for acting strangely when under low voltage, so I also tethered my other car to my MINI (as if to jump start it), and tried again.
Here�s a vid of the current symptoms:
Full function of electrical systems, windows, lights, locks, climate, etc.
12.4v Static in ACC (13.X in this video because I had my other car also feeding the charging circuit.)
Fuel pump �whirrs� on key entry like normal
Starter motor solenoid rapidly clicks, but only intermittently - about one of every three attempts to start the engine
Voltage drops to ~12.3v under starter motor load, then returns to 13v when releasing the key.
My leading hypothesis is the starter motor is dead. After finishing my SC service and refilling the coolant, I remember thinking how stupid the placement of the thermostat coolant bleed valve was. It basically pisses coolant directly into the starter motor below.
Anyway, with power supply not being an issue, I think my next move is to pull out the starter to inspect it. Might just buy a new starter to have standing by as well. Not a bad part to have two of!
Last edited by Tragesaurusrex; 07-15-2020 at 10:36 PM.
Well your doing better than I do when my s*** breaks. Last time my starter went I was halfway between Cleveland Ohio and Hampton VA on my way home from a visit with my sons surgeon...in the dead of winter. It ended up being a bad solder joint on the starter motor itself. And as far as fluids go, they don't mix well with starters either. The starter in my wife's Land Rover died in the grocery store parking lot. It had a valve cover gasket leak that spilled directly onto the starter. The saying with Land Rovers is "if there is no oil under them, there's no oil in them!" So I guess it was just a matter of time with that one.
But back to your car, with all my infinite knowledge of automobiles , I'd put money on it being starter (or starter wiring) related since it ran so well on the last trip out.
Keep us posted. Hopefully it's something simple.
Very true @JerBear , I�m thankful I didn�t find this issue while stopped somewhere still out in the pine barrens. If it had to happen, this was best case scenario.
A brand new starter unit (TYC) arrived, and I hope to have time in the next two days to pull the old one out for a look.
One other thing I still need to order (and forgot to mention) are some wheel spacers for the front.
After installing the BCs the car drove fine with no audible signs of rubbing, so it took me a bit to remember to actually check the spacing between tire and shock body.
For reference with photo:
OEM S-lites 17x7 et48
205/45/17
BC coilovers with Swift springs. (BR Series)
With no spacers, the inner front tire just barely rubs the lower ride height collar on the struts.
if my ride height was much lower though, I�d start to encounter more significant rubbing between the tire and the lower shock collar. (Gold rings one top of pic)
Minor issue, but I still plan to solve with a 3-5mm spacer.
Rear has no issue.
I replaced the starter last night with the new unit. Man, is that an annoying job.. So much scraping the inside of your arms against sharp plastic and metal heat shields while reaching down the back of the engine. In any case, it turns out I was a little too arrogant in my diagnosis. The new starter didn't solve the problem.
I checked both fuse panels and everything looked in order. Now I'm going to get out the trusty multimeter and test the relays and the continuity of the charging circuit. I still think it's most likely related to the recent work I've done on the car. Perhaps I didn't snug a connection properly while assembling the engine after the SC service.
If tracking down current to find connection issues still doesn't yield results, the other places to look I've gathered are:
Clutch safety switch
Ignition switch
Somehow still a battery issue
..but it would have to be quite a coincidence for something totally unrelated to the work I just did to also fail. At least that's my hypothesis for now.
Hmm, earth wires all ok? Fuses ok? If the engine is "spinning" when trying to start, but ignition does not engage, then check/replace the crank position sensor.
If the signal from crank position sensor is faulty, the fuel is cut as a safety mechanism (to prevent fire). This will usually not trigger a CEL. I have had this issue in 2 cars from separate manufacturers.
You referenced a leaky 3rd brake light earlier in the thread, check your battery connections and cables really well. You may have good battery voltage/good battery and it may run small accessories just fine, but that starter motor pulls some amperage. Check the battery ground where it hooks to the frame very well. If there is a rust corrosion issue that can cause the symptoms your experiencing. Also check both cables for any damage to the insulation or any pinching if something got moved and ended up where it wasn't supposed to be...if that makes sense. And I would also second your opinion of rechecking every connection that was disturbed with any recent repairs/upgrades you've done.
Good luck and keep us posted.
Good suggestions guys . @nd-photo.nl the starter wasn�t engaging at all, so the engine wasn�t turning over. But yes, the ground cables were nice and snug.
@JerBear Good memory haha, and I did go through all the 12v connections In the boot, as well as all the ground straps in the engine bay.
I also read loose alternator wiring can throw a safety shut off for the ignition, but all was well there too.
After deciding that all the power and ground connections were in good condition, I reallllllly didn�t want to take the new starter back out. After all it was a brand new unit that came with the QA test sheet in the box, so I moved on to the clutch safety switch and ignition.
The clutch safety switch looked fine, and holding a magnet against it while turning the key over didn�t do anything.
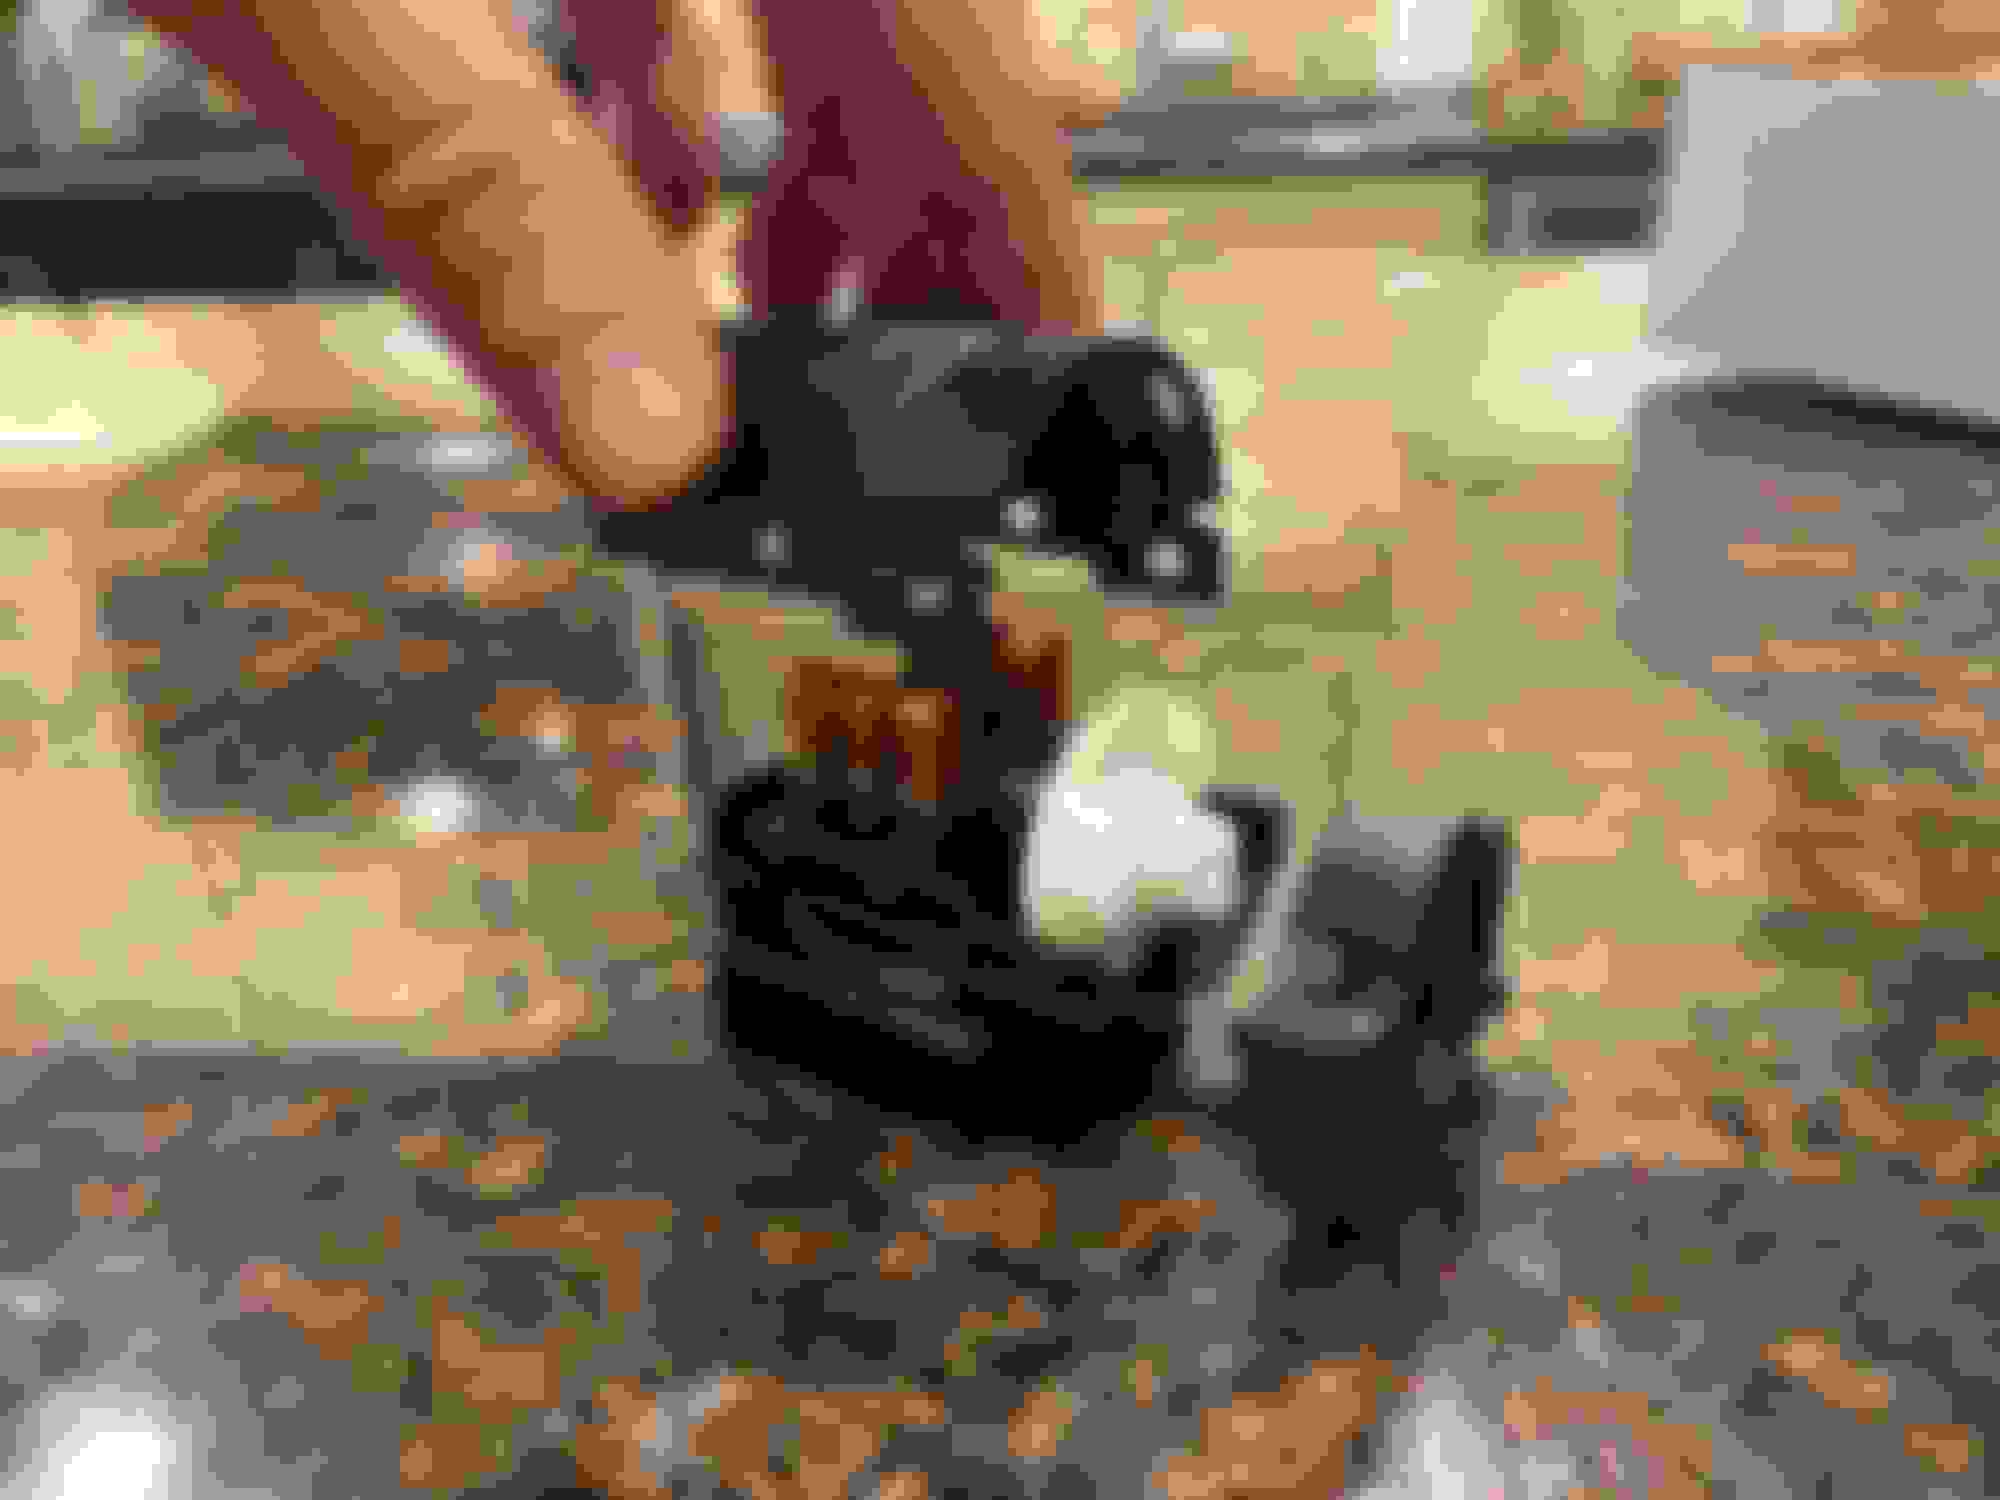
Continuing to the ignition switch, I took photos along the way in case I found anything worth showing...
Removing the steering column trim and ignition switch harness. (The ignition switch is the black module attached to the column just under the indicator stem)
The switch is held in by two tiny set screws. Get your eyeglasses repair kit out.
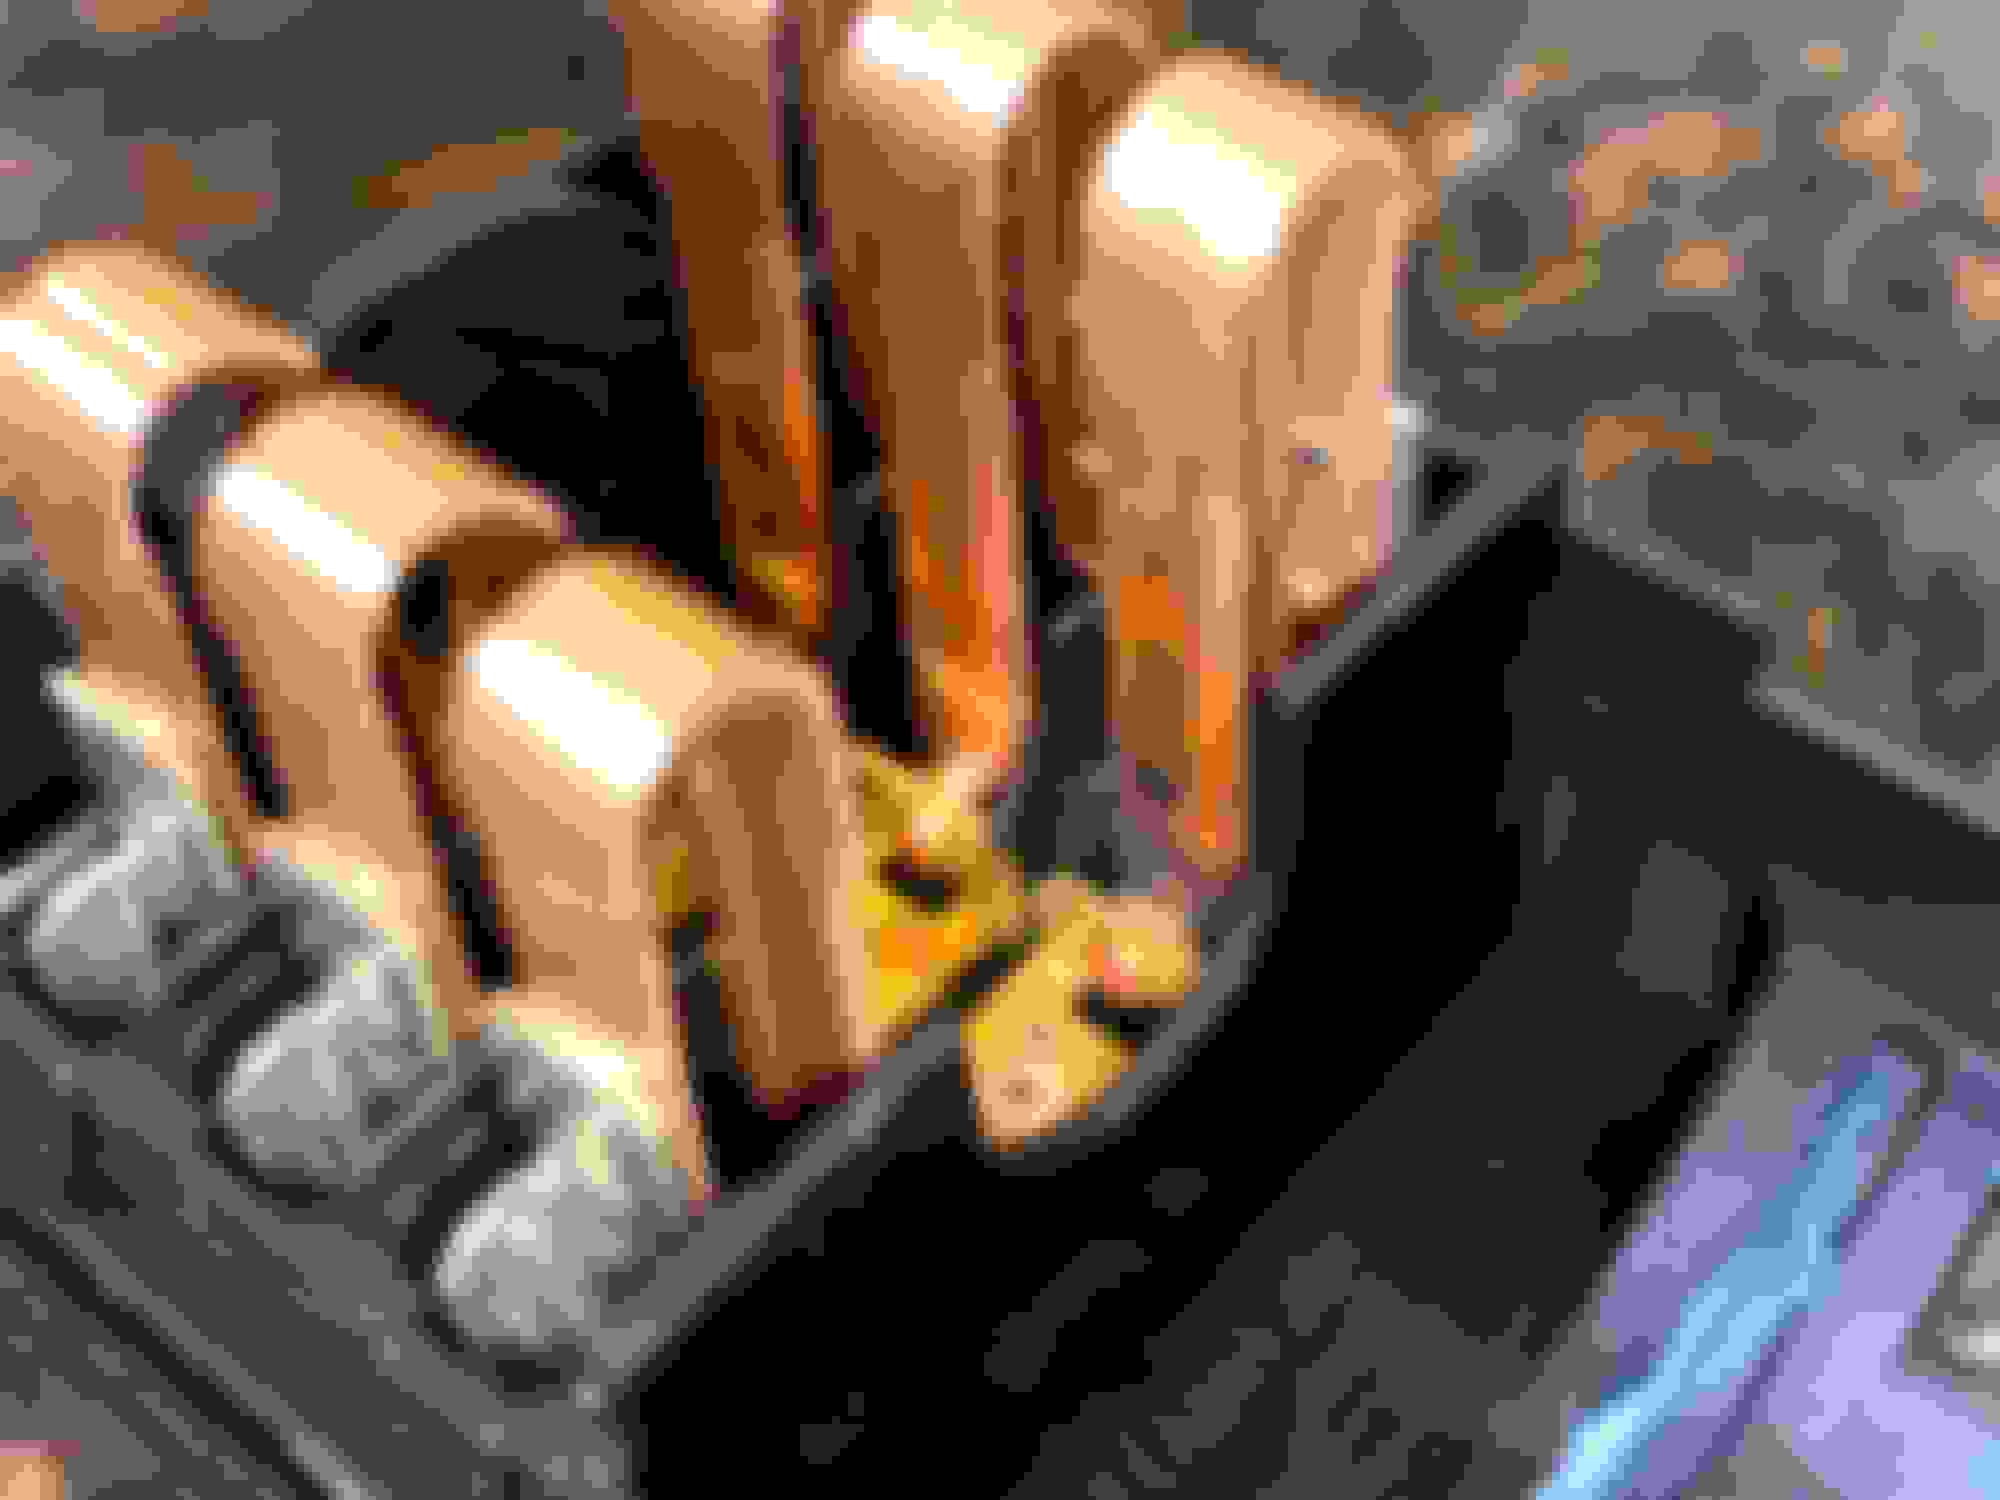
Once the switch is removed from the car, you can disassemble the switch with a small flathead screwdriver. Be careful, the plastic tabs are small and fragile.
When removing the front facet, it�s probably a good idea to take a photo of the position in relation to the tumbler. That ball bearing and metal tab have to slot back into the same spot of the white column when you put it back together
All the switch connections inside looked fine.. except for number 6..
It that a tiny piece of plastic stuck in terminal 6?!
It turns out a small bit of plastic had rubbed off of the tumbler and wedged itself in one of the pressure switches. The terminal contact was also charred and yellowed, so this may have been hindering the switch for a while before causing symptoms.
Cleaned out the plastic with a little screwdriver and alcohol cleaned the contacts. Good as new.
Assembled the switch and re-installed, and she started right up!
It turned out to be a freak coincidence that some random piece of plastic decided to wait 14 years to get stuck in the ignition switch just after I finished a bunch of other work on the car. Go figure.
The MINI gods are certainly having a laugh.
Last edited by Tragesaurusrex; 07-22-2020 at 05:05 PM.
That's crazy. I wonder if that's a freak occurrence or if this is a problem that more people will have to deal with as these cars age? Good find though! It's always nice when its a relatively easy repair and doesn't cost much to fix.
That's crazy. I wonder if that's a freak occurrence or if this is a problem that more people will have to deal with as these cars age?
I read a fair number of peoples stories about having a �bad/dead� ignition switch. I�d be willing to bet I�m not the only one who had a piece of the plastic tumbler rub off and get caught in one of the contact points. I don�t know what else could cause these switches to die other than an issue like that with the copper contacts. It�s a really simple mechanism.
Last edited by Tragesaurusrex; 07-26-2020 at 07:58 PM.

 07-04-2020, 07:46 PM


 , I'd put money on it being starter (or starter wiring) related since it ran so well on the last trip out.


 . @nd-photo.nl the starter wasn�t engaging at all, so the engine wasn�t turning over. But yes, the ground cables were nice and snug.