When you click on links to various merchants on this site and make a purchase, this can result in this site earning a commission. Affiliate programs and affiliations include, but are not limited to, the eBay Partner Network.
you should try autocross TRIAD does events right in greensboro last year there were 2-3 mini's at the events. Your mod list would put you in SMF, I've not ran that with triad but with tar heel I took 1st in the one event I did run. I normally run my jcw in DS. Switching to STX this year the tire wear is killing me
Updated my parts list after realizing that the issues I've noticed with my transmission seeming to bump in and out under rapid acceleration and deceleration might be caused by bad motor mounts. Here's where the carts stand now:
Alright, put in my first big set of orders. Wanted to address some of the mechanical concerns before doing bigger upgrades, though I couldn't resist doing the RSB and intake. They won't affect dyno numbers much anyway, and I do plan on getting a baseline dyno from SneedSpeed sometime soon. Will also be picking up their race axles when I get back in town. I also checked out underneath the car today and saw quite a lot of fluid at the bottom of the engine and rack. The valve cover gasket is definitely leaking, but the mid-block area looks fairly clean so hopefully the fluid is mostly made up of power steering fluid that I think is leaking from the pressure line above the rack. I had the power steering recall done awhile back and I don't think they replaced the pressure line, maybe they will now?
- Mann oil filter w/ Liqui Moly 5w30 oil
- OEM CD case (visor mounted)
- OEM front door brakes
- Mann active carbon cabin air filter
- Various nuts and bolts (and a socket housing for the coil pack)
Paid SneedSpeed a visit yesterday to buy axles. They are on the way and I will probably do some dyno runs when they get here to get a baseline for the car. Also put on my Craven stubby antenna.
Also checked my oil level today and there is apparently nothing in the sump. The dipstick was practically dry. That's pretty concerning. I did an oil change 12,000 miles ago and had to add another quart 5-6 months later. Been maybe 9 months since then. I guess I have some excessive consumption, I don't think I have bad leaks.
Just our climate alone puts a bit of stress on oil and anything mechanical up here in Maine. I would probably be OK letting it go longer between oil changes if I lived in a milder part of the country.
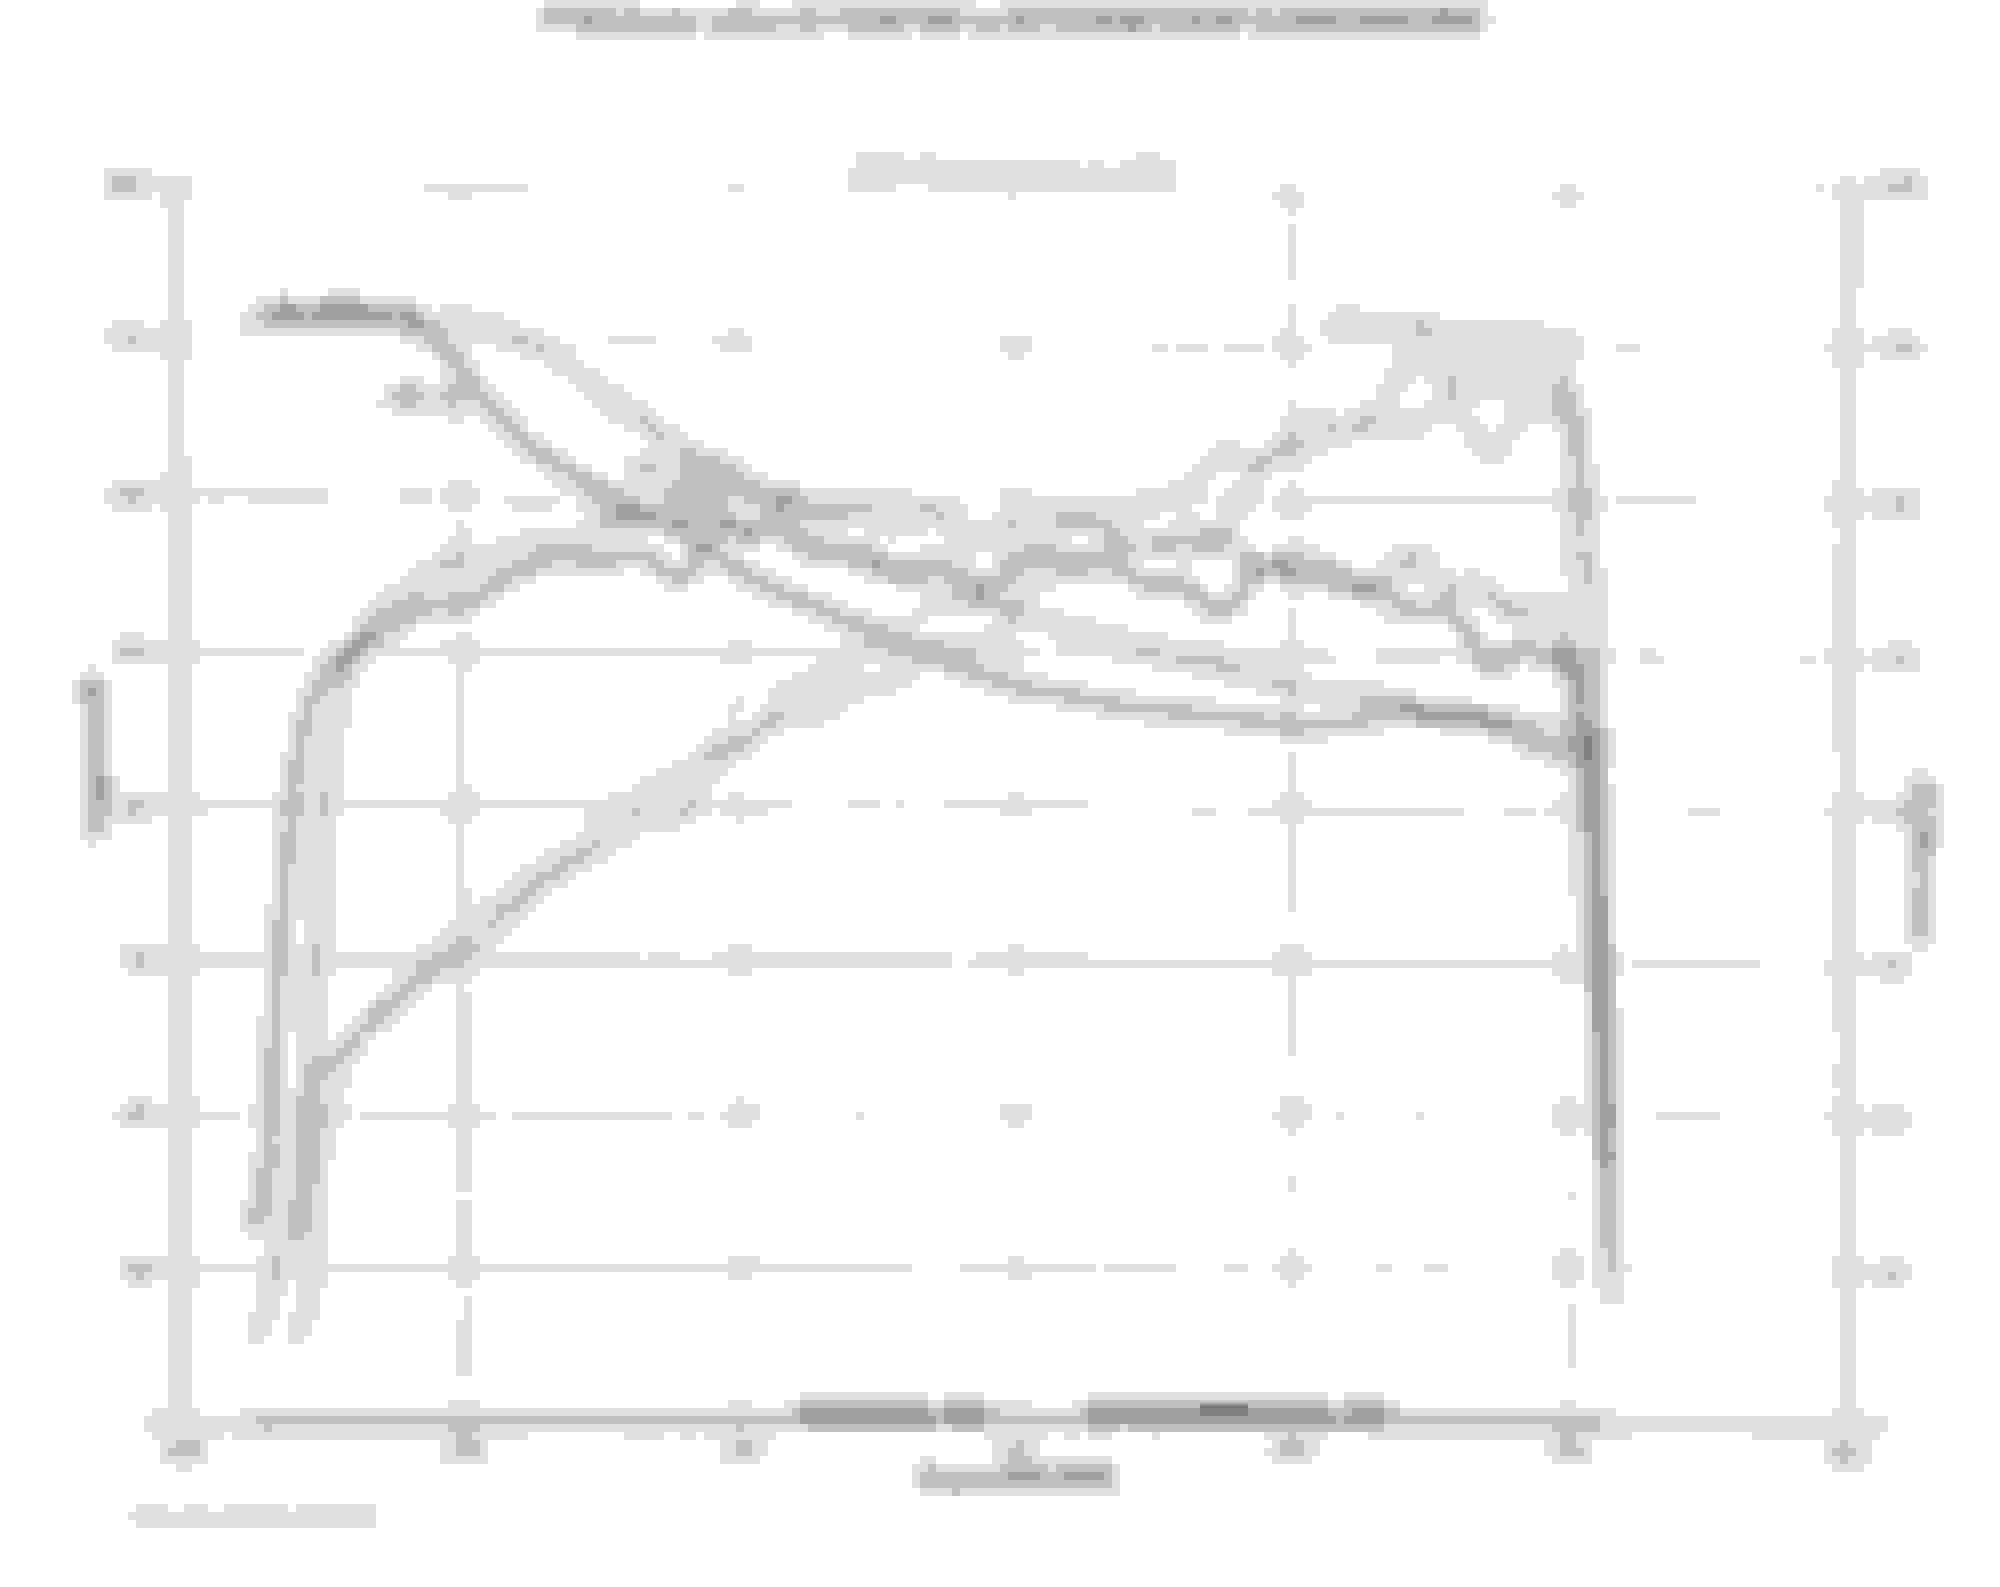
Paid another visit to Chris at SneedSpeed today to pick up my axles and do a few baseline dyno runs.
The car made about 175whp from 6500-6900 rpm and 150wtq from 3600-4600 rpm, way more than I was expecting. MINI rates the crank horsepower of the pre-facelifts at 163, so theoretically it should make around 150whp. Chris was saying that manufacturers often rate their engines low and the MINIs are no exception. He says he's never dynoed an R53 under 160whp.
He also said after I get my 17% pulley, intake, and tune done I'll probably be looking at around 200-205whp. We shall see, I'm gonna begin installing the first round of stuff in the next couple weeks and order the next round when I finish. Stay tuned!
Installed my DDMWorks intake today. Also replaced the PCV valve and did the spark plug wires with some blue NGK ones I got on Amazon. PCV valve and wires are very simple to replace; took me about 5 minutes.
I had already done a dry run installing the intake a few days ago and stopped when I got to reconnecting the rubber intake hose. It will not slip over unless you heat the hose, so I needed to wait until I could get back to the shop to heat it with a heat gun.
Install on the intake went well, maybe 30 minutes total. I couldn't really figure out how to snap the battery terminal box back into the side, but that's okay. The main thing the DDMWorks intake has you do is remove the plastic cover at the back of the intake, which I guess serves to silence the air and supercharger. When you open the throttle now, the noise of the air rushing in is very pronounced, as is the supercharger whine. I love it!
I also took a look at replacing the axles, but the ball joints are really tight and I don't know if I should remove the passenger side carrier or not yet. I'll save that for a day when I have more time.
Next up will probably be to do the valve cover gasket and spark plug tube seals along with the rear sway bar. I'll also be putting in my next orders from ECS and WMW soon, along with the tensioner from RockAuto.
Placed the next round of orders. Sealing up the rest of the engine and power steering with this order, as well as a bunch of stuff in the belt area. Went with kind of an expensive ATI gauge pod, but it looks pretty factory and that's what I want. ECS is having somewhat of an extended sale on the nice active carbon cabin filters, so I bought 2 more of those. The high beam/DRL LEDs are kind of a gamble, they may not work well in either mode but we shall see. They are the highest rated H7 LED on Amazon. Also wasn't very happy with the PIAA super silicone wipers so I'm gonna try out the Bosch ICON's this round, read they were pretty good too.
Should hopefully be able to begin installing this round in the next 2 weeks or so, I'm still working on getting time for the remainder of the first round.
WayMotorWorks
- WMW pulley package (17% pulley, belt, plugs)
- IE fixed camber plates
- Oil pan gasket
- Crankshaft position sensor o-ring
- ATI super damper crank pulley (0%, new crank bolt, seal)
- ATI ePod gauge mount
- Crank pulley tool
- Belt tensioner tool
- S/C Pulley tool
- WMW delrin tensioner bushings
- Powerflex transmission mount inserts
- OEM front upper engine mount
- OEM rear upper engine mount
- OEM lower engine mount
ECSTuning
- Active carbon cabin filter (2)
- Power steering return line and hardware
- Liqui Moly 5 liter bottle
- Fuel filter kit
- Pentosin CHF 11S power steering fluid
RockAuto
- ACDelco tensioner
Amazon
- Hikari Cree H9 high beam/DRL LED kit
- Bosch 18A ICON wiper blades
have you given autocross or track days any consideration? We need more mini's, we had 2 at the tar heel autocross in Danville saturday, and we had 2 at VIR for the tar heel trackday
have you given autocross or track days any consideration? We need more mini's, we had 2 at the tar heel autocross in Danville saturday, and we had 2 at VIR for the tar heel trackday
No, not really. Maybe once I've finished more of my mods and still want to be able to mat it everywhere, I'll give it another thought. I work Saturdays anyway.
Replaced the valve cover gasket and spark plug tube seals yesterday. The only thing I had real trouble with in the install was figuring out how to get the back bolt off a bracket just to the right and in front of the valve cover. I ended up not taking it out and wiggling the valve cover out around it. With the valve cover removed, I could access to the bolt and ended up unscrewing it enough to pivot the bracket around and give me room to get the valve cover in. I ended up leaving that bolt loose, there was just no way I was getting at it with the valve cover installed. It felt solid enough. My old gasket looked pretty good, but it was leaking from a few spots. New one I can see is leaking from one corner, but maybe I didn't torque the valve cover bolts enough. I don't have a torque wrench that goes low enough for them and I've broken several of those before.
Also installed the race axles on both sides and the rear sway bar. The only thing that went smoothly was the drivers side axle. The passenger side carrier was a bear to deal with. Even with a couple people helping me periodically, that axle took probably an hour and a half to do, while the drivers side took me under 15 minutes. Oh well, at least they're in. No more leaking boots and clicking joints, plus a 2 year unlimited warranty.
Rear sway bar took much longer than I was expecting as well. First, wasn't sure if the struts needed to come out or not and prying the rear subframe down enough to wiggle the bar over the inner subframe mount to have it come out was also a challenge even with 2 people helping me. Getting the subframe bolts to line up after installing the new bar also really sucked. The subframe naturally wants to fall towards the back of the car when you take the bolts out, so we had something like an inch to push the subframe to the front to get the inner holes to line up. I set the bar to the middle setting and I'm honestly surprised that it is not as stiff as I thought it would be. It is definitely stiffer than stock, but I thought this bar would make it corner almost flat. It certainly doesn't. I might set it to the stiffest setting another day.
All in all, not too bad. I'm just having to get used to planning for a job and then starting to do the job and realizing it's just always going to be more frustrating and take longer than I thought.
I also realized I forgot to reconnect the brake hoses and speed sensor wires to the mounting points on the struts, so I'll need to get those connected today if I can reach them without jacks. On the test drive after the jobs, we also heard something fall off the car. It sounded to me like it came from the front and banged down to the rear, but the guy sitting in the back said nothing fell on the road and the guy in the passenger seat said he thought it was just a squeak, or something settling. I still don't know what it was, but the car drives normally and everything seems to be okay.
maybe you forgot a wrench up front, I one time i left a wrench up front, drove down to New Jersey from Mass, the wrench actually made the journey and fell out in the parking lot at the hotel clanking its way out from the back of the car just before we parked
maybe you forgot a wrench up front, I one time i left a wrench up front, drove down to New Jersey from Mass, the wrench actually made the journey and fell out in the parking lot at the hotel clanking its way out from the back of the car just before we parked
It's a possibility, but I'm pretty sure I got everything out of the engine bay when I finished the valve cover gasket. I went to lunch after that and the hood remained closed for the rest of the day while I did the axles and rear sway bar. Would be strange for it to not fall out while I drove around during lunch and only pop out after the other installs. But you may be right.
I lost a lot of tools during the "children years", once they started driving and wrenching mods on their cars and friend's cars. I lost plenty of them when I started messing around with cars in my youth. My Godfather was a total motorhead and taught me to use a tray with selected tools for the job at hand. Use one tool at a time and replace on the tray, whether working under the car or from above. He called it tool control. I called it slowing down the job.
In the long run, it probably turns out about the same or even a little quicker to do any job this way, especially when trying to make sure that all tools have been accounted for. Not completely fool proof, but it did cut down on the tools and bits that can easily go missing. I can still drop some small socket, bolt or wrench into the engine bay and somehow never find it. Garage magic.
That's quite a bit of work you did. Way more than I've ever attempted. Good going!
I keep a pair of magnetic trays in the engine bay while I work, I dump nuts and bolts and tools in those as I work. If I remove the trays, then I have to remove everything else since they were all on top of the trays.
To be fair, I work at a Toyota dealership so I have all the tools I need, proper lifts, and co-workers with experience and this stuff is still hard for me.
So, a big couple days for the MINI came and went this week. I planned to install the 17% pulley, ATI super damper, crank position sensor o-ring, oil pan gasket, all motor mounts, gearbox mount insert, power steering pressure line, door brakes, and an oil change on Thursday. I was also going to take pics as I went, but it really didn't go as planned (never does) and I was too stressed out to bother.
I got to the shop around 9:30 and got set up while I waited for my friend who was going to help me with the installs to arrive. Stripping the car down enough to access everything I wanted went smoothly; too smoothly. We got so caught up taking stuff apart that we didn't organize everything well, and I lost several bolts and screws.
Installing the S/C pulley requires that you disconnect all the motor mounts so you can jack the motor up enough to pull the pulley off, so I replaced the lower mount first. Just 4 bolts on the bracket, and a couple through-bolts on the mounts and that mount was out. After we took the bumper, carrier, and crash tubes off I settled the car down on the lift and got the floor jack in place while we disconnected the stuff up top to get a clean shot to the mounts and pulleys. After the tensioner was compressed and the drive belt removed, I decided to tackle the crank pulley.
Now the nightmare begins: I was still in rush-mode from just having stripped the front and top end of the car down and I thought I knew how to pull the crank pulley off with the WMW puller I got with the ATI super damper. I was wrong. It's really embarrassing for me to tell you just how bad I screwed up, but I'll do it anyway. The puller comes with three bolts to thread into the crank pulley and a fourth that goes through the center of the puller and into the back of the crank snout bore to essentially push the pulley off. This center bolt is broken into two sections; the bottom section that threads into and sits at the back of the crank snout bore and the top section that threads through the puller and pushes against the bottom section. The crank bore and puller threads are pitched differently, as you'll see from the bolts. For whatever reason, I thought you didn't need the bottom section and just didn't even bother to look at the thread pitches. I literally rammed the top bolt into the crank and didn't stop turning until I noticed the puller was no longer centered on the pulley. I started backing the pulley bolts out and two of them just fell off because they had sheared in the pulley. All three of them were bent as well. This was around 10:45. We spent the next 7-8 hours trying to get the pulley off, with a couple breaks for lunch and installing new door brakes. It was terrible and made me feel so stupid.
We ended up getting it off by drilling the puller bolts out and retapping the pulley holes. Then we just reused the puller (with both crank bolt sections) and new pulley bolts and it came off just fine.
Then we installed the 17% pulley. Not bad once we figured out you probably shouldn't try to walk it off slowly with a ratchet. Just causes the puller to slip off the pulley grooves. An impact gun is necessary here. We also had to use vise grips on the old belt to stop the puller from turning with the bolt. The new pulley (at least the WMW one) is split in two sections. You just slip the part with the tapered end over the snout and then push the second piece over that. Blue Loctite the threads for the bolts that connect the two pieces together, tighten them down and you're good. That was all we did Thursday and I had to leave the car in my bay and have one of them take me home.
The next day I did the crank position sensor o-ring and new JCW NGK spark plugs in the morning in between jobs. The front of the block was absolutely filthy and I couldn't get much of it off due to the limited access with the radiator still on. Managed to get the sensor off and the o-ring looked fine to me, but I'm sure it must have been contributing to the filth down there.
The old plugs felt extremely tight, but once out they looked fine. No signs of excessive oil or fuel consumption or other fouling. I don't know how many miles they had on them, but I would have been fine to put them right back in if I didn't need to use the JCW ones. The new plugs made me nervous to torque down, as apparently you're supposed to get them snug and go another 180 degrees. That felt tight as hell to me. I ended up doing 1/4-3/8 of a turn extra each.
After work I installed the ATI super damper. I heated the bore with a heat gun and slipped it over the crank snout. Ratcheted it in with the bolt ATI provided and then with the crank bolt, but when it came time to apply final torque, I couldn't do it. Even with the car in gear and the brakes locked down, the crank kept wanting to turn with the bolt. So I just blasted it with my impact gun until the bolt stopped turning. I hope it's okay.
The belt was very tight to go on even with the tensioner fully compressed, but I got it eventually. Seemed easiest to use the idler pulley as the final installation point.
After that, just kind of guessed as to where everything clipped in up top and bolted the new mounts in. Also couldn't find the bolt or either of the nuts that hold the ground strap in place, so I just used some random ones from the shop. Put the crash tubes back in (now missing the 10mm bolts on the front of both tubes) and the carrier. Put the bumper on but couldn't get one of the torx bolts to line up and I didn't really feel like taking it back off to line up the carrier better. Wheel liners and undercarriage covers/skid shields went back on (now also missing several screws and clips) and then the wheels. I bought 10 of the plastic clips since I knew I would be breaking several of them, but now I can't find them. Let me also just rant about the clips for a second too; they're just impossible to get off right. You have to hold the outer section while you turn out the inner Phillips-head section to get it off. But the outer section is pretty hard to hold still while you turn the inner, and moreover the inner section strips out so incredibly easily you end up having to just break the clip off half the time. Stupid little things.
Even with all the missing bolts and clips, everything felt sturdy enough except for the bottom of the passenger side wheel liner, which I think is the cause for a rattle I'm now experiencing at 2300-2700 RPMs.
The car started up fine and my friends and I did some test driving to get dinner (which I provided for their dedication) and all was well in the end.
Still need to address the rattle and install several things I just didn't want to deal with later, but I'm really pleased with the results. The car doesn't actually make as much power as I was expecting to gain from the pulley, but it does feel a bit smoother with the new ATI damper and mounts and the intake sound is just heavenly. I love the whoosh you get even at light throttle and the whine of the supercharger.
I was also expecting the new mounts to hold the motor down a bit better as they still allow a lot of jerking at snap throttle and deceleration. I was considering getting a TSW poly upper mount, but I don't want any extra NVH if I can help it, so I'm wondering if one of those TSW engine dampers might help me out. Anyone with any experience on that?
As for current plans, I will be visiting Sneed Speed again tomorrow for my dyno tune. I was also planning on doing an oil change last week, but the oil pan gasket I ordered from WMW with the rest of the stuff wasn't actually included in the order so I've contacted Way to see if he'll send me another. I'm gonna be trickle installing whatever I have left over the coming weeks, and after that I don't know. I'd like to address tires and brakes, but both are still relatively healthy so I'll wait for more tread and pad wear before I do anything about those. As for suspension, I'll probably go for some poly LCA bushings and I haven't decided if I want some nice coilovers or just a set of Koni FSD's. I probably won't add power again until I've addressed those things.
I also have an o3 Copper S and did spend 3 months working the car after purchase. The toughest part for me was getting that top bolt back in on the axle carrier on the passenger side. I had removed the axle for replacement and while out did the LCA bushings with poly and all ball joints, steering rod as well as replacing the oil filter housing ( which had a broken plastic drain in the housing which does not have a replacement part----you must replace the entire housing)----it took my forever to get that bolt back in a torqued up-----I almost pushed the car out of the garage and threw a match into it I was so mad and frustrated. I must say my rear Hotchkiss roll bar went in much easier than yours----working by myself I think it took me about 1/2 hour so I guess I was lucky. I went with Koni Yellow adjustable on the front end and an still running stock shocks on the rear. I am now running in D/S in autocross so I must stay with stock springs. If you want to take the dive out of the front end try Swift springs and the Koni Yellows to tighten up the front end. I did the switch to the ATI damper but did not experience the problem you had----mine went in quite easily and you are correct you do need an impact gun. I bought a set of used of pads and rotors from Tank up in NY that had come off one of his track cars with low use and do meet the stock requirement while adding better brake performance. I run 215/45-17 Bridgestone RE-71-R tires which are about as good as it gets for auto cross, very sticky but not good for DD use----they will wear out quickly for highway use. I have to run stock intake and stock motor in order to stay in the stock/street class. I would suggest you give autocross a go, it is cheap racing and a lot of fun and the Mini lends itself to most courses especially if they are tight and slow where power has no advantage. Jump into the Novice class and give it a go, you will be amazed how fast the Mini can get along. I continue to work on the Mini----it never seems to stop but I have thrashed it at a few autocrosses and it has not let me down yet.

 01-04-2017, 12:55 PM