When you click on links to various merchants on this site and make a purchase, this can result in this site earning a commission. Affiliate programs and affiliations include, but are not limited to, the eBay Partner Network.
i am going through this nightmare also 😭 first tool broke, tomorrow a mobile mechanic is coming to help me out..wish me luck!
Watch those mobile mechanics. I ended up having to do the work on my own in the end. Dude took my money and ran. Long story. Know who you are dealing with.
Watch those mobile mechanics. I ended up having to do the work on my own in the end. Dude took my money and ran. Long story. Know who you are dealing with.
all done! my mechanic was better than yours i got lucky i guess, I needed to tell him exactly what to do, anyways with his experience he was able to remove it and put the new one back, I have my mini back and nothing makes more happy than this, now again I drive it like I stole it!
all done! my mechanic was better than yours i got lucky i guess, I needed to tell him exactly what to do, anyways with his experience he was able to remove it and put the new one back, I have my mini back and nothing makes more happy than this, now again I drive it like I stole it!
I see you had that roof rack that screws into the nut plates in the roof itself....I have the came color car and I took my racks off the day after I got it. There are special covers made that you can pick up at the dealer....around $8 each I think....I had to poke holes in each end to use plastic push pins to make them stay...when they get hot in the sun, they won't stay on while driving
The problem with the "Mod Mini" video is he states he cut off "some head bolts he had laying around", without specifying the size. The bolt that screws into the crank is 12mm. The actual hole in the pulley is not much larger.
So, I'm going to try to explain this with words, no pics. Wish me luck!
My suggestion is to get 1 or 2 , 12 mm bolts x 100mm [or so] long and the standard puller. Also some longer 6mm bolts for the pulley. 6mm x 40-50mm would probably work with most pullers along with some washers that will work with the 6mm, as most pullers have holes, [slots] about 3/8" wide.
I removed the OEM 12mm pulley bolt then screwed in the new 12mm x 100mm bolt. Next screwed one of the 6mm bolts in [through the puller - it doesn't have to be centered at this point]] just to gauge how long to cut off the 12mm bolt.
You want this bolt [the 12mm] as long as possible and still have enough room to install the puller. With the longer 6mm x 40-50mm bolts I think there was room to leave about 1/2" of the 12mm bolt extending past the face of the pulley after threading the bolt into the pulley [or more accurately into the hole in the crank] as far as it would go in, finger tight.
At that point I marked the 12mm and cut the head and extra off with a cut-off wheel. I used a 5/16 bit to drill a dimple in the center of end of the 12mm bolt for the point of the center bolt of the puller.
Note; after drilling the dimple in the end of the bolt, I used a cut-off wheel to cut a slot in the end in order to use a screwdriver to unscrew the temporary bolt]
Then with the cut-off bolt installed, I held the puller up to the face of the pulley [with the pullers center bolt un-screwed [back] as far as possible but with at least half the threads engaged] [ don't forget some never seize on the puller bolt especially if it's new] and began installing the three [3] - 6 mm bolts.
They won't screw in far and if screwing them in finger tight, or loosely with a wrench, after about 3/8' to 1/2 inch you will feel resistance. Stop there, but make sure the puller is parallel with the face of the pulley [ more or less an even distance from the pulley to each of the three fingers of the puller where the bolts are].
Then, screw the center bolt of the puller in, making sure the point is centered with the dimple drilled into the cut off head of the bolt. When it starts to get snug, stop. Again, make sure the face of the puller is parallel with the face of the pulley.
Then and only then, use a ratchet or a wrench and begin screwing in the pullers center bolt. Take your time and continue to check that the face of the puller remains parallel to the face of the pulley. Eventually as tension is applied the crank will begin to turn. At that point if you are confident in your ability, you can start turning the bolt [slowly] with an impact gun. As slow as possible.
If you have to stop to think about if you are confident, you're not. Skip the impact and stick a long, [really long] screwdriver between the bolts and the center shaft of the puller to keep the crank from turning, and continue to tighten the center bolt on the puller.
While doing this keep a very close eye on where the center point on the end of the puller is located. As the pulley comes off, the point of the puller will get closer and closer to the face of the pulley. As the point and bolt of most pullers will not go through the hole in the face of the pulley, you need to STOP when the puller bolt [tip] is at the edge of the bolt hole in the pulley.
At this point you can do 1 of 2 things. If your 6mm bolts were long enough, and the modified 12mm bolt was left long enough and threaded into the crank far enough, you can back off and remove the center screw of the puller, then stick a flat blade screwdriver into the slot you cut and unscrew the temporary bolt some and began using the puller again.
BUT, be certain you have at least 3/8" [at the very least] of threads still in the crank. If not sure, unscrew the modified center bolt and screw it in again, paying attention to how far in it threads.
If you don't have that much thread remaining on the modified bolt in the crank hole, put the second 100mm bolt in the crank hole and make a new, slightly longer bolt and begin again .
DO NOT pry or hammer on anything! If you are where you think you need to pry or hammer, you are messing up.
STOP, STOP,STOP right there, re-think what you're doing or get someone with a new set of eyes to look are what you're doing. But a hammer, torch or pry bar is just going to make things worse. If you think you need any of these things you're doing something wrong.
No problem with any hijacks here. This has turned out to be a great group discussion. Thanks for that. The mod-mini videos are awesome, but his voice sounds a bit depressed about always having to work on these cars. Just my observation, I could be wrong.
I only needed a longer M12 bolt to reinstall the new pulley. To remove, I just used a longer bolt that fit inside the threads without actually using them. I think that's what modmini was referring to and why he didn't mention the thread size (doesn't matter). You just set it against the back of the 'hole' in the crank. Less stress on the threads.
In the video he says he grabbed some "larger head bolts" so what you did was a little different but obviously worked, but since installing the pulley requires a longer 12mm anyway, why not pick up 2, and use one for removal.
I get that you were using a bolt smaller than the threads in the crank [smaller than 12mm] which went past the treads in the crank and reached the very back of the hole in the crank, but that's a smaller "target" for the point on the puller and if the puller isn't set up exactly square with the face of the pulley, the smaller bolt could possibly be pushed "crooked" toward the threads enough to possibly cause damage.
[and what size/ how much smaller? I can see a less experienced guy going too small and messing things up as well]
With going "larger", the problem is the hole in the pulley is only very slightly larger than the 12mm hole in the crank. So you really need a bolt that just barely fits through the hole in the pulley otherwise you risk the bolt trying to enter the threaded portion of the crank and damaging the threads in the crank, a real disaster.
My feeling is it's much safer to utilize the threads in the crank to stabilize the bolt the puller is pushing on which eliminates any danger of crank thread damage. In the video by saying just grab a "larger bolt" and given the limitations of the hole in the pulley, using an SAE bolt, or one that's not quite "larger enough", you run the risk of the bolt forcing itself into the crankshaft threads.
I'll add measurements and photos of the bolt I made when I get to the shop this evening. I just think that knowing exactly what size bolt will work and eliminate any possibility of damage is the preferable way to go. Especially for less experienced mechanics.
Rather than bolts with cut off heads, you can use a 3/8" socket extension. I don't recall the length, but if you have a few different extensions, it's an option that you may have in your tool box already.
I just did this last week and put an ATI damper on my R53. A word of advise to anyone moving forward with a crank pulley replacement and reading through this thread. RENT THE PROPER TOOLS (from Detroit Tuned)!!!. Seriously. It cost me ~$45 for tool rental and shipping (PA to MI) to use the tools specifically designed for this car and this job. It worked perfectly, saving me time and headaches.
Completely worth the cost of the tool rental. I'd do it again in a second but hopefully won't have to.
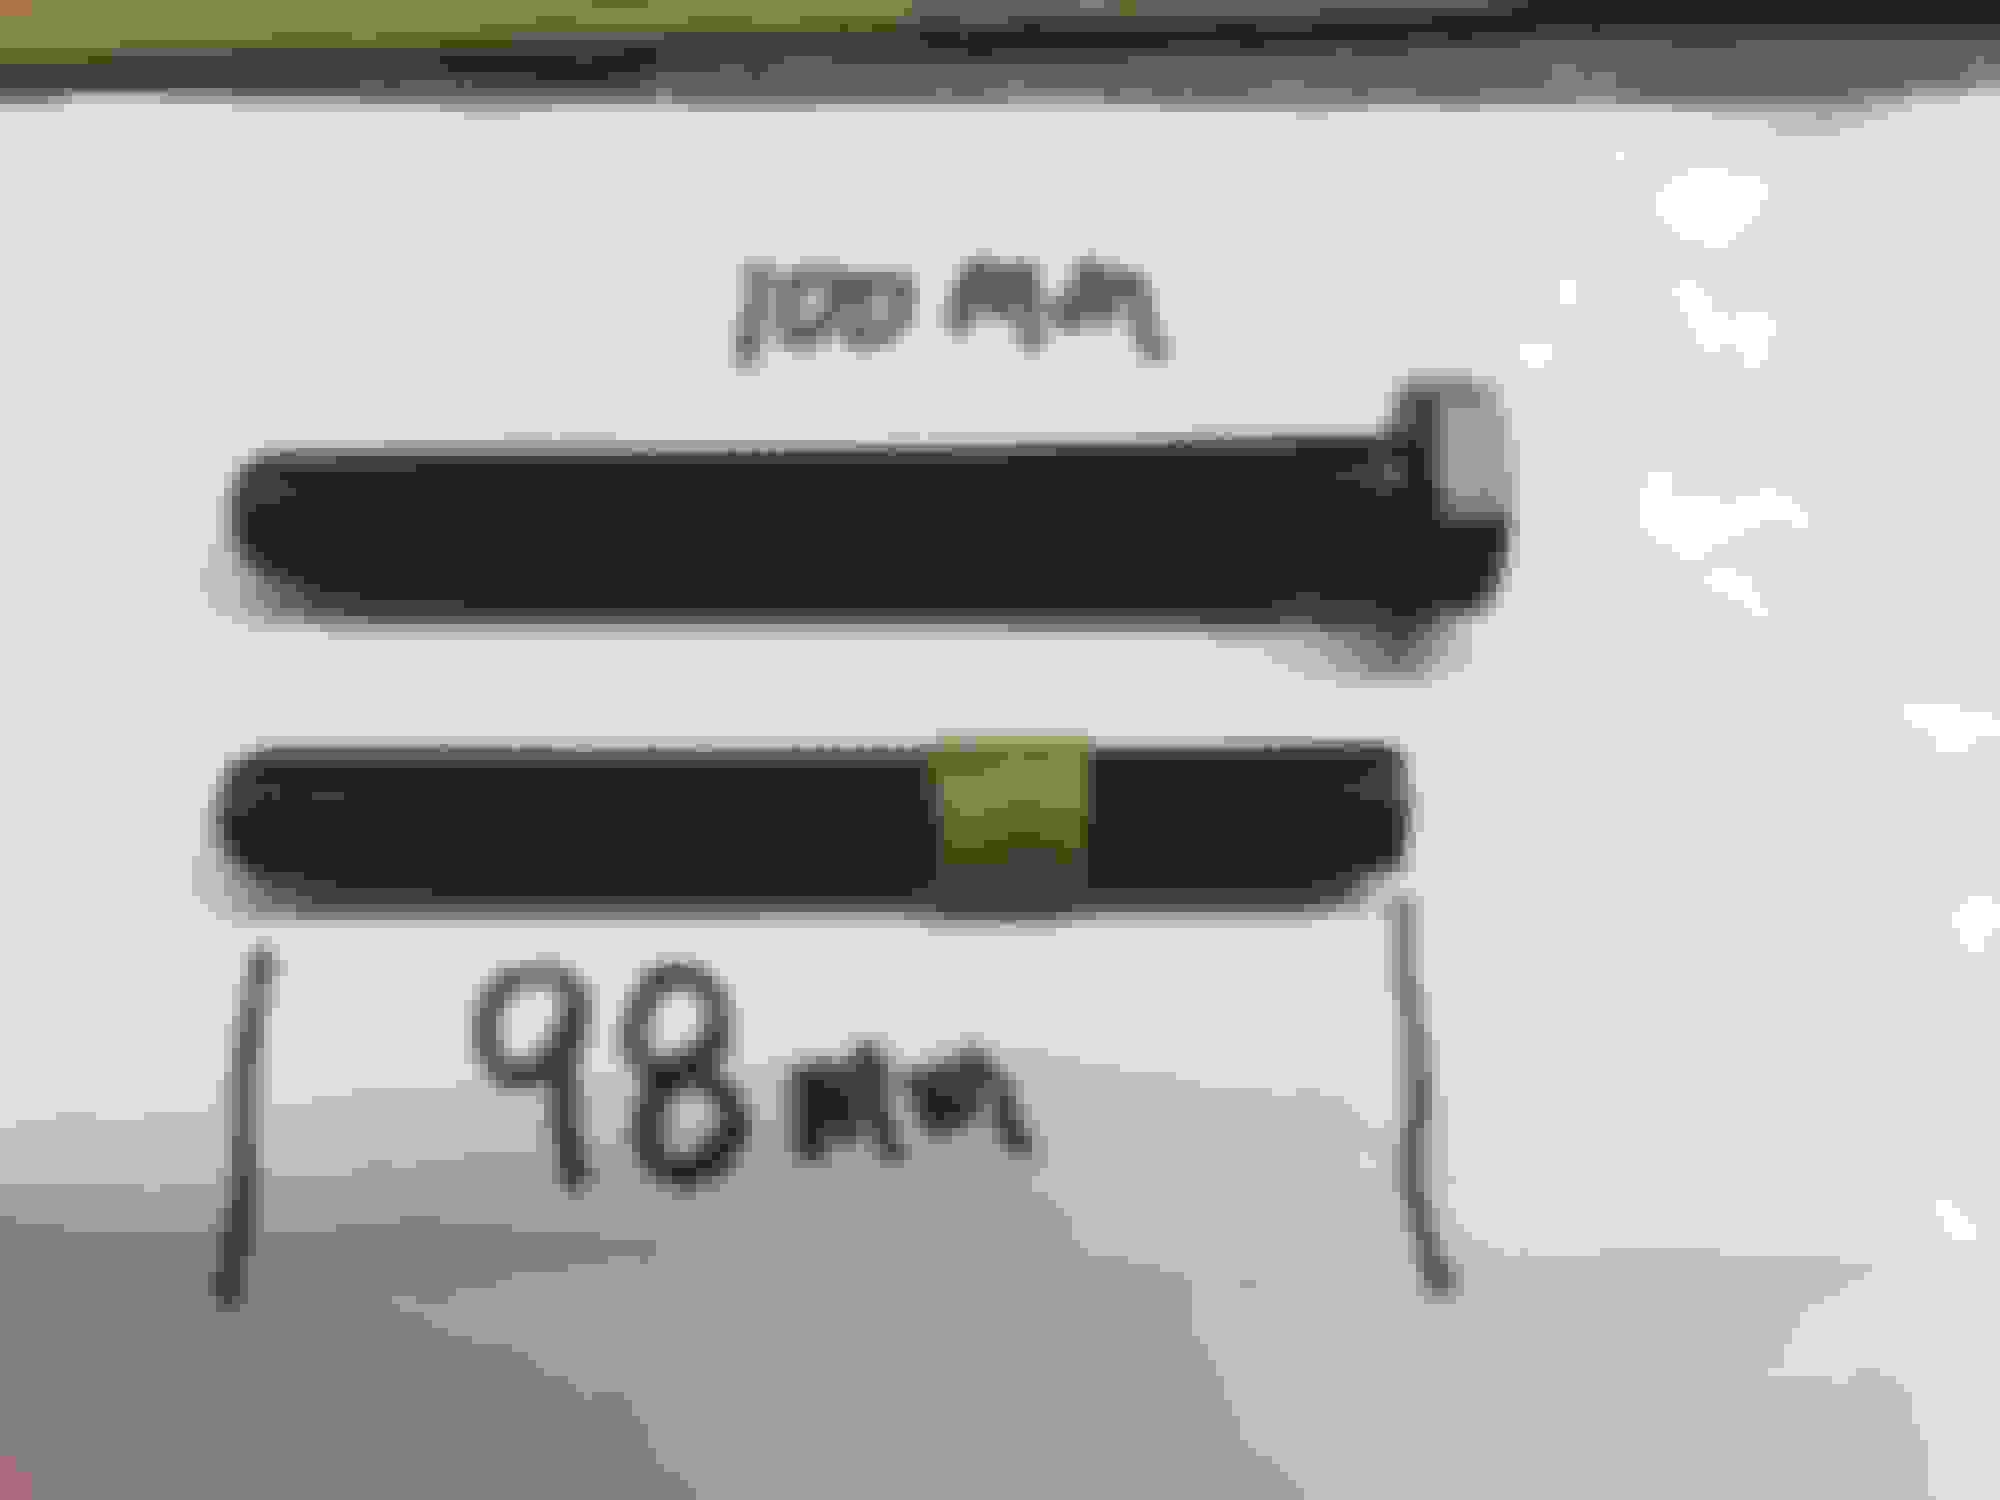
Photos of the modified 12mm x 100mm bolt when screwed all the way into the crank using a screwdriver. It was long enough that when the pulley is partway off it can be screwed out a bit so no second longer bolt was needed.
The modified bolt is 98mm long. The top bolt is the unmodified which is 100mm long. I drilled the end to make a dimple for the point of the puller, then cut a slot to be able to turn it in and out with a screwdriver.
It worked pretty well and it was nice not to having to worry about munging up crank threads.
Whatever method used, take your time and don't force anything. A bigger hammer isn't always the answer.
I just did this last week and put an ATI damper on my R53. A word of advise to anyone moving forward with a crank pulley replacement and reading through this thread. RENT THE PROPER TOOLS (from Detroit Tuned)!!!. Seriously. It cost me ~$45 for tool rental and shipping (PA to MI) to use the tools specifically designed for this car and this job. It worked perfectly, saving me time and headaches.
Completely worth the cost of the tool rental. I'd do it again in a second but hopefully won't have to.
+1
the proper tool = an easy job
cheap or incorrect tools = ghastly nightmare!
(as noted in this very thread)
Had to remove my crank pulley for the first time today, the previous owner had installed WMW pulley so I was already set up with no worries,
but have oil leak so I'm right now in the middle of doing timing cover seals + crank seal...
...pulley came off simple smooth like butter because I invested in a good tool,
only $70 from Way Motor Works and it will pay for itself in the long run.
I have a question- why isn't anyone using a LITTLE heat on the PULLEY when doing this operation? Yes, I understand there's a seal right there (that tolerates engine heat level everyday), and NO, I'm not suggesting a cutting torch ; )
Seems to me a little heat could be a big help here.
I've NOT done this job, and I'm asking, not telling.
I used a little heat, but I believe people commented that its not absolutely necessary. Dont know if it helped though, but I was able to get it swapped in 2 hours or so, went way better than I expected.
[edit]
And yes, work with the correct tools!
Last edited by nd-photo.nl; 05-03-2021 at 04:15 AM.
I used one of the “lesser” pullers and came very close to breaking it. You can see some of my notes here>>> https://www.northamericanmotoring.co...t-begin-4.html
There's a point where Mod Mini uses the bolt from the ground strap, He screws it into the supercharger pulley to press against. Well, I couldn't make the puller fit over the head of the nut, so I almost skipped this step. But then I found a spare bolt and ended up grinding the head off the bolt and making the puller fit over it. In hind sight, this was a good idea. There was a ton of pressure when pressing the pulley off and I think the bolt head took a lot of the force.
Also... you can do it without air tools. Just need a big breaker bar and patience.
[img]blob:https://www.northamericanmotoring.com/18cd31ab-6f9e-4935-8731-4a9bc245ab45[/img]
In hind sight, it can be done with the cheap puller but if I did it again I would get the puller for Way or whomever, then just sell it to the next guy that needs it.
In my opinion - I'm surprised your factory/OEM has lasted that long!
I would definitely consider replacing it with an upgraded SFI/PRW (fluid filled) or an ATI (super damper).
I've had at least 2wo of them (OEM) separate/fail, leaving me and/or my wife stranded within the first four years of ownership while still under warranty.
In just this last year I replaced my 3rd OEM with a PRW (fluid filled) before it would inevitably fail as in my previous experiences.
EDIT:
BTW: Pulling the old OEM using the proper tool as mentioned in post #35 , was effortless.
On the otherhand, Installing the PRW was a real PIA. It was a tight fit. You really have to pay close attention in confirming that the pulley is completely flush and seated all the way down on the crankshaft end without damaging the inner threads of the crankshaft.
As it turned out I almost made that very mistake. I also discovered that there were remnants of old threadlocker (from previous replacements) in the crank threads preventing the bolt from threading in/bottoming out. Luckily I had a tap and die set on hand and was able to chase the crank threads and clear out the remnant threadlocker/obstruction.
Others have mentioned (although pricey) that installing the ATI is a breeze by comparison.
I got this car used... and I am bringing everything to stock. Looks like the previous owner did not maintained it correctly.
What I am saying here I am getting everything that needs to be replaced, to make it reliable.
The car will be used only for weekend joy rides... not even for daily driving. The OEM mini is somewhere $360, the PRW $260 and ATI $343 --- then you have OE quality ones corteca $120 approx.
my question here is since I will not be abusing this car is the stock mini still a bad choice? I mean it will not last say 25 Kmiles? it will just fail on you?
now I am checking PRW and ATI... people say ATI needs rebuild? for what? I thought you'll install once and that's it.
people with PRW is claiming no maintenance at all what if the liquid leaks or dries out?
say I am going with ATI... for my type of usage and driving ( weekend use and normal driving --- not like a maniac )., will this last ? People say it has rubber inside some type of elastomers and this need to be checked and then rebuilt. I just want to install good one leave it for a long time without failure.
I got this car used... and I am bringing everything to stock. Looks like the previous owner did not maintained it correctly.
What I am saying here I am getting everything that needs to be replaced, to make it reliable.
The Factory rubber core Harmonic Balancers/ Crank pulleys are NOT reliable. The rubber can spit apart at the core, separate and leave you stranded. The PRW & ATI (or WMW) crank pulleys are not (poorly) designed/manufactured in that way.
(FWIW - I too was an emphatic purist about my Mini when I first bought it. Even being mindful to put no more than 6k mi/per year - I insisted on keeping everything original or OEM replacements....Until all these original factory parts kept to failing; costing me $$$ while sitting at the dealer.
The car was no longer reliable.
I'm just glad there are reputable manufactures who responded to the problems, have taken the initiative and are producing quality parts above OEM standards. I'm still a Mini purist but now taking comfort in knowing I've been driving a more reliable car.)
Originally Posted by Mforce
The car will be used only for weekend joy rides... not even for daily driving. The OEM mini is somewhere $360, the PRW $260 and ATI $343 --- then you have OE quality ones corteca $120 approx.
my question here is since I will not be abusing this car is the stock mini still a bad choice? I mean it will not last say 25 Kmiles? it will just fail on you?
I can only offer insight from my 21 years owning my Mini.
My wife and I never abused or drove our 04 R53 hard since we bought it brand new (2003) w/ 3mi on the OD. I am not saying that the OEM pulley will fail in 25k mi. Ours did twice within four years between 3mi - 38K mi.
One doesn't need to drive the car hard for the OEM pulleys to fail. They just do. Most times without a moments notice....The only indication might be that if you start smelling burning rubber while driving. Then you know the factory pulley is about to give out.
Originally Posted by Mforce
...now I am checking PRW and ATI... people say ATI needs rebuild? for what? I thought you'll install once and that's it. people with PRW is claiming no maintenance at all what if the liquid leaks or dries out?
From what I have read: Yes - One advantage that relates to the ATI is that they can be rebuilt if need to (why?...I have no idea.). I haven't read or heard of any accounts of the fluid in the PRW ever leaking. The unit is metal encased with the fluid inside. From my perception the only way that I can think of to have the fluid/gel leak out, would require some sort of significant impact/damage. I don't think the encased/sealed fluid would ever dry out. They are not manufactured like the metal hydraulic motor mounts found on some 1st gen Minis that usually begin to split and leak due to wear/age.
Just my experience and thoughts.
EDIT:
BTW - Another unreliable failure point would be the plastic factory coolant expansion tank. They are notorious for leaking. Either from the cap or worse splitting at the seam. The color of the OEM plastic should appear off white to light yellow. If it looks brownish in color - change it out asap. Not knowing this; Mine literally exploded at the seam leaving me stranded/flat bedding it home.
I prefer the OEM plastic expansion tank oppose to the aluminum aftermarket types. I was mindful to buy a couple of them as back-ups. Should this ever happen again? - I keep a spare in the rear hatch.
Oh man twice failed in 4 years? say you're averaging 12kmiles per year... man every two years you got to replace this crappy OEM mini pulley? okay let me decide which one to buy PRW or ATI... just wanted to deal with this once then forget it.
How hard is it to remove the stock pulley with proper tools? this crank bolt is it prone to snapping like the steering knuckle pinch bolt? I am planning to use electric impact wrench from milwaukee the one I think the 600 ft-lbs --- can I use this without messing up the crank or the bolt?
About the coolant reservoir -- I already bought a backup plastic reservoir same brand I think. one of those 3rd party german or china made reservoir.
Thank you man let me do a little more research on these dampers.
Oh man twice failed in 4 years? say you're averaging 12kmiles per year... man every two years you got to replace this crappy OEM mini pulley?
Yeah- Actually, In my case; at the time, less than 12k mi/year (2004-2008 = 38k). In 2011 @ 78k mi, I started smelling burnt rubber while driving 65mph. I had the pulley replaced for the third time as preemptive precaution. Each time they were replaced at the MINI dealership.
Earlier this year I finally got around to replacing it with the PRW @ 100k mi.
Originally Posted by Mforce
How hard is it to remove the stock pulley with proper tools? this crank bolt is it prone to snapping like the steering knuckle pinch bolt? I am planning to use electric impact wrench from milwaukee the one I think the 600 ft-lbs --- can I use this without messing up the crank or the bolt?
I highly recommend buying this particular pulley removal tool. Trust me (and others)...
The above puller also came with instructions on how to use the tool.
I had initially tried to remove the pulley bolt with an 18v Ryodi impact wrench which failed miserably. I then purchased a 600ft lb pneumatic impact which also failed to remove the bolt. I was finally successful at removing the bolt after purchasing/using a $300 Dewalt 20v impact driver.
Your Milwaukee should do just fine. Just be sure to buy/replace the old bolt with a new one upon installation.
The ModMini video "replacing - the crank pulley" as referenced in the earlier posts, is a very intuitive guide to preforming the procedure as well and worth the watch.
The ATI pulley has a core with several rubber o-rings in grooves between it and the pulley shell. The rubber o-rings probably break down over time like any other o-ring. You can buy the special tool to rebuild the pulley but it�s expensive and only really worth it if you rebuild or tune them often. ATI offers a basic rebuild service (o-rings only?) for $99: https://www.atiracing.com/pdf/ATI-damper-overhaul.pdf
The �stock size� ATI is almost 1% (.8?) larger than stock due to the minimum size limit of the core. Also, the o-rings are available in different durometers to tune the damper depending on the engine harmonics.
Yeah- Actually, In my case; at the time, less than 12k mi/year (2004-2008 = 38k). In 2011 @ 78k mi, I started smelling burnt rubber while driving 65mph. I had the pulley replaced for the third time as preemptive precaution. Each time they were replaced at the MINI dealership.
Earlier this year I finally got around to replacing it with the PRW @ 100k mi.
I highly recommend buying this particular pulley removal tool. Trust me (and others)...
The above puller also came with instructions on how to use the tool.
I had initially tried to remove the pulley bolt with an 18v Ryodi impact wrench which failed miserably. I then purchased a 600ft lb pneumatic impact which also failed to remove the bolt. I was finally successful at removing the bolt after purchasing/using a $300 Dewalt 20v impact driver.
Your Milwaukee should do just fine. Just be sure to buy/replace the old bolt with a new one upon installation.
The ModMini video "replacing - the crank pulley" as referenced in the earlier posts, is a very intuitive guide to preforming the procedure as well and worth the watch.
This amazon version looks the same as the one offered by Way
The ATI pulley has a core with several rubber o-rings in grooves between it and the pulley shell. The rubber o-rings probably break down over time like any other o-ring. You can buy the special tool to rebuild the pulley but it’s expensive and only really worth it if you rebuild or tune them often. ATI offers a basic rebuild service (o-rings only?) for $99: https://www.atiracing.com/pdf/ATI-damper-overhaul.pdf
The “stock size” ATI is almost 1% (.8?) larger than stock due to the minimum size limit of the core. Also, the o-rings are available in different durometers to tune the damper depending on the engine harmonics.
oh wait a minute this ATI breaks too? for how many miles does it last? I mean I do only normal driving. will this last atleast 5-8 years?
Okay let's say those rubber O rings break? is it the same issue as the OEM design that you will lose AC, SC/Water pump and overheating? Will this ATI damper work just no more damping but it will still spin the SC/waterpump, AC?
What I am avoiding is losing function on the accessories *( sC/waterpump - AC )

 10-19-2019, 08:46 PM