R50/53 AC Expansion Valve Hell
#1
AC Expansion Valve Hell
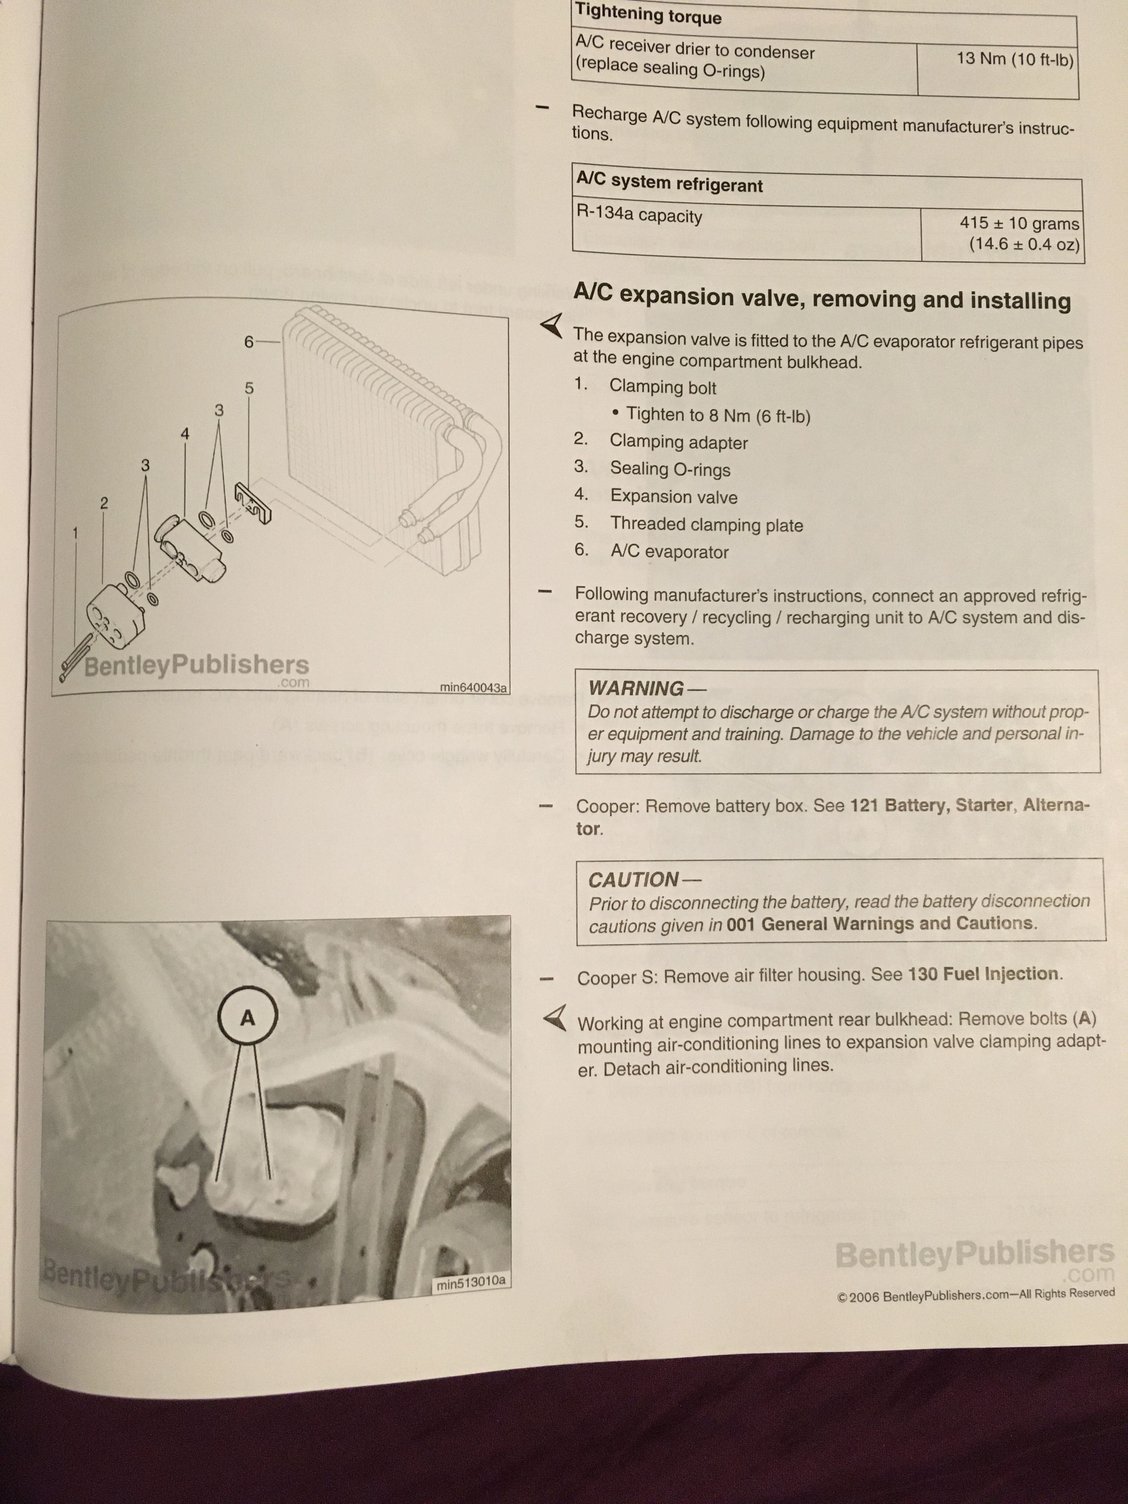
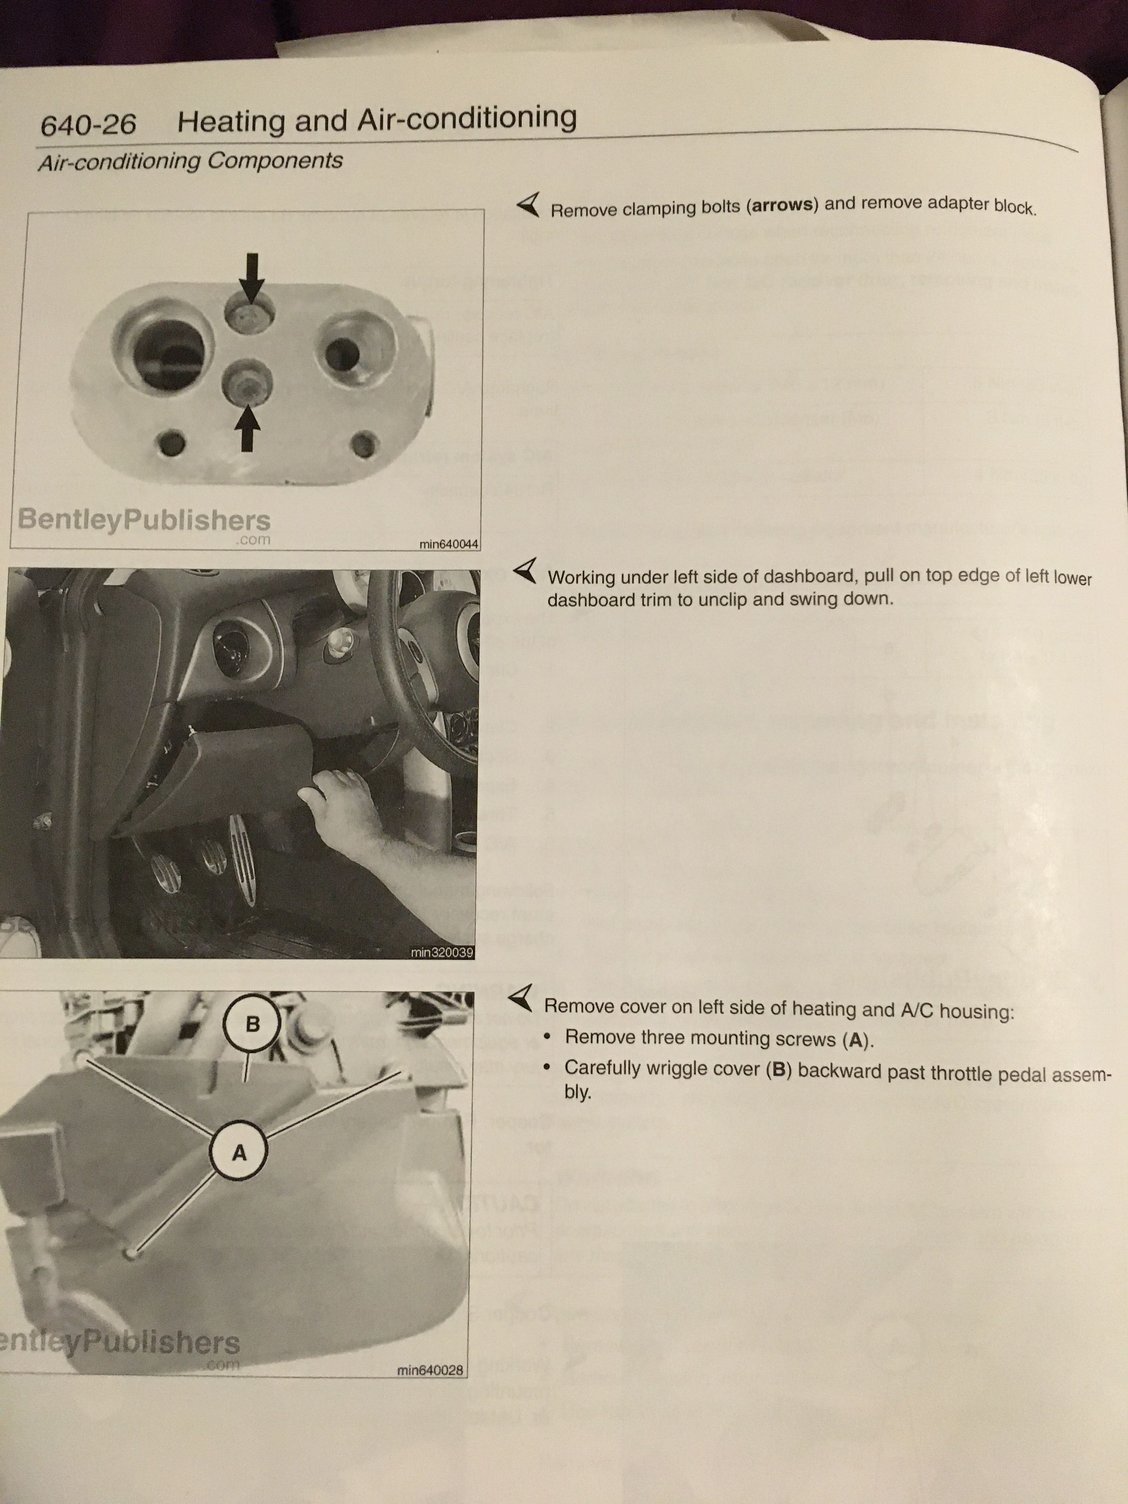
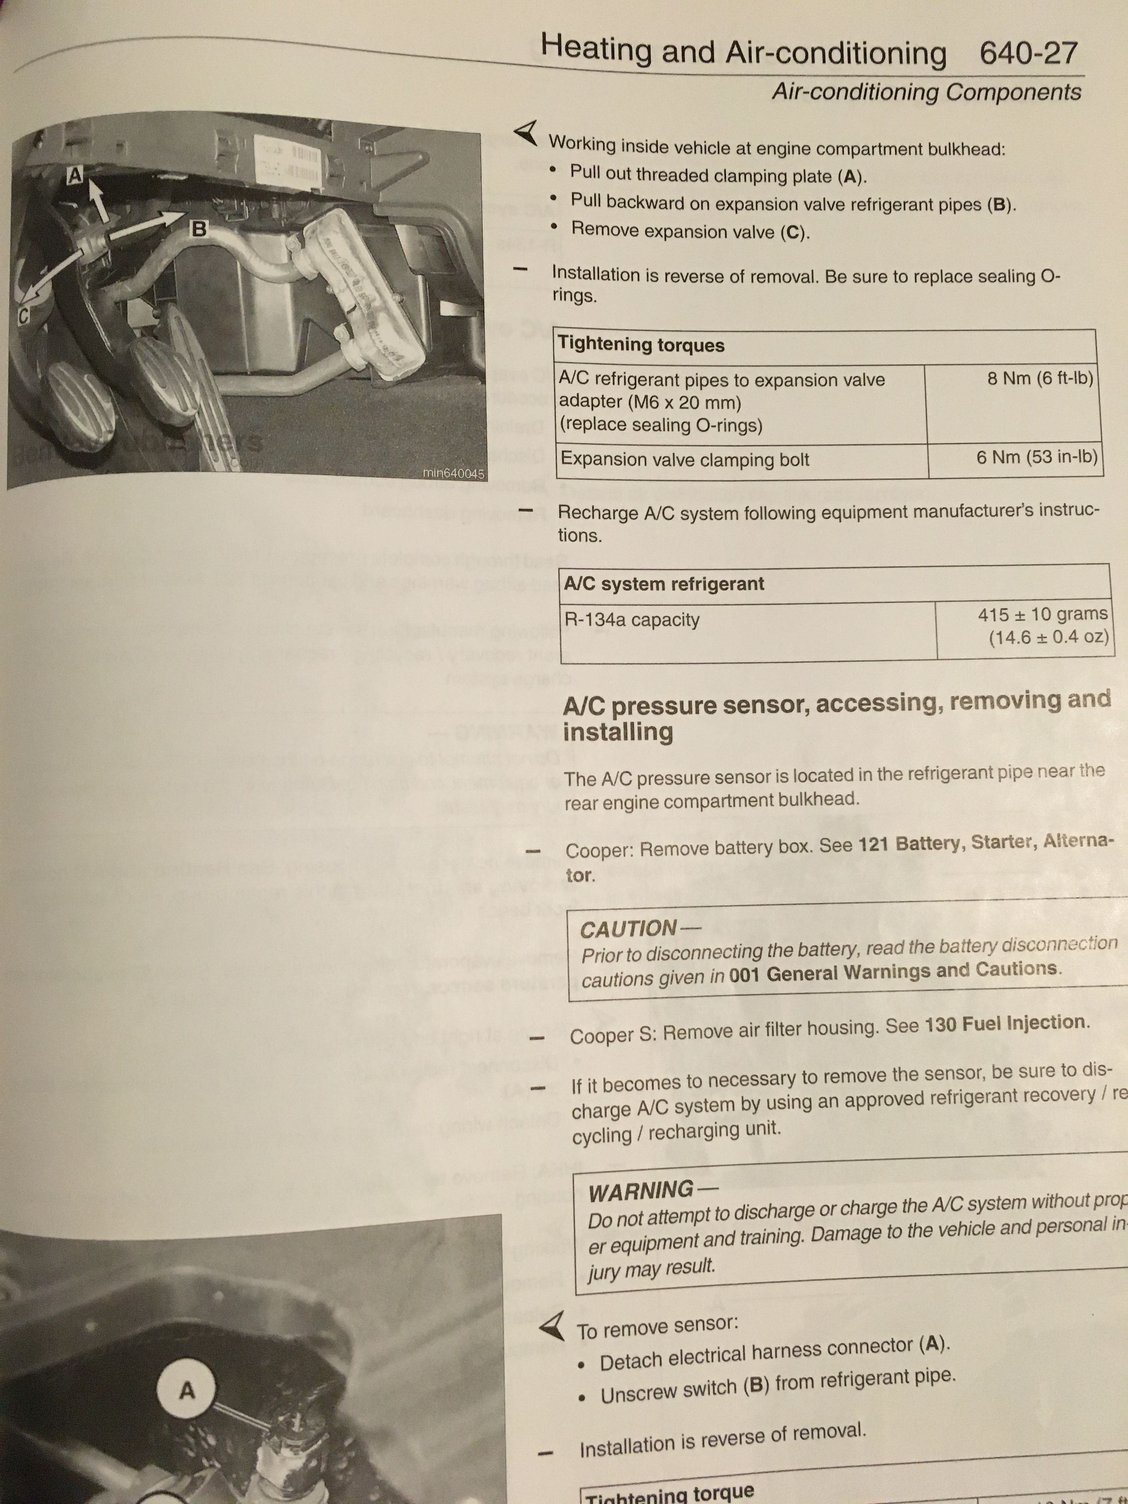
Replacing the compressor which is leaking, along with the condenser, drier, etc. Kit came with a new expansion valve and Iím regretting tackling it. Got the lines off, but canít seem to figure out what fasteners hold in the valve to the metal block. Found an old post here that says T25, but on my 04 that doesnít fit. Anyone know? Any other suggestions to get me through this hellish job? How am I supposed to change those seals, too? Pull the whole AC lines? I thought of trying to remove that plastic cowl (not the air box backplate, but the one that runs behind the expansion tank and such as that would give tons of access, but donít know what that entails since I couldnít find it in any instructions.
#2
#3
#4
Yeah, I have the Bentley manual. The problem is getting those two screws (labeled 1) out. Getting the two hex bolts (labeled A) that hold the lines out was also ridiculous, but that's done. Then I can move inside and I assume that part will be relatively painless. Reinstallation of those 4 fasteners will also be a bear I imagine.
#5
#6
https://i.imgur.com/LWVHMlS.jpg (not my picture, but gives a good idea of the difficulty...it's back there at the end of that silver AC line). I haven't been able to see the bolt heads, but I'm thinking hex as well. I decided to call it a night last night, but I looked at New TIS and the picture there shows a hex (no size of course), so that's what I'll start with tonight when I get back on it. I'm going to grab my borescope (working at my parents' garage since they have the extra space to leave it on stands for a few days), so that should help identify the type at least. Still doesn't answer the size question, but it's something.
The following users liked this post:
ssoliman (07-21-2020)
#7
Sounds good.
that picture doesnít show much. Stick the iPhone down there with the flash on. Sometimes that does well for me.
also just another thought. There is a heat shield in that area that you might bend out of the way iirc. Not sure now
last, I was able to access this area (hoses that run to the heater core) from under the car surprisingly. Worth a look.
Trending Topics
#8
#9
Sounds good.
that picture doesnít show much. Stick the iPhone down there with the flash on. Sometimes that does well for me.
also just another thought. There is a heat shield in that area that you might bend out of the way iirc. Not sure now
last, I was able to access this area (hoses that run to the heater core) from under the car surprisingly. Worth a look.
that picture doesnít show much. Stick the iPhone down there with the flash on. Sometimes that does well for me.
also just another thought. There is a heat shield in that area that you might bend out of the way iirc. Not sure now
last, I was able to access this area (hoses that run to the heater core) from under the car surprisingly. Worth a look.
#10
#11
Yeah, tried that. It kinda works. Or at least it worked to get the line set bolts out. But it took me being under the car and my dad doing the ratchet because it's near impossible to keep on the hex heads until it breaks free and gets out a little bit. I was running into an issue with the mix of extensions I had last night and hitting the shift linkage for these two, but if I can't muscle them out with a hex driver or whatever, that's an option.
The following users liked this post:
ssoliman (07-21-2020)
#12
#13
For anyone who does this job in the future, mine were 5mm hex.
Also, if youíre going to flush the lines, the best way to do so is from inside the cabin through the firewall hole when all this junk is out. Otherwise itís near impossible without spraying flammable solvents all over your exhaust. This part may or may not be from personal experience...
Anyway, got the valve changed, lines flushed and back into the valve block, and all the O-rings done. Took way too long, but some of this was cleanup of said solvent and PAG residue as well as finding a screw that lodged in the heat shroud. It was a fun night... Also for anyone contemplating this job, a borescope makes things so much easier. Game changing. Also, if youíre contemplating this job, stop. Just hire someone. Or skip the expansion valve part. The compressor and dryer are super easy. I had the compressor and condenser/dryer off in about an hour. The expansion valve took like 7 and the original part looks brand new.
The following users liked this post:
ssoliman (07-22-2020)
#14
#15
No, I ran out of time. It was after midnight when I called it quits. The joys of only working after the kids are in bed... Should be back together and running tonight, long with a freshly oiled and cleaned filter in the CAI and new M7 silicone intercooler boots. That's the plan, anyway.
The following 2 users liked this post by indianajonesy:
ssoliman (07-22-2020),
user 7389739 (07-22-2020)
#16
For anyone who does this job in the future, mine were 5mm hex.
Also, if youíre going to flush the lines, the best way to do so is from inside the cabin through the firewall hole when all this junk is out. Otherwise itís near impossible without spraying flammable solvents all over your exhaust. This part may or may not be from personal experience...
Anyway, got the valve changed, lines flushed and back into the valve block, and all the O-rings done. Took way too long, but some of this was cleanup of said solvent and PAG residue as well as finding a screw that lodged in the heat shroud. It was a fun night... Also for anyone contemplating this job, a borescope makes things so much easier. Game changing. Also, if youíre contemplating this job, stop. Just hire someone. Or skip the expansion valve part. The compressor and dryer are super easy. I had the compressor and condenser/dryer off in about an hour. The expansion valve took like 7 and the original part looks brand new.
Also, if youíre going to flush the lines, the best way to do so is from inside the cabin through the firewall hole when all this junk is out. Otherwise itís near impossible without spraying flammable solvents all over your exhaust. This part may or may not be from personal experience...
Anyway, got the valve changed, lines flushed and back into the valve block, and all the O-rings done. Took way too long, but some of this was cleanup of said solvent and PAG residue as well as finding a screw that lodged in the heat shroud. It was a fun night... Also for anyone contemplating this job, a borescope makes things so much easier. Game changing. Also, if youíre contemplating this job, stop. Just hire someone. Or skip the expansion valve part. The compressor and dryer are super easy. I had the compressor and condenser/dryer off in about an hour. The expansion valve took like 7 and the original part looks brand new.
I think I need to add changing out the evaporator. Have a leak I cannot find... yay :/
#17
AC flush solvent and a flush bottle hooked up to an air compressor (loaner tool from O'Reilly). Pretty easy, really, other than the messiness part.
Have you put UV dye in the system? Should help figure out where it is. The evaporator is super easy to replace, honestly. Probably an hour or so job, maybe less if you've done FESM more than I have. Make sure you get an evaporator with a new dryer (they're connected) or buy a separate dryer. Have a shop recover your refrigerant before you do the work and then you can either refill yourself (loaner tool manifold gauges and vacuum pump and a cheap can tap) or go back when everything is one (still a good idea to rent the vacuum pump and manifold set and run a pressure test). Just make sure it's your actual problem, though. Not a lot to fail on those except maybe the line O-rings (unless you have road debris damage or something).
Have you put UV dye in the system? Should help figure out where it is. The evaporator is super easy to replace, honestly. Probably an hour or so job, maybe less if you've done FESM more than I have. Make sure you get an evaporator with a new dryer (they're connected) or buy a separate dryer. Have a shop recover your refrigerant before you do the work and then you can either refill yourself (loaner tool manifold gauges and vacuum pump and a cheap can tap) or go back when everything is one (still a good idea to rent the vacuum pump and manifold set and run a pressure test). Just make sure it's your actual problem, though. Not a lot to fail on those except maybe the line O-rings (unless you have road debris damage or something).
#18
AC flush solvent and a flush bottle hooked up to an air compressor (loaner tool from O'Reilly). Pretty easy, really, other than the messiness part.
Have you put UV dye in the system? Should help figure out where it is. The evaporator is super easy to replace, honestly. Probably an hour or so job, maybe less if you've done FESM more than I have. Make sure you get an evaporator with a new dryer (they're connected) or buy a separate dryer. Have a shop recover your refrigerant before you do the work and then you can either refill yourself (loaner tool manifold gauges and vacuum pump and a cheap can tap) or go back when everything is one (still a good idea to rent the vacuum pump and manifold set and run a pressure test). Just make sure it's your actual problem, though. Not a lot to fail on those except maybe the line O-rings (unless you have road debris damage or something).
Have you put UV dye in the system? Should help figure out where it is. The evaporator is super easy to replace, honestly. Probably an hour or so job, maybe less if you've done FESM more than I have. Make sure you get an evaporator with a new dryer (they're connected) or buy a separate dryer. Have a shop recover your refrigerant before you do the work and then you can either refill yourself (loaner tool manifold gauges and vacuum pump and a cheap can tap) or go back when everything is one (still a good idea to rent the vacuum pump and manifold set and run a pressure test). Just make sure it's your actual problem, though. Not a lot to fail on those except maybe the line O-rings (unless you have road debris damage or something).

On the evaporator, I might have the wrong word there. I thought the evaporator was behind the dash inside the car?
The condenser with dryer Iíve replaced. Agree that one is easy if you have the gauges...
Iíve tried everything to find the leak. UV dye, a refrigerant ďsnifferĒ, soap and water...
I found a leak at the valves. Replaced the valves and it is still leaking somewhere. Was sure I had it.
ive replaced the compressor, condenser / dryer, valves, o-rings to go with all of those.
the only things left are the expansion valve and the evaporator (and respective o-rings).
Saving the hardest for last. Lucky me 😉
#19
You're absolutely right and in my head I've been calling that the heater core 🤦♂️ Good luck if you do it. Probably worthwhile to do both if you're draining and recharging. You're already there with the inside work, you'd just have to add the awful bit with removing the intake and ECU and trying to get those screws out for the valve.
The following users liked this post:
ssoliman (07-22-2020)
#20
You're absolutely right and in my head I've been calling that the heater core 🤦♂️ Good luck if you do it. Probably worthwhile to do both if you're draining and recharging. You're already there with the inside work, you'd just have to add the awful bit with removing the intake and ECU and trying to get those screws out for the valve.
OP any luck with the expansion valve?
#21
Luck yes...good luck, no. Wouldnít hold a vacuum, so I need to go through and check all the connections. If I was a betting man, my money would be on those expansion valve connections. I regret ever touching it, honestly. Another night gone and still no joy. I mean, the compressor is on, the lines are all run, the condenser and dryer are on, new serpentine belt is on and tensioned, and new inter cooler boots are on. Oh, and the AFE cone filter in my ProMini CAI is cleaned and reoiled. Glad I didnít reinstall it because Iíd jut have to pull it to check those fittings.
#22
So final summary: It's working...turned out the pressure leak was all/mostly the rental manifold gauge set. Running and cold now, although it's got a bit of a "darth vader breathing" sound effect that makes me wonder if there's a slight leak or a bit of air in the system. I bought a sniffer to check for freon leaks, hopefully the answer is no. If I was doing it again, I'd likely omit the valve, but if I wanted to do it, I would try and not undo the linesets from the brass block in the firewall and only undo those two hex screws (I'm assuming this is possible, but there might not be clearance to access them). There's nothing gained and a lot of hassle added by removing that block unless you know those O-rings on those connectors are failing and need to be replaced. You should still be able to flush the lines from inside the cabin (which you should do anyway to avoid getting solvent on the exhaust manifold) and it'll make disassembly and reassembly easier in theory. Maybe this will be of some help to someone in the future.
The following users liked this post:
ssoliman (08-04-2020)
#23
So final summary: It's working...turned out the pressure leak was all/mostly the rental manifold gauge set. Running and cold now, although it's got a bit of a "darth vader breathing" sound effect that makes me wonder if there's a slight leak or a bit of air in the system. I bought a sniffer to check for freon leaks, hopefully the answer is no. If I was doing it again, I'd likely omit the valve, but if I wanted to do it, I would try and not undo the linesets from the brass block in the firewall and only undo those two hex screws (I'm assuming this is possible, but there might not be clearance to access them). There's nothing gained and a lot of hassle added by removing that block unless you know those O-rings on those connectors are failing and need to be replaced. You should still be able to flush the lines from inside the cabin (which you should do anyway to avoid getting solvent on the exhaust manifold) and it'll make disassembly and reassembly easier in theory. Maybe this will be of some help to someone in the future.
Good to hear you got it working. Sounds like it was a bear of a job.
#24
Not really. Having the evaporator itself out might give you a bit easier access, though. Also, for either the evaporator or the valve, I recommend removing the gas pedal. I didn't bother disconnecting it from the wiring, but just sliding it off the mount and lying it on the floor makes getting the cover panel in and out much easier (I'm not sure you could really get it on without doing so based on my trying) and gives you more room to work.
The following users liked this post:
ssoliman (08-05-2020)
Thread
Thread Starter
Forum
Replies
Last Post


