When you click on links to various merchants on this site and make a purchase, this can result in this site earning a commission. Affiliate programs and affiliations include, but are not limited to, the eBay Partner Network.
We didn't make it to Flagstaff for lunch last week as planned but did so this Tuesday. No new R53 pics this time but both Mormon Lake and Lake Mary were full to the brim from winter storms and snow melt. Highest we've ever seen but I've only been in this area 10 years vs much longer for my buddy. The shifter and exhaust swaps done recently worked out quite well, however there's an audible heatshield vibration buzz ascending mountain grades under certain rpms and loads only, undoubtedly related to the header. So, another session is planned underneath soon to find and tweak that aspect. Mine rolled over 7k miles on the way home and his a few hundred higher than that.
An unrelated issue that's been bugging me a few months is the driver side window making a "pop" sound while being raised and lowered. Raises to fully closed docking position without grinding, so didn't seem related to the regulator assembly or motor but decided to pull the door card yesterday and watch what was going on. Aha! It was the inside door latch cable where factory applied cloth tape was snagging at same point each time gong up and down. An simple fix to move that aft where shown and now running smooth and quietly! The 3rd pic taken in dusty mirror reflection shows that cable against the inner door skin with cable's slightly abraded tape now moved out of the way. An unusual problem corrected unusually easily. I like that!
My driver's window was/is making a loud snap sound, but only when going up.
I know for sure that the two white plastic pieces are both broken off inside the door. They hold the cabling away from the window I think and when one, or maybe both, break it causes a lout slap when window goes up. I tried to replace them, but it's a major PITA to get to them and I just wound up breaking the new ones too so I just forgot about it.
Do you think your fix might work for when these plastics are broking?
My "fix" was just moving the inside door latch cable out of the way and didn't include using any clips. Nothing found broken inside, so I just left it that way overnight in case it "remembered" where it had been before reinstalling the door card next morning. Drove the mini a few hours yesterday with the window up and down several times without problems.
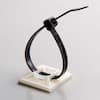
You might consider this type of cable tie mounts placed on an accessible location on the backside of the inner door skin. I've used them before and the adhesive sticks quite well to a clean surface. If my cable noise issue returns, I'll use one.
My "fix" was just moving the inside door latch cable out of the way and didn't include using any clips. Nothing found broken inside, so I just left it that way overnight in case it "remembered" where it had been before reinstalling the door card next morning. Drove the mini a few hours yesterday with the window up and down several times without problems.
You might consider this type of cable tie mounts placed on an accessible location on the backside of the inner door skin. I've used them before and the adhesive sticks quite well to a clean surface. If my cable noise issue returns, I'll use one.
Ya, I was thinking about using those too. The location/access to the OEM ones is horrendous. Maybe it�s easier if you remove the entire window mech from the door but that seems extreme.
1) Driving mine with buddy and his wife in their R53 JCW to view the now-full Roosevelt Lake in Tonto Basin revealed some racket from the marine-style Johnson Pump (Sweden), which is constant flow whenever 12v present from the ignition switch. I knew the W-2-A IC's brazed inlet hose port weeped slightly but not enough to visibly leak. Got home and determined that noise was cavitation from closed system coolant having been lost over time, which took 1.5 qts to fill and burp full but all is well now. Unknown how much total coolant in this custom system but combo of long hoses, dedicated front mounted radiator plus the IC suggests quite a bit. From now on, I'll check and top that off same time as oil checks (noting mine hasn't consumed noticeably any oil in 3k miles).
2) Backed-off the recently installed Cravenspeed machined plastic shifter bushing's machine screws (6 total) 1/4 turn each for a bit more relaxed shifting effort (that bushing essentially being a spherical clamp on the actuator lever's lower rotational ball).
3) Jacked up both the front and rear and finessed the aluminum heat shielding to reduce if not totally eliminate mild resonant buzzing at certain RPMs. It's the 4:1 header and hi-flow cat creating those, which is nearly gone now. I'll drive it more and evaluate if done or more tweaking required. Very quiet and pleasant otherwise, with just soft burbles and pops on decel. Nice!
Bottom line, all 3 aspects relate to those modded components. Be careful what you wish for when swapping in aftermarket parts!
Last edited by MCS4FUN; 04-29-2023 at 06:42 PM.
Reason: typo
How was the Cravenspeed bushing installation, and how do you like it (I see you’ve adjusted it, so maybe that question is premature)? I didn’t realize you had installed one until today, and I happened to have been looking at it on WMW’s site last night. I know I’ll have to address the stock bushing at some point, so I was considering buying one for my parts stash, along with some of the metal bushings for the housing.
^^^ Other than driving my buddy's 2006 R53 JCW briefly, I hadn't driven one with an unmodified OEM shifter. Objective with the Cravenspeed bushing kit (from WMW, although not so noted on Way's website) was in case the used donor shifter assy had a worn or cracked bushing as stated they're prone to do. I carefully removed that OEM bushing without damaging and then installing the new one was easy. Cravenspeed's (or whoever makes for them) is much more robust with breakage unlikely ever. I greased all rotational parts liberally, then just snugged the 6 machine screws down into the bushing tapped lower section. Snugged it a bit tighter yet, then decided to back off 1/4 turn as stated. So easy by just popping off the boot ring with no need to access the bottom side of the shifter assy. I have the donor shifter's bushing but can't imagine why I'd reinstall that vs the upgraded machined bushing. See pics in post #396...
I think you’ve swayed me to pick one up soon. I realized after answering a question about shifter play a while back that I don’t really remember how much play my shifter had when new. I’ve never been wild about the idea of running a short shifter, partially due to the same clearance issues you’ve had, so this seems like a nice compromise. And the added durability is a major plus.
Its likely obvious but for clarification, the replacement bushing is a clamshell design which must be installed with the lower section capturing the rotational shift actuator lever ball from bottom side, then engaged into the housing with the (3) metal tabs and machined top ring capturing that from the top side. Doing is easier if not mandatory with the shifter box removed entirely or at least disengaged from the chassis. Just dropping it down with cables still attached to the housing would provide better access to the (10) bottom cover retention tabs which otherwise could become fiddly and/or be broken in the process. Also noting, the o-ring will likely have been broken from age and use as was on the donor shifter assy. That o-ring acts as a bump stop during shifter throws and wears over time. Doing all that of course, requires dropping the center exhaust section and removing the heatshield for access. Not at all difficult but better factored in advance. At that point, making shifter bushing tension adjustments from the top is quick and easy from the top.
That’s great info. I was actually just wondering how hard it would be to do in the car. Since I need to drop my exhaust sometime anyway, I should probably put this on the “while I’m in there” list.
You wouldn’t happen to know what size o-ring you used, would you? I’ve probably got the right size in my stash, but if you know offhand, it might make things easier. I need to special-order some o-rings for a set of old eggbeaters that I’ve been meaning to rebuild anyway. I wouldn’t have even known to check it, actually, though if it were broken but intact, I suspect I would have noticed.
No install instructions came with, however Cravenspeed's website shows 2nd gen install with full access apparently possible from top side. Unsure if that's possible with 1st gen but my project was a complete swap so not applicable: MINI Retaining Clip
I only had a cheap H-F rubber o-ring kit, so bought the Viton assortment below. Only one of correct size included which I used, so I'll determine that and let you know. Pics are that kit plus new o-ring, old broken o-ring and H-F o-ring not used.
By coincidence I bought one of these CS shift lever bushings from WMW a few weeks ago.
I unfortunately missed the fine print which states that it doesn't fit/work in an '02-'03 with the white shifter box.
My '04 R53 is pre-facelift built in November '03. Since my shifter is still pretty tight (no slop) and has plenty of spring back; I haven't taken the time to look to see if mine has the white shifter box as noted.
Nonetheless, I'm glad I read your post regarding underneath access required by dropping the exhaust for installation.
I had also read the CS site stating otherwise. Perhaps I misunderstood or neglected to realize that installation from the top was specific to the later 2nd Gen models.
Rather than expand explanation on accessing the shifter box internals, watch this 22 min installation video forum member @Grand-Cayman did 2 yrs ago showing steps required including removal, replacement with Cravenspeed's SSK plus the current topic replacement bushing kit. I did so in advance of my project which was helpful. I usually take pics during such projects, incl above o-ring pics texted to my buddy saved to my laptop folder in case needed for reference (or sharing) but I don't shoot videos nor have a youtube channel.
Thanks for that!
I agree - in the interest and respect to avoid belaboring the subject on your thread with my personal issue; between the info you've kindly provided in tandem with my Bentley manual, I have the tools and resources to preform the upgrade.
The issue with my particular model being a "pre-facelift", has always been confusing when sourcing the right parts and procedure for repairs and upgrade.
On a final note: I just visually confirmed that my '04 MCS 11.16.'03 build is indeed equipped with the facelift shifter assembly installed! Upon discovery it is evident my shifter lever bushing is beginning to split.
Therefore, no money wasted on the CS part I'm happy to say. I can now move forward with the upgrade and repair
Thanks again for your time, insight and consideration
Oh wow. That really is in bad shape. Come to think of it, my assortment is probably pretty low quality.
If it’s a lot of trouble to figure out, there’s no need to bother just for me, but I do appreciate it if you can.
Not a problem, so just now checked. The Dorman kit I bought at AutoZone ($11 + tax - yikes!) has 18 o-rings of decreasing size. From the size missing, I used the 20.4mm OD x 15.3mm ID x 2.6mm thk (noting sizes shown in mm despite online descriptions in fractional inches). The shift actuator lever is machined with a groove to retain that o-ring, so once determined what the 0-ring does (bump-stop vs seal), the Viton quality plus thickness worked well. Maybe you can find individually but Amazon is less than I paid at $7.66 + tax.
Thanks a bunch! I've got the size down in my notes for when I have the time to tear everything apart. Since the Mini is my daily, I try to have everything I need on hand so that I'm not stuck with a bunch of downtime or frantically trying to track down parts.
Yes. I realize the age of the post im replying too here.
Originally Posted by JerBear
I think that 4-1 header would hurt your street driving performance more than changing from a cobbled cat back to one with some of the highest reviews in the entire Mini community. A whole lot more gos into exhaust than just "restrictions" (ie cats, bends, mufflers, etc.). For a street car you might want to do some research into a 4-2-1 header. As I understand it a 4-1 is better in the upper rpm limits and a 4-2-1 helps with scavenging and makes more torque, better on the street. Might be worth looking into as long as your working on the exhaust....
Your sort-of correct, but the devil is in the details. Your exhaust has to be sized to suit the rest of the tune that all the other parts are trying to generate.
None of the 4-1 performance systems available for the mini have a nice mixer (where the 4 join into 1), so even if their headers are sized right for 5k rpm + airflow that the supercharged 1600 is making, they still are a dud system. Making a 4-1 that works across the whole rev range, as well as helping promote high rpm power (& 7000 rpm isnt very high) isnt easy. The mixer is the most critical part.
Like ports, you can be 90% close to the ideal size - but still be missing out on most of the potential gains. Even if your pipe volumes are good, the airspeed can fall apart at the mixer. This is the milltek, its horrible:
& your 4-2-1 can also be sized for high rpm power. They are not exclusively for low rpm powerbands.
Originally Posted by JerBear
Had I known that kind of fuel mileage was attainable with an R53 I would not have even considered an R50! But it also begs the question, how efficient could an R50 be made with tuning...?
Actually, a properly sized performance exhaust combined with a de-restricted intake can make a car more fuel efficient!. Your taking the brake off the engine that its fighting when stock, liberating HP & Torque, & freeing up its willingness to rev out.
All this results in you having to stand on the gas less, for shorter periods of time, when trying to reach the normal legal cruising speeds. I generally see a real-world fuel improvement around 8% on cars ive made pipes for. Bikes its hard to say because I dont generally cruise when riding . . . . .
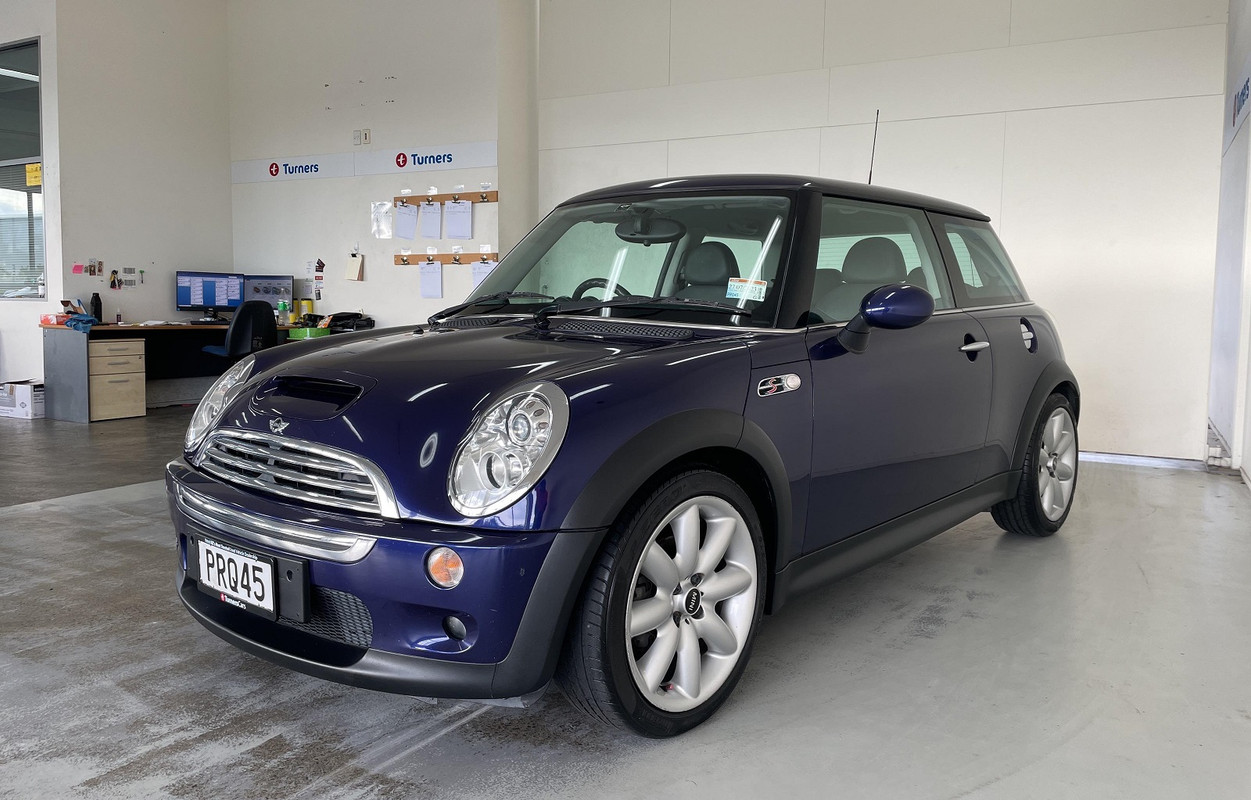
Ok this thread was a great read, TY. It hit close to home for me because I missed out on the perfect buy - by 1 day - that I believe is the same colour as yours:
2005 Chrono optioned, 1 Owner from new, 83k miles. Regularly driven & properly serviced, this had the perfect history & was garaged its entire life.They dont come this good very often in my country so I thought . . . . . . .
1 month later later a 60k mile, almost showroom condition 2006 appeared. Messaged the seller only 5 minutes from it being uploaded & had an eyes-on the next day.
^^^ Greetings Brad the Kiwi! I visited NZ in 1988 on a 2-wk fly 'n drive in your country and Australia (1wk each - Auckland north quite a ways, then south as far as Rotorua plus Sydney to Brisbane). Good memories 35 yrs later!
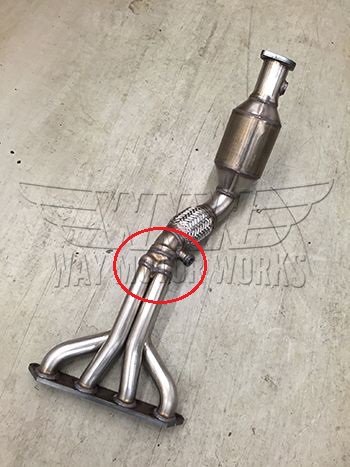
So you commented on those R53 that got away but do you own one now? Since you commented on Jer's post from over a year ago, you must have also viewed pics of the header installed on mine early in 2006 when nearly new. Manufacturer is unknown (doubtful Milltek), however the 4-1 collector looks smooth and efficient to my eyes as also does Milltek's 2.5" ID cat-back exhaust where that transitions to 2 pipes routed to twin silencers. Pic shows the non-res pipe however I'm back to resonated version now.
My driver's window was/is making a loud snap sound, but only when going up.
I know for sure that the two white plastic pieces are both broken off inside the door. They hold the cabling away from the window I think and when one, or maybe both, break it causes a lout slap when window goes up. I tried to replace them, but it's a major PITA to get to them and I just wound up breaking the new ones too so I just forgot about it.
Do you think your fix might work for when these plastics are broking?
I had the same problem. It's unlikely that simply sticking a cable tie onto the inner door skin will solve the problem as there is a fair amount of tension. I was able to solve the problem by removing the white clips and threading a zip tie through its mount location. I used the zip tie to hold the cables in place. Not a factory fix, but more than adequate.
^^^ Greetings Brad the Kiwi! I visited NZ in 1988 on a 2-wk fly 'n drive in your country and Australia (1wk each - Auckland north quite a ways, then south as far as Rotorua plus Sydney to Brisbane). Good memories 35 yrs later!
So you commented on those R53 that got away but do you own one now? Since you commented on Jer's post from over a year ago, you must have also viewed pics of the header installed on mine early in 2006 when nearly new. Manufacturer is unknown (doubtful Milltek), however the 4-1 collector looks smooth and efficient to my eyes as also does Milltek's 2.5" ID cat-back exhaust where that transitions to 2 pipes routed to twin silencers. Pic shows the non-res pipe however I'm back to resonated version now.
Heyya!, bang on the money as to my location. I did buy an R53, but for 2 weeks after missing out on that purple one I was despondent - it was such a good example in a small market like NZ that I really felt like I had missed my chance.
It sold on the sunday afternoon & my plan originally was to head over on the saturday to view/purchase it. But a workmate broke down going home on the friday evening so I spent that saturday running around getting him mobile again. With the 2 trips we had to do for parts I stayed home on sunday & planned to do the trip on monday. When I opened up the auction website on sunday to double check the details I couldnt believe it, gone after being up for just 6 days!
But 4 weeks later an even better example showed up & I it was mine 2 days later. They are getting few & far between, I got lucky is all (after getting totally out of luck)
Im getting a few things painted & waiting on wheels to arrive, but pics will get posted here once thats done. Im really looking foward to tuning a supercharged engine, but header making is an involved process even tho its mostly basic metal working.
^^^ Your linked 4-2-1 header reminds of "can of worms" as sometimes referred on custom equal length headers. I'd want to see pics installed, along with comments on fitment and possible clearance issues. With that said, my objective going on 2 years since purchase has been to tame my R53 from track-oriented priority to strictly streets and highways practicality. My objectives might well not be your own. I suggest posting a new thread topic on your R53 when you're ready, for maximum viewing exposure and subsequent comments.
It's now just a few days short of 6 months since I last posted on my own topic. Why? Well, I've run out of "to-do" projects! In the spirit shown yesterday by @Boostmaster with total project costs on his own R53, figured I'd do likewise. The nature of my expenses totaling roughly $7k were quite different though wherein the major costs related to taming the race track build theme from when new in 2006, replacement of some items that had been blemished during previous ownership and replacement of aged-out DOT racetrack tires despite few miles on those. Some of those costs were partially offset by selling used takeoffs, including 2 sets of OEM wheels on CL (one set with original tires still sporting mold ****) and some of the aftermarket stuff here on NAM. Major costs consisted of; replacement OEM driver side door card (one of just 3 remaining worldwide in a Germany warehouse location at that time), replacement premium grade tires and the unfortunate failure of the fuel pump 100 miles from home requiring being towed to the nearest MINI dealer (in hindsight, obviously should have replaced that at time of purchase). After another 200-mile roundtrip lunch run last week, current total mileage is 7.4k. Feel free to ask any related questions...
Last edited by MCS4FUN; 10-29-2023 at 01:16 PM.
Reason: Edited to add missing item costs
^^ Nice break down. I kinda wish everyone would do this. Not really for me to be nosey, but rather as an informative snapshot in time. It's interesting to see what things cost and I suppose that armed with this knowledge the average reader can better assess if this "project" they are planning has really been thought out as it pertains to the funding.
Case in point: that door card costing over $1k??? I would spend every waking moment at a salvage yard if I needed one after seeing what a new one might cost me as parting with money is painful to me. LOL

 04-20-2023 | 05:10 PM


 I would spend every waking moment at a salvage yard if I needed one after seeing what a new one might cost me
  as parting with money is painful to me. LOL