
R50/53 Dorky cheapskate modification
#526
 06-12-2011, 12:39 PM


5th Gear
C ya,
Dutch
#527
07-04-2011, 03:29 PM

2nd Gear
Join Date: Mar 2009
Location: Washington
Posts: 98
Likes: 0
Received 0 Likes
on
0 Posts

#528
07-23-2011, 09:41 PM
rattle fix
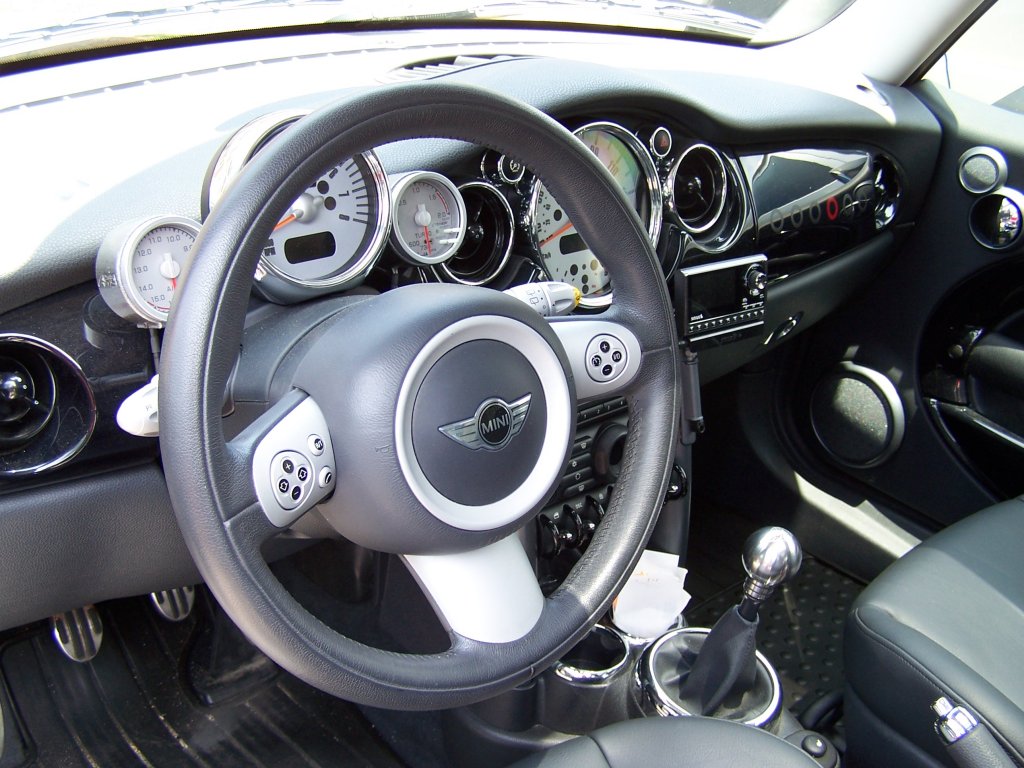
My cheapskate fix - i had a rattle in the car when driving over grooved pavement which drove me nuts. Turns out the pass side downtube (?) was ever so slightly loose and would buzz against the bottom of the console. Whomever installed the cup holder totally bugged up the lower fastener so tightening it was a no go.. Used a screw driver and gently wedged the lower console away from the downtube so I could squeeze just a little goop in the space (it's like stronger rubber cement) to kinda make a gasket. Now the downtube is all snug and no rattle. It's the little things..
The arrow shows where the goop got squeezed into, kinda; Be really gentle making the gap to squeeze in the goop
fyi not my car in the pick, that one has no cup holder...but it was the perfect angle shot
The arrow shows where the goop got squeezed into, kinda; Be really gentle making the gap to squeeze in the goop
fyi not my car in the pick, that one has no cup holder...but it was the perfect angle shot

#530
07-26-2011, 12:17 PM
Did this last year
R-FREE just some sanding and paint
53 - 12.00 carbon fiber look
Questions I get priceless.............
R-FREE just some sanding and paint
53 - 12.00 carbon fiber look
Questions I get priceless.............
Thanks to all for showing me little tricks to change the badge on my Mini Cooper. Like so many others, I want to make my Cooper S a little different.
$ 0.00 - Removing Cooper S Badge
$ 8.00 - R badge
$29.00 - 56 badge
Priceless - making my Cooper a little different
Attachment 54332
Attachment 54334
$ 0.00 - Removing Cooper S Badge
$ 8.00 - R badge
$29.00 - 56 badge
Priceless - making my Cooper a little different
Attachment 54332
Attachment 54334
#532
07-26-2011, 08:34 PM
6th Gear
DixonL2, to my best knowledge, those circles were part of the Interior Surface Seven package, which was one of the ones that came with this MINI when it was originally delivered (I bought it used). This includes the black dash and two large door rings. Guess the small circles are just something to help take up the large panel so it's not so plain looking. Since the airbag is actually in the top of the dash, some sort of LCD swapout would not be too bad of an idea either. 
#533
09-17-2011, 06:58 AM
Magnetic stone guards---bought magnetic signs at Lowes in the sign department that say "For Sale" on them. You get two for about ten dollars. Cut them to the shape of the stone guard that I wanted and then painted them flat black. I have had them on my car for over year and they look great. I touch them up with paint once a year. The OEM guards are expensive, very thin and very cheaply made. These are very thick and sturdy. I am very happy with the results.
#534
09-17-2011, 07:21 AM
Magnetic stone guards---bought magnetic signs at Lowes in the sign department that say "For Sale" on them. You get two for about ten dollars. Cut them to the shape of the stone guard that I wanted and then painted them flat black. I have had them on my car for over year and they look great. I touch them up with paint once a year. The OEM guards are expensive, very thin and very cheaply made. These are very thick and sturdy. I am very happy with the results.
#535
09-17-2011, 07:35 PM
#536
09-19-2011, 06:11 AM

i guess i fall into the catagory of "mcgiverism, cheep, innovative, cheep, creative, cheep....
my 03 mini was a commuter car before it came into my garage ,,one of the biggest things that drove me nuts was the scratches in the center of the steering wheel, and the silver ring looking really poor...
since there werent any real options available, i decided to play w it
I found that some careful prying got the center off..i did find that the mini wing is part of the thin metal that makes up the center insert, and no matter of paint would cover it completely...sooo...
in the end, i carefully sanded off the silver ring until it was all black...using a piece of black wire, i made a thin trim along the outside egde of the ring
for the center, i brainstormed for days about something that would be the right diameter...in the end, and dont laugh too much, i found that the bottom of my dodge nitros cup holder had this round foam piece that fit perfect..attached it to the removeable center, reintalled it, and ran a smaller gray ( silver) wire around that
in the end, a few drops of super glue, a half sheet of sandpaper , and a few hrs of work/thinking, etc...
the result
Last edited by rod from maryland; 09-19-2011 at 09:31 AM.
#538
09-19-2011, 07:06 PM

I closed in the airbox with aluminium plate after installing the K&N Typhoon, then extended the "front" air intake with a silicone 45 bend and hose clamp. Finished it off with a little foam door seal along the top edge. Cost- maybe $20 total.
I made the radiator air diverter from a rubbermaid cuttlery tray with some fancy cutting and sanding for a perfect fit. The intent is to force more air up into the above mentioned airbox pipe. Cost-$3
The door bin lights were made from motorcycle light pods. They are clusters of coloured LEDs mounted in a chrome housing. Mounted with 3M double sided trim tape and wired in to the footwell lights which also have green LEDs in them. This was pushing the budget at $16 cost.
Andy
Thanks!!
#539
10-06-2011, 07:22 PM

i think im gonna do the garage door front lip. I might try to give it a spray with some leftover krylon textured paint that i touched up my grill with.But not too much that it would give a cracked look when it bends but see if i can get it to blend better with the trim on the mini. it'll be something interesting to try when im bored...
#540
10-06-2011, 07:31 PM

3rd Gear
Join Date: Sep 2011
Location: FL 321
Posts: 205
Likes: 0
Received 0 Likes
on
0 Posts


#543
10-08-2011, 06:25 PM

3rd Gear
D'OMG, I love this thread! 
Being that I just recently purchased my R53, I'm a wee bit light on modification funds. Perfect for this thread right? Anyway, enjoy my cheapskate mods! Here's what I've done so far:
1 ) My door pull handles were a little scratched up (previous owner must have liked wearing rings) and I happened to have a ton of extra tennis racquet wrap laying around, so this happened:

I actually rather like it. I use sponge-like wrap, which makes these handles rather comfortable now. Anyway, it's a good fix until I get some leather door pull covers. I wouldn't recommend the thin tape-like wrap.
2 ) While I was messing around with the door pull handles, I also threw some wrap on my downtubes. It's a very cushy wrap, so resting or bumping your leg against the downtube is now more comfy. This is good for now, but I will be trying the plasti-dip or leather covers later on.

3 ) I was going a little crazy trying to find a small box or two to fill the vacant spaces in my center console area. Come to discover, my iPhone 4 box was a perfect fit! The box is in two parts, a bottom piece and a top piece that fits over the top. I stuck some soft red velvet to the inside of each, double-sided tape to the surfaces meeting the floor, put the top piece in the space ahead of the cup holders, and the bottom piece in the space under the E-Brake handle (note: the box is the perfect height as well! Does not interfere with the E-Brake operation at all):

I also used the little plastic plate that held the iPhone in the box as a divider for my make-shift change holder. I can't get over how well this works! lol
4 ) I saw someone online selling a decal for spicing up the center dash, and decided to try making one myself. Instead of a decal, I printed out my Mini's Electric Blue color onto photo paper. Then I took off the trim pieces on the center dash (hazard lights, center gauge, and brightness trim pulls straight off - the air duct trim pieces need to be turned clockwise about 1/4 of an inch then pulled straight off). I carefully drew the layout freehand, then used a compass to get the curves right. I kept my template a little larger than what I actually needed, so that I could make adjustments with a pair of scissors as I went. It did take awhile, but eventually I got every edge flush. I didn't use any kind of adhesive, since the trim pieces hold the paper firmly in place. Now that it's there, I most likely won't stay with the photo paper blue (it's too shiny), but I'm not sure exactly what I'm going to go with next. I can cut in just about anything now that I have the exact template. My girlfriend suggested picking up an old tweed sport jacket and using that. Guess we'll have to go shopping, heh. oh, I also used double-sided tape and cut in a piece to go in between the tach and the speedometer.


5 ) And for my next trick, I have something very cheap! I want to put in colored LED lights for my overhead and accent lights, buuuut I won't be able to for a little while. In the meantime, I simply pulled out the bulbs, colored them with a blue wedge-tipped Sharpie, and carefully put them back into place. The effect is spot on! Sure they are not as bright as LED lights, but they do the job. I left the reading lights clear, just in case. I don't have pics of this atm, but I love the look.
Being that I just recently purchased my R53, I'm a wee bit light on modification funds. Perfect for this thread right? Anyway, enjoy my cheapskate mods! Here's what I've done so far:
1 ) My door pull handles were a little scratched up (previous owner must have liked wearing rings) and I happened to have a ton of extra tennis racquet wrap laying around, so this happened:
I actually rather like it. I use sponge-like wrap, which makes these handles rather comfortable now. Anyway, it's a good fix until I get some leather door pull covers. I wouldn't recommend the thin tape-like wrap.
2 ) While I was messing around with the door pull handles, I also threw some wrap on my downtubes. It's a very cushy wrap, so resting or bumping your leg against the downtube is now more comfy. This is good for now, but I will be trying the plasti-dip or leather covers later on.
3 ) I was going a little crazy trying to find a small box or two to fill the vacant spaces in my center console area. Come to discover, my iPhone 4 box was a perfect fit! The box is in two parts, a bottom piece and a top piece that fits over the top. I stuck some soft red velvet to the inside of each, double-sided tape to the surfaces meeting the floor, put the top piece in the space ahead of the cup holders, and the bottom piece in the space under the E-Brake handle (note: the box is the perfect height as well! Does not interfere with the E-Brake operation at all):
I also used the little plastic plate that held the iPhone in the box as a divider for my make-shift change holder. I can't get over how well this works! lol
4 ) I saw someone online selling a decal for spicing up the center dash, and decided to try making one myself. Instead of a decal, I printed out my Mini's Electric Blue color onto photo paper. Then I took off the trim pieces on the center dash (hazard lights, center gauge, and brightness trim pulls straight off - the air duct trim pieces need to be turned clockwise about 1/4 of an inch then pulled straight off). I carefully drew the layout freehand, then used a compass to get the curves right. I kept my template a little larger than what I actually needed, so that I could make adjustments with a pair of scissors as I went. It did take awhile, but eventually I got every edge flush. I didn't use any kind of adhesive, since the trim pieces hold the paper firmly in place. Now that it's there, I most likely won't stay with the photo paper blue (it's too shiny), but I'm not sure exactly what I'm going to go with next. I can cut in just about anything now that I have the exact template. My girlfriend suggested picking up an old tweed sport jacket and using that. Guess we'll have to go shopping, heh. oh, I also used double-sided tape and cut in a piece to go in between the tach and the speedometer.
5 ) And for my next trick, I have something very cheap! I want to put in colored LED lights for my overhead and accent lights, buuuut I won't be able to for a little while. In the meantime, I simply pulled out the bulbs, colored them with a blue wedge-tipped Sharpie, and carefully put them back into place. The effect is spot on! Sure they are not as bright as LED lights, but they do the job. I left the reading lights clear, just in case. I don't have pics of this atm, but I love the look.
#545
10-09-2011, 07:24 PM

5th Gear
Join Date: Sep 2011
Location: Southern CA
Posts: 763
Likes: 0
Received 0 Likes
on
0 Posts
This is NOT me and this is NOT my car, but I saw this on YouTube and I couldn't stop laughing. When you look up ghetto on dictionary.com, there is a picture of this armrest. I especially like the hinges. LMAO And, dude, if you're on NAM and you see this post, my apologies in advance, but I couldn't resist. You did save a couple of hundred dollars, though!
http://www.youtube.com/watch?v=fAe4t3ypHI0
http://www.youtube.com/watch?v=fAe4t3ypHI0
#546
10-10-2011, 12:24 PM

This is NOT me and this is NOT my car, but I saw this on YouTube and I couldn't stop laughing. When you look up ghetto on dictionary.com, there is a picture of this armrest. I especially like the hinges. LMAO And, dude, if you're on NAM and you see this post, my apologies in advance, but I couldn't resist. You did save a couple of hundred dollars, though!
http://www.youtube.com/watch?v=fAe4t3ypHI0
http://www.youtube.com/watch?v=fAe4t3ypHI0

"She may not be very pretty now, but she was somebody's baby once..." (Bugs Bunny, circa 1956)
#547
10-10-2011, 05:28 PM
5th Gear
Join Date: Sep 2011
Location: Southern CA
Posts: 763
Likes: 0
Received 0 Likes
on
0 Posts
#548
10-10-2011, 10:03 PM
3rd Gear
Join Date: Sep 2011
Location: FL 321
Posts: 205
Likes: 0
Received 0 Likes
on
0 Posts
#549
10-12-2011, 10:00 AM

2nd Gear
Join Date: May 2006
Location: Port Charlotte, FL.
Posts: 71
Likes: 0
Received 0 Likes
on
0 Posts
D'OMG, I love this thread!
Being that I just recently purchased my R53, I'm a wee bit light on modification funds. Perfect for this thread right? Anyway, enjoy my cheapskate mods! Here's what I've done so far:
1 ) My door pull handles were a little scratched up (previous owner must have liked wearing rings) and I happened to have a ton of extra tennis racquet wrap laying around, so this happened:
I actually rather like it. I use sponge-like wrap, which makes these handles rather comfortable now. Anyway, it's a good fix until I get some leather door pull covers. I wouldn't recommend the thin tape-like wrap.
How about a tennis racket webbing roof graphic?
#550
10-12-2011, 02:24 PM
3rd Gear