

R56 Mud flap installation instructions?
#1
 06-16-2007, 11:56 PM


Join Date: Mar 2007
Posts: 119
Likes: 0
Received 0 Likes
on
0 Posts
Mud flap installation instructions?
I purchased the front and rear mud flaps for my R56 S. On the package that arrived there is a sticker that says:
This retrofit kit does not contain any installation instructions: See Aftersales Assistance Portal. Print out and give to the customer.
Now I know I can call Classic Mini where I purchased the items from and ask for that, but does anyone have these instructions?
The installation looks rather simple, but I am curious about the exact instructions for the clips, drilling holes if necessary, and if there is any prep suggested before applying the adhesive tape.
Greg
#2
06-17-2007, 05:30 AM

4th Gear
Join Date: Jun 2007
Location: Vernon, NJ
Posts: 321
Likes: 0
Received 0 Likes
on
0 Posts
Great, ain't it? I bought and installed the same "paperless" kits. 
They're not too difficult to install. I made it through the whole job in about 1.5 hrs, including pulling & bathing the wheels, anti-seizing the rotor alignment bolt and lugs. If you're handy and equipped, you should have no issues.
There's no way I'd try these without pulling the wheels. It's just too tight to get anything done. I'll try and highlight the process:
Front:
1) Pull the wheel and dry-fit the guard to get an idea of how it should fit. Prep the plastic where it meets the taped part of the guard with some isopropyl alcohol.
2) remove the downward-facing retainer for the body lower skirt below the rear of the wheel arch. This gets replaced by the supplied Christmas Tree retainer.
3) Set the splashguard in place and align the plastic tit on the body edge of the splashguard with the seam in the body side molded sections to give you correct alignment. DO NOT adhere anything yet. Check alignment with the bottom retainer hole that you exposed in step two. When you have a good alignment, mark the felt wheel well housing with a bright magic marker for the two screw penetrations you'll be making.
4) Use an awl or sharp punch to penetrate the felt at the markings.
5) Pull the felt skirt from its recess along the outer edge to allow installation of the two screw/clip retainers provided. It should be obvious which one goes top and which goes bottom, depending on the offset from the edge of the felt liner. I don't recall what the order was. Slip the screw/clip retainer over the felt edge chacking alignment with the holes you made in step 4. NOTE: If yours is anything like mine, the alignments were more than the clip provided for. Just X-Acto some felt liner out of the way. Don't go all crazy on it, just remove what you need to get the right amount of offset releif to the hole. If it's more than a 1/4 inch, you're probably using the wrong screw/clip retainer.
6) Pop the felt back into their original retention slots in the side arches.
7) Check alignment with the splashguard again to insure a good fit. Make any adjustments you need to now.
8) Pull the orange cover from the double-sided tape. Fit carefully in place without exerting too much force on the tape. When you find your alignment with the body seam (remember the plastic tit on the guard?) and a good alignment with the inner fender edge (where the 3 clamping clips will go) and your penetrations from step 4, give the taped area a good firm press to set the tape.
9)Drive the two screws into the clipped penetrations and secure.
10) Hand install the three clamping clips in the provided slots and thumb-press them as much as possible. I secured the top two using a rag against the outer face of the guard and a channel-locks. The lower most clamp was driven home with a gentle hammer tap.
11) Fit the Christmas Tree retainer to the hole exposed in step two and drive it home with a gentle rap from the hammer.
12) Wipe it down and fit the wheel.
Rears:
1) Pull the wheel and dry-fit the guard to get an idea of how it should fit. Prep the plastic where it meets the taped part of the guard with some isopropyl alcohol. Use the side marker lamps as a visual alignment guide.
2) Remove the lowest, rear-facing screw retainer for the body lower skirt. This gets replaced by one of the two provided screw clip/retainers.
3) Set the guard in place for an idea of how everything will align and when you have a good fit, mark the felt liner with a magic marker to provide a second penetration, just outboard of the one using the original retainer location from step 2.
4) Pop the felt skirt from it's location in the wheel arches and penetrate at the mark from step 3 with an awl or sharp punch. Re-seat the skirt back to it's original fender arch location.
5) Refit the guard for another alignment check and make any adjustments now.
6) Strip the orange tape layer from the double-sided tape and carefully fit the guard without exerting much pressure so you can re-align if needed. Give everything a once over and secure the taped surfaces when all your retention locations align and the body fit is tight. Recheck your side marker lamps for fitment (from step 1).
7) Set the clamp retainers (2 p/side) by hand to hold the part in place and get on your back under the rear of the car. Always use jack stands and be safety concious! Push the two provided screws through the skirt penetrations and sneak the two provided retainer clips into the rear well to fit up with the screws. It helps if you have small hands here; there's not much room to work in, but it's completely do-able.
8) Get out from underneath and set the screws tight. Secure the two clamp retainers that were set in the last step; you can tap them home with a small hammer if needed.
9) Wipe the job down and reinstall the wheel.
I didn't stop to shoot images while I was doing this, but it's pretty straight-forward and makes a big difference in the look afterwards. Well worth the time and effort to do it right.
I hope this helps...Good luck!
#3
06-17-2007, 05:56 AM

There's some pictures and additional instructions over in the 2nd Gen. Mods forum. Adam at Alta posted them. Very helpful.
Front: https://www.northamericanmotoring.co...d.php?t=103856
Rear: https://www.northamericanmotoring.co...d.php?t=103860
Front: https://www.northamericanmotoring.co...d.php?t=103856
Rear: https://www.northamericanmotoring.co...d.php?t=103860
#4
06-17-2007, 09:36 AM

Join Date: Jun 2007
Location: Oregon
Posts: 3,155
Likes: 0
Received 0 Likes
on
0 Posts
msh441: You just beat me to that! I was just going to link those.
gregdconsulting: Let me know if you have any questions or concerns. Be preparred to purchase some 3m adhesive for the rears. Everyone that I have talked to has found the OEM tape to be too shallow and thus not properly engage the bumper.
Thanks guys!
gregdconsulting: Let me know if you have any questions or concerns. Be preparred to purchase some 3m adhesive for the rears. Everyone that I have talked to has found the OEM tape to be too shallow and thus not properly engage the bumper.
Thanks guys!
#5
06-17-2007, 01:25 PM

4th Gear
Join Date: Apr 2007
Location: Maryland
Posts: 474
Likes: 0
Received 0 Likes
on
0 Posts
#6
06-17-2007, 03:04 PM


#7
06-17-2007, 03:52 PM
Join Date: Mar 2007
Posts: 119
Likes: 0
Received 0 Likes
on
0 Posts
I thought I might get some help, but this is even better than I hoped. I have printed out both Paul and Adam's instructions and will study both before I begin.
Coffeeman, My rear flaps came with the same pieces you mentioned. I think since this is an international part that you would use those in other countries. I think I remember that the UK wheel arches don't have the reflectors that we do in the US.
Adam, When you suggest the 3M adhesive, do you mean 3M double-stick foam tape or some other product? I do have the 3M stuff, but could probably get the industrial tape that is used in the glass industry from my brother.
I will probably put this off until next weekend since I really need to do other things, like sell my CR-V.
Thanks!
Greg
Trending Topics
#8
06-17-2007, 03:57 PM
4th Gear
Join Date: Apr 2007
Location: Maryland
Posts: 474
Likes: 0
Received 0 Likes
on
0 Posts
I thought I might get some help, but this is even better than I hoped. I have printed out both Paul and Adam's instructions and will study both before I begin.
Coffeeman, My rear flaps came with the same pieces you mentioned. I think since this is an international part that you would use those in other countries. I think I remember that the UK wheel arches don't have the reflectors that we do in the US.
Adam, When you suggest the 3M adhesive, do you mean 3M double-stick foam tape or some other product? I do have the 3M stuff, but could probably get the industrial tape that is used in the glass industry from my brother.
I will probably put this off until next weekend since I really need to do other things, like sell my CR-V.
Thanks!
Greg
Coffeeman, My rear flaps came with the same pieces you mentioned. I think since this is an international part that you would use those in other countries. I think I remember that the UK wheel arches don't have the reflectors that we do in the US.
Adam, When you suggest the 3M adhesive, do you mean 3M double-stick foam tape or some other product? I do have the 3M stuff, but could probably get the industrial tape that is used in the glass industry from my brother.
I will probably put this off until next weekend since I really need to do other things, like sell my CR-V.
Thanks!
Greg
RE the tape: you want 3M automotive double sided tape. Grey tape with red release liner. Pep Boys carry it.

#10
06-17-2007, 09:32 PM
Join Date: Jun 2007
Location: Oregon
Posts: 3,155
Likes: 0
Received 0 Likes
on
0 Posts
#11
07-23-2008, 04:43 PM
Join Date: Jun 2007
Location: Oregon
Posts: 3,155
Likes: 0
Received 0 Likes
on
0 Posts
#12
07-23-2008, 08:18 PM

MiniMania has official-looking installation instructions in a PDF linked to on this page:
http://new.minimania.com/web/item/G2.../InvDetail.cfm
http://new.minimania.com/web/item/G2.../InvDetail.cfm
#14
07-24-2008, 04:09 AM

3rd Gear
Join Date: Jun 2008
Location: Jupiter, Florida
Posts: 189
Likes: 0
Received 0 Likes
on
0 Posts
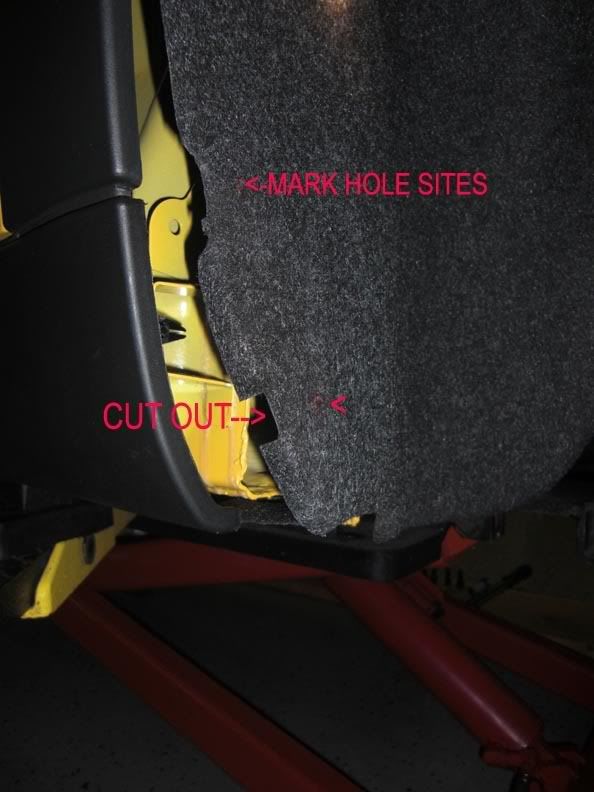
Just installed mud/splash/debris flaps yesterday... instructions fairly decent but found out a few tricks (got flaps from Moss Motors and they have a pdf install file on their web site)>
-Only need to notch wheelwell liner (fronts) on bottom...notched already at top
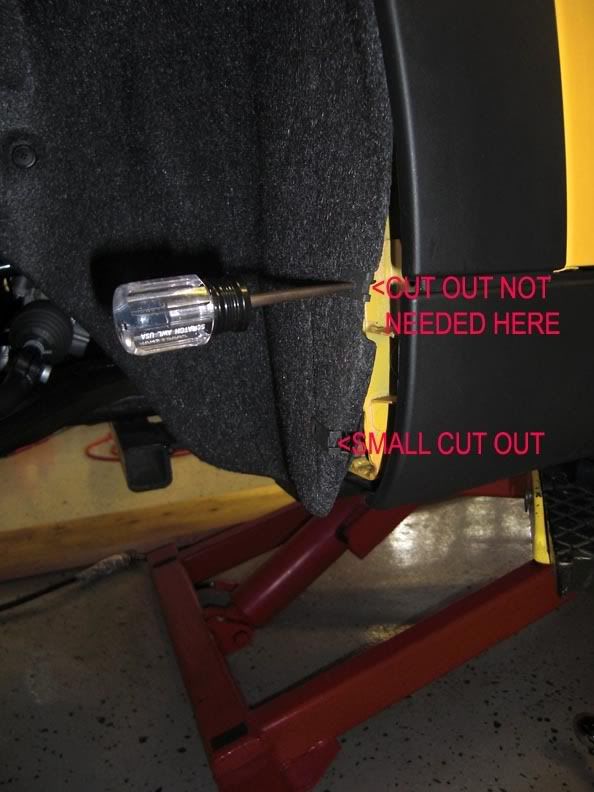
-Flaps come with (3) clips each for front flaps and (2) clips each for rear flaps... once clips are in place by hand you can gently wiggle them a bit tighter by placing a large screw driver in the flap slot behind the clips>>>

-Found it easier to mark the hole site for the screw clips and then drill thru liner... liner is fairly tough>>
Since I have a garage lift I went ahead and removed all four wheels to install and made it easier...but instructions say you only need to remove rear wheels to install rear flaps.
Here are pics of the installed flaps..actually the rear ones give the MINI a 'broader' butt wider stance look>>
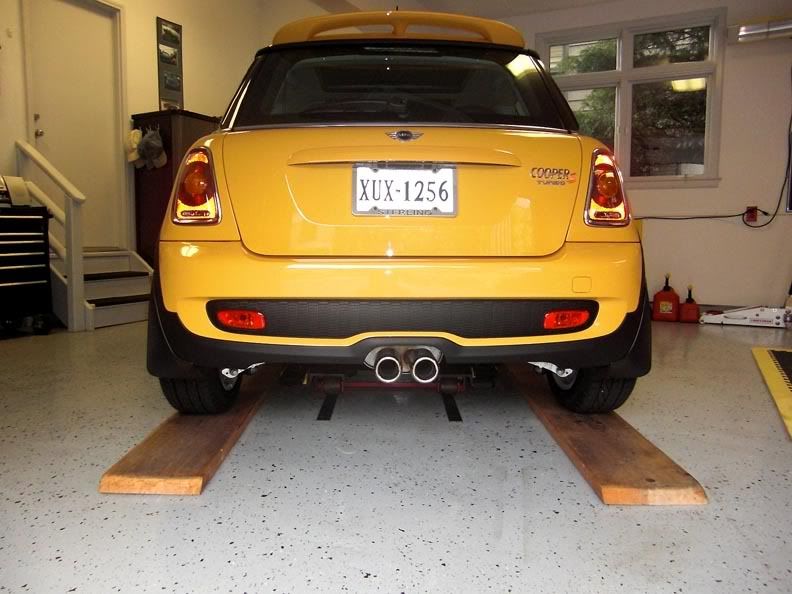
Now to the WOW part... when we ordered our MCS told dealer to go ahead and install flaps not thinking such an item could cost very much... went to pick up Me'lo and no flaps? Fortunately, the flaps were "on national back order" so they deleted the $425 charge for them... $425!!!!! Fortune smiled on us since we had NO idea mud flaps would be so ridiculously priced.
Flaps (all four) from Moss Motors was $78 delivered (interesting thing is the flaps are the OEM ones which dealers apparently can not get right at the moment) and I spent about 1.5 hours installing. Saved myself about $350
Michael
-Only need to notch wheelwell liner (fronts) on bottom...notched already at top
-Flaps come with (3) clips each for front flaps and (2) clips each for rear flaps... once clips are in place by hand you can gently wiggle them a bit tighter by placing a large screw driver in the flap slot behind the clips>>>
-Found it easier to mark the hole site for the screw clips and then drill thru liner... liner is fairly tough>>
Since I have a garage lift I went ahead and removed all four wheels to install and made it easier...but instructions say you only need to remove rear wheels to install rear flaps.
Here are pics of the installed flaps..actually the rear ones give the MINI a 'broader' butt wider stance look>>
Now to the WOW part... when we ordered our MCS told dealer to go ahead and install flaps not thinking such an item could cost very much... went to pick up Me'lo and no flaps? Fortunately, the flaps were "on national back order" so they deleted the $425 charge for them... $425!!!!!
Fortune smiled on us since we had NO idea mud flaps would be so ridiculously priced.Flaps (all four) from Moss Motors was $78 delivered (interesting thing is the flaps are the OEM ones which dealers apparently can not get right at the moment) and I spent about 1.5 hours installing. Saved myself about $350
Michael
Last edited by MeloR56; 07-24-2008 at 04:56 PM. Reason: Update images
#15
07-24-2008, 06:53 AM
Join Date: Jun 2007
Location: Oregon
Posts: 3,155
Likes: 0
Received 0 Likes
on
0 Posts
FRONT CLICK HERE
REAR CLICK HERE
For detailed on NAM instructions with .pdf attached in the first post, photos etc. etc. Makes it a breeze! I wrote them about a year ago when I had "Howard"
REAR CLICK HERE
For detailed on NAM instructions with .pdf attached in the first post, photos etc. etc. Makes it a breeze! I wrote them about a year ago when I had "Howard"

Thread
Thread Starter
Forum
Replies
Last Post
BennyF
F55/F56/F57 Stock Problems/Issues
3
09-04-2015 02:13 PM
ECSTuning
Vendor Classifieds
0
08-07-2015 05:55 AM