

R56 Fun with plasti-dip


#27
 12-26-2008, 07:05 PM

4th Gear
Join Date: Nov 2008
Location: Arlington, VA
Posts: 371
Likes: 0
Received 0 Likes
on
0 Posts
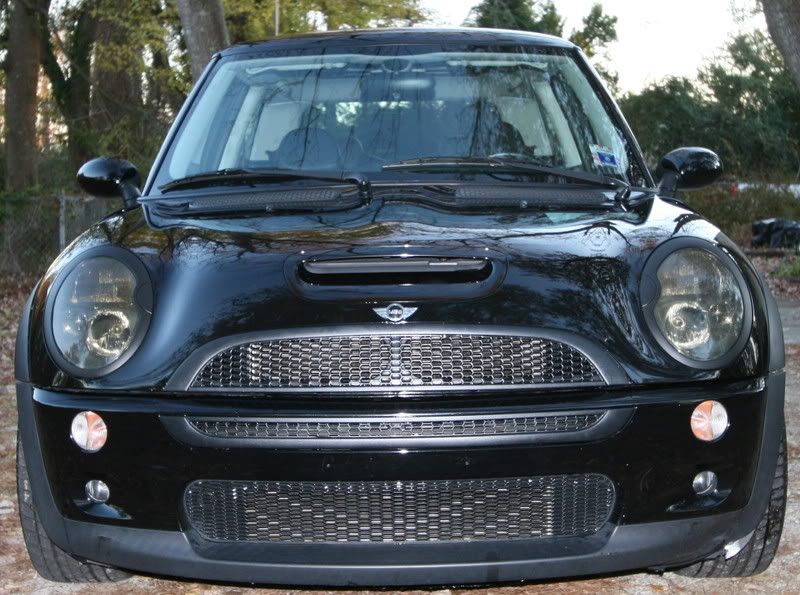
Thanks for the kind words. The stripes are vinyl, forgot to mention that. Also I used VHT nite shades for the front signals and side repeaters with plasti-dip on the other black parts.
The wheels were done about a month ago and they're holding up just fine. I can't post any pics yet because internet is down at home.
The plasti-dip joey mod was done this past monday so no long term conclusions yet. I read some first-gen folks using plasti-dip for their joey so I think it should be ok. Taking the headlights apart were easy since I've done the same to my other cars before. I didn't do the projector shrouds because my wife was coming home and I didn't have enough time to try to figure out how to take it apart. I think it looks fine for now.
I can't help but wonder if it'd look good to do the projector shrouds in yellow, matching the body color. Either it would look bad, or it'd be an awesome highlight.


#29
12-26-2008, 09:31 PM
as for plasti-dip....I love the stuff. I need to remove my door handles and redo them.
P.S. I did get my tail lights open tho and working on them right now
Last edited by 4Boogie; 12-26-2008 at 09:35 PM. Reason: forgot something
#30
12-26-2008, 09:39 PM

#31
12-26-2008, 09:48 PM
3rd Gear
Join Date: May 2003
Location: Albuquerque, New Mexico No I dont need a Green Card
Posts: 256
Likes: 0
Received 0 Likes
on
0 Posts

#33
12-27-2008, 02:18 AM
6th Gear
Very nice car. It's clean !! I really love the debadged look. I see BMW got smart and stopped putting holes in the body work. You second geners are lucky. If I had the chance to take my badges off as simple as you guys, they'd be gone in a second. If that's any motivation for some of you to debadge your car, then I'm glad I could help. It really looks clean. I do agree with others though, ditch that plate and find a better spot for it.
One more thing to the OP, you still haven't answered some questions in here. Did you spray the plasti dip or brush it on? Your results look amazing. Looking at your headlight rings, they are very well done.
One more thing to the OP, you still haven't answered some questions in here. Did you spray the plasti dip or brush it on? Your results look amazing. Looking at your headlight rings, they are very well done.
#34
12-27-2008, 05:49 AM
I did my handles on the car with no problems - easy. Mask around and under the handle with blue tape. Doesn't have to be perfect, because the dry dip will rub right off of where you don't want it. I also used some tape on the inner "button" of the door handle.
The trick is to use an Xactco knife to go around each side of the handle where the chrome meets the rubber gasket after each coat dries for about 10 minutes - while it's still a little soft. This will "score" the cover enough to make it cut cleanly when you remove the masking and peel off the excess dip... plasti-dip is hard to cut cleanly when dry (it stretches and tears) but if you pre-cut it when damp, no worries.
#35
12-27-2008, 05:56 AM
6th Gear
#36
12-27-2008, 06:10 AM
Oh yeah... I also used a sheet of paper to mask (I used big kraft paper from a roll I have, but you could use a full sized sheet of newspaper). Just cut about a 2x9" hole in the middle for the handle, then tape it on the door to cover the area around the handle - like a surgical drape... then use tape to finish masking...
#37
12-27-2008, 06:21 AM
#38
12-27-2008, 08:31 AM
3rd Gear
Join Date: May 2003
Location: Albuquerque, New Mexico No I dont need a Green Card
Posts: 256
Likes: 0
Received 0 Likes
on
0 Posts
#39
12-27-2008, 09:44 AM

Join Date: Jul 2008
Location: Castro Valley, CA
Posts: 232
Likes: 0
Received 0 Likes
on
0 Posts
finally internet is back up. looks like i didn't take much pics of the wheels. i only have one closeup. right now its already covered in brake dust so i'll take some pics after i wash the car. the brake dust is now no longer as ugly as before. actually you can't see it much at all.
doing the wheel was easy. i didn't remove the tires. i washed them, inside and out, and let dry. then painted the inside 2x, light coat then heavy coat. for the outside i stuck a bunch of old business cards along the edge of the rim, where it meets the tire. i pull them out immediately after i paint each tire because if the overspray dries, it'll rip off the paint on the rim itself. it was a little tedious to insert and remove the cards each time but it saves a lot of headache i think. i did 3 coats for the front and that was it. the "MINI" logo pops out from the back.
oh yea. there are holes with the badges. but you can't really tell with the vinyl on top. i was going to stick the badges back on but i'm liking it more without the badges. also bought some tape to do the belt line. i have a lot of excess vinyl to attemp to wrap the door handles but i think it'll be tough to do.
i need to find some plain black license plate frames. the mini branded ones are so expensive.
#40
12-27-2008, 10:04 AM
6th Gear
#41
12-27-2008, 10:29 AM

5th Gear
Join Date: Mar 2008
Location: Phila, PA
Posts: 678
Likes: 0
Received 0 Likes
on
0 Posts
I was in a minor accident which marred my rims. I'll plasti-dim them weather permitting.
#42
12-27-2008, 10:31 AM
Join Date: Jul 2008
Location: Castro Valley, CA
Posts: 232
Likes: 0
Received 0 Likes
on
0 Posts
its easy to use. just spray like any other rattle can paint. i usually do 1 light coat, then heavier on the next two. i stop at 3 coat with the last coat the heaviest. it turns to a flat color after it dries. they have other colors besides black to play with
#43
12-27-2008, 01:04 PM
6th Gear


#44
12-27-2008, 01:56 PM

4th Gear
Join Date: Apr 2008
Location: Catawba, VA
Posts: 499
Likes: 0
Received 0 Likes
on
0 Posts
finally internet is back up. looks like i didn't take much pics of the wheels. i only have one closeup. right now its already covered in brake dust so i'll take some pics after i wash the car. the brake dust is now no longer as ugly as before. actually you can't see it much at all.
doing the wheel was easy. i didn't remove the tires. i washed them, inside and out, and let dry. then painted the inside 2x, light coat then heavy coat. for the outside i stuck a bunch of old business cards along the edge of the rim, where it meets the tire. i pull them out immediately after i paint each tire because if the overspray dries, it'll rip off the paint on the rim itself. it was a little tedious to insert and remove the cards each time but it saves a lot of headache i think. i did 3 coats for the front and that was it. the "MINI" logo pops out from the back.
oh yea. there are holes with the badges. but you can't really tell with the vinyl on top. i was going to stick the badges back on but i'm liking it more without the badges. also bought some tape to do the belt line. i have a lot of excess vinyl to attemp to wrap the door handles but i think it'll be tough to do.
i need to find some plain black license plate frames. the mini branded ones are so expensive.
#45
12-27-2008, 02:48 PM

http://www.motoringunderground.com/f...ead.php?t=8000
#46
12-27-2008, 04:45 PM
Join Date: Jul 2008
Location: Castro Valley, CA
Posts: 232
Likes: 0
Received 0 Likes
on
0 Posts
#47
12-27-2008, 10:06 PM

3rd Gear
Join Date: Jul 2007
Location: Houston, TX
Posts: 190
Likes: 0
Received 0 Likes
on
0 Posts
I don't know HOW different the headlight assembly is, but I completely disassembled my 1st gen light (it took days for me to figure out how to take it apart w/o damaging anything) I can dig up my post w/ pics locating all the screws and what-not if you think it would help

#49
12-28-2008, 05:07 AM
5th Gear
Join Date: Mar 2008
Location: Phila, PA
Posts: 678
Likes: 0
Received 0 Likes
on
0 Posts
. Take care.
#50
12-28-2008, 07:34 AM
3rd Gear
Join Date: May 2003
Location: Albuquerque, New Mexico No I dont need a Green Card
Posts: 256
Likes: 0
Received 0 Likes
on
0 Posts