

R56 Tach disassembly/reassembly (and Craven gauge mount)
#1
 04-01-2013, 03:26 PM


Tach disassembly/reassembly (and Craven gauge mount)
I recently opened up my tach to smooth out some of the damage I had done with overly-long screws earlier. (Oops.) I did this at the same time I installed the CravenSpeed gauge mount, since it was going to be about halfway apart anyway.
So, the first step is to remove the tach from the steering column. Tilt the column all the way down, then remove two Torx bolts on the arm holding the tach to the column. Curse because at least one always falls into the dash, then go under the dash and remove three slightly-smaller Torx bolts to drop the bottom of the lower dash cover down so the bolt falls onto the floor.
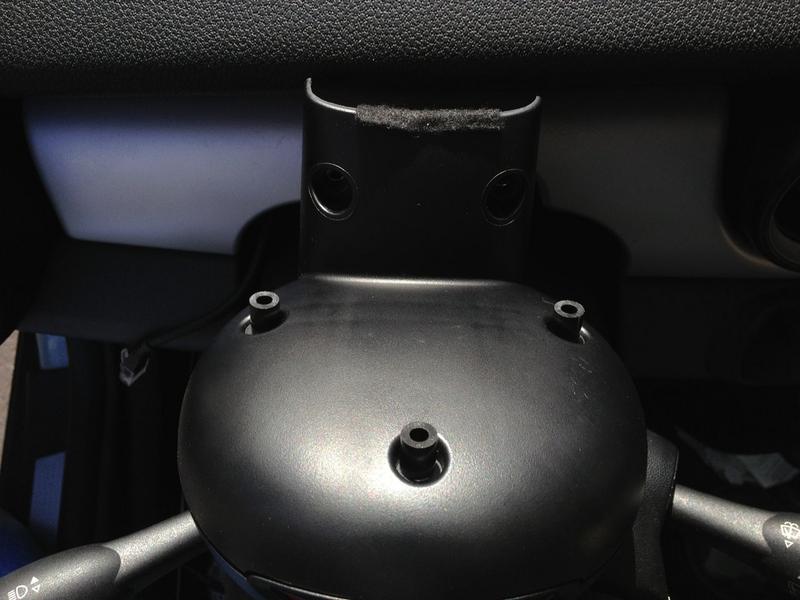
Once the tach is free from the column, flop it on its face so you can remove the three screws that hold the front to the back. In this pic I actually have the spacers from Craven sitting in the screw holes--a stock tach won't have them, but they show where the holes are quite nicely.
Then you pull the back half off of the tach. It just slides off, no fussing required.
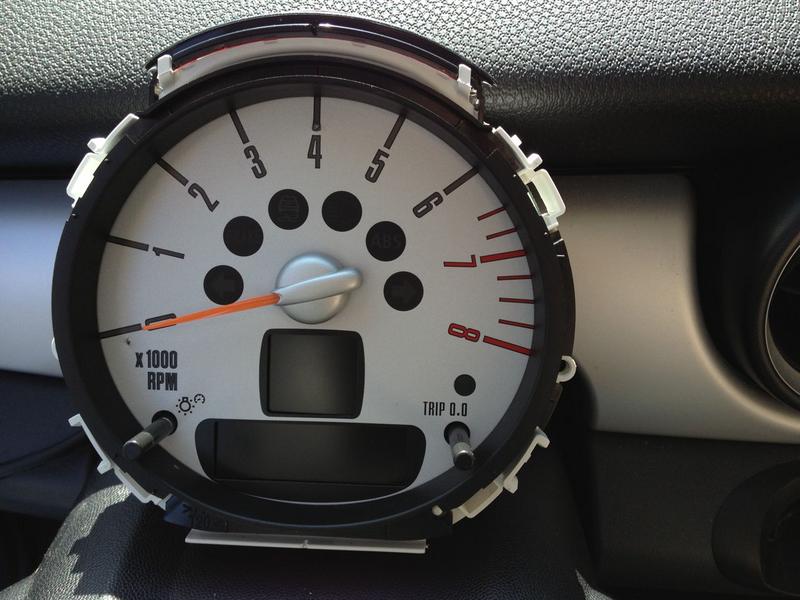
Then you remove the black bezel from around the tach face. This does require some fussing; it has tabs that hook over angled pegs on the body of the tach. Pry those up (carefully!!) and the bezel will slide off. Please forgive the slightly out of focus image.

This leaves the tach with no plastic housing. Here you can see the clear plastic covering for the gauge face.

(Continued in replies so I can keep loading images!)
So, the first step is to remove the tach from the steering column. Tilt the column all the way down, then remove two Torx bolts on the arm holding the tach to the column. Curse because at least one always falls into the dash, then go under the dash and remove three slightly-smaller Torx bolts to drop the bottom of the lower dash cover down so the bolt falls onto the floor.
Once the tach is free from the column, flop it on its face so you can remove the three screws that hold the front to the back. In this pic I actually have the spacers from Craven sitting in the screw holes--a stock tach won't have them, but they show where the holes are quite nicely.
Then you pull the back half off of the tach. It just slides off, no fussing required.
Then you remove the black bezel from around the tach face. This does require some fussing; it has tabs that hook over angled pegs on the body of the tach. Pry those up (carefully!!) and the bezel will slide off. Please forgive the slightly out of focus image.
This leaves the tach with no plastic housing. Here you can see the clear plastic covering for the gauge face.
(Continued in replies so I can keep loading images!)
#2
04-01-2013, 03:32 PM
To get the clear cover off, there are tabs you have to push inward so they come out from under the hooks in the white plastic body of the tach.

Once the cover is off, you can then just slide off the inner black bezel.
That leaves you with just the face, here:
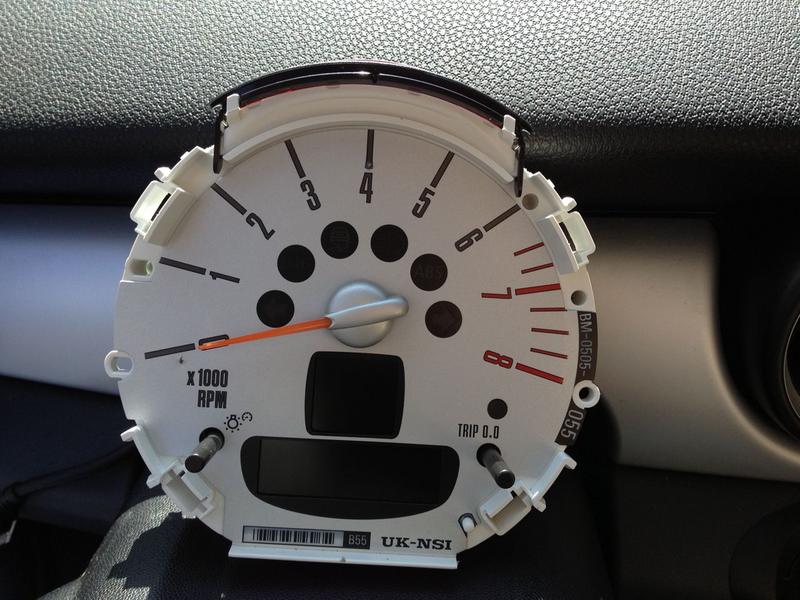
That gives you a decent idea of the damage I did with the tip of the screw. Look over by the 0 on the dial. There's another spot on the inner end of the line of the "4", but that is less obtrusive. I smoothed the damaged plastic down as well as I could, and put a tiny bit of black electrical tape behind the hole on the left. That should keep the back-lighting from coming through at night. I haven't really noticed it since, so it must be working--right?
The face is just glued onto the body of the tach, and the glue is not that strong. It gets sandwiched in between the inner bezel and the body anyway, and it doesn't exactly have to hold up to much force, so a weak glue is fine. It's also easier to peel up a little so you can get a piece of tape behind it. Note that there is no easy way to remove the face from around the needle without removing the needle or cutting the face.
(Continued next post!)
Once the cover is off, you can then just slide off the inner black bezel.
That leaves you with just the face, here:
That gives you a decent idea of the damage I did with the tip of the screw. Look over by the 0 on the dial. There's another spot on the inner end of the line of the "4", but that is less obtrusive. I smoothed the damaged plastic down as well as I could, and put a tiny bit of black electrical tape behind the hole on the left. That should keep the back-lighting from coming through at night. I haven't really noticed it since, so it must be working--right?
The face is just glued onto the body of the tach, and the glue is not that strong. It gets sandwiched in between the inner bezel and the body anyway, and it doesn't exactly have to hold up to much force, so a weak glue is fine. It's also easier to peel up a little so you can get a piece of tape behind it. Note that there is no easy way to remove the face from around the needle without removing the needle or cutting the face.
(Continued next post!)
#3
04-01-2013, 03:39 PM
Putting it back together is, as they say, the reverse of taking it apart. Make sure the tabs slide through the correct slots and onto the correct pegs, and it almost falls together. 
When you put the rear cover on, you can install the CravenSpeed gauge pod mount if you have it. That's where the spacers in my first picture came from, remember?
The mount is held on by three new longer screws that go into those holes, and the spacers keep the mount from needing to bend around the curved back of the gauge. They also keep the screw ends from digging into the tach face....
Then you slide the tach back onto the rail on top of the steering column, drop the two Torx screws several times trying to get them threaded into the holes, and thank the heavens you didn't bother putting the under-dash cover back on again. (Unless you did bother, in which case you curse even more because you have to take it apart again!)
Then you can screw the gauge-holders onto the mount. I got two of the "universal" spring-loaded ones, one for a ScanGauge, and one for my phone.
Here you can see the cord for the ScanGauge. After this pic was taken, I zip-tied the cord to the arm of the mount, and ran it back through the dash to the OBD2 plug.
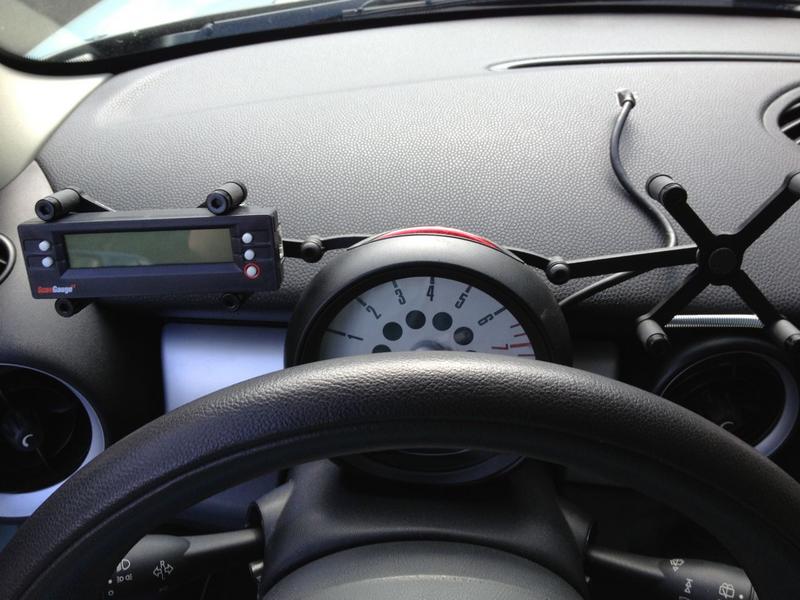
Here is the finished result. I like it!

When you put the rear cover on, you can install the CravenSpeed gauge pod mount if you have it. That's where the spacers in my first picture came from, remember?
The mount is held on by three new longer screws that go into those holes, and the spacers keep the mount from needing to bend around the curved back of the gauge. They also keep the screw ends from digging into the tach face....
Then you slide the tach back onto the rail on top of the steering column, drop the two Torx screws several times trying to get them threaded into the holes, and thank the heavens you didn't bother putting the under-dash cover back on again. (Unless you did bother, in which case you curse even more because you have to take it apart again!)
Then you can screw the gauge-holders onto the mount. I got two of the "universal" spring-loaded ones, one for a ScanGauge, and one for my phone.
Here you can see the cord for the ScanGauge. After this pic was taken, I zip-tied the cord to the arm of the mount, and ran it back through the dash to the OBD2 plug.
Here is the finished result. I like it!


Thread
Thread Starter
Forum
Replies
Last Post
Mini Mania
Interior/Exterior Products
1
09-11-2015 01:15 PM
Mini Mania
Interior/Exterior Products
0
09-04-2015 02:34 PM