
Cabin Filter Replacement
#1
 12-08-2010, 09:31 AM


Join Date: Sep 2007
Location: Sarasota, FL
Posts: 318
Likes: 0
Received 0 Likes
on
0 Posts
#2
12-08-2010, 11:34 AM

Searching the archives turned-up this post:
- Erik
- Erik
Swapping this filter is a 5 minute - no tools required job, {that the dealer will charge something outrageous to do.....}
Look under the glove box and you'll see this box
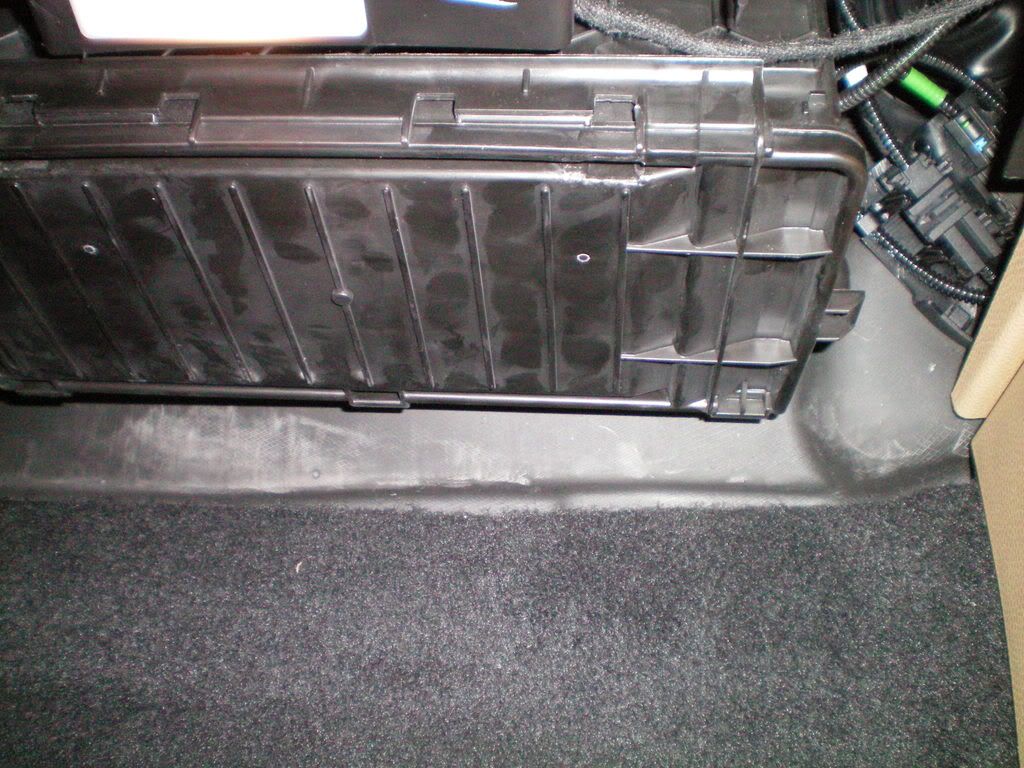
Two plastic clips on the front hold it closed. I used a screw driver to get under them and pull them towards me to release the bottom of the box, but a strong fingernail will work fine. The cover is hinged at the back. Once open the filter can be pulled out
Pull the old, slide in new and shut the box. It will take longer to vacume the fallen crud if you didn't put down newspaper and you had crud in here....
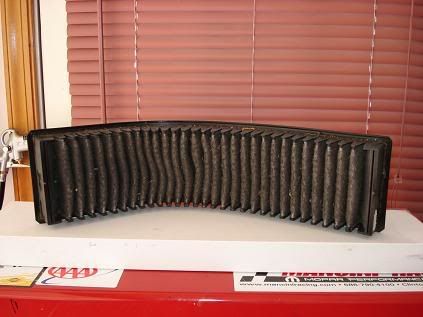
A quick eyeball suggects to me that the filter has changed a bit but MOSS only lists one part number for all years (actually 2, paper or paper with carbon as noted for the auto-a/c...but they are the same size) Here's the original filter from my 02 changed at about the 3~4 year point after the car went out of pre-pay maintenance....
Look under the glove box and you'll see this box
Two plastic clips on the front hold it closed. I used a screw driver to get under them and pull them towards me to release the bottom of the box, but a strong fingernail will work fine. The cover is hinged at the back. Once open the filter can be pulled out
Pull the old, slide in new and shut the box. It will take longer to vacume the fallen crud if you didn't put down newspaper and you had crud in here....
A quick eyeball suggects to me that the filter has changed a bit but MOSS only lists one part number for all years (actually 2, paper or paper with carbon as noted for the auto-a/c...but they are the same size) Here's the original filter from my 02 changed at about the 3~4 year point after the car went out of pre-pay maintenance....

#4
12-08-2010, 01:40 PM

#6
12-08-2010, 04:43 PM
Join Date: Sep 2007
Location: Sarasota, FL
Posts: 318
Likes: 0
Received 0 Likes
on
0 Posts
Cabin filter replacement
Thanks for the response. Is there any way you can indicate where the tabs are located. I was under there for 20 minutes trying to figure out what to pull and where and am still puzzled. I can see from you second picture that there are two slots which obviously are filled when the cover is secured. Once I find out how it works I'll begin to wonder how dumb I was in not seeing it.
Thanks again.
Thanks again.
#7
12-08-2010, 05:46 PM
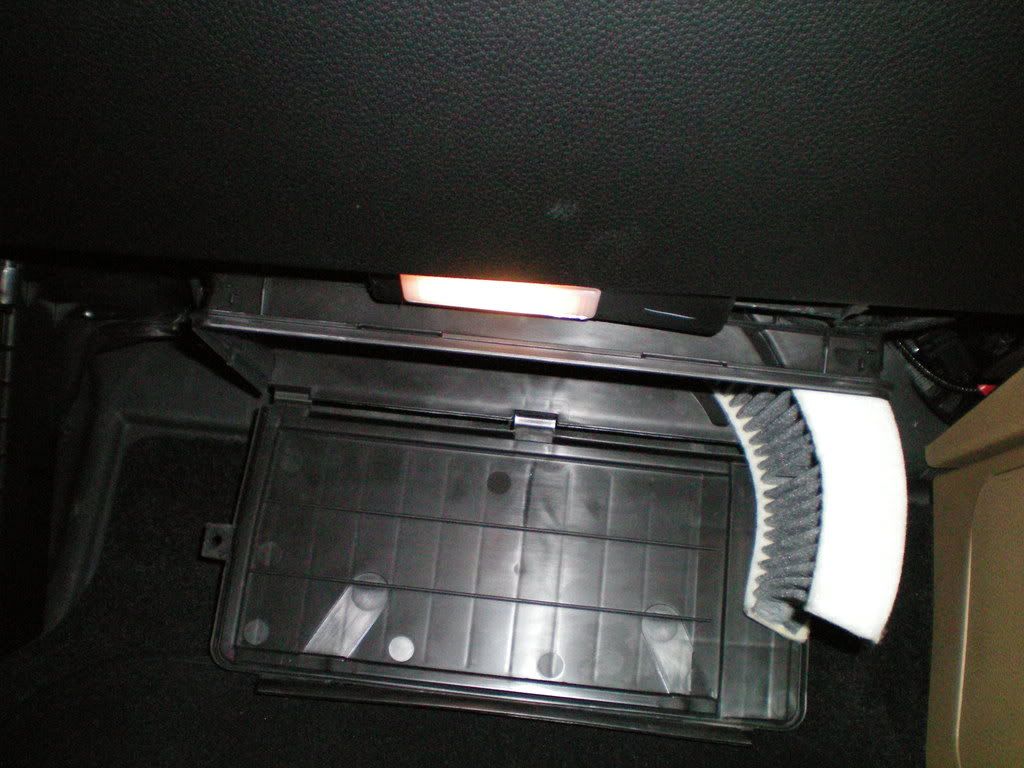
On the R56, the entire front edge needs to be flipped down. Below is a pic I just went out and snapped. Hopefully you can see the flap on the front edge is probably about a half-inch wide or so (and you'll note the slots where tab A goes in). When you find the edge, pull down (toward the bottom of the front seat).
The hinge for the cover is along the back edge (closest to the front of the car). So when you get the front edge popped off, it just flips down but does not come entirely off (at least mine doesn't)..It is not the easiest thing to get it off. I start at one side and get it popped off, then work along to the other side.
Good luck!
Trending Topics
#8
12-09-2010, 06:01 AM
Join Date: Sep 2007
Location: Sarasota, FL
Posts: 318
Likes: 0
Received 0 Likes
on
0 Posts
Cabin filter
From what position did you take the picture. From the other pictures I've seen yours appears to be upside down. Where is the footwell light in reference to your picture and what is the black ribbed piece below your left thumb. Sorry to be picky but I'm having a tough time understanding this. I have yet to see exactly how to pull the tab down. I very much appreciate your effort to help.
**** (that is my name !) B
**** (that is my name !) B
Last edited by investigator; 12-09-2010 at 06:06 AM. Reason: Someone saw fit to disrespect my name.
#9
12-09-2010, 10:15 AM
The picture is taken from the doorway right next to the passenger seat. The footwell light would be just off the screen at the twelve o'clock position. The black ribbed background is my floormat - the slanted part where the passenger would put their feet. So my hand in the pic is over next to the center stack and the right side of the pic would be next to the door opening.
I've tried to draw a pic below looking at the MINI from the side. You'll have to forgive the crudeness of it. HTH.

I've tried to draw a pic below looking at the MINI from the side. You'll have to forgive the crudeness of it. HTH.

#11
12-09-2010, 10:26 AM
Join Date: Sep 2007
Location: Sarasota, FL
Posts: 318
Likes: 0
Received 0 Likes
on
0 Posts
 I will get to it as soon as I finish work for the day. Thanks also for taking the time to draw the diagram.
 3:45PM So I got to it. I tried and tried to pull that flap down but I couldn't get my fingers in there. But here's what I found..... you see the four square holes in the front? If you stick a stubby screwdriver in one and press down toward the floor you'll hear a click and that apparently releases something. Doing each in succession and the whole cover drops down. I knew it would be simple once I figured it out. So you don't need to pull that long flap down, just insert a screwdriver sequentially in each of the four holes using the screwdriver as a lever and push toward the floor and voila ! Thanks everyone for the help and most of all the pictures.
Last edited by investigator; 12-09-2010 at 12:48 PM. Reason: Update on my efforts

#13
12-10-2010, 04:05 PM
Join Date: Sep 2007
Location: Sarasota, FL
Posts: 318
Likes: 0
Received 0 Likes
on
0 Posts
In my earlier life I did a lot of mechanic work on such cars as Austin Healey Sprite, Volvo PV544, BMW 2002, VW GTI, and others. I've changed oil/filter, plugs, points, alternators etc etc etc so I'm no dummy when it comes to cars. However at 70 years of age I am not nearly as able to figure out some of the modern cars' installations. The plastic drives me nuts. So I would respectfully request that you not criticize until you've learned what the person has done in the past.
#15
12-11-2010, 04:56 AM
you haven't tried to change the oil yet I'm guessing
if you thought the cabin air filter was 'unique' you ain't seen nothin' yet
it was a warning about another very unique feature you might want to research, not a comment on your skills or lack there of
p.s. using a screw driver is what I said I did in the first picture caption . . .
if you thought the cabin air filter was 'unique' you ain't seen nothin' yet
it was a warning about another very unique feature you might want to research, not a comment on your skills or lack there of
p.s. using a screw driver is what I said I did in the first picture caption . . .
#16
12-11-2010, 05:08 AM
I had posted this for GEN1 and re-did for GEN2; reused the picture of the GEN1 old filter however since it was the one that prompted me to not trust the dealer to change it even tho it is covered under pre-pay mintenance. As I recall the GEN1 box is not hinged, but has clips front and back - an even harder finger bender.
#17
12-11-2010, 05:18 AM
Join Date: Sep 2007
Location: Sarasota, FL
Posts: 318
Likes: 0
Received 0 Likes
on
0 Posts
you haven't tried to change the oil yet I'm guessing
if you thought the cabin air filter was 'unique' you ain't seen nothin' yet
it was a warning about another very unique feature you might want to research, not a comment on your skills or lack there of
p.s. using a screw driver is what I said I did in the first picture caption . . .
if you thought the cabin air filter was 'unique' you ain't seen nothin' yet
it was a warning about another very unique feature you might want to research, not a comment on your skills or lack there of
p.s. using a screw driver is what I said I did in the first picture caption . . .
#18
12-11-2010, 06:13 AM
Join Date: Sep 2007
Location: Sarasota, FL
Posts: 318
Likes: 0
Received 0 Likes
on
0 Posts
Just wanted to mention a couple of other experiences I've had regarding cars. I lived in Europe for 10 years and five of those years I worked on a number of racing circuits in England, I wrenched on a Formula Ford team with a British friend for three years. I've also swapped out cylinder heads on a DOHC Lotus Cortina which I owned for a number of years. I've tuned up cars with points, condenser and plugs and balanced twin carburetors, both SUs and Weber 45DCOEs. The Webers were on the Lotus Cortina and the SUs were on my 1964 Austin Healey Sprite which I bought new in '64. I also ported and polished the heads on the Sprite and shaved .100" off. Modified the exhaust system too for better scavenging. 'Nuf said.
#19
12-11-2010, 02:39 PM
changed an oil filter on a GEN2 MINI?
I'm not trying to slam you
I'm trying to warn you
sorry I missed
I invite new owners to my house where I show them how to change the oil and cabin filter and engine air filter ..... cuz on the MINI these are almost ALWAYS different than they've seen on any car in ther garage.
I'm an old fart too
I'm not trying to slam you
I'm trying to warn you
sorry I missed
I invite new owners to my house where I show them how to change the oil and cabin filter and engine air filter ..... cuz on the MINI these are almost ALWAYS different than they've seen on any car in ther garage.
I'm an old fart too
Last edited by Capt_bj; 12-11-2010 at 03:28 PM.

#21
12-18-2010, 06:22 PM
Join Date: Sep 2007
Location: Sarasota, FL
Posts: 318
Likes: 0
Received 0 Likes
on
0 Posts
#22
12-21-2010, 12:03 PM

6th Gear
Join Date: Sep 2007
Location: Youngsville, NC, USA
Posts: 1,342
Likes: 0
Received 3 Likes
on
3 Posts
Thanks. That was a big help.
I'm figuring it is fine to get the carbon even if I started
out with the non carbon?
I only ask this thing seems to have so many sensors and particulars
in a freaky way it could know the difference somhow.
I have to wonder how long the carbon lasts when exposed to the air?
Because it would be absorbing stuff all the time.
#23
04-13-2011, 09:22 AM

Just wanted to mention a couple of other experiences I've had regarding cars. I lived in Europe for 10 years and five of those years I worked on a number of racing circuits in England, I wrenched on a Formula Ford team with a British friend for three years. I've also swapped out cylinder heads on a DOHC Lotus Cortina which I owned for a number of years. I've tuned up cars with points, condenser and plugs and balanced twin carburetors, both SUs and Weber 45DCOEs. The Webers were on the Lotus Cortina and the SUs were on my 1964 Austin Healey Sprite which I bought new in '64. I also ported and polished the heads on the Sprite and shaved .100" off. Modified the exhaust system too for better scavenging. 'Nuf said.
#24
09-10-2011, 10:11 AM

I just finished changing the cabin filter on a 07 "Justa". The screwdriver suggestion in the slots is genius -- much better than pulling down on the tabs, IMO.
I'm sure if you've done this a few times, it's easy, but if not it takes a few minutes to figure out that the new filter "snakes" into the housing starting on the passenger side kick panel area meandering left toward the driver's side and up into the upper part of the housing (i.e. start lower right and snake to upper left). You can feel the guide ridges on the side of the housing after you remove the old filter.
Also, you can fit your hand into the upper left after starting the filter to make sure it is tight against the top. I got it wrong a few times and noticed that the extra filter sticking out wouldn't allow the hatch to close properly. If the filter isn't seated at the top, unfiltered air will likely get into the cabin.
Sometimes I marvel at Mini ingenuity, othertimes I wonder why they didn't just make it simple like so many other cars.
Dave
