Control Arm Bushing/ Ball Joints Easier How-To
#1
 02-21-2016, 10:21 AM


Control Arm Bushing/ Ball Joints Easier How-To
First off, I'd like to say that I DO NOT have pics "guiding" this how-to nor will I go into extreme detail. There are many places to go for this. I'll just note what we did/what to do for things we change and found easier to do. It is pretty straightforward, yet difficult to do. It's best to get under your MINI and do it.
Secondly, the methods my friend and I used to accomplish this are what we thought were the easiest to do WITHOUT dropping the subframe.
Lastly, this project took my friend and I nine hours due to setbacks and getting different parts/tools as well as food breaks (I had all ball joints/ bushings and ball joint separator bought prior, but I forgot to bring the bushings ).
).
NOW LET'S BEGIN
Parts and Part Numbers:
Left-Inner Ball Joint: 31106779437
Right-Inner Ball Joint: 31106779438
Left/Right Outer Ball Joint: 31122167245
Powerflex Control Arm Bushings: PFF5-101x2

Specialty Tools:
Ball Joint Separator (For Outer Ball Joint)
Sliding Hammer and fork piece (For Axles)
I originally was just going to do the bushings, but decided to do the ball joints since I was in the area. SO GLAD I DID IT!
DO THE BUSHINGS FIRST
Here's one of the bushings. The other looked similar..
To make things quick about the bushings, I used MODMINI's method here:
-The only thing we modified here was the tool (shown in video). We used two 75mm oil filter wrenches, that you can get for $5 at O'reily's), to use as the press. Why did we do this? Because the one of the Flat pieces he used in the video (I got everything for the tool at Ace Hardware), were too small for the rear of the bushing area.
-In order to fit the piece, we cut one of the oil filter wrenches in 6 areas and folded them inward (this will face the rear end of the bushing).
-For the other piece we had the non-concave area of the oil filter wrench facing the front of the bushing and had a socket in the concave area of the filter in front of the nut.
This is what it looks like in words:
Nut-Cut filter--Bushing Housing--Bushing--Filter--Socket--Nut
-We had trouble Keeping the threaded rod straight and had to force it in the right orientation multiple times using MODMINI's tool, resulting in a severely bent rod! Luckily we had a vice to straighten it out.
-Using the oil filter wrenches resulted in no bends in the rod, though it was still difficult to press the bushing in.
DO THE OUTER BALL JOINTS SECOND
This part is pretty straight forward... here's a vid by MODMINI:
DO THE INNER BALL JOINTS LAST!
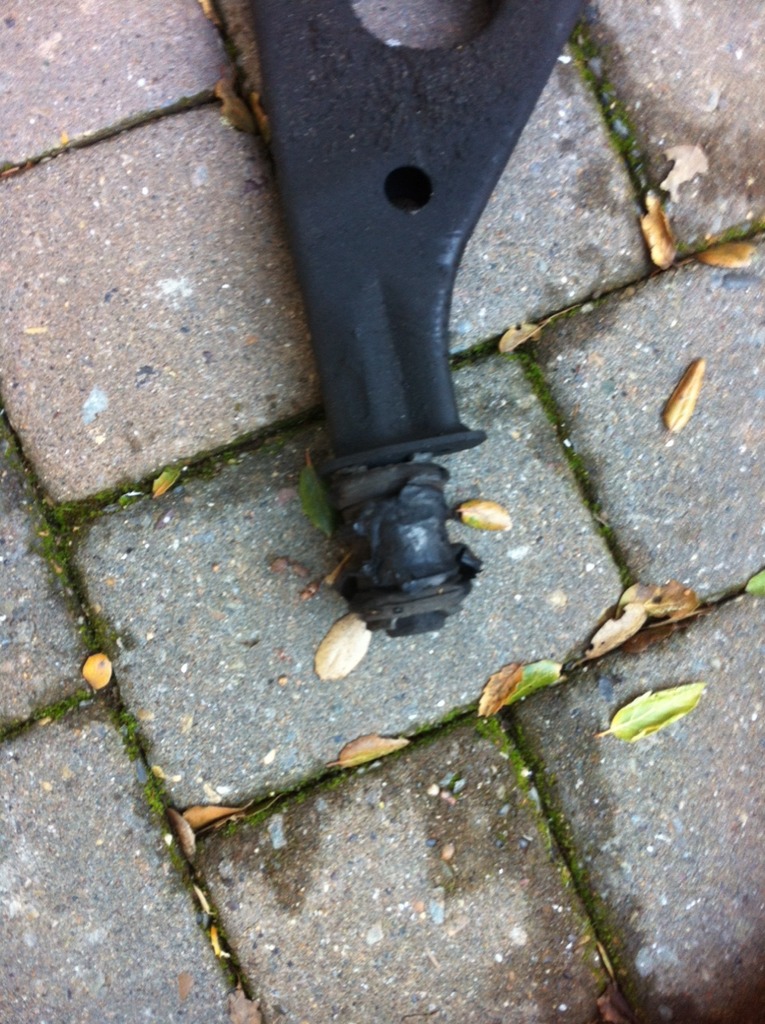
If you see black crap all over your control arms, your inner ball joint exploded!
Here's what a messed up ball joint looks like...

-In order to NOT DROP THE SUBFRAME, you need to remove the axles, hence the sliding hammer. This isn't as scary as it sounds! The reasoning is one of the bolts for each inner ball joint is DIRECTLY UNDERNEATH the axle! GENIUS!
-For the passenger side, we lifted the engine slightly using a floor jack, but the bolt was pressing against the axle boot... if I could to it again, I'd just take the axle out.
-The problem came when we did the driver side inn ball joint and couldn't get the engine high enough (the mini started to lift! ).
).
-It should also be noted that we did the inner ball joints first. Imagine shoving in the control arm in, bolting in the outer control arm, and having to awkwardly shove the bolt sticking down from the inner ball joint into the hole at a weird angle.
-If the inner control arm is put in last, you avoid difficult times and gain happy ones
That pretty much sums it up! If you experience any kind of sway while driving (as if it's windy and you're fighting to stay straight), I highly recommend doing this! My car feels EXTREMELY solid now!
Secondly, the methods my friend and I used to accomplish this are what we thought were the easiest to do WITHOUT dropping the subframe.
Lastly, this project took my friend and I nine hours due to setbacks and getting different parts/tools as well as food breaks (I had all ball joints/ bushings and ball joint separator bought prior, but I forgot to bring the bushings
).NOW LET'S BEGIN
Parts and Part Numbers:
Left-Inner Ball Joint: 31106779437
Right-Inner Ball Joint: 31106779438
Left/Right Outer Ball Joint: 31122167245
Powerflex Control Arm Bushings: PFF5-101x2

Specialty Tools:
Ball Joint Separator (For Outer Ball Joint)
Sliding Hammer and fork piece (For Axles)
I originally was just going to do the bushings, but decided to do the ball joints since I was in the area. SO GLAD I DID IT!
DO THE BUSHINGS FIRST
Here's one of the bushings. The other looked similar..

To make things quick about the bushings, I used MODMINI's method here:
-The only thing we modified here was the tool (shown in video). We used two 75mm oil filter wrenches, that you can get for $5 at O'reily's), to use as the press. Why did we do this? Because the one of the Flat pieces he used in the video (I got everything for the tool at Ace Hardware), were too small for the rear of the bushing area.
-In order to fit the piece, we cut one of the oil filter wrenches in 6 areas and folded them inward (this will face the rear end of the bushing).
-For the other piece we had the non-concave area of the oil filter wrench facing the front of the bushing and had a socket in the concave area of the filter in front of the nut.
This is what it looks like in words:
Nut-Cut filter--Bushing Housing--Bushing--Filter--Socket--Nut
-We had trouble Keeping the threaded rod straight and had to force it in the right orientation multiple times using MODMINI's tool, resulting in a severely bent rod! Luckily we had a vice to straighten it out.
-Using the oil filter wrenches resulted in no bends in the rod, though it was still difficult to press the bushing in.
DO THE OUTER BALL JOINTS SECOND
This part is pretty straight forward... here's a vid by MODMINI:
DO THE INNER BALL JOINTS LAST!
If you see black crap all over your control arms, your inner ball joint exploded!
Here's what a messed up ball joint looks like...

-In order to NOT DROP THE SUBFRAME, you need to remove the axles, hence the sliding hammer. This isn't as scary as it sounds! The reasoning is one of the bolts for each inner ball joint is DIRECTLY UNDERNEATH the axle! GENIUS!
-For the passenger side, we lifted the engine slightly using a floor jack, but the bolt was pressing against the axle boot... if I could to it again, I'd just take the axle out.
-The problem came when we did the driver side inn ball joint and couldn't get the engine high enough (the mini started to lift!
). -It should also be noted that we did the inner ball joints first. Imagine shoving in the control arm in, bolting in the outer control arm, and having to awkwardly shove the bolt sticking down from the inner ball joint into the hole at a weird angle.
-If the inner control arm is put in last, you avoid difficult times and gain happy ones
That pretty much sums it up! If you experience any kind of sway while driving (as if it's windy and you're fighting to stay straight), I highly recommend doing this! My car feels EXTREMELY solid now!

Thread
Thread Starter
Forum
Replies
Last Post
Mini Mania
Drivetrain Products
2
05-09-2017 12:35 PM
Mini Mania
Interior/Exterior Products
0
01-19-2016 11:38 AM
Mini Mania
Drivetrain Products
0
01-18-2016 10:38 AM
Mini Mania
Interior/Exterior Products
0
01-15-2016 03:56 PM
Mini Mania
Drivetrain Products
0
01-15-2016 03:30 PM