When you click on links to various merchants on this site and make a purchase, this can result in this site earning a commission. Affiliate programs and affiliations include, but are not limited to, the eBay Partner Network.
1st Gen Mini heater blower fan diagnostics (2005+ with auto AC)
Stock Problems/IssuesDiscussions related to warranty related issues and repairs, or other problems with the OEM parts and software for MINI Cooper (R50), Cabrio (R52), and Cooper S (R53) MINIs.
1st Gen Mini heater blower fan diagnostics (2005+ with auto AC)
1st Gen Mini heater blower fan diagnostics (2005+ with auto AC)
AC Blower on my '06 MCS went out a few weeks ago and I found there's a severe lack of information out there on this. I hope this helps others.
This will be focused on LCI cars (the 2005 refresh for R50, R53, R52, R52S) primarily, but I'll include what I know about earlier models where I can - there are some important variations. Nothing in this discussion covers anything for R56 or later Minis!
My car is left hand drive IHKA (auto AC) - manual versions (IHKS) behave similarly I believe, though some parts may be different. I think you can apply the same techniques.
These test sets should allow you to rule in/out some of the common failure points in the heater/ac/hvac blower fan circuit.
The resistor plug is the easiest to access and can be done without removing parts of the car and without blinding swapping parts out and makes a good starting point.
Tools needed:
Jumper wire (4-6 inches but you can get away with about 3)
12v test probe (test light or voltmeter)
All of these tests require the key turned on (not running) and the fan control set to a speed that should have the fan running.
You might want to go ahead and hook up a battery charger or 12v power supply.
Wiring diagram:
Parts involved:
Blower fan - the hardest part to change, since you have to remove significant amounts of the dash (it's in the front - front is front. behind the firewall, in front of the center console)
Blower fan resistor (aka "the hedgehog resistor") in the passenger footwell and almost as hard to remove as the fan itself - note that this is MISSING on early 2002 cars, and the control is on the fan itself.
IHKA/IHKS controller (your friendly interface on the center console)
BC1 computer module (right side footwell)
Blower fan relay in the cabin fuse panel (2003 update cars have this as a removable relay, earlier cars have this in the engine compartment fuse block, 2005+ have this embedded inside the fuse block assembly)
Verify blower output stage aka hedgehog resistor
NOTE for 2002 cars! There is no hedgehog resistor in your car! In it's place is a simple blockoff panel. This is normal! Your resistor is part of the blower fan motor, and you cannot test this portion.
In the passenger side floorboard, on the side of the center stack, as far forward and as high as it can be.
The screw is virtually inaccessible, but it's a Torx T15. Good luck removing it! Thankfully there is a way to test it without removing it.
For IHKS this module is different - but I believe it performs a similar function. It is in the same place. Remember that some 2002 cars dont have this.
Bypass resistor to engage fan
Disconnect the plug from the resistor pack and jump across the Brown and Black/Yellow wire (in effect grounding the black/yellow wire and the fan motor ground)
If the fan turns on at high speed, your problem is in the resistor. Replace it.
This module is in the ground path from the blower motor.
The Brown wire goes to ground, and the black/yellow goes to the ground-side of the blower fan motor. The white/red (thin) wire is where the computer tells the resistor pack how to regulate the voltage.
Other diagnostics at the resistor plug
Other diagnostics could be available here - you should be able to measure current draw of the fan on high with an amp meter across the brown and black/yellow terminals. This should give an indication of a bad fan. Since this has a 30amp fuse, I'd suggest at least 30amps of amp meter or a clamp meter.
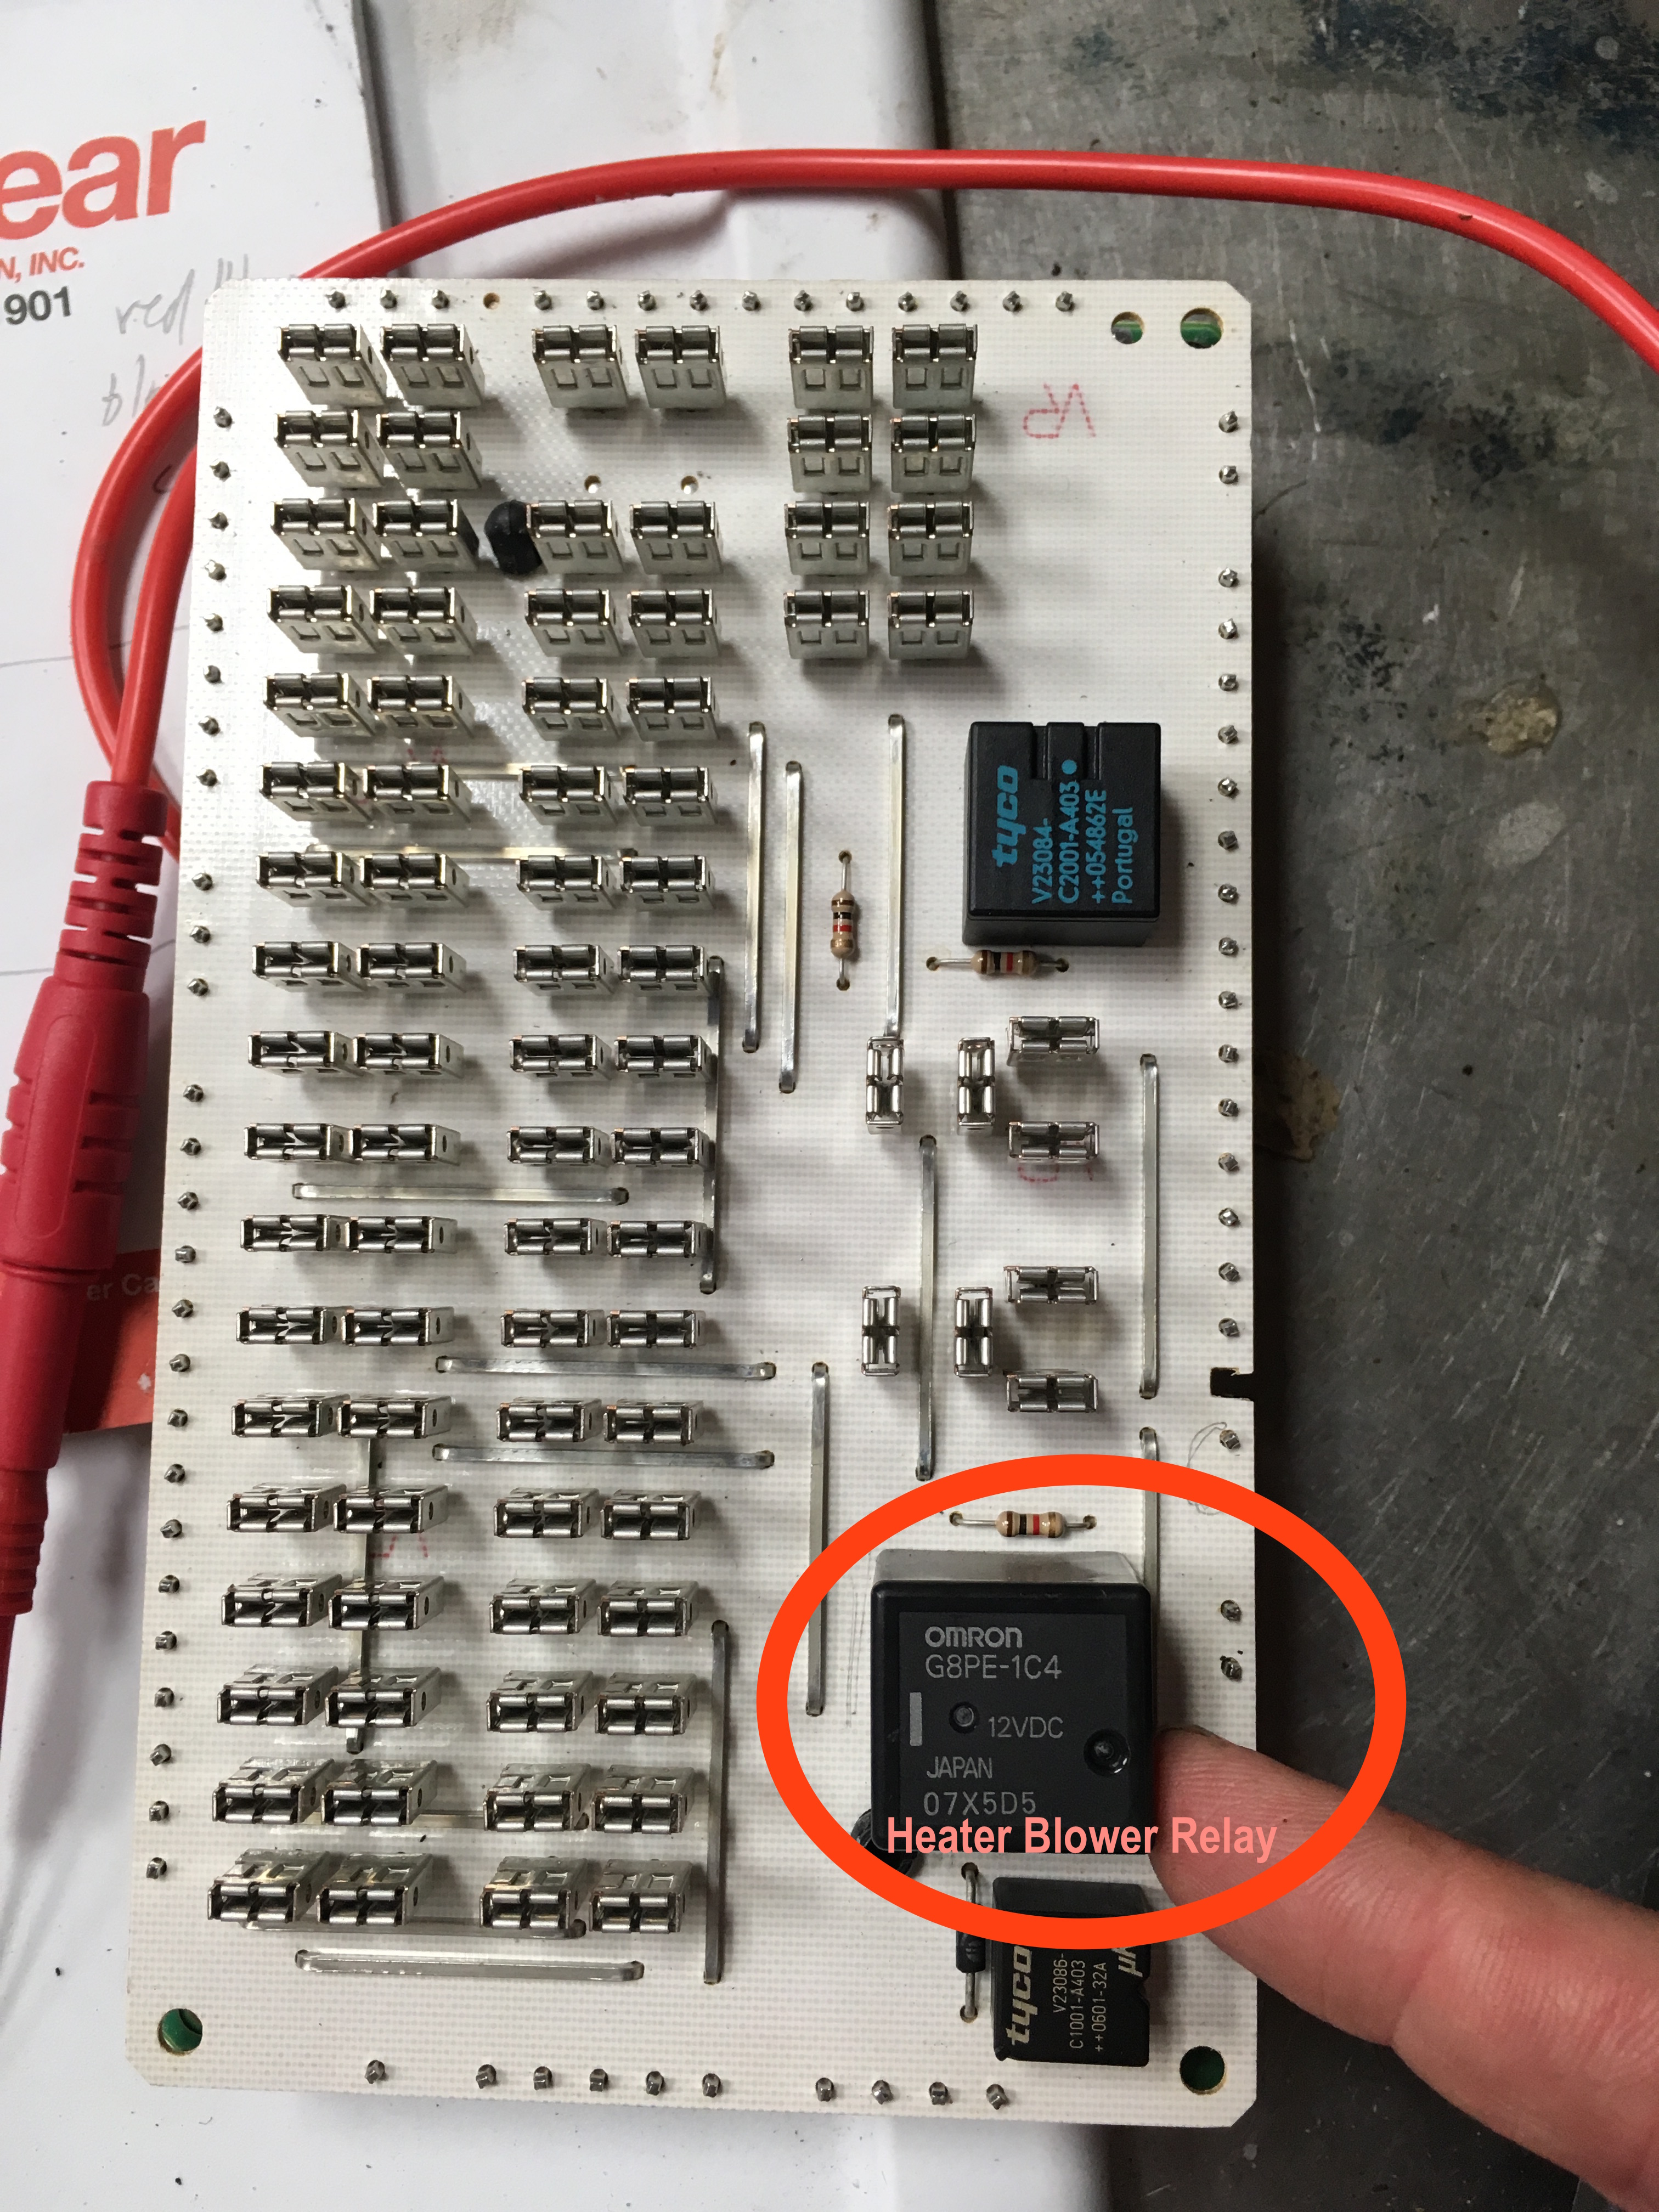
Testing the integrated blower fan relay (1/2005 and up)
For ~2005+ cars (probably 1/1/2005 production) the blower fan relay is soldered to the passenger compartment fuse panel and is not serviceable or replaceable. It's also not accessible to directly test, even if you disassemble the fuse block.
Earlier cars have two variations - ~2003 to early 2005 have a removable relay on the fuse block. Even earlier cars have a removable relay in the engine compartment. (I believe)
With the integrated (not removable) blower fan relay, you'll need to remove the seat belt bottom mount and the interior rocker trim panel. Then you can unbolt the fuse block from the side of the car and pull it away to access the wiring and plugs on the back of the fuse block.
The blower fan relay gets +12v from fuse F31. The relay is triggered by the BC1 when all conditions are met to allow the fan to run. This is done by grounding the brown wire on the blue plug (pin 4 on connector C587 on the back of the fuse block). This then supplies +12v to the red/green wire on pin 4 of the black 6 wire connector C583.
Test for proper computer control signal for blower fan relay
Supply your test light or voltmeter with +12v (you can use the thick black/blue wire on the black C580 plug with 3 pinds - middle wire is a source of +12v).
Probe the brown wire on the blue plug (C587) for ground - turn the fan on/off and this should be grounded with the fan on, lifted with the fan off. This is the "signal" from BC1.
If this grounds on demand, the entire control chain is operational - your problem is on the fan side, not the computer/control side.
Test the blower fan relay itself
If you're getting signal from BC1, next step is to test for output voltage.
Verify that fuse F31 has +12v on both sides (test on the top of the fuse with your probe).
On the 6 pin black connector C583 (mine has 3 wires), there's a red/green wire. These are thicker wires. The red/green wire should get +12v from the relay when it triggers.
If you don't have +12v here, and you do have a ground signal from BC1, and +12v on the F31 fuse, your relay is bad.
You can temporarily bypass the relay by jumping from the red/blue wire on black 3 pin C580 to the red/green wire on the black 6 pin C583. This will supply +12v to the fan motor, and if the rest of the system is operational the fan will run. You can cycle fan speeds and on/off to confirm the system is working.
If your non-removable relay is bad, you need a new fuse block
On mine, it has a bad solder joint - but it's not accessible for repair. Part 61132159689 (01/01/2005 — 08/18/2011) is the direct replacement. You won't need any other parts.
EDIT: It's is not possible to use the early fuse block in the later car (see post below)
pre 1/2005 blower fan relay tests
You can do these same diagnostics with the earlier removable relay version, but it's probably easier to either swap the relay or remove the relay and test for +12v (on two pins) and ground (with computer demanding fan). the extra pin should feed +12v to the fan - you can jump the +12v to this and effectively bypass the relay. Similarly for the engine compartment mounted relay of the 2003-back cars.
I'll try to develop a test for this when I have one in my hand.
Other Notes
The wiring diagram
Finding this was a godsend - because the "diagrams" in the Bentley are less than useless, and the WDS system doesnt work on a Mac (nor on my windows netbook I use to run AutoEnginity)
Someone has shared Mitchell1's wiring diagrams here, in color. The first 2 are what we need (because we have dual speed cooling fans)
Where the Mitchell1 diagram falls down is in telling me what plug and what wire at the fuse box I needed to check - it has the wrong color for the BC1 signal wire, and doesnt tell me which plug (Cxxx).
Diagnostics Information
Another gem from Mitchell1 and shared by the folks at wtxms, a full walkthrough of how the system works.
This includes how to put the IKHA into debug mode and check for codes (IKHA isn't accessible with AE via the OBDII plug on these cars, but it has it's own code system.)
Turns out I also have a problem with the air distribution servo motor (code 09)!
If you have the control module removed from the dash, and need to do additional checks - the red wire is connected to the +12v output from the relay (so should have +12v when the fan is engaged), and the black/yellow wire is the same black/yellow wire at the hedgehog resistor - the ground path from the blower motor.
This is NOT the case. pictures below show a 10/jan/06 61146906626 block on the left and a 3/march/05 61136906600 on the right. Yes, the 05 block has the RL4 relay, and my 06 block doesnt. That shouldn't matter for this purpose (I'd just leave the relay out).
I think realoem is failing on this. Seattle MINI's parts shop says differently:
Part Number: 61136906600 Supersession(s): 61-13-6-906-600; 61131509011; 61132159689; 61136906598
Part Number: 61146906626 Supersession(s): 61-14-6-906-626
If you're searching for used parts - it's worth noting that they are only labeled with PART of the part number. So searching for 6906626 and 6906600 or whatever is listed on the side of yours might net additional results.
Of note, the empty fuse sockets that don't match up one each block - there are no pins inside them in either case, so you can't use them.
Of even more important note - the wiring socket pins in the back don't match. The sockets match, but not the pins.
This means we can't use the removable relay version on the later car, which leaves us only with the unrepairable version when the blower relay (or another relay) goes out. And since we can't service it, it's probably not worth the risk of buying a used part. I sure with the realoem listed price was accurate.... :-D
Since mine is just a bad joint, I think I'm going to give a shot and trying to get a iron down into the nearly blind hole and try flowing some new solder into it..... if that doesnt work, I guess I'll be shelling out the $350 or so for a new one.
Wow thanks! Just had the blower go out on my daughters R50 with manual controls and been looking for that relay for a while. Any chance you have the prints for the manual? The ones I find on line the wire colors don't match her car.
If you take the blower fan motor apart from its housing it's quite easy to finesse it in without taking apart the dash you just need a buddy to help you align it from the other side. On another note is it possible to desolder the old blower heater relay in the box and put another one on... I plan on trying and it's the difference between an 8$ fix or a 120$. Thanks for the information it's quite useful.
cheers River
Last edited by RippyMcDippy; 06-08-2021 at 05:12 AM.
Out standing info thank you i am currently experiencing a non work blower per the computer (fan control voltage short circuit to ground fault currently present) but it sound similar, the motor is good new resistor the auto controller appears to work ok tested any thoughts ? and did you used fuse box work,
Thanks Doug
Thank you for this great and much needed thread. My sister has a late 2005 mini. Fan stopped working just as winter was setting in. Was ready to order a new one, pretty penny here in alaska. But decided to do some research and found this thread. Went through the integrated fuse relay diagnostic and found when I touched the brown wire on back of the fuse block with the 12v attached power tester the fan started working again as usual. Thought I had just moved something that was loose. But when I turned the key off and on again (regrettably after putting the car back together) the fan no longer works again. Does this indicate the controls are bad? Thank you in advance
Thank you for this great and much needed thread. My sister has a late 2005 mini. Fan stopped working just as winter was setting in. Was ready to order a new one, pretty penny here in alaska. But decided to do some research and found this thread. Went through the integrated fuse relay diagnostic and found when I touched the brown wire on back of the fuse block with the 12v attached power tester the fan started working again as usual. Thought I had just moved something that was loose. But when I turned the key off and on again (regrettably after putting the car back together) the fan no longer works again. Does this indicate the controls are bad? Thank you in advance
It's been a while since I did this, so I'd suggest running through the diagnostic (or the part you found that triggered the problem) again. It _sounds_ like you're saying the relay has failed (or the solder joint to the relay). you supply power to the fan wire, the fan runs. check to see if the BC1 trigger goes to ground. if both of those things work, then I think it's going to be the relay (which means the entire fuse block panel)
So I've taken the the fuse block loose again. And the fan works again. So I assume something is loose. I just can't figure out what it is. I have the fuse block pulled out so I can see the back and now the fan works again. Can't see any damaged wires.
Hi. First of all, i want to thank you to 3rd Gear to take the time to made the step by step tutorial.
I had the same relay bad solder problem, so i decided to repair the fuse block instead of take the risk to buy a second hand fuse block with the same known problem. So, i just cutted all the joints in half, take all apart, resoldered the relay bad pin, and soldered back all cutted joints. These are the pictures. Relay is ok and everything is working again. Hope this help too.
Joints before be cutted Joints cutted and cutting tool Relay bad solder Pins with new solder Soldering cutted joints
Originally Posted by keen
I picked up an "early" fuse block to try to replace my "late" fuse block - the realoem parts cross reference suggests that these are interchangeable.
This is NOT the case. pictures below show a 10/jan/06 61146906626 block on the left and a 3/march/05 61136906600 on the right. Yes, the 05 block has the RL4 relay, and my 06 block doesnt. That shouldn't matter for this purpose (I'd just leave the relay out).
I think realoem is failing on this. Seattle MINI's parts shop says differently:
Part Number: 61136906600 Supersession(s): 61-13-6-906-600; 61131509011; 61132159689; 61136906598
Part Number: 61146906626 Supersession(s): 61-14-6-906-626
If you're searching for used parts - it's worth noting that they are only labeled with PART of the part number. So searching for 6906626 and 6906600 or whatever is listed on the side of yours might net additional results.
Of note, the empty fuse sockets that don't match up one each block - there are no pins inside them in either case, so you can't use them.
Of even more important note - the wiring socket pins in the back don't match. The sockets match, but not the pins.
This means we can't use the removable relay version on the later car, which leaves us only with the unrepairable version when the blower relay (or another relay) goes out. And since we can't service it, it's probably not worth the risk of buying a used part. I sure with the realoem listed price was accurate.... :-D
Since mine is just a bad joint, I think I'm going to give a shot and trying to get a iron down into the nearly blind hole and try flowing some new solder into it..... if that doesnt work, I guess I'll be shelling out the $350 or so for a new one.
Hi. First of all, i want to thank you to 3rd Gear to take the time to made the step by step tutorial.
I had the same relay bad solder problem, so i decided to repair the fuse block instead of take the risk to buy a second hand fuse block with the same known problem. So, i just cutted all the joints in half, take all apart, resoldered the relay bad pin, and soldered back all cutted joints. These are the pictures. Relay is ok and everything is working again. Hope this help too.
nice!
glad it's helping people - it was a pretty complicated debug, so it seemed like it was worth the investment to share it (and I had the time)
were the joints that needed to be cut only and re-soldered around the edge, or were there ones further inside? seems like if they were anywhere past the first half inch or so they'd be pretty hard to get apart and together!
great to hear that this is a workable option, and thanks for that picture that showed the burned joint.
Around the edges only. There is a black plastic piece between the boards that have to pins, and serve as a guide, so it is not difficult to align them again to make the soldering job. Its is pretty easy with a litlle soldering skills.
Originally Posted by keen
nice!
glad it's helping people - it was a pretty complicated debug, so it seemed like it was worth the investment to share it (and I had the time)
were the joints that needed to be cut only and re-soldered around the edge, or were there ones further inside? seems like if they were anywhere past the first half inch or so they'd be pretty hard to get apart and together!
great to hear that this is a workable option, and thanks for that picture that showed the burned joint.
1st Gen Mini heater blower fan diagnostics (2005+ with auto AC)
AC Blower on my '06 MCS went out a few weeks ago and I found there's a severe lack of information out there on this. I hope this helps others.
This will be focused on LCI cars (the 2005 refresh for R50, R53, R52, R52S) primarily, but I'll include what I know about earlier models where I can - there are some important variations. Nothing in this discussion covers anything for R56 or later Minis!
My car is left hand drive IHKA (auto AC) - manual versions (IHKS) behave similarly I believe, though some parts may be different. I think you can apply the same techniques.
These test sets should allow you to rule in/out some of the common failure points in the heater/ac/hvac blower fan circuit.
The resistor plug is the easiest to access and can be done without removing parts of the car and without blinding swapping parts out and makes a good starting point.
Thank you so much for such a fantastic troubleshoot guide.
I have IHKS and I can get the fan operational by shorting the brown/blue wire on blue connector at the back of the fuse-board to ground.
This is the relay trigger from the body computer.
I assume that this means that the fan, relay, switch and control unit are all OK?
Do you know what conditions need to be met for the BC1 to supply the trigger to the relay?
Appreciate the diligence here and all of the info. I have a late 2005 R53 and everything seems to work. AC compressor died two years ago and I had it replaced and the system pumped down and the refrigerant properly replaced. Everything works but, it does not provide more than a 15-20 DegF temperature drop when the auto controls are set to max cooling (LO). The blend and temperature control flaps sound like they are moving when they should be, but when its 85 deg outside I can only get the discharge air (measured in the dash vents either side of the speedo) down to 65-70 degrees. I live a couple of hours away from MINI mechanics and shops that I trust in Dallas-Fort Worth, so when I have a chance I'll try the IHKA diagnostic that you linked. I want to see if the actuators, the temp sensor, or the controls might be an issue. My gut tells me that the temperature control flap isn't sealing off heated air across the heating coil and that is warming the airflow. If the diagnostic shows an issue, and I find a fix, I'll try to remember to return here and post what I found. Thanks again!

 04-11-2021, 10:41 AM