Throwing some ideas around for painting my wheels...
#1
 03-13-2008, 08:27 AM


Join Date: Dec 2007
Location: Albany, NY
Posts: 497
Likes: 0
Received 0 Likes
on
0 Posts
Throwing some ideas around for painting my wheels...
Hello all!
I bought a set of R98 webspokes that have been polished and powdercoated clear off of a fellow NAM member. They look fantastic but unfortunately while dismounted one of the tires a local tire place chipped the powdercoated lip. This means that the wheel has to be broken apart, stripped and repowdercoated. So what i'm thinking is...I might just paint the lips on all 4 wheels. Break them all apart myself and strip then paint the lips. I like the polished lip but thought this might make them that much more unique but not too over the top.
I was thinking of doing the lip in a gold metallic finish...but I'm not sure if that would just look weird on my British Racing green 08 MCS. My backup plan is just gloss black or a dark graphite color since I know that won't look god awful lol. I plan on having the whole wheels completely redone over next winter but this would just be for this summer and to get the wheels done for next week when i'll be needing them.
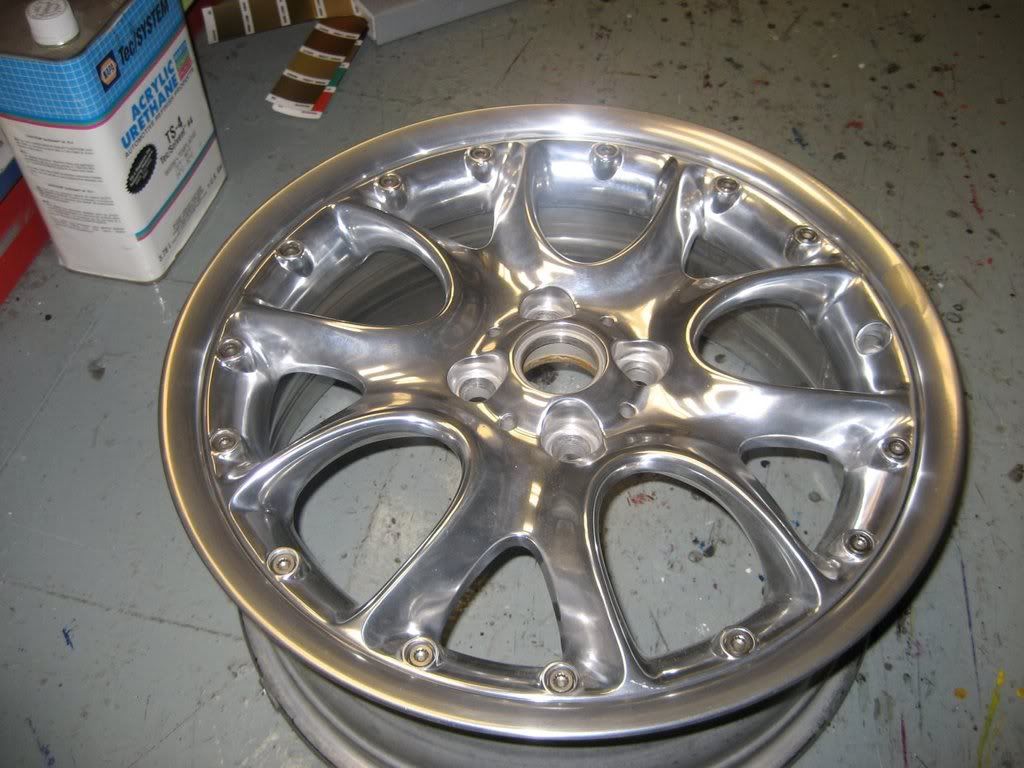
Here's the pic of the exact wheels I bought off of Passat774 on here. Obviously they look different on my BRG R56...but I don't have the tires on them or my car at home for a week lol so I can't do pics of them on mine.
Any input would be appreciated. Powder coat is NOT an option right now but i'll be using a polyurethene single stage paint that i use on motorcycle frames and wheels all the time and it holds up great. Good selection of colors too.

I bought a set of R98 webspokes that have been polished and powdercoated clear off of a fellow NAM member. They look fantastic but unfortunately while dismounted one of the tires a local tire place chipped the powdercoated lip. This means that the wheel has to be broken apart, stripped and repowdercoated. So what i'm thinking is...I might just paint the lips on all 4 wheels. Break them all apart myself and strip then paint the lips. I like the polished lip but thought this might make them that much more unique but not too over the top.
I was thinking of doing the lip in a gold metallic finish...but I'm not sure if that would just look weird on my British Racing green 08 MCS. My backup plan is just gloss black or a dark graphite color since I know that won't look god awful lol. I plan on having the whole wheels completely redone over next winter but this would just be for this summer and to get the wheels done for next week when i'll be needing them.
Here's the pic of the exact wheels I bought off of Passat774 on here. Obviously they look different on my BRG R56...but I don't have the tires on them or my car at home for a week lol so I can't do pics of them on mine.
Any input would be appreciated. Powder coat is NOT an option right now but i'll be using a polyurethene single stage paint that i use on motorcycle frames and wheels all the time and it holds up great. Good selection of colors too.
#2
03-13-2008, 10:42 AM

#3
03-13-2008, 11:28 AM
Join Date: Dec 2007
Location: Albany, NY
Posts: 497
Likes: 0
Received 0 Likes
on
0 Posts
Yeah after thinking about it more and more...i think either gold or BRG is the way i'm going. The wheels came apart surprisingly easy. Loosened the bolts, used a torch to warm up the outside ring and the center section dropped right out! I might go with gold and eventually replace the Ti fasteners with gold anodized ones to match the look...but BRG lip with gold ti bolts could look cool too lol...so many choices!
#4
03-15-2008, 10:25 AM
Join Date: Dec 2007
Location: Albany, NY
Posts: 497
Likes: 0
Received 0 Likes
on
0 Posts
Ok decision made! I am going with a metallic gold lip, and my new stripes for the car are going to be white with a metallic gold edge to them. I started the process of things today. Got all the wheels taken apart, halfway through stripping them now. Turns out Permatex Gasket Remover strips powder coat like nobody's business! I just masked off everything but the lip and a little further and stripped em...then i'll be scuffing things down, using a self etching primer, 2k primer sealer, then a nice super tough Polyurethane single stage paint. I'll post some pics of the progress later this afternoon.
#5
03-15-2008, 10:39 AM

Peace Keeper
#6
03-25-2008, 08:57 AM
Join Date: Dec 2007
Location: Albany, NY
Posts: 497
Likes: 0
Received 0 Likes
on
0 Posts
For those of you that wanted to know ScottRiqui helped me figure out between me making measurements and weighing...that the bolts on the webspokes ARE IN FACT TITANIUM! He figured it out through their density I believe. So now if only the places i've been e-mailing about replacement bolts availability would get back to me...wheels are getting painted tonight but before that i'll post pics of before, and taking them apart for anyone that plans on doing it themselves. Sorry I havn't been updating here...been busy as heck!
#7
03-25-2008, 10:01 AM
Peace Keeper
 If you find a supplier let me know
Trending Topics
#8
03-27-2008, 01:04 PM
Peace Keeper
#9
04-01-2008, 10:38 AM
Join Date: Dec 2007
Location: Albany, NY
Posts: 497
Likes: 0
Received 0 Likes
on
0 Posts
Never heard back about the bolts from the companies i've contacted...bah. The german place from what another member posted somewhere wants 400 dollars or something crazy for a set...so screw that. I got the lips all painted up last night. I PROMISE tonight i'll post some before, during, and after pics. I'm just re-using the ti bolts. Ti bolts are good for shear strength, it's the tensile strength that causes re-using issues. They aren't torqued very high...so I don't see the big deal in just using them again. My friend that autocrosses his WRX reuses his BBS ti bolts all the time and has never had a problem.
#10
04-01-2008, 08:08 PM
Join Date: Dec 2007
Location: Albany, NY
Posts: 497
Likes: 0
Received 0 Likes
on
0 Posts
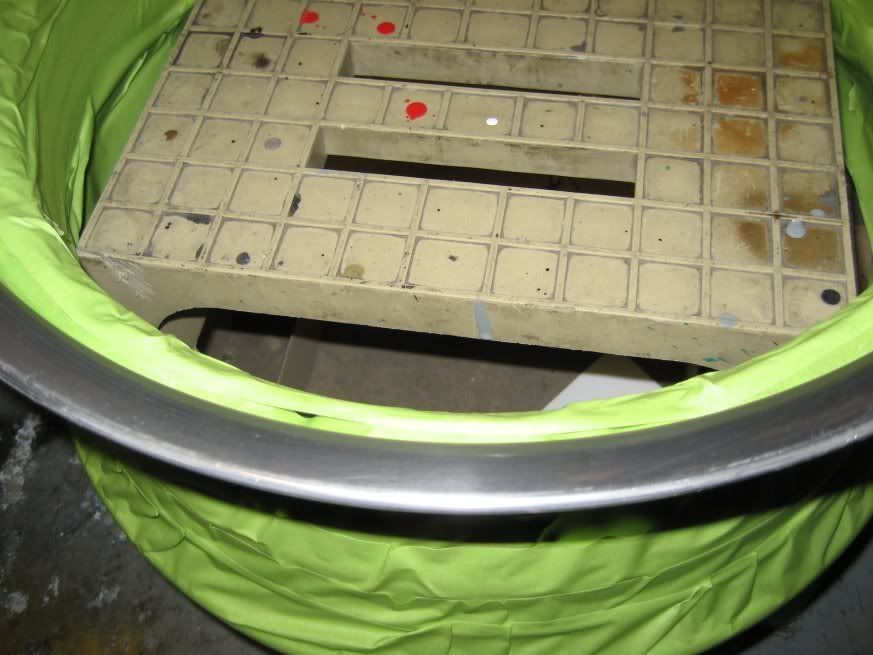
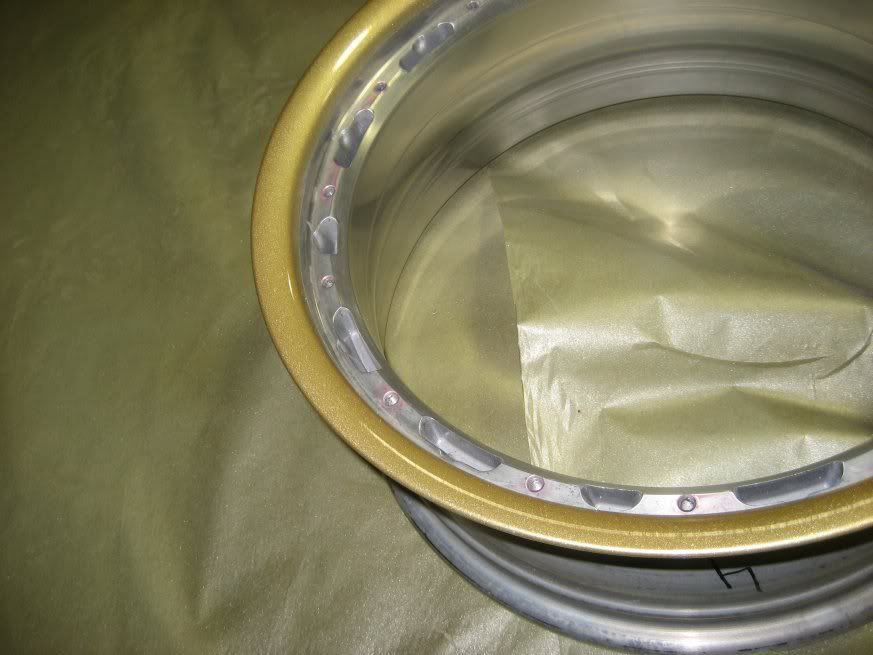
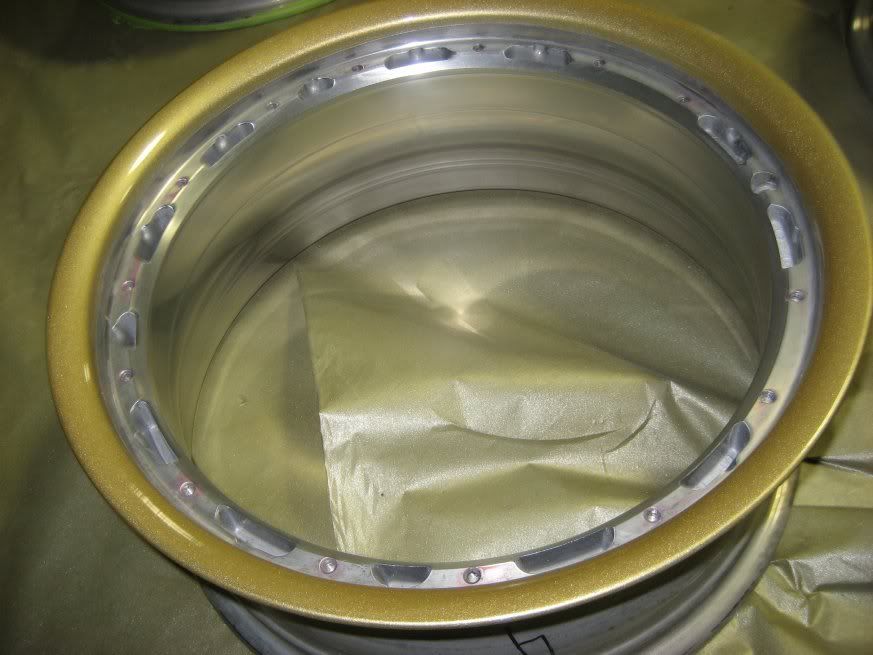
Ok FINALLY pictures! First here's a before pic:
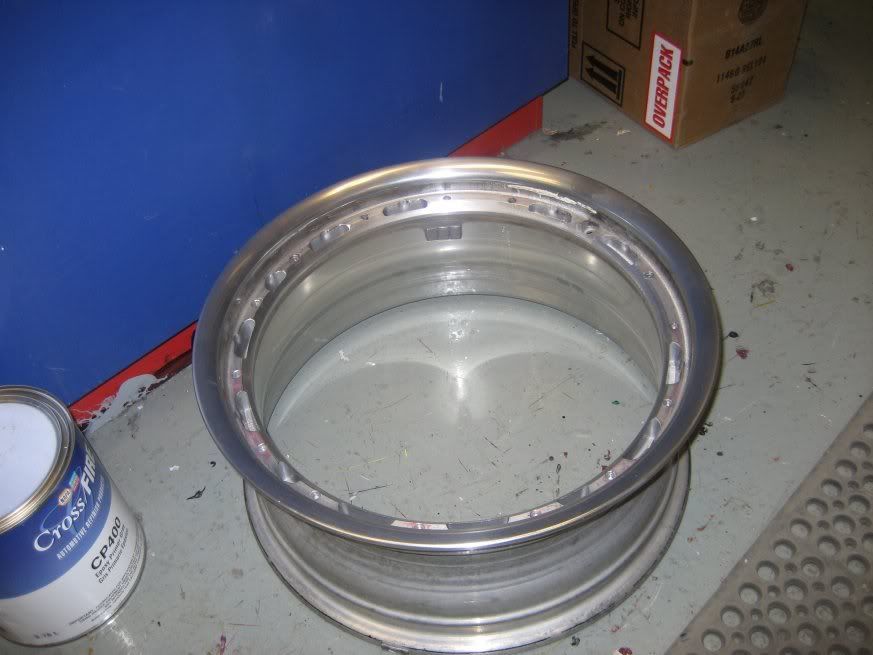
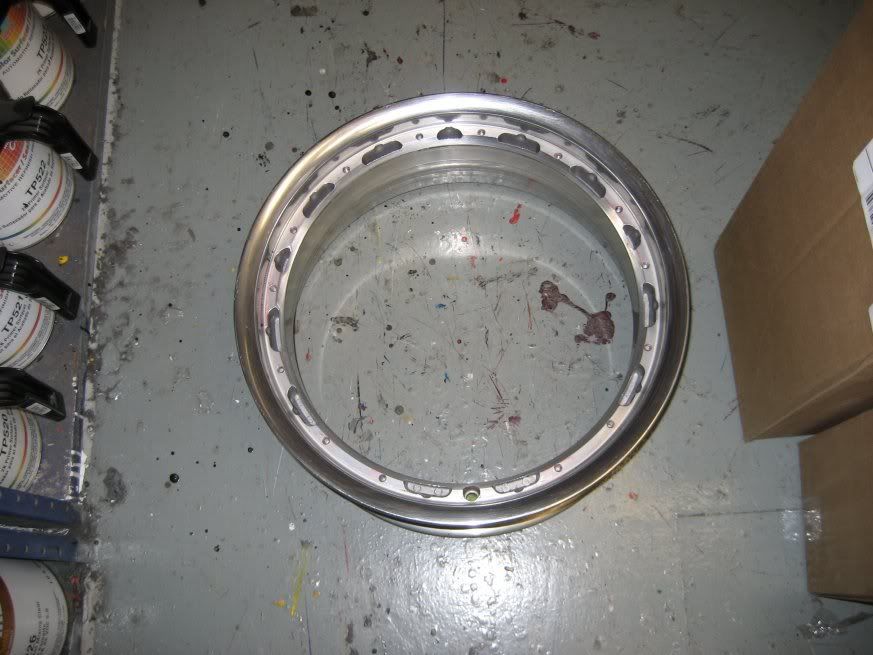
Here's some pics of them split apart:
Here's some pics of the process of stripping the powdercoat with Permatex Gasket Remover available at any NAPA store. Amazing how well it worked!
Before strip:
During:
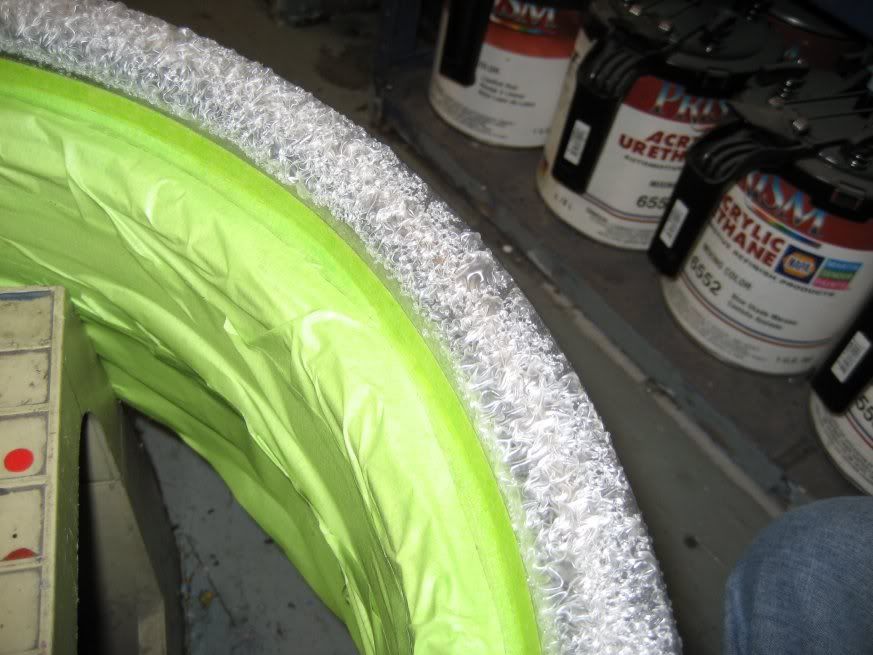
After just wiped right off with a rag!:
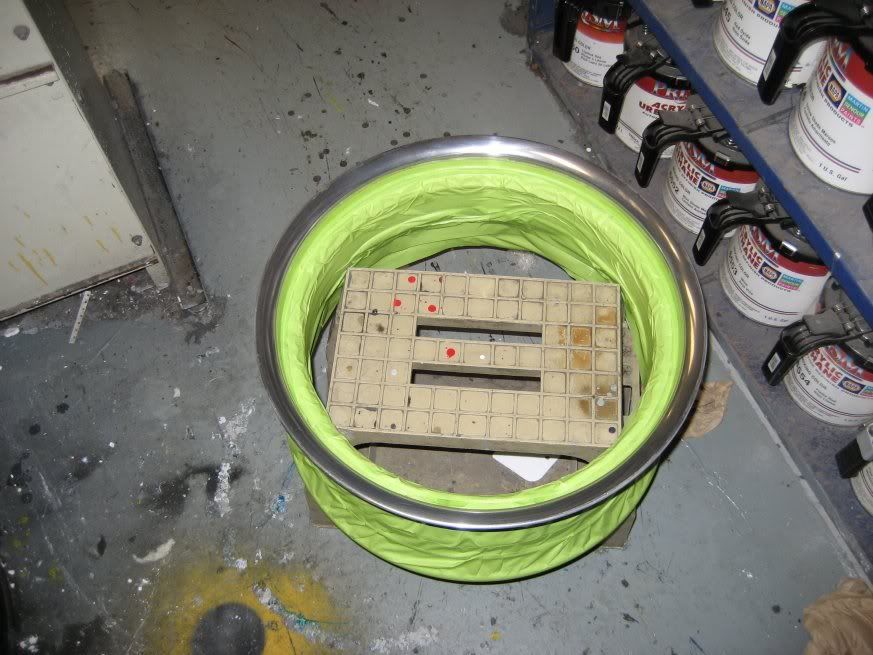
Here's a couple pics of them primered with self etching primer and 2k primer on top of that ready for paint!


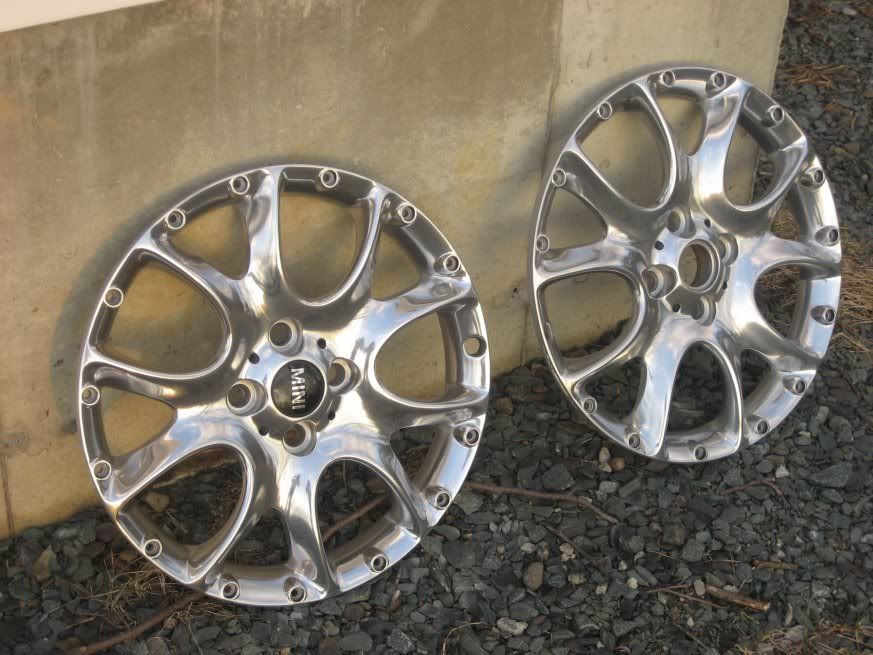
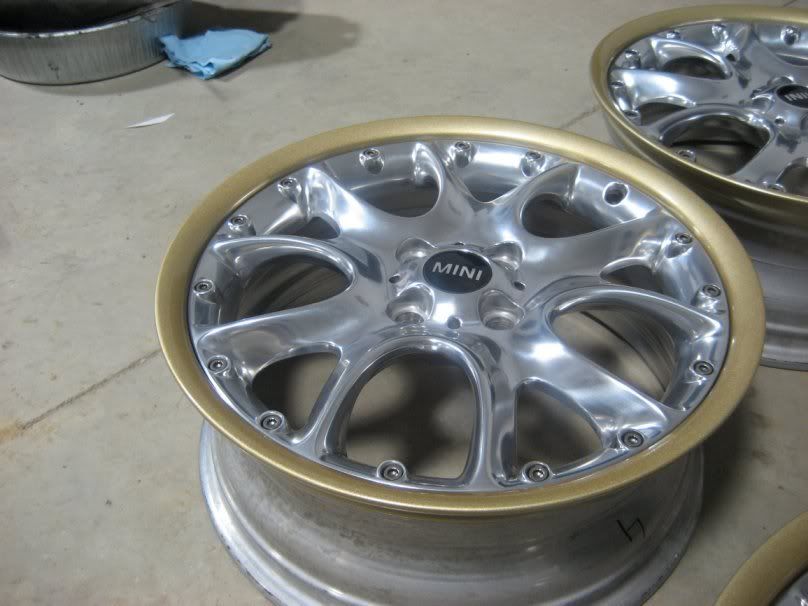
A few of the them finished with a nice coat of Polyurethene single stage that is tough as nails!

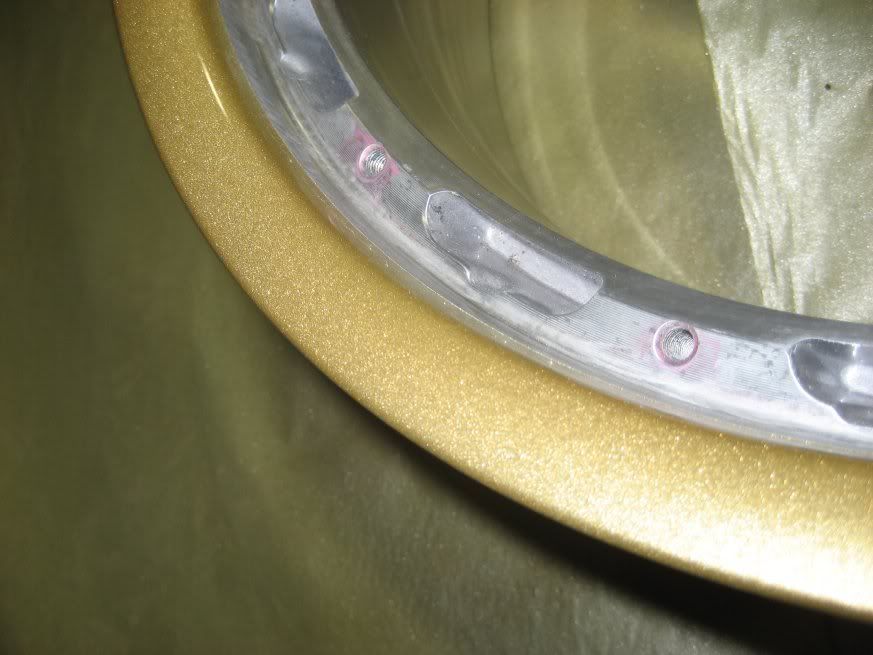
And last but not least, them reassembled and ready to go!

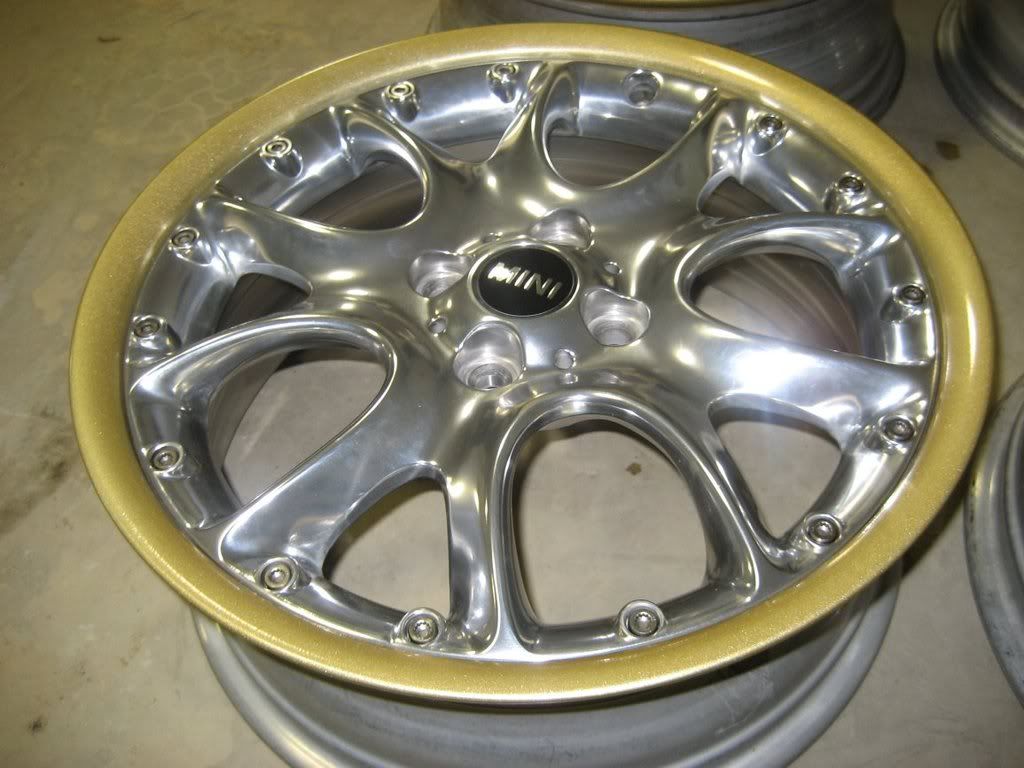
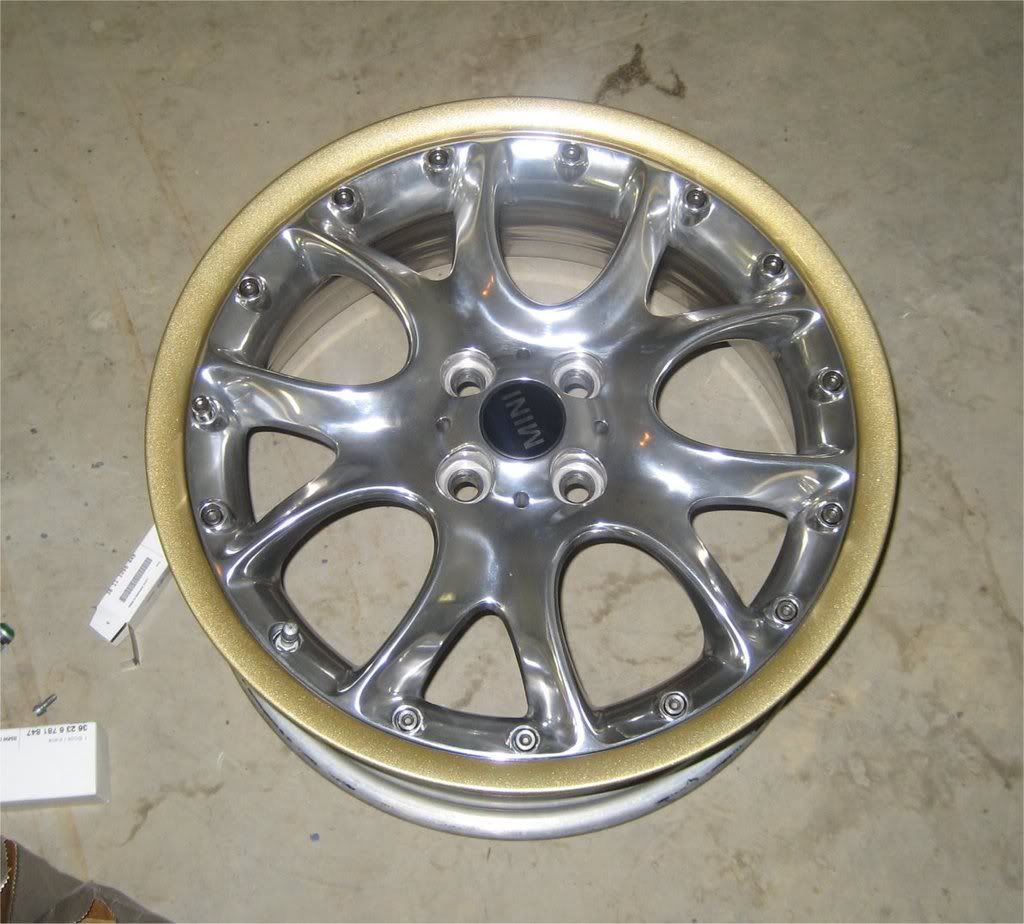

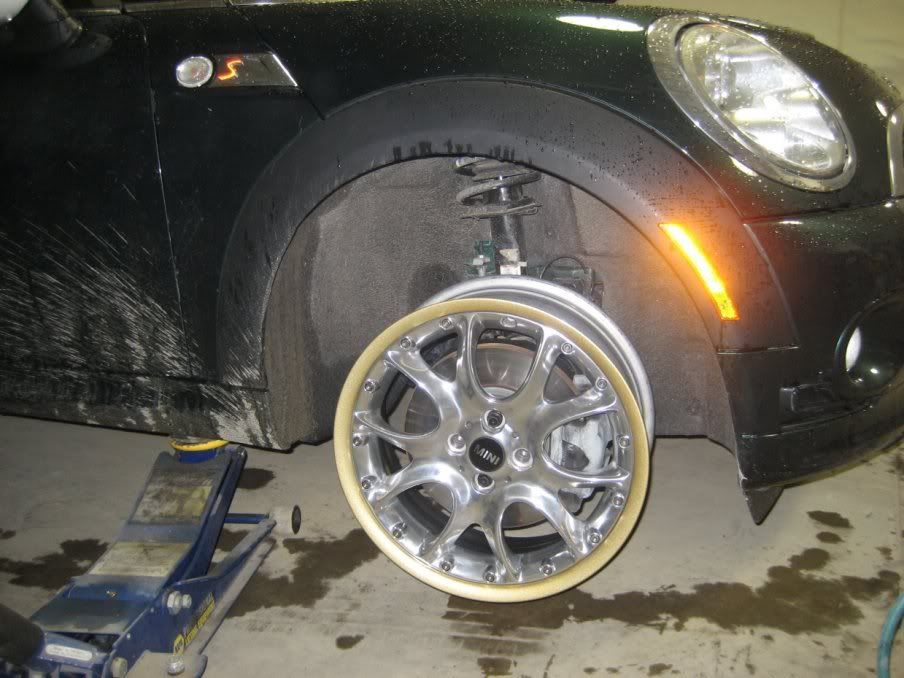
Oh and a test fit of course!
Taking them apart was easy. I used a serrated 8mm service tool bit from NAPA. just put the bit in each bolt and tap lightly with a hammer, then the bolts come right out. Then flip the wheels over and heat the outer rim gently with a torch until the center drops right out! Might want to put some rags down to catch it so you don't get any scratches!
The trick for getting them back together easily as well, is to put the center sections in the freezer and the lightly heat up the outer rim with a torch...just warm to the touch. Then the centers drop right in! Easy to get things lined up correctly too and torque those bolts down with some blue loctite! I can snag the part number tomorrow for the service tool bit if anyone is interested.
Here's some pics of them split apart:
Here's some pics of the process of stripping the powdercoat with Permatex Gasket Remover available at any NAPA store. Amazing how well it worked!
Before strip:
During:
After just wiped right off with a rag!:
Here's a couple pics of them primered with self etching primer and 2k primer on top of that ready for paint!
A few of the them finished with a nice coat of Polyurethene single stage that is tough as nails!
And last but not least, them reassembled and ready to go!
Oh and a test fit of course!
Taking them apart was easy. I used a serrated 8mm service tool bit from NAPA. just put the bit in each bolt and tap lightly with a hammer, then the bolts come right out. Then flip the wheels over and heat the outer rim gently with a torch until the center drops right out! Might want to put some rags down to catch it so you don't get any scratches!
The trick for getting them back together easily as well, is to put the center sections in the freezer and the lightly heat up the outer rim with a torch...just warm to the touch. Then the centers drop right in! Easy to get things lined up correctly too and torque those bolts down with some blue loctite! I can snag the part number tomorrow for the service tool bit if anyone is interested.
Last edited by ColinMc; 04-01-2008 at 08:12 PM.
#12
04-01-2008, 08:21 PM
Join Date: Dec 2007
Location: Albany, NY
Posts: 497
Likes: 0
Received 0 Likes
on
0 Posts
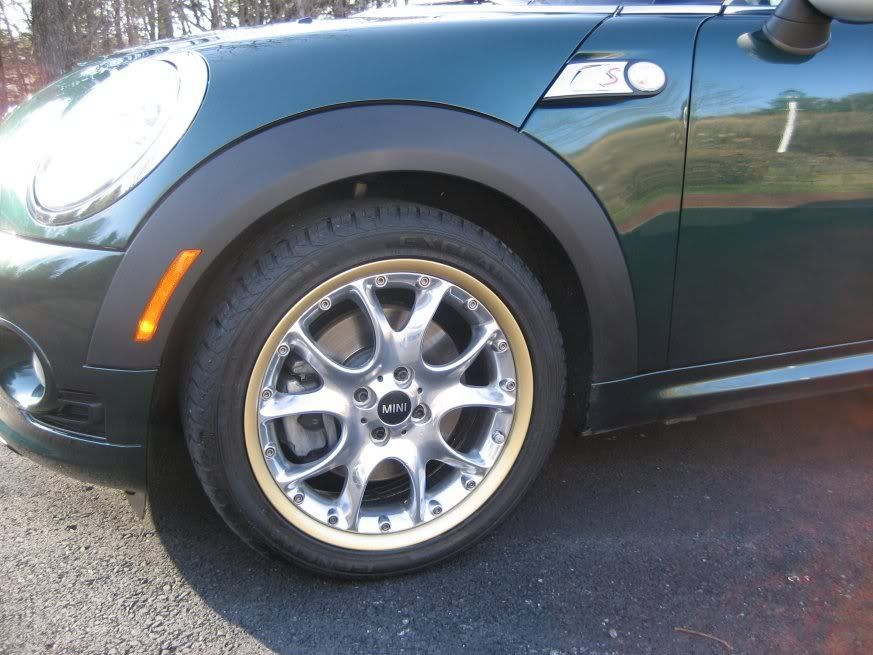
Ouch, that hurts :( All I did was the reverse of painting the centers gold and the lip being polished...didn't think it was that bad lol. I'm actually really happy with how they came out. The last pic is proof that older webspokes can and will fit an R56! They even have the slots for mounting TPMS sensors...which I now have to mount then get some tires back on these babies.
#13
04-02-2008, 07:22 AM
Join Date: Dec 2007
Location: Albany, NY
Posts: 497
Likes: 0
Received 0 Likes
on
0 Posts
Ok trying to mount the TPMS sensors...i figured out how they bolt in pretty easily. I got all new sensors and valve stems from the dealer. One question the valve stem came with a 3 or 4 inch long round metal rod...looks almost like a tiny piece of welding rod...any idea what the heck this if for?! Is there anything I need to do besides just bolt these on then have the tires mounted? I don't want to screw it up and have to have the tires removed again lol.

#15
04-03-2008, 08:33 AM
Join Date: Dec 2007
Location: Albany, NY
Posts: 497
Likes: 0
Received 0 Likes
on
0 Posts
TPMS sensors mounted. Turns out the little welding rod type pin is just to hold the valve stem in place while you tighten the nut that holds it on, then also while you tighten the TPMS sensor to the valve stem itself...i hope so anyways because that's what I used it for. Having the tires remounted first thing tomorrow and then putting the wheels on the car if it isn't a crappy wet nasty day like I think it might be...I'm assuming the sensors don't need to be turned on or anything...that I just need to reset the TPMS system in the car when I put the wheels on. We'll see how it goes.

#17
04-03-2008, 11:29 AM
Peace Keeper
#18
04-07-2008, 06:24 PM
Join Date: Dec 2007
Location: Albany, NY
Posts: 497
Likes: 0
Received 0 Likes
on
0 Posts
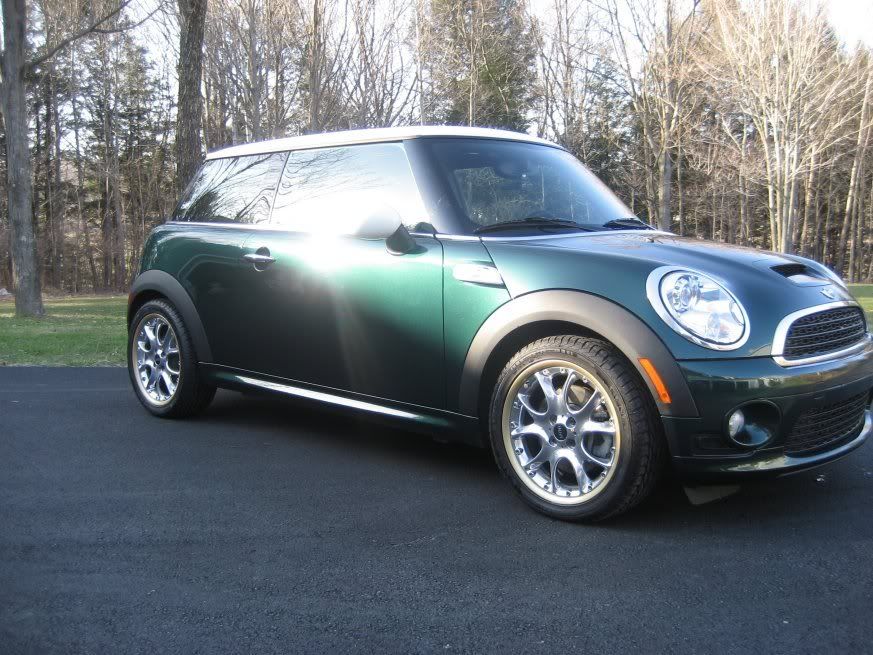
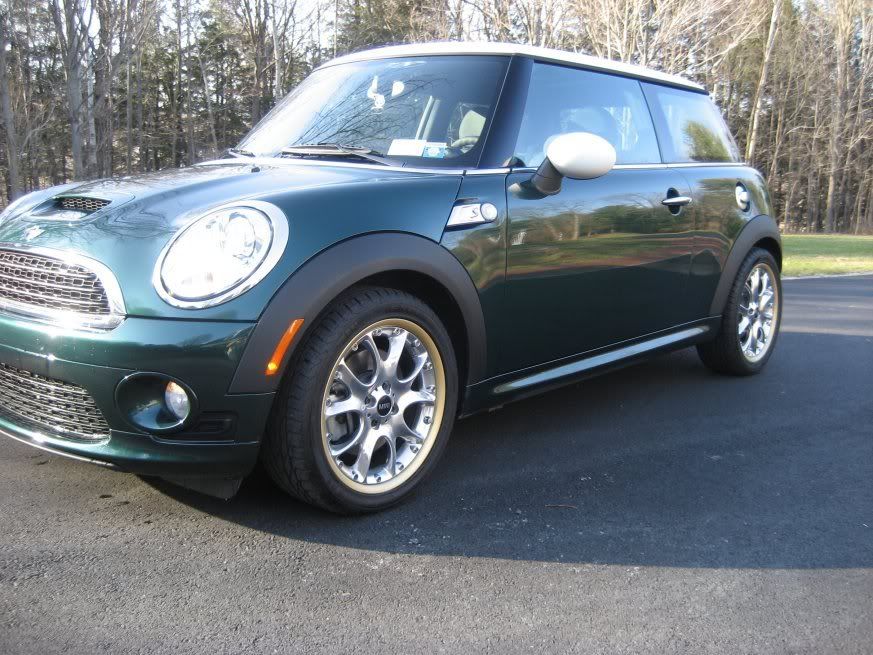
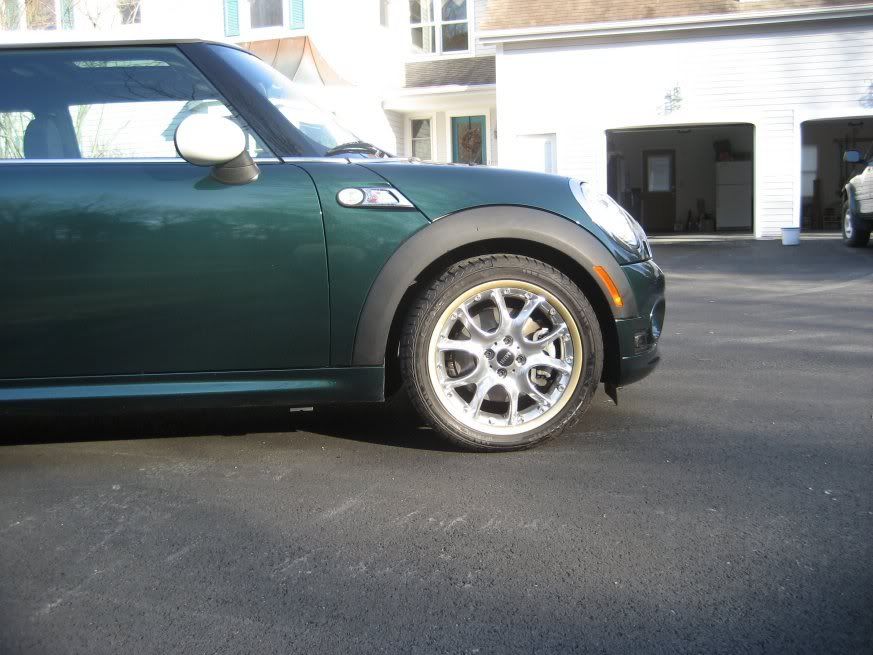
Gave my baby a good wash today, inside and out! Oh and got the tires mounted and swapped the wheels on! I'm very VERY happy with how they came out. Once I get my white stripes with the gold pinstriped edge for the bonnet, boot, and front bumper from Aesthetic Creations it'll really tie things together nicely. Next thing on my list is painting the arches, Joey mod and blacking out the chrome. But those will have to wait until mid summer when I have more time to paint again! For now i'm very happy...although she looks quite naked without stripes lol. Oh and eibach springs are definetly going in asap...that wheel gap needs to be just a little bit lower!

#19
04-08-2008, 10:25 AM
Peace Keeper
#20
04-08-2008, 10:33 AM
Join Date: Dec 2007
Location: Albany, NY
Posts: 497
Likes: 0
Received 0 Likes
on
0 Posts
#21
04-08-2008, 11:28 AM
Peace Keeper
#23
04-08-2008, 06:32 PM

#25
04-08-2008, 07:19 PM
Join Date: Dec 2007
Location: Albany, NY
Posts: 497
Likes: 0
Received 0 Likes
on
0 Posts
Hmmm, I had called BBS and a rep there said most of their wheels are torqued to 21 ft/lbs...not realizing that Ronal makes the R98's...not BBS. So now i'm doubting that torque spec lol. Well they havn't fallen apart yet and seem to be holding fine, but now it's time to research this some more methinks.